
This adventure is a prequel to the first ever stand-alone module published Palace of the Vampire Queen by Wee Warriors She is simply called the Vampire Queen. A being so powerful and evil that the mere mention of her title, raises shrieks of horror and anguish. Her reach is seemingly infinite and her machinations sinister beyond the un-derstanding of mortal men. But those very same mortals must stop her. The path to victory leads to only one place. A place of legend and mystery; the Palace of the Vampire Queen! For the first time the ruined Palace Keep is detailed and ready for exploration! The adventure includes one new monster and two new magic items. This module is designed for the First Edition game using six to eight characters of first level.

Something evil is devouring the souls of the living in Chult, but before the characters take on the horrors in Tomb of Annihilation, they must first uncover the death curse’s origin by braving a lich’s tower in the Cloakwood. This introductory adventure is designed for a party of four to six 1st-level characters, who should advance to 2nd level by the adventurer’s conclusion. It is a prelude to Tomb of Annihilation that should take about 2 to 3 hours. This product includes Fantasy Grounds files for the adventure. What Inspired Cellar of Death? The introduction of Tomb of Annihilation states Syndra Silvane learned about the Soulmonger from the Harpers, who “received their intelligence from a lich.” This adventure is the story of how the Harpers gathered that information. Cellar of Death has a second purpose: to give characters a greater stake in the outcome of Tomb of Annihilation by creating an NPC they love. The death curse kills this NPC, giving the characters a personal reason to go to Chult.
This Digital Quarterly is built around a series of four micro-dungeons that can be used as an introduction to The Roslof Keep Campaign for characters just starting out. These dungeons should allow for a small group of players to not only become familiar with each other but also gain a level before taking up the banner of the Ivory Scimitar and entering Mithelvarn’s Labyrinth. As Roslof Keep is built around characters being asked to take up the Ivory Scimitar banner, it makes sense that they wouldn’t be completely ‘green’ and also might have gotten a bit of a reputation within Daern Kelton and Roslof Keep as trusted adventurers who are looking to help out the locals. This reputation can be used to bring The Folio: Digital Quarterly #6 the characters into the sights of House Aldenmier and, therefore, push characters into the campaign on a more realistic basis. It should also be noted that beginning Dungeon Level 1 with a level of experience is something that will be invaluable to the party and the early stages of the campaign. This adventure is formatted to both 1E & 5E gaming rules.

This material was originally published as three separate adventures: G1 (STEADING OF THE HILL GIANT CHIEF), G2 (THE GLACIAL RIFT OF THE FROST GIANT JARL), and G3 (HALL OF THE FIRE GIANT KING). Contained herein are referee notes, background information, maps, and exploration keys for three complete adventures using the ADVANCED DUNGEONS & DRAGONS rules. This module can be used alone or as the first in a series of adventures that includes Dungeon Modules D1-2 (DESCENT INTO THE DEPTHS OF THE EARTH), D3 (VAULT OF THE DROW), and Q1 (QUEEN OF THE DEMONWEB PITS). TSR 9058

Sent on a desperate mission into an unknown land, you must seek out the one called "the Master" and his Temple of Death. There is little time to waste, as you must act before the Master's armies destroy your homelands. But to complete your task, you must battle fearsome guardians, travel through a hostile kingdom, and discover the secret of the master. Can you survive his defenses and win? This module contains referee's notes, background, maps and detailed keys. It is the second adventure in the two-part Desert Nomads series begun in X4, Master of the Desert Nomads, but it can stand on its own as a seperate adventure. Wheter you play Temple of Death by itself or as part of a series, the adventure will offer you hours of excitement and fun! TSR 9069

On the night of the rare Witch Moon, a binding spell placed over the mighty devil Tchernabog finally breaks. Will the characters be able to survive the night of boiling hellfire, furious undead, and diabolical mayhem Tchernabog orchestrates from atop Devil's Peak? Night on Devil's Peak is an apocalyptic, events-based survival adventure for 6th-level characters. It takes about 5-6 hours to complete and includes: -The awakening of a CR 24 devil, mighty Tchernabog! -A powerful holy relic the characters can wield in battle -Two diabolical new monsters: Tchernabog and giant flaming skeletons -Combat cards for each monster, PC, and special treasure -Gorgeous digital maps (with and without grid) for virtual table tops

Part Two of the Umbral Aristocracy Trilogy. The treasure hunt has led to the City of the Dead. Beneath that well-manicured park is an ancient crypt where the treasure awaits you!
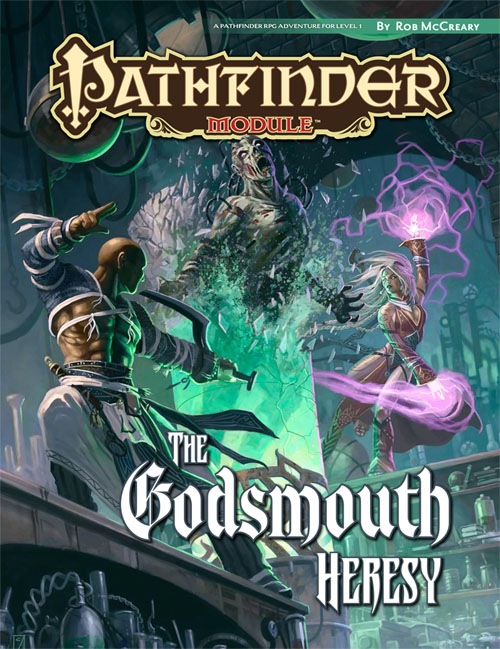
Deep below the anarchic city of Kaer Maga, someone—or something—has begun stealing corpses from the city’s most prestigious tomb, the Godsmouth Ossuary. Fearing the worst, the clerics of Pharasma in charge of maintaining the crypts quietly call for aid, not wanting to risk their own members in combating whatever horrors may have crept in from the tunnels and hidden chambers of the legendary Undercity. Beneath the infamous crypt lies a temple from an ancient empire devoted to sin, and a former Pharasmin cleric whose weathered his goddess’s wrath to create an army of undead minions, their dead flesh standing ready to support his heretical plans.
"The dead just want a little respect." The village of Wargrave's only claim to significance is as the resting place of soldiers from a long-ago battle. Now it seems that the dead are stirring. Roleplaying of forces at cross-purposes, with sentient undead. Set nominally in the Forgotten Realms, but the adventure is essentially generic.

The wizard Abracadamus hid the Forever Stone in the darkest depths of a failing mine, coerced monsters into serving as guardians, and rigged the dungeon with traps galore. Then he died, as all good wizards do. Many heroes have fallen prey to the Forever Stone’s lure of immortality. To date, only one stalwart band has plunged into the Mines of Madness and lived to tell the tale. You think you’re better than them? You think you got what it takes to grab life by the stones and conquer the dungeon that won the 2012 Gygaxian Award* for Bonecrushing Awesomeness? We seriously doubt it, but go ahead . . . prove us wrong! Mines of Madness is a Very Special D&D® Next Adventure written for PAX East 2013 and designed for four 3rd-level characters.

Chapter 1 - When a relative of someone close to the characters goes missing from a nearby village, the players are asked to investigate. The party has to recover stolen goods from a thief before setting out from the City of Ravens Bluff. They travel through the wilds of Vesperin in search of the missing person, finding trouble and helping locals along the way. Chapter 2 - As the journey continues, the party arrives in a small hamlet suffering from a strange blight. The players will need to investigate the situation and choose sides in a longstanding feud between the mayor and a local magic user. Chapter 3 - After clearing a tribe of violent orcs from a nearby mountain pass to protect the residents of a town, the party will have to enter the lair of a long-dead dragon to rescue their quarry from a band of goblinoid slavers, where they discover an entrance into a dwarven city, lost and forgotten centuries ago. Chapter 4 - The party will have to traverse the ruins of the dwarven city, avoiding hazards and battling the horrors that lurk there, to uncover the identity of the slaver's leader. A discovery that will lead them through a treacherous forest to the city of Tsurlagol in search of a pirate ship called the Star Carver, and its drow captain, The Viper's Kiss. Along the way, they meet an unlikely ally. Chapter 5 - Once they arrive in Tsurlagol, the players will have to choose between gaining the assistance of the city council to fight the pirates head on, or making a deal with the Viper's Kiss, herself. The path they choose will either lead to an epic battle on the Sea of Fallen Stars, or into the deadly sewers and tunnels beneath the city to face an enclave of wererats, undead, and a tribe of mad, kraken-worshipping kuo-toa, in search of a fabled relic. The Laughing Horde of Ruin, Part 1 is the first module of an original 5e adventure campaign. It is designed for character level 1-5, and uses material from the Dungeon Master's Guide, Monster Manual, and Volo's Guide.

Important: The adventure is 1e but it has monster conversion notes for D&D 4th edition The town of Highport, once a human community overlooking Wooly Bay from its perch on the northern coast of the Pomarj, fell prey to hordes of humanoids swarming out of the jungle-covered hills surrounding the settlement. Though the orcs, goblins, kobolds, ogres, and gnolls razed much of the place in their ferocious rampages, the smoldering ruins they left behind soon became a new kind of community, a place of trade between the humanoid “locals” and the unsavory human traders who have no compunction about doing business with them. Slaves are a commodity in ready supply in Highport’s market, since many pirates raid up and down the coast of the bay, putting fishing villages to the torch and filling their holds with captured refugees. Slavery has become a thriving business in the town, and rumors abound of a cartel of Slave Lords who run things from behind the scenes, filling their coffers in secret from the buying and selling of human chattel. The trade has become so prolific that the good folk to the north have grown tired of these depredations and decided to fight back. Forces of righteousness and honor have recently descended upon Highport, some openly and others in secret, in various attempts to destroy the machinations of the Slave Lords and abolish the abominable enterprise that has taken far too many loved ones from home and hearth. One such doughty servant of goodness is Mikaro Valasteen, a cleric of Trithereon. Mikaro slipped unnoticed past the crumbling walls of Highport with a single mission: to rescue and transport as many slaves to their freedom as possible. Mikaro and a handful of faithful assistants located a number of escaped slaves—as well as rescued a few more not sufficiently restrained and guarded—and shepherded them through the gates and beyond the reach of their humanoid tormentors, returning them to their lands and homes. This covert freedom brigade enjoyed remarkable success early on, since the servants of the Slave Lords were often lax in their vigilance and sloppy in their efforts to prevent loss of the “merchandise.” After one too many shipments never made its destination, the humanoids stepped up their security and the normal channels of escape from Highport closed to Mikaro and his team. He cannot risk exposure by smuggling the freed slaves through the gates as merchandise any longer, since shipments of goods are now regularly stopped and checked. No longer able to free the slaves in that manner, Mikaro began hiding his charges in an abandoned villa in a particularly rundown part of the town. Although they are safe for the moment, their numbers have grown unmanageable, and the priest fears it is only a matter of time before someone slips up and brings slavers to their doorstep. Ever more desperate to find a new means of escape from Highport, Mikaro has started work on a plan that is both daring and dangerous. He intends to use a series of old sewers coupled with natural caverns running beneath the town as an escape route to the sea beyond the walls. But he needs someone to clear out the creatures and pitfalls he knows lie within. Pgs. 2-27

For months, the dreams of the people of Emystrell have become dark and terrible. It seems their nightmares have come to life as in recent weeks, people have mysteriously gone missing, vanishing in the night without a trace! Everyone is too paralyzed by their own despair to do anything or venture far from the safety of their homes. Emystrell is on the brink of collapse. The baron is offering a handsome reward to anyone who can show proof of the end of whatever evil curse that has taken hold of their town. This adventure is designed for a party of 3-5 heroic characters from the 2nd to 3rd level. It has elements of mystery and investigation in the first section which can be detailed and highly involved for groups that enjoy the process of searching for clues and solving mysteries or just as easily glossed over for groups that are more tactics focused. The second section of the adventure features the dungeon: a labyrinthine complex of an ancient elven crypt which the thieves guild has used as a base of operations for a decade...until the serpent worshipping cult arrived. The third section of this book is the detailed map and notes on the town and surrounding area of Emystrell. Roleplaying notes are kept light to allow for room for your own interpretations and details to NPCs remain as free to do with as you choose unless I felt inspired and hoped to give you a cool idea. This adventure has hooks for Dungeon Masters interested in a larger campaign involving the sinister plots of the Yuan-Ti (snake people) as well as other interesting adventure hooks (such as the giants in the nearby mountains or the stolen gem: The Eye of the Dragon). These plot points are intentionally left vague for you to fill in the gaps based on what your players seem interested in. You are invited to use this as a launch point adventure to lead your heroes on a larger adventure that might someday set them against an Anathema Serpent demigod, or it may simply be the adventure that begins their journeys and the evil of Yargoth stops here at Emystrell. If your campaign is set in a pre-published setting, this town of Emystrell can be replaced or fit into any campaign with a few tweaks to local gods and names. If you are playing in Dragonlance, you could replace Yargoth the Dread Serpent with Tiamat, or Dendar in Fearun. The local goddess, Tyr, could be the Tyr from the Forgotten Realms or even Norse myth if that is your campaign setting.

Lost within the ruined House Cannith citadel of Whitehearth, an arcane workshop somewhere in the perilous Mournland, is the key to constructing a terrible magic weapon. Agents of the Emerald Claw will stop at nothing to recover the ancient device. As malevolent forces hunt for the artifact, only the most resourceful heroes will reach Whitehearth first and discover the secrets that lie within. "Shadows of the Last War" is a stand-alone adventure for the Dungeons & Dragons game that will immerse your characters in the Eberron campaign setting. Designed to challenge 2nd-level D&D heroes, it pits them against one of Eberron’s most nefarious organizations.

Nearly 100 years ago, Lord Eriador wrested the lands from the hands of evil and began a reign of unsurpassed courage, wisdom, and might that lasted over three centuries. One day this great man of valor was called onward to continue his battle for freedom and goodness on a higher plane of existence. Leaving the responsibilities of rulership to his faithful overseer, he donned his magical shield, helm, and sword and traveled to the Holy Maountain of Anduin to meet his destiny. Eriador left the overseer with this solemn promise: if there ever arose a time of great need, he would answer a summons from the Mountain of Anduin to come back to vanquish any evil that dared to oppress his people. It is now the reign of the third overseer. For years now, an evil mage has been plaguing the land by sending forth hordes of evil humanoid minions to oppress the people. The overseer has been forced to pay tribute to the mage to protect his people. Life has become nearly unbearable for his subjects. It has been over five years since the mage desecrated the holy mountain by placing foul creatures in its depths to guard against the possibility of the people seeking help from their nearly forgotten champion. A fortnight ago, your party was gathered in a secret council chamber to meet with the overseer himself. You felt a spark of hope for the people of this land as the overseer told the legendary tale of Eriador. He gave you the equipment you need and charged your party with the task of venturing into the heart of the now monster-infested Mountain of Anduin to call back the people's great hero, Eriador the Paladin. Although the three parties sent before you had not returned, ridding the of the land of the mage seemed worth any risk, and you eagerly set out on your quest. Now, standing before the defiled mountain, you wonder if perhaps you were too hasty.

Old Olga and Young Yvonne is a four- to six-hour adventure for 1st-4th level characters, designed for Dungeons & Dragons 5th Edition, with a village theme, hags and witches, an abducted child to save, some horror, and mysteries to solve! Willow Creek, a remote farming village, is in trouble: livestock is going missing and reappears gutted in the woods, crops fail and fields blight - and now the bastard child of young Yvonne has gone missing as well. What no one in the village knows: Yvonne is a budding witch secretly feuding with Old Olga, an evil hag in the woods - who now demands a human sacrifice from Yvonne in return for her child. Who can sort out this mess, bring back the innocent child, prevent a murder, and return peace and quiet to Willow Creek? This adventure can also be used as a mini-campaign sandbox. With the branching and inter-connecting scenes, locations, and NPCs it provides, combined with the guidance on how to run a "village adventure", the material provided here on more than 60 pages can easily cover up to eight hours of playtime. Included with this adventure are: + an original custom creature, the young witch + 12 original fleshed out NPCs, including personality traits and roleplaying tips + a toolset for creating villager NPCs quickly + 7 hand-drawn maps of important locations + 4 alternative story rewards (depending on how the adventure resolves)
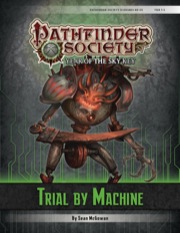
More than a millennium has passed since the "machine mage" Karamoss's failed siege of Absalom, and for years the Pathfinder Society has used upper reaches of his subterranean siege tower as a training ground for initiates. During a routine drill, the once-dormant dungeon springs to life, and it will take all the PCs' resourcefulness and skill to make it out alive.

The heroes arrive at the eponymous Keep on the Borderlands, a fortress on the edge of civilization built to stave off the chaos and evil of the wilderness. Using it as a home base, a party can make forays into the surrounding wilderness, encountering monster and marauder alike. The centerpiece of the adventure is certainly the CAVES OF CHAOS, a network of tunnels and caverns found in the walls of a nearby but isolated ravine. It is here that hordes of evil humanoids have made their home. Through combat and negotiation, the players can try to explore and map out these caves, perhaps with the aim of accumulating valuable treasure or even cleansing the land of evil creatures. However, even the Caves are not all they seem. Beyond the goblins and kobolds lurk dark horrors: cults dedicated to fiendish chaos and a Minotaur's enchanted labyrinth await the unprepared adventurer. But for the hero who is brave, clever, and fortunate in equal and sufficient measure, great treasures and glory await in the Caves of Chaos that lie beyond the Keep on the Borderlands! TSR 9034

Deep in the elven forests of Myereth, ancient rowan trees spread white boughs above a sacred site. Pillars of stone twist like some strange form of vine, curling among the branches and reflecting the light of a silvery moon. The forest is silent, and beautiful, protected since the dawn of time by a powerful Unicorn. The elven forest of Myereth is well known throughout the world as a safe haven of good and peace, a place where evil cannot stand to enter and where the trees weep healing tears upon those injured within its boundaries. Any player character elves know of the forest, its healing properties, and its legendary beauty. They may have heard of it as a legend, or they may have visited its mystic shrine when they were children, brought along on a pilgrimage by other elves. But something has gone terribly wrong. Refugees from Myereth, terrified and confused, are flooding into other elven cities. They speak of a great evil that has conquered the forest, one that has killed the body of the immortal Unicorn and tainted its spirit. Myereth runs with blood, they say, and the once-powerful rowan trees have begun to wither and die. In the center of the Rowan Grove, the bloodied bodies of the last elven warriors of Myereth lie scattered and broken. Those responsible call themselves the Servants of the Blood Moon, and they are led by a dark-robed sorcerer. The surviving elves do not know this evil man — all but one of those who fought against the Servants died — but they know that the sorcerer calls himself Tamarat. He has butchered the Unicorn, the spirit of the forest. The Myereth, and the elves, are dying.

Desolate and abandoned, the evil alchemist's mansion stands alone on the cliff, looking out towards the sea. Mysterious lights and ghostly hauntings have kept away the people of Saltmarsh, despite rumors of a fabulous, forgotten treasure. What is its sinister secret. Made for 5-10 character of levels 1-3, contains maps, handouts and encounter descriptions. The Sinister Secret of Saltmarsh is the first installment in a series of three modules designed and developed in the United Kingdom for beginning adventures with the AD&D rules. TSR 9062