
"The end times approach. To everything there is a season. Every campaign has to come to an end sometime, so why not go out with a bang? The Apocalypse Stone is an epic adventure to challenge high-level characters, but beware, it will destroy your world. This adventure has it all: gods and devils, plague and pestilence, rains of fire, and world-shattering conflicts. Here is an opportunity for PCs to display undreamt-of heroism. . . or fall to ultimate defeat. The Apocalypse Stone is a tool for Dungeon Masters to present extremely challenging encounters for high-level parties, to wrap up a long-running campaign. . .or both. This adventure is a literal universe-ender. Past a certain point in the campaign, there is nothing the players can do. The world *will* end.

The dragonmen have taken Solace. Its beautiful tree houses lie black and battered amid the stumps of great vallenwood trees. Kapak Draconians, armed with poisoned weapons, enforce a brutal martial law on the survivors. And Solace is only one outpost: the dragon armies control the plains. Only the elven kingdom of Qualinesti stands unconquered. The rest of the plainsmen suffer the most: a long slave caravan hauls hundreds of them to the fortress prison of Pax Tharkas. "Dragons of Flame" is the second in TSR's series of Dragonlance adventures for use with the AD&D game system. Your players will adventure in the world of Krynn and visit strange places such as Qualinost or the Sla-Mori, encountering bizarre draconians and disgusting Aghar. They can play the modules as a set of separate adventures or as a great quest that spans the entire Dragonlance story. Art by Jeff Easley. TSR 9132

The Submerged Spire of Sarpedon the Shaper lies to the west of the Isle of the Dismemberer. On the northwestern shore of this island, crumbling steps spill from the shore directly into the sea. There, a seaweed choked stone path can be glimpsed winding down into the depths. At low tide, a quarter mile along the path, a lone onion dome may be seen poking through the waves. In the twilight of the sorcerer lords, The Submerged Spire was the jewel of the Shattered Isles. Within his submarine redoubt, Sarpedon penetrated ever deeper into the organic mysteries. Now, its for- lorn dome the roost of seagulls, its secrets slumber beneath the waves.

So you want to be a Mage of High Sorcery? To join the esteemed organization, you must travel to the Tower of Wayreth and undertake the most important event in your life—the harrowing Test of High Sorcery! If you can survive where so many aspiring mages have failed, you will forever bind your soul to the Gods of Magic and gain access to untold arcane secrets. The Test of High Sorcery is the perfect adventure for new and veteran players looking to experience Dungeons & Dragons in a new way! It is a solo adventure, where your choices have meaningful consequences, but it also provides balanced rules to play with a group or a Dungeon Master. This 154-page tome features: - A sprawling adventure that fits perfectly as an expansion to any Dragonlance campaign, Dragonlance: Shadow of the Dragon Queen, or as a stand-alone replayable experience - A tale full of sorcerous intrigue, featuring many new characters alongside iconic favorites like Fistandantilus, Takhisis, Fizban the Fabulous, and the Gods of Magic - Innovative Destiny and Trait mechanics make your choices really matter—and ensure every mage’s Test of High Sorcery is a unique experience - Over 60 possible outcomes to determine which Order of High Sorcery you join and provide compelling new plot hooks for your character during future adventures - Dozens of unique locations with rich stories and sorcerous challenges that Dungeon Masters can use to create their own version of the Test of High Sorcery - New magic items and stat blocks, with mechanics that support clever use of enemies’ weaknesses and the environment against them - Four gorgeous sample characters, with interactive character sheets designed to be new-player friendly so that you can jump right into the story - A detailed primer on the history of Krynn and how it relates to the Mages of High Sorcery - A community survey when you finish to let you see how you compare to other mages taking their Tests of High Sorcery

Dark Water Trap is a mini-adventure that has a single encounter that involves Duergar using darkness and anti-darkvision to get the player to fall into a Pit trap full of water, so that the party will drown. The encounter either works as a standalone (Ie. the Duergar have been causing trouble), or as a part of a larger adventure or dungeon, Duegar or otherwise. Pgs. 26-27
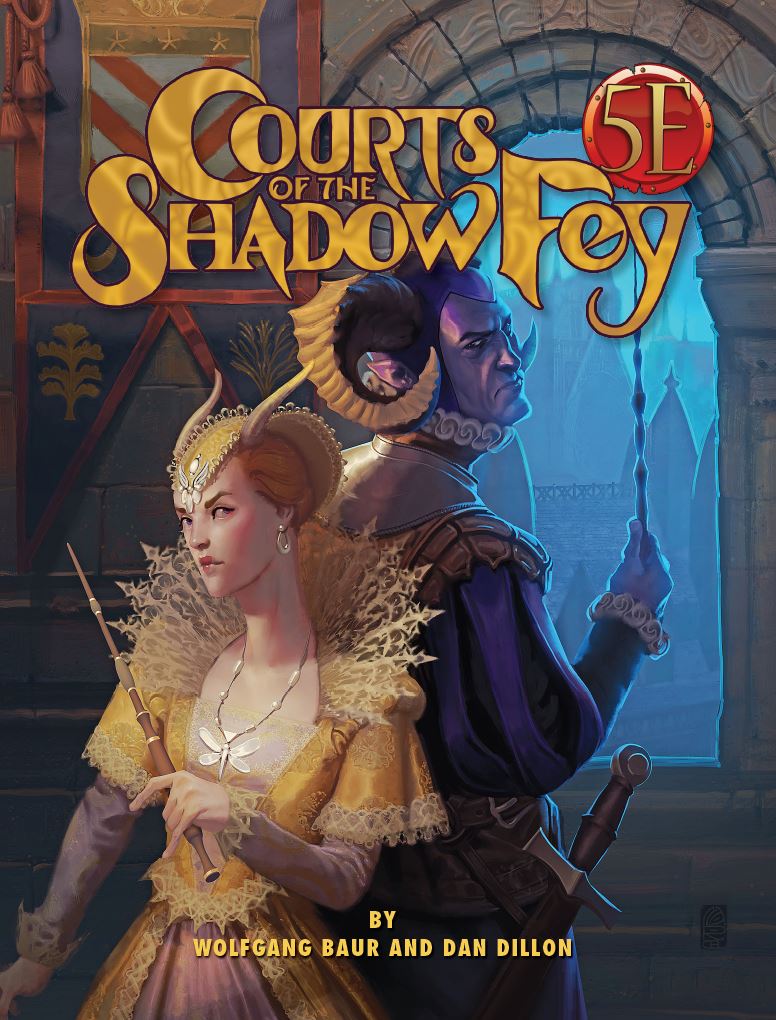
The Free City of Zobeck has thrived since overthrowing the tyrannical Stross family. But an ancient bargain gives the Queen of Night and Magic a claim to the city—and now the shadow fey have seized Zobeck as their own. The city’s only hope lies with a band of heroes who can outfight and outwit the shadow fey in the heart of their own realm: the maze of treachery and deceit that is the Courts of the Shadow Fey. This 148-page 5th Edition adventure contains 100 NPCs, a map with more than 60 locations of the Courts, and more than 40 combat and roleplaying encounters. Courts of the Shadow Fey takes you from the mortal world to the heart of Shadow, where you’ll: Fight your way through the dangers of the Shadow Realm to reach the shadow fey’s courts Engage in dangerous courtly intrigue, trying to increase your status to win an audience with the Queen herself Duel for honor, and perhaps win the hand of a lover among the fey nobility Can you free Zobeck from the grasp of the shadow fey? Or will your fate become a tale told in hushed tones as a warning against angering the Queen?
Displace Beast Maze is an adventure that has one long encounter that is a combination of a puzzle (maze) and combat encounter (Displacer beast). The Displacer beast tentacle's ability to attack through the maze walls, knowledge of the layout, and hit-and-run tactics make the labyrinth both a useful and possibly deadly lair for the creature. Pgs. 27-29

After a series of successful exploits you and your associates decide it is time for a nice vacation. You pull into the large city of Breckengarden to take a few weeks off when you are approached by a courier. After a clandestine meeting you are informed that several well-known adventurers have been disappearing and the party has been asked to resolve the issue. The bigger problem is the likely source of the kidnappings is the master of the Cloud Giant kingdom that floats above the ground!

"Lost Halls of Everforge" is a flame dragon wyrmling lair suitable for four or five 3rd level characters. This adventure can be completed in one session.
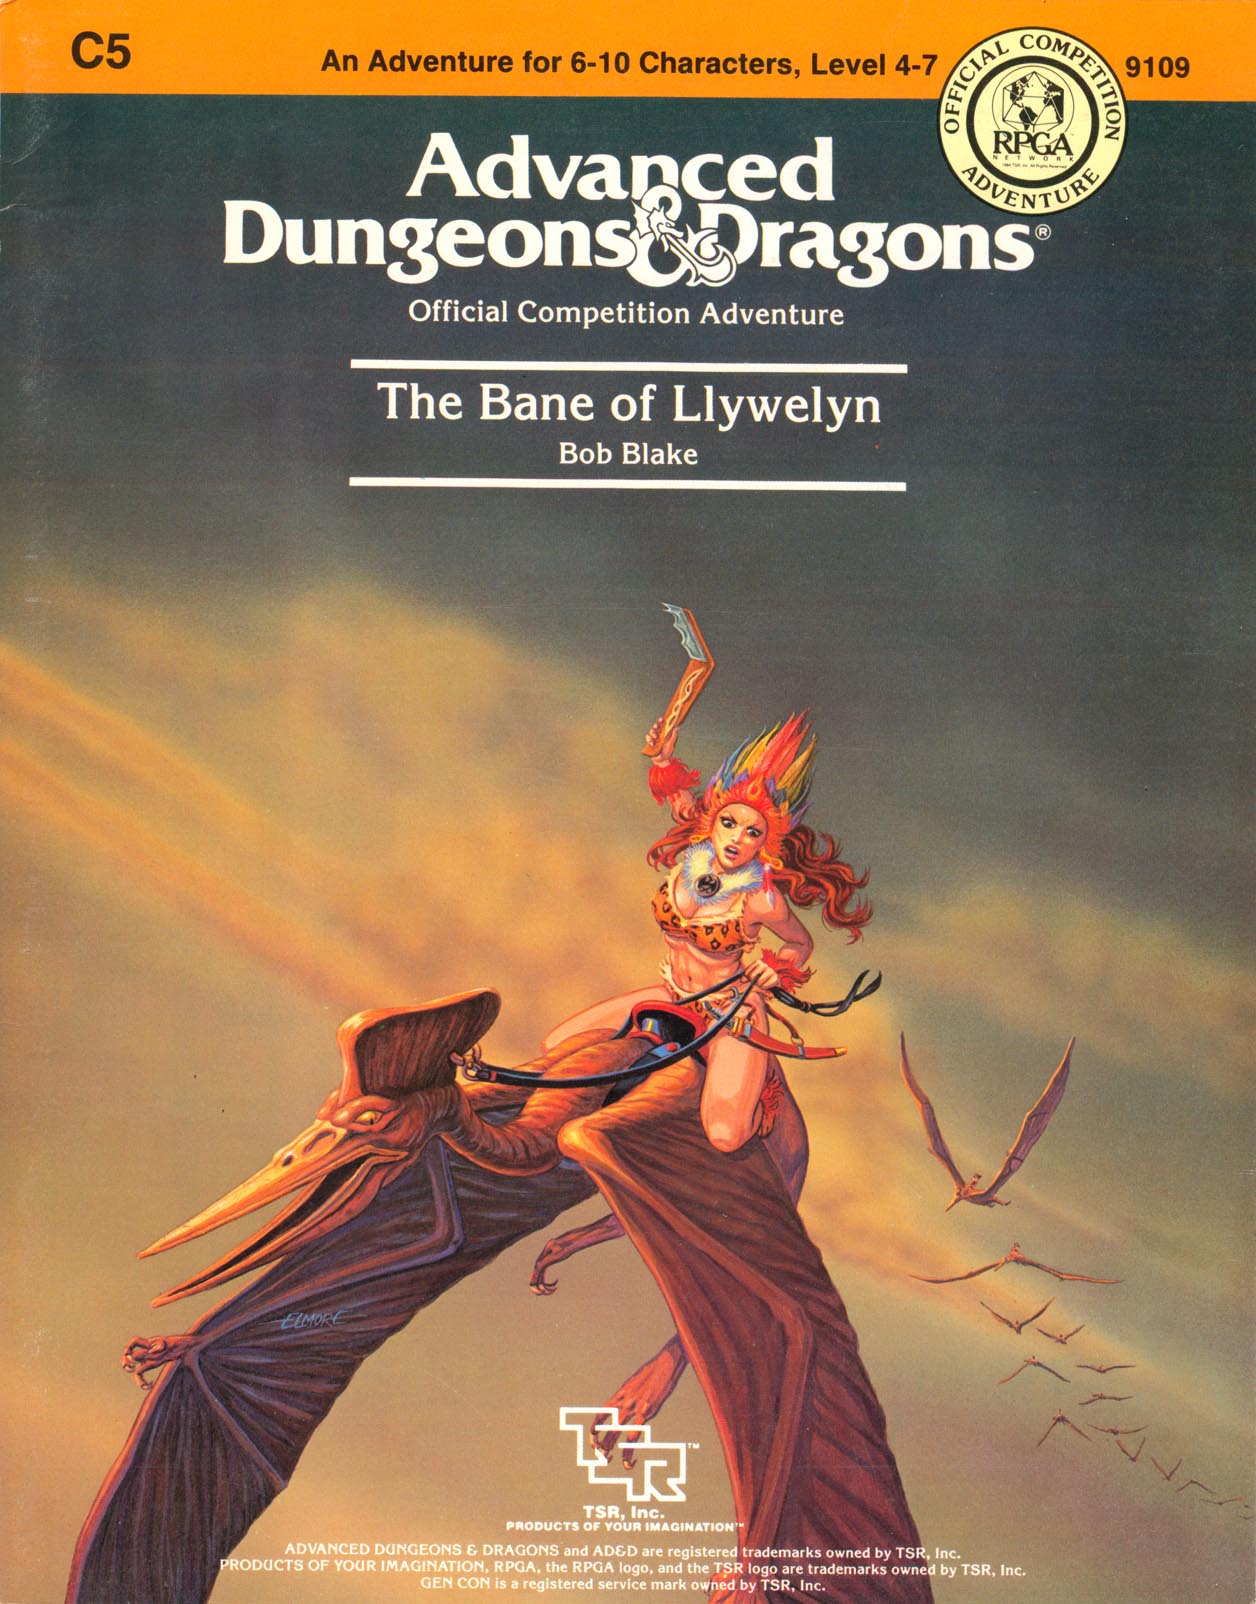
Excitement and unrest grip the land of Pellham. Two hundred years ago, the royal line of kings was deposed and replaced by a High Council. The current council is well-meaning but hopelessly incompetent. Everyone agrees that a drastic change is needed for the kingdom to survive. The ancient Prophecy of Brie foretells that in Pellham's darkest hour, a king from the past will return to restore the kingdom. The time of the prophecy is now. All is in readiness: the symbols of the ancient kings have been recovered, the keys to the royal tomb are in hand, powerful magics to revive the long-dead king have been secured at great cost. Only one problem remains... no one knows where the king is buried! The Bane of Llywelyn concludes the epic adventure of the Prophecy of Brie -- can YOU insure that the quest will be a success? The adventure can be played as a separate adventure or as the second part of the Prophecy of Brie series. TSR 9109

A Ravaged Land... Villains that really are larger than life... A time for heroes... A decade ago, the land of Geoff was overrun by a horde of giants, ogres, and evil humanoids, its people either slain, enslaved, or driven into exile. Now at last the tide has turned. The time to free the people of Geoff from their servitude to the giantish tyrants has come! But don't forget to watch your step when you confront the true masters behind the giant Clans! Contains the full text of three classic adventures by Gary Gygax: G1, Steading of the Hill Giant Chief; G2, The Glacial Rift of the Frost Giant Jarl; and G3, Hall of the Fire GIant King. Details Eighteen new encounter sites in the war-torn land of Geoff, linked together to form a grand campaign. Provides dozens of hours of gameplay as the heroes struggle to free an entire country from the grasp of giant overlords. TSR 11413

An Arch-Mage who can kidnap a dragon is one tough Arch-Mage. Definitely not for those who are afraid of heights. An evil archmage, Ezoran, has kidnapped a dragon in order to discover the means to seize control of a cloud giant's castle. The adventures are tasked with rescuing the dragon by the dragon's mate. The adventure revolves around tracking and navigating through dense jungle and working through a cloud giant's fortress. Pgs. 50-63

To arms! To arms! The battle lines are drawn as desert men and inhuman tribes wait poised to strike on the fertile and rich lands of the east. The call has gone out through the civilized lands. The armies have been raised to match the invading foes from the west. Nobles and peasants have joined swords to greet the foes. But Fate or Chance has decreed another role for a small few. No glorious banners will wave on their march. No squadrons of knights will charge at their word. Instead, they will fight the war with stealth, secrecy, and cunning. The risks they will take are great, but the fates of both armies lie with them. It begins one night for your party far from the fighting. Suddenly you are entrusted with the most dangerous mission of the war. Can you cross the Sind Desert, occupied now by enemy armies, to find the Great Pass? Can you find the one known only as The Master? What will you do if you find him? So begins your adventure in The Master of the Desert Nomads, the first module of a two-part adventure that can be concluded in the exciting Temple of Death or played entirely on its own. Can your party do what must be done? TSR 9068

The prince's godmother commissions you to retrieve the prince's jade crown, held in the tower of the vampire! The vampire's tower has three levels, and the three-level dungeon below 45 rooms. The party must be wary! Lethal traps abound. Marching order is important. A straight-forward dungeon crawl with many Gygaxian rooms and encounters. No roleplaying to speak of. Pgs. 4-18

The battle against the slavers continues! You end your fellow adventurers have defeated the slavers of Highport, but you have learned of the existence of another slaver stronghold, and you have decided to continue the attack. But beware! Only the most fearless of adventurers could challenge the slavers on their own ground, and live to tell of It! Second part of Scourge of the Slavelords (A1-4) TSR 9040

All ocean voyages are fraught with peril, yet a voyage to the infamous Isle of Dread might seem to some old salts to be a deliberate goading of the gods of the sea. Many of those who have attempted the voyage before managed to return to civilization often choose not to speak of the trials they experienced on that dangerous route, yet those whose lips can be loosened by a draught of grog whisper amazing stories... tales of pirates, sea monsters, terrifying storms, and perhaps most harrowing of all, of a strange and sinister land without land, a floating graveyard of dead ships mired in a sargasso the size of an island. This place has many names, but its most well-known may be it's most apt - Journey's End. "The Sea Wyvern's Wake" is the third chapter of the Savage Tide Adventure Path, a complete campaign consisting of 12 adventures appearing in Dungeon magazine. For additional aid in running this campaign, check out Dragon magazine's monthly "Savage Tidings" articles, a series that helps players and DMs prepare for and expand upon the campaign. Issue #350 of Dragon magazine features a regional guide to the seafaring environs the PCs can expect on the journey to the Isle of Dread. It’s time to bid farewell to the city of Sasserine as the PCs board the Sea Wyvern for a 3,000-mile voyage south into the uncharted waters of the Vohoun Ocean. Their destination: the Isle of Dread. Pgs. 16-48

Old soldiers never die... For more than three decades, Dr. Rudolph van Richten stood against the forces of darkness, and hunted their servants in the far corners of the land of Mists. Now he had thought his long battle over, had thought he could spend his declining years in quiet enjoyment with old friends. But for some, a tragic end is inevitable. Dark forces have been gathering in the Mists. Their objective is to see Ravenloft's foremost expert on the supernatural destroyed, shattered in spirit as well as in body. From the crumbling edifice of Van Richten's childhood home, an enemy long thought vanquished spins a web of powerful evils and lost souls, drawing Van Richten to his doom. And then a group of heroes gets trapped in the web as well.... This is a boxed set adventure containing 3 adventures: Whom Fortune Would Destroy: https://www.adventurelookup.com/adventures/whom-fortune-would-destroy The Baron: https://www.adventurelookup.com/adventures/the-baron Homecoming: https://www.adventurelookup.com/adventures/homecoming TSR 1141

Roots of Evil, the conclusion to the adventure begun in From the Shadows, delves into the horrific origins of Strahd von Zarovich, master vampire. This 96-page adventure module features Strahd in his final showdown with Azalin the lich, the two most powerful lords of evil in RAVENLOFT® realm. Player characters return to the popular Castle Ravenloft and discover never before known facts about the vampire's roots and origins. The outcome impacts the RAVENLOFT® realm for years to come! TSR 9413
The heroes have spent the last several days in the quiet, secluded town of Relvaunt. Relvaunt's vineyards, wines, and scenic beauty are the subject of bards's songs, and many travelers journey long miles to visit them. Another site receives far fewer visitors--several miles east of town, partially obscured by woods and hills, stands the wondrous Castle Freitstein. As the heroes depart the town in search of adventure, an elderly couple approaches them. The woman suddenly clutches her chest and collapses in the street and the old man calls out to the heroes for help. Includes castle random encounter chart, a map of castle grounds and isometric castle level maps (four main levels, a tower level and a cellar level).

Ten days ride north of the great city, there is a small town named Treefall. Up until recently, this town was well known for its rich harvests, happy villagers, and prosperous weather. These days, however, the once-proud details from Treefall have turned darker. Instead of tales of unending prosperity, you hear hushed whispers of a great curse that has struck the once-happy village. Word has it that, where once roamed contented cattle, now strange beasts hunt by the moon's cold light and terrorize the hapless region. You have scoffed with the others at these stories. Despite the things you've seen in you adventures with your friends, the thought that such ill might befall such a sleepy town strikes you as terribly unlikely. There is plenty of evil in the world, true, but there are also much bigger and better targets. But, tonight despite the firmness of your disbelief, the stories come to find you. You have been traveling north along the roads on your own business, enjoying the rich fall colors and warm afternoons. Your camp os small and secure, with a roaring fire and meat cooking over the flame. It's one of those crisp autumn days that makes you long for a warm hearth after a long ride in the cool air. Still, the fire is good enough for now and you and your friends have a wonderful meal, talking and singing and laughing, anticipating a restful sleep beneath the blanket of stars. Until the beast attacks.