
The bustling metropolis of Saydown City is the largest settlement in the Denali land and home to the current ruler King Pellet. As your party reaches the watery entrance a huge iron statue guards the docks. Upon closer inspection you notice that the item is actually a golem. After continued investigation you discover that the ‘heart’ of the creature has been stolen and you accept the job to uncover the loss!

Mimic Madness is a psudeo-adventure with four interesting mimic encounters. These four encounters are structured in a way that they can be used together as one adventure, or each individually dropped into any adventure from EL4 to 7. The encounters vary the mimic's tactics significantly, such as by having them we a weapon rack that wields the weapon it holds, pretending to be animated furniture using its ability to speak, and pretending to be a floor covering a pit; none of them rely on the typical chest or door mimics. Pgs. 24-25
This dungeon is a tower inhabited by a goblin tribe, who is performing a ritual to gain the aid of their god. This adventure is perfect for any adventuring group. It pushes adventurers to be more thoughtful about their decisions, especially before and during combat. It is perfect for a one-shot but is meant for a starting dungeon for the players to go from level 1 to level 2.
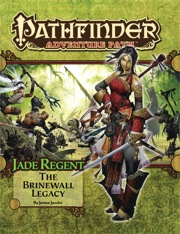
The town of Sandpoint, Varisia, Inner Sea Region has put out a bounty on the nearby tribe of Licktoad Goblins in retribution for the goblins raiding traders and travelers near the quiet town. The party takes up the bounty and ventures into the swamp; eventually finding the goblin village in ruins and it's inhabitants scared in it's burned huts. The party finds out; either through investigation of the ruins or the goblins themselves; that a group of skeletons with eastern arms and armor had ransacked the village and took a stash of fireworks that the goblins stole from an old shipwreck. The party then makes it to this cave and finds it empty except for a half dozen skeletons. Further in past the skeletons is their leader, a skeletal samurai who fights the party in an attempt to defend his treasure. The treasure turns out to be a letter that reveals that secrets of the Kaijitsu family; the same family their good friend Ameiko who runs the Rusty Dragon inn belongs to; that lies in wait in the abandoned town of Brinewall to the northern boarder of Varisia. Ameiko along with several other important NPCs with a caravan north. It's recommended that GMs create encounters for the caravan trip north as it's essentially 3 weeks of travel with nothing in it. It's also recommended that GMs completely ignore caravan rules; they're not flushed out and they're not fun to run. The party and the caravan reaches the abandoned town of Brinewall where their friend Ameiko becomes possessed and is thrown into a coma; where the other NPCs agree to take care of her while the party explores the town and castle. The castle is a three floor behemoth of a dungeon populated by Dire Corbies, Troglodytes, and various other monsters all under the leadership of Kikonu, an Yamabushi Tengu Oni. The goal of exploring Brinewall Castle is to find the two keys to the vault; one of which is on the Yamabushi Tengu while the other is on a Half-Fiend Decapus that lives in the basement of Brinewall. Once the PCs enter the vault they find the Amatatsu Seal; one of the seals that cement authority to one of the ruling houses in Minkai of Tian Xia; as well as several visions that show that Ameiko Kaijitsu is the rightful heir to be ruler of Minkai and that they'll need to travel north to do so. Such ends the first book of six.

The Baronies of Erlkazar, once a prosperous region of pastoral tranquility, is now a land of nightmares and dread. Bandit armies plague the region, terrorizing the populace and surrounding countries of Calimshan, Tethyr, Amn, and Turmish. Though these threats are terrifying enough, it is nothing compared to what awaits the people of Erlkazar at night. In caves, tombs, and subterranean communities beneath the seemingly pastoral villages of Erlkazar live the secretive Night Barony. Ruled by the vampire Saestra and her legions of darkness, these monstrous denizens of the Five Baronies are the real power in the region. The country’s only hope of liberation is you.

Deicide is a campaign designed to begin with a party of four to six 1st-level characters, who should advance to 20th level by its conclusion. The Gods have abandoned Faerûn. Bringing loved ones back from the dead hasn’t been done in centuries, and communion with the deities is a spiritual exercise only. Holy warriors and messengers have lost their powers and have all but completely disappeared. In this bleak world, wars are frequent, crime runs rampant, and hope has faded. Rumours are abound of a mysterious crime lord taking control of the underworld. Monsters roam the lands and every road is increasingly more dangerous. Without guidance, the many civilizations of this world are plagued by greed and corruption. The only way forward is to bring the Gods back, or to take their place in the heavens. Deicide takes place across two islands, Aurora and Limdorkal. These landmasses are the westernmost islands of the Moonshae Isles, an archipelago located roughly 400 miles west of the region of Amn and to the southwest of the Sword Coast. Surrounding the Sea of Moonshae, these islands feature a wide array of cities, civilizations, climates, terrains, and monsters. Limdorkal is famously a harsher environment, home to exotic races, whereas Aurora is almost entirely dominated by the human kingdom. Elminster Aumar, the famous Old Mage of Faerûn, once visited these islands and claimed it surprising how such diverse environmental systems erupted here, and how varied were the people inhabiting them. While the Sword Coast is part of Faerûn, a continent of Toril in the Forgotten Realms, feel free to adapt these islands to any setting of your choice, such as Ravenloft, Eberron, Ravnica, or even on your homebrew world. The story told here happens some hundreds of years after the beginning of 5th Edition, and the Overgod Ao is trapped inside an artifact, which limits the workings of gods around Toril. The characters will be able to learn more about the missing Gods, about a mythical folklore artifact known as the Wand of Wonders, which carries the powers of the Gods, and about the crime lord Kaiser Soze. Through their adventures, they will be able to visit other realms, planes, and dimensions, as well as come into contact with different races and civilizations. In the end, it is up to them whether to ally with the Crime Lord, and whether to release the Gods or keep their power for themselves. This campaign can work as a loose set of modular adventures, which can be easily picked separately and played as one-shots of different levels. Even their locations on the map might be moved, and events happening in particular towns can happen on others. The adventures include dungeon crawls, murder mysteries, sandbox urban quests, exploration on land and in the seas, inter-planar travelling, among others.
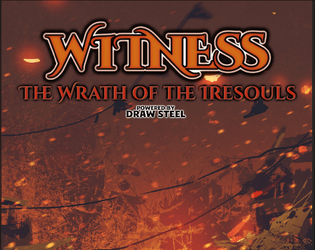
A storm brews above Nexarin, a town known for its perfect weather, bountiful harvests, and always-clear water. However now, flames cover the street, earthquakes level buildings, and a rotted stench fills the air. A wicked void mage attempts to use the town’s power for his own gain. None can stand against him and his legion of wrathful elementals… Get ready to Draw Steel! In this unofficial 1st-level adventure for the MCDM RPG Draw Steel, fight through never-before-seen elementally imbued Iresouls as you save Nexarin, discover powerful artifacts that convey boons you can use throughout the rest of the adventure, and face down the fearsome void mage Lord Cawlmire. This product contains: - An adventure that takes 6-10 hours to complete and that is designed for 4 players (with suggestions to adjust for more or fewer players) - 12 brand new statblocks, including 4 minions, a powerful Void Mage, and Iresouls for all 7 elements - 5 encounter maps specially designed for Draw Steel, each with unique and interactive terrain effects - Encounter sheets for each encounter, helping the Director with quick references to statblocks, terrain effects, and combat objectives - 2 unique treasures, including a Void Amulet for spellcasters designed to grow with you through adventures - Rules for rebuilding Nexarin after the events of the adventure, and lasting benefits for doing so

The battle against the slavers continues! You end your fellow adventurers have defeated the slavers of Highport, but you have learned of the existence of another slaver stronghold, and you have decided to continue the attack. But beware! Only the most fearless of adventurers could challenge the slavers on their own ground, and live to tell of It! Second part of Scourge of the Slavelords (A1-4) TSR 9040

Deep in the elven forests of Myereth, ancient rowan trees spread white boughs above a sacred site. Pillars of stone twist like some strange form of vine, curling among the branches and reflecting the light of a silvery moon. The forest is silent, and beautiful, protected since the dawn of time by a powerful Unicorn. The elven forest of Myereth is well known throughout the world as a safe haven of good and peace, a place where evil cannot stand to enter and where the trees weep healing tears upon those injured within its boundaries. Any player character elves know of the forest, its healing properties, and its legendary beauty. They may have heard of it as a legend, or they may have visited its mystic shrine when they were children, brought along on a pilgrimage by other elves. But something has gone terribly wrong. Refugees from Myereth, terrified and confused, are flooding into other elven cities. They speak of a great evil that has conquered the forest, one that has killed the body of the immortal Unicorn and tainted its spirit. Myereth runs with blood, they say, and the once-powerful rowan trees have begun to wither and die. In the center of the Rowan Grove, the bloodied bodies of the last elven warriors of Myereth lie scattered and broken. Those responsible call themselves the Servants of the Blood Moon, and they are led by a dark-robed sorcerer. The surviving elves do not know this evil man — all but one of those who fought against the Servants died — but they know that the sorcerer calls himself Tamarat. He has butchered the Unicorn, the spirit of the forest. The Myereth, and the elves, are dying.

The Known Gnomes are a Gnomish adventuring party who must use their size to save Lady Kaja Foss from a horrible fate. This module is a level 5 primed adventure that requires an entirely Gnomish player character party. Come Gnome it up! This module was inspired by the porter Known Gnome by Off Color brewery located in Chicago, Illinois. 'The Known Gnomes' is meant to be fun and zany module for those looking to crack skulls and be silly. Included in a separate link (https://www.dmsguild.com/product/256719/The-Known-Gnomes-Maps--Extras) are: Maps Keeper Maps (Color & Low-Ink BW) Player Maps (Color & Low-Ink BW) Trap Prop

Part 3 of the Shackled City Adventure Path "Wherein a tribe of the Sea Mother's children suffer for sparing the life of a mad prisoner they probably should have eaten." Synopsis: The adventure begins with an Umber Hulk attack in the middle of the city. The fame gained by assisting during the attack allows them to gain the notice of a representative of Davked Splintershield. The group is asked to rescue Zenith Splintershield from a Kuo-Toan temple in the Underdark. But to find it, they have to visit Crazy Jared to locate an entrance to it. Upon journeying to Crazy Jared's, they fight Hookface's offspring. After more travelling, they are able to descend into the Underdark. Once they find the Kuo-Toan temple, they must fight through many hard challenges, only to realize that Zenith is not a prisoner, but instead is a prophet. Zenith does not go willingly, and so must be captured. Pgs. 28-61
An embattled outpost at the edge of the wilderness has finally been overthrown. Strange creatures patrol the land. A local hamlet is in ruins. But just who-or what-has taken over this once mighty fortress?

Word has reached your ears that a relic weapon is nearby and at the ruins of Linthar Keep. Once a bastion of humanity the remains of this fortress is now home to roving bands humanoids that have been attacking nearby communities. Can your young adventurer brave the dungeon of the old keep and find the riches others have been unable to…..the famed SKULLCLEAVER blade!
The 13th Circle is an epic battle with one of the archfiends of legend, the demon Baphomet. Designed for Tier 3-4 characters (levels 15-17) and set in the Dread Domain of Kachelior, the adventure requires the party to navigate the mysterious and maddening mazes that protect the demon's castle, and battle fiends of all kinds to reach his throne room. But will they discover the truth of his machinations? Word has spread through the small collection of towns within the Grey Shade that a cult of Baphomet has been preparing something for their master within his palace. The players will travel to Baphomet’s palace, and make their way through the massive forest maze that surrounds it. They will find the corpse of one of the previous heroes enshrined near the center which hints towards the true purpose of the cultists. They will then have to infiltrate the dread palace either stealthing or fighting their way through the defenses. They then must make it past Baphomet’s Lieutenant, Aphalos, the Godeater. The characters defeat Aphalos or persuade him to leave his master to his fate. Once they enter the chamber, Baphomet’s plan is made clear. He wishes to create a maze within time, thus trapping this world in the same cycle of pain and doom as before.

Alphatia, the most ancient empire, land of the arcane and obscure secrets. It has grown for centuries and its might now overshadows the cauldron of civilization. Some say the Alphatians come from elsewhere, but no one knows for sure. Beyond the scope of mortals broods an evil mastermind, still in darkness. Once a betrayed emperor of ancient Alphatia, now an entity of the Sphere of Entropy, he seeks revenge on the greatest empire and on the race of man. His plots brought a deathly fog on all of Norworld. Perhaps it will extend to the southern nations. The matter is grave, so much that lords of the spheres have now to show their might. For them, it is time for mortals to intervene. Man defends his cause for him to earn divine favor. A great armada has been raised and able commanders must be found. Prove your worth, and the eternal portals of the spheres may open for you. TSR 9159

A ruined monument to folly and ego, the Shadowed Keep stands atop an isolated bluff deep in a mist-wreathed forest. Sacked by marauding goblins decades ago the place was thought abandoned, but shadows now creep among the forest's great boles and footprints have appeared on the single, overgrown track leading to the keep. Travellers have begun to disappear with alarming regularity from the nearby road and the local folk fear some slumbering evil has claimed the ruin as its own. Dare you brave the terrors of the Shadowed Keep to crush that which lurks within or will darkness shroud the surrounding lands? Designed to be easily inserted into a GM's home campaign, Shadowed Keep on the Borderlands is an excellent starting locale to test the mettle of neophyte adventurers. Shadowed Keep on the Borderlands is designed for the medium advancement track. 1st-level PCs completing all the challenges of the place can expect to reach 3rd-level by the time they have exhausted all the keep has to offer.

Haedirn Lastlight is a respected elven wizard and sage. After the death of his lover Lyonthel, the elf has been overcome with grief and has locked himself away in his study- a small manor on the cliffs of Wailing Crag. Haedirn has not been seen for over a year now, and those that knew him are beginning to worry. Worse still, a band of ogres has been terrorizing the nearby town, slaughtering the town folk and haughtily boasting the elf wizard is dead. The PCs must put a stop to the ogres' attacks, make way to Wailing Crag to root out the rest of their gang, and lay Haedirn Lastlight's tortured remains to rest.

Summary The party is sent to deal with a problem that should be instantly familiar to all rookie adventurers - exterminating giant rats that have taken up residence in a beer cellar. However, if they are to achieve their goal our heroes are going to have to get their first taste of a real dungeon as they explore the ruins of an ancient Wizard’s Tower. What is this adventure? This first-level adventure is designed for D&D veterans and complete beginners alike. It only uses rules, items, monsters and concepts found in the free basic ruleset that can be downloaded from the Wizards of the Coast website. That means that you and your friends can play this without having to buy anything other than snacks, drinks and maybe some dice - though even these can be replaced by the many free Dice Roller apps available for phones and tablets.

Ranked in 2004 as the single greatest adventure of all time by Dungeon magazine, this is a compilation of three series of modules: the G series "G1-2-3 Against the Giants" (G1 Steading of the Hill Giant Chief, G2 Glacial Rift of the Frost Giant Jarl, G3 Hall of the Fire Giant King), the D series (D1 Descent into the Depths of the Earth, D2 Shrine of the Kuo-Toa, D3 Vault of the Drow), and Q1 Queen of the Demonweb Pits. The characters begin by attempting to stop giant raids that have become prolific. They find out that the giant alliance is caused by the drow. They then descend into the Underdark in order to find the drow and stop their sinister plan. TSR 9179

Blinsky's Toyshop is our take on what happens to Blinsky and Piccolo during, or after the Curse of Strahd campaign. Blinsky, the toymaker in Vallaki with the cute monkey wearing a pink tutu, received a large inheritance from a long-time client. The client, Obtavius Swat, a retired adventurer and avid collector of toys, left his entire estate to Blinsky. The estate included coin, precious gems, art, and his collection of toys, some made by Blinsky and others he acquired during his travels. Blinsky used the fortune to pay a wizard to create a small island in the middle of Lake Zarovich, located just outside of Vallaki. He then paid masons and workers to build a fantastic new toyshop, which he designed to be an experience for both the young and old alike. Though the number of children in Barovia was increasing, mostly imparted to the devil Strahd’s downfall, Blinsky wanted to touch the inner child of the adults in the city. He wanted happiness. He wanted smiles. He named the castle Blinsky’s Toyshop of Marvels. One of the toys, a small silver tiara kept in a black satin-lined ivory jewelry box, was such a lovely piece. Blinsky couldn’t stand the thought of leaving it in the box. He already had enough gold and losing the small tiara wouldn’t be a large loss, so he decided to give it to his monkey – Piccolo (see Creatures of the Toyshop). He smiled at the thought of her running around in her pretty, shiny tiara. Sadly, as Barovian luck would have it, trapped inside the tiara is the sole of an evil gnome wizard named Aribetha Strangge. In his old age, Obtavious Swat forgot that he and his fellow adventurers used the tiara to imprison the gnome’s soul. Yesterday, when Blinsky placed the tiara on Piccolo’s head, silver tendrils cascaded from the tiara and into poor Piccolo’s skull, allowing Aribetha to control the monkey. Now, Aribetha has incapacitated Blinsky in the toyshop’s tower, brought many of the toys to life, and imprisoned or killed many of the workers and customers. The adventure includes costumes (which the character may wear), Strahd Hand Puppets, and a possessed Piccolo.