
City of the Dead A 4th Level adventure for 4-6 players A strange thief wandered into Waterdeep and stole from the wrong person. Now, he has died of “natural causes” on his visit to the City of Splendors. Having no known friends or relatives, he was hastily buried, along with his possessions, at Waterdeep’s Cemetery (The City of the Dead) in The Road’s End Tomb. While the PCs are dining in the taproom at The Dripping Dagger Inn, they are approached by a stranger who claims that the unknown man had stolen a necklace from his employer, and he needs the adventures to reclaim it. Unfortunately, the thief’s fresh corpse has been pilfered by a dire evil with unknown motives. What starts off as a simple recovery mission, turns into a fight for survival in the City of the Dead. The Adventurers must solve the mystery and destroy the evil that lurks beneath the cemetery, if they are to succeed in their quest and escape with their lives!

This is the introductory adventure in the Bugger's Mill campaign. It introduces the characters to the village of Oak Mill along edge of Border Forest and has them hunt down a local arsonist, as well as assist with putting out a forest fire.

Someone in the misty, wooded Moonshae isles needs hundreds of brand new swords taken under guard from Sword Coast smiths to a certain place on the Isles. The swords are needed so badly, and their safe arrival is considered so unlikely, that someone is willing to pay adventurers a lot of gold - someone fairly important. Adventures foolish enough to take assignments too good to be true (or merely desperate for coins) will soon find themselves embroiled in a dark and mysterious struggle against evil that will take them into sacred groves, crumbling castles, and through ancient magical gates to the halls of the High King - and beyond -- An adventure that takes place on the Moonshae Isles, in which a mid-to-high level party fights against the encroaching darkness of The Cult of Bane. Although helped by the Harpers, players will have to uncover the plans of the cult, and thwart them where possible. Preventing the summoning of the "Godson", a manifestation of Bane's evil. Part of the "Forgotten Realms Adventure" series, this is FA1 - Halls of the High King. FA2 is "Nightmare Keep" TSR 9301

When the adventurers are tasked with destroying a symbol of Demogorgon, they end up falling foul of the great mage Mordenkainen himself – or at least a simulacrum of him. Will they agree to help maintain the great Balance of the Blood War, even if means sacrificing innocent lives in the process?

The yuan-ti have a long, storied past in the history of Chult. So, if they are to be defeated, we must look back into history. Within the jungles, a number of cities fell into ruin during the Year of Blue Fire. Both the merchant princes and factions believe that if discovered, they likely contain knowledge that’ll prove invaluable in the battles to come. Get looking! A Four-Hour Adventure for 11th – 16th Level Characters
Two Red Wizards of Thay have undertaken a secret mission into the High Moors east of the Sword Coast. They are searching for something or someone. Whatever their goal out there in the cold and windswept hills, if the Red Wizards want to keep it secret then it is probably best uncovered swiftly for the good of everyone else. Even the mercenaries who escorted them into the wilderness earlier agree: someone should stop them. Pursuing the Red Wizards leads the adventurers to a barrow mound in the wild grasses of the High Moors. At the barrow, they discover the remnants of a wizards' sanctum still being plundered. The fate of its lore and treasures is up to the characters. Without caution, things may get out of hand. This Dungeons & Dragons adventure is written to suit four to six characters of 8th level. With this text and the core D&D manuals, you have everything you need to play. You may also benefit from the Sword Coast Adventurer's Guide to learn more about the High Moors of Faerûn. Made for the Magic: the Gathering set "Adventures in the Forgotten Realms".

5e Solo Gamebooks presents The Tortured Land, the fourth in our series of solo adventures set in the Forgotten Realms. With this adventure, we take off the gloves and throw your PC into the thick of some serious danger in the frigid north of Faerun. Only the most hardened adventurers will make it through this adventure in one piece, and with several different paths available, replayability is assured. The Tortured Land will provide you with hours of enjoyable, challenging play time. Arriving in a lonely village in the middle of the northern plain known as The Ride, your hero is soon drawn into a quest to retrieve a precious artifact. From there they will journey even further north, towards the barren waste known as the Tortured Land, in search of an unknown enemy. There are items to collect, codewords to activate and perils to avoid. And of course, many combat encounters! As always, hyperlinks are included in the text to facilitate easy navigation, removing the need for scrolling between entries.

Frog-Emperor Tadpool has led his people to the wonderful warmth of the jungle peninsula, and seeks to be part of the grung village of Dungrunglung. However, he'll need some impressive gifts if the grungs are going to let their poison-less cousins move in. The adventurers will assist the king's aide, Pond-Dredger, in completing these tasks. This adventure should take approximately two hours and is designed for a party of four players, ranging from levels 3-5. Jungle Politics is a short, lighthearted module that can help facilitate the player's introduction to Dungrunglung. If aided, the bullywugs can translate the grung language to common, an invaluable asset when dealing with a race that speaks only one language and who are known for poor tempers.

In this adventure, the player characters discover the illegal actives of an ambition Red Wizard operating out of an enclave in a small town. This adventure is short and a great way to introduce players to Red Wizards. For a group willing to use diplomacy fighting they can cut down there combat. The adventure is found on pages 284-287

This third installment of the Aumvor saga includes: ● 19 encounters ● Stats for Living Zombies (converted from 3.5e) ● and an introduction to the tower The adventure continues as your PCs make their way to the upper reaches of the tower and learn of the danger involved in moving deeper into Aumvor's dark realm. For centuries Aumvor the Undying has fed upon the life force of innocent folk who stumbled upon his portal traps. For centuries he has planned for and prepared for the eventual return of Netheril as a power in the world. That hope has now faded, and he has returned to his vault to regain strength and begin anew. Even now, he is deep in his tower vault plotting. 𝐁𝐞 𝐬𝐮𝐫𝐞 𝐭𝐨 𝐜𝐡𝐞𝐜𝐤 𝐨𝐮𝐭 𝐓𝐡𝐞 𝐓𝐨𝐰𝐞𝐫 𝐨𝐟 𝐁𝐨𝐧𝐝𝐚𝐠𝐞 𝐩𝐚𝐫𝐭 𝟏 “𝐀𝐮𝐦𝐯𝐨𝐫𝐬’ 𝐖𝐞𝐥𝐜𝐨𝐦𝐞” 𝐚𝐧𝐝 𝐩𝐚𝐫𝐭 𝟐 “𝐅𝐚𝐧𝐞 𝐨𝐟 𝐭𝐡𝐞 𝐉𝐚𝐢𝐥𝐞𝐫𝐬”.

In this prelude to the full Princes of the Apocalypse campaign book, adventurers face off against the influence of Elemental Cultists in the hills and canyons of the Dessarin Valley. The four mini-adventures within are only tangentially related to each-other, and instead serve as starting points and hooks for the plots of the complete Princes of the Apocalypse Campaign. Players start in the well-described town of Red Larch; first investigating a local necromancer, then uncovering cult influences within the town, and finally heading off to infiltrate or do battle with two small elemental cultist strongholds. All parts of this adventure can serve as great places to seed hooks for other campaigns.

A short plug in adventure that can be used as part of a larger campaign or run as a one shot for 3-4 Tier I or II characters. The Twin Temple was once a place where the people of the city can come to and get help and guidance, but change has come to the Twin Temple now. The characters seek to find what poisons this well and how they can get to the bottom of it and who is responsible. This adventure is ideal for for 3-4 tier I and II characters. Playable as a one shot or the start of a larger campaign. The characters are sent to investigate the Twin Temple and see if they can find the root cause of trouble with various clues and encounters in most rooms this adventure is customizable and adaptable to fit into most campaigns as needed.

Inside this full-color, 124-page anthology you’ll find four best-selling Adventurer’s League quests for level 1-10 characters set in the hobgoblin fortress of Glip Dak. Also included are instructions on how to weave these adventures into an ongoing story arc as part of your campaign. Tier 1 (Level 1-4): Glip Dak (CCC_GLIP-01-01) The Kroth Magg hobgoblins run the trade city of Glip Dak in the Troll Hills of Thar. From there they have taken control of the trade routes along the northern Moonsea. A young noble has been captured for refusing to pay their tariffs and his house looks to hire adventurers to rescue him. Beneath Glip Dak (CCC_GLIP-01-02) A series of unusual heists has both the thieves’ guild and city guard scrambling to uncover the culprits before the burglaries destabilize the thriving trade within the city, threatening the budding kingdom the Kroth Magg have fought and died to forge. Citadel of Vlaakith (CCC_GLIP-01-03) The adventurers are tasked with rescuing a group of heroes who vanished in the pearlescent fortress that manifested on the border between the Kroth Magg kingdom and the Varkonin empire in the Steppes of Thar. Tier 2 (Level 5-10): Blue Scales (CCC_GLIP-02-01) A behir has been hired to destroy the herds of aurochs necessary to feed the hobgoblin city of Glip Dak. Patrols and scouts continue to go missing, forcing the hobgoblins to hire mercenaries to track this behir as they recall their troops to the capital to maintain order as food riots break out.
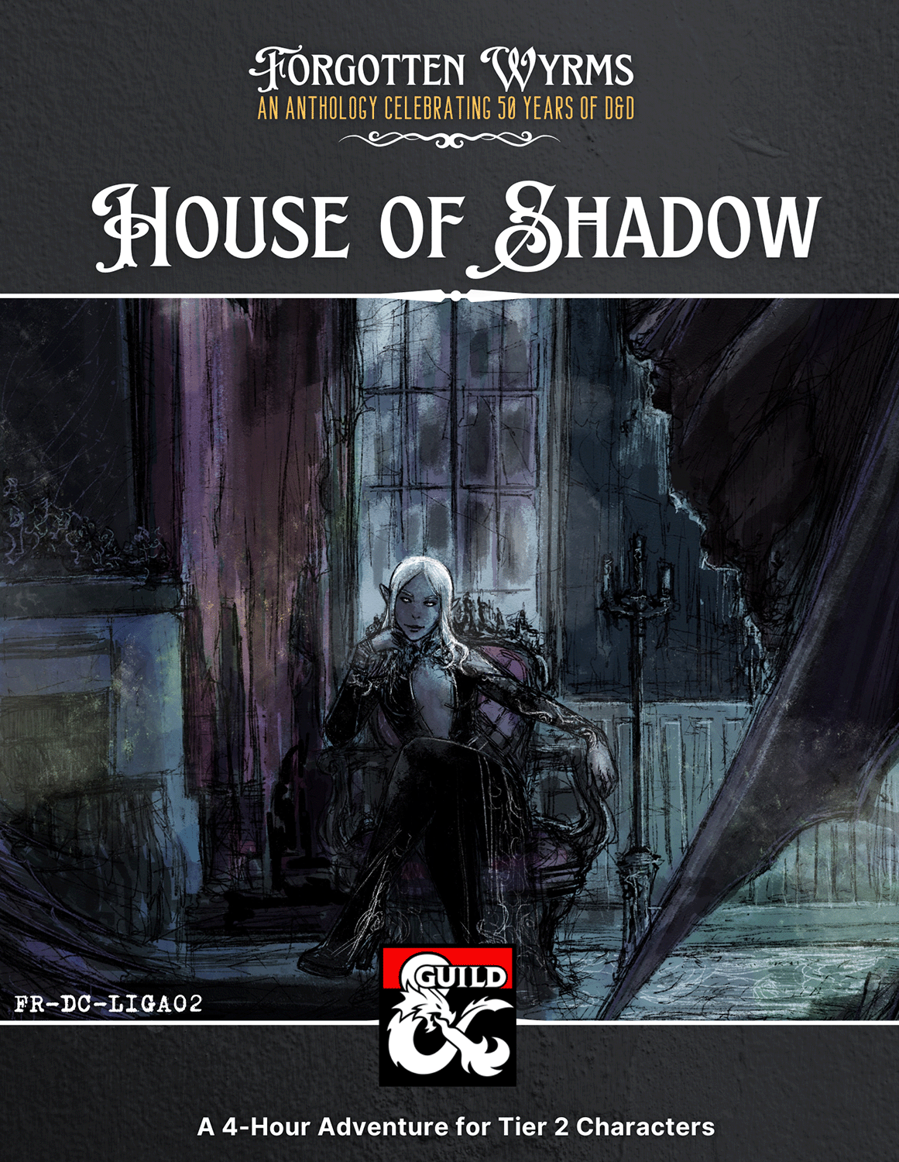
The Dark Lady has spread chaos and ruin across the Dessarin Valley, causing great misfortune to nearly all adventurers and guilds that visit. Thus, it is time to endeavor to bring this power to heel, helping save the Savage Frontier or deal with this threat in a more permanent way. Dive into one of her lairs, Rundreth Manor, survive the horrors within, and end her tyranny. A Four-Hour Adventure for Tier 2 Characters. Optimized for APL 8. A stand-alone adventure. Part of the Forgotten Wyrms Anthology. Content Warning: Slavery, sexual coercion, charm and physical contact (illusions), cannibalism, mental torture.

𝐓𝐡𝐢𝐬 𝐢𝐬 𝐭𝐡𝐞 𝐭𝐡𝐫𝐢𝐥𝐥𝐢𝐧𝐠 𝐟𝐢𝐧𝐢𝐬𝐡 𝐭𝐨 𝐭𝐡𝐞 𝐓𝐨𝐰𝐞𝐫 𝐨𝐟 𝐁𝐨𝐧𝐝𝐚𝐠𝐞 𝐟𝐞𝐚𝐭𝐮𝐫𝐢𝐧𝐠: ● Eight deadly encounters ● More deadly traps ● The water maze ● and Aumvor himself! Will your PCs escape with their lives or stand and face Aunvor and put an end to his deadly game?

The heroes hurry to reclaim a treasured item that an evil hag has hidden away. The item they seek is well guarded by dangerous foes bent on destroying any that dare enter their domain. Estimated play time - 1 hour. This product contains two combat encounters designed for 4th level PCs, an extensive backstory, new monsters and new magic items. The encounters are easily adapted to almost any campaign setting. The text also includes optional changes that DMs may consider when running the adventure for their own campaigns. This side trek encounter is the second of a three-part "Fey's Bargain" encounter series.
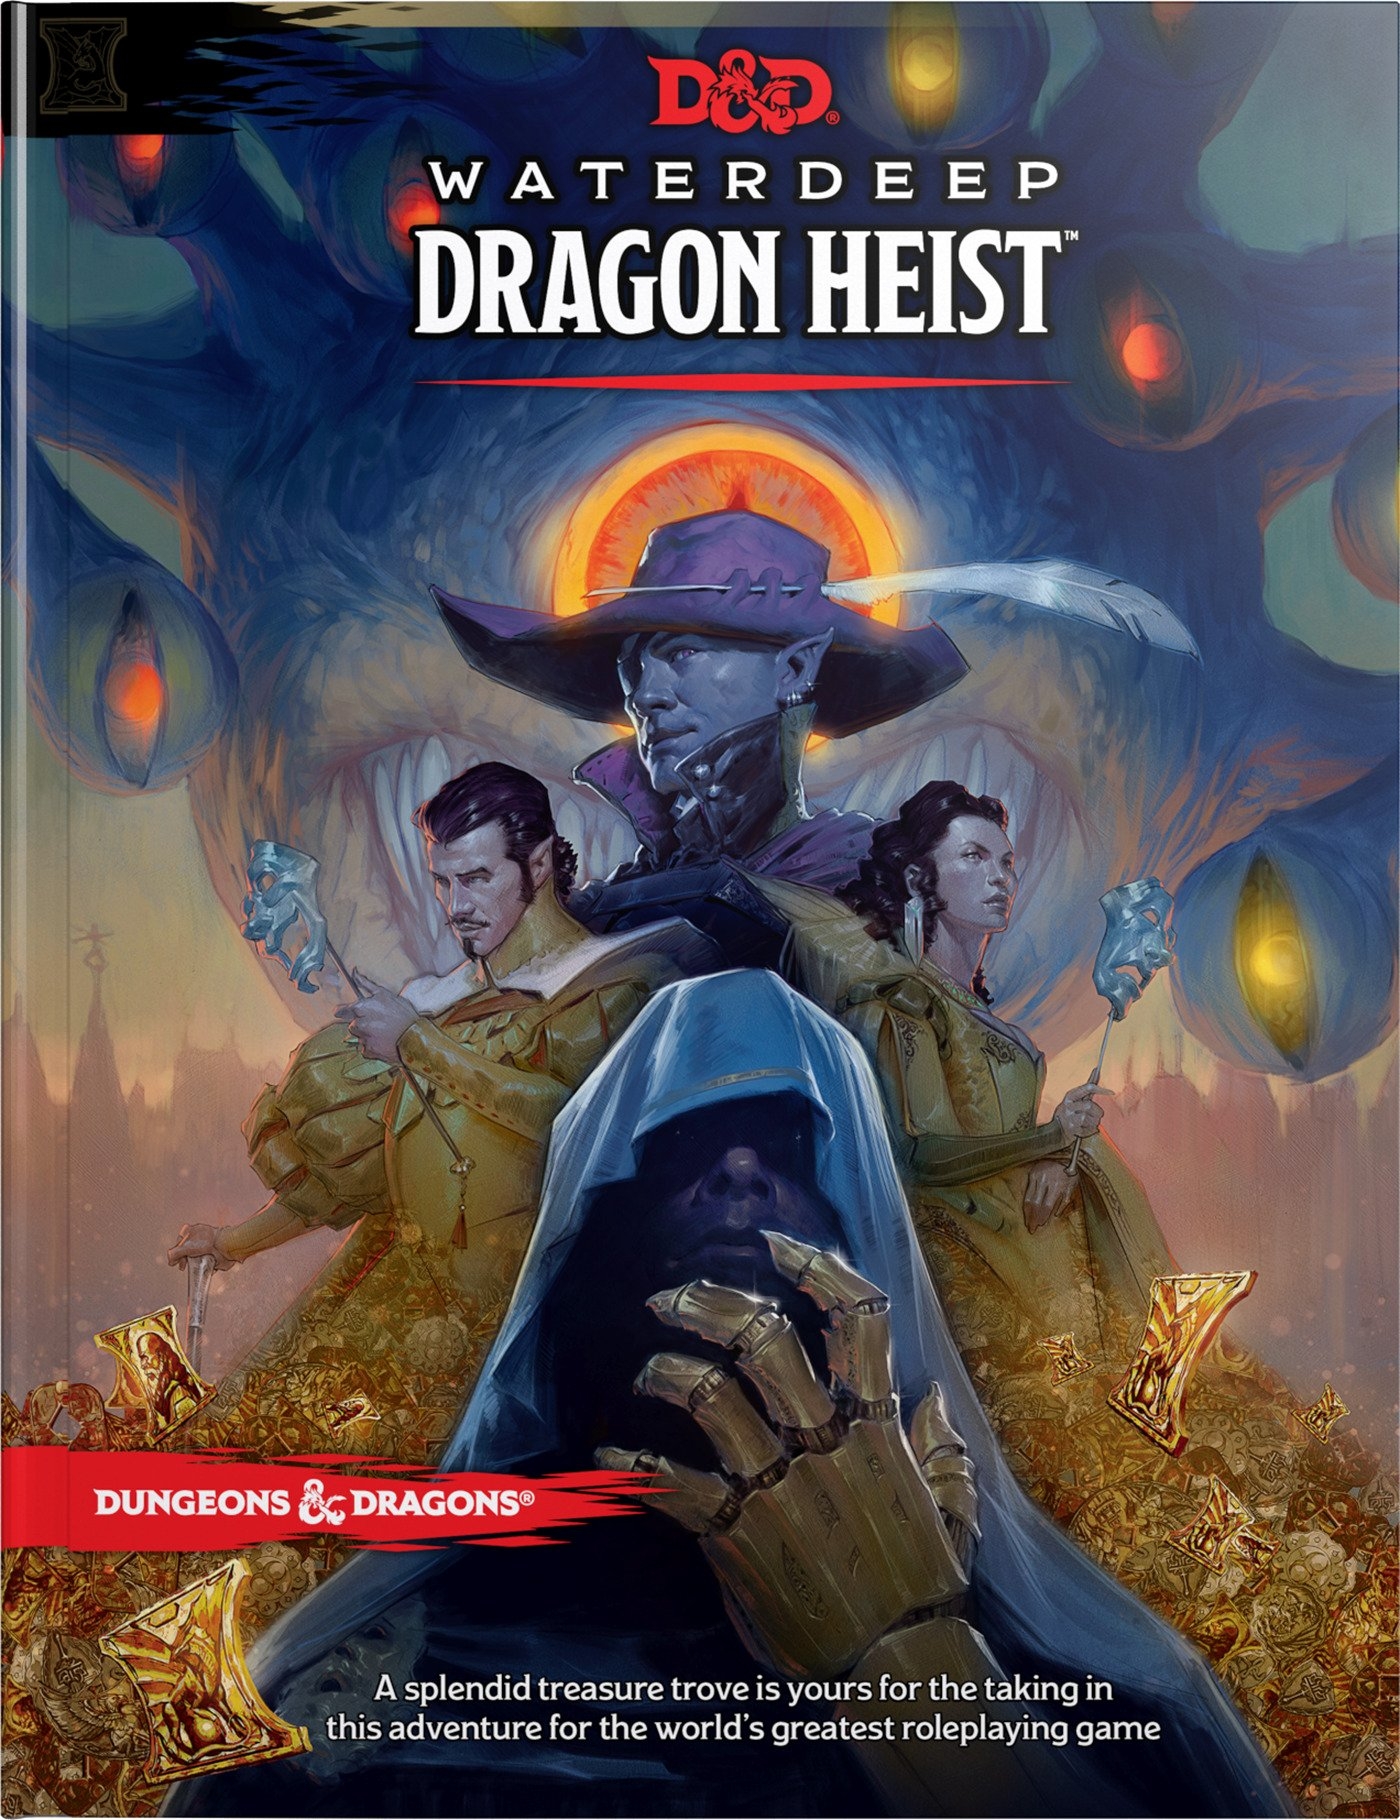
Welcome to Waterdeep! A fantastic treasure trove is yours for the taking in this adventure for the world's greatest roleplaying game. Famed explorer Volothamp Geddarm needs you to complete a simple quest. Thus begins a mad romp through the wards of Waterdeep as you uncover a villainous plot involving some of the city’s most influential figures. A grand urban caper awaits you. Pit your skill and bravado against villains the likes of which you’ve never faced before, and let the dragon hunt begin!

Six short adventures to supplement your exploration of the jungles of Chult! These six fun adventures feature interesting challenges highlighting the dangers of the jungle. Each scenario is easy to drop into Tomb of Annihilation or any wilderness campaign. Includes the following adventures: Tavern Trouble - With a mysterious curse upon your guide, escaping lizards, and foes who have come to settle debts, your jungle trek gets interesting before you even leave the tavern! If Looks Could Kill - Crossing paths with a merchant prince's expedition can be very lucrative. The expedition members' agendas present interesting choices, as do the dangerous denizens of the swamp. Ambush from Above - Grung acrobats? With a team mascot? What is going on here? Mystic River - Traveling downriver suddenly comes alive with dangerous white water, carnivorous plants, a brontosaurus' tail... and an unusual spectator! Mudslide - It's been raining for days, and that rumble isn't a dinosaur! Run for your lives, and watch the creatures in the mud! Beautiful Plumage - Ancient ruins are now home to beautiful but dangerous singers. A batiri queen demands revenge and her tribe's totem awakens! Perfect for DMs running Tomb of Annihilation: Each adventure fully supports levels 1-10 Ready to run fun, with maps, art, and complete monster statistics Is traveling through the jungle getting dull? Drop in one of these innovative encounters providing interesting roleplay and combat experiences! Party unsure of where to head next? Each scenario provides links both to other Jungle Trek adventures and to Tomb of Annihilation plot points. Provides hours of play!

An old elf has wandered into the city from the jungle--prattling on about his long-lost daughter to anyone whose ear he can bend. Though most in Port Nyanzaru dismiss him as mad, he speaks the truth. Can you find and save his daughter?

Descend into the depths of a tomb which has remained undisturbed for decades. However, a few weeks ago, the gears of war started turning, grinding the northern folk to dust. An undead host marches, leaving a trail of destruction in its wake. A decisive strike to cut off the snake’s head might save thousands of lives! Pgs. 16-39