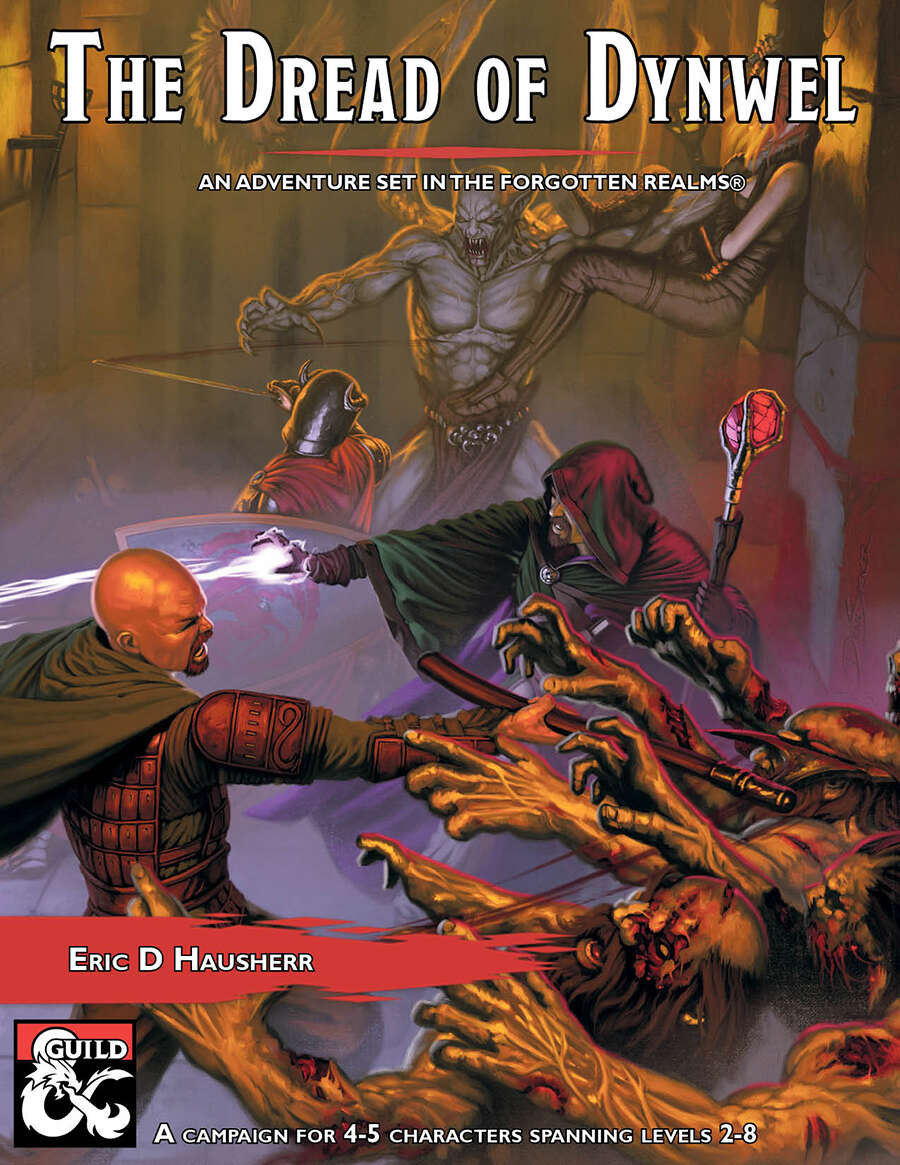
The Dread of Dynwel is an adventure set in the Forgotten Realms and optimized for 4-5 players. The characters start as a down on their luck but somewhat experienced crew of adventurers with a wanted poster which pays a much-needed gold reward. Soon, events in the Sunset Vale are revealed as more dangerous than they seem, sweeping the characters along with them. From the heights of the Sunset Mountains, the alleyways of Scornubel, and depths of the Reaching Wood: The Dread of Dynwel covers levels 2 through 8 and features material which can be played as a full campaign or dropped into an ongoing one.

Surviving the shipwreck is easy; living through the wizardly bet afterward is not. Their game could mean your lives. A storm caused the PCs' vessel to sink and is now forcing them to seek shelter in the keep on the remote isle. Their goal is to locate a boat or some other means of transportation to return to the mainland after the storm has passed. But first, they must survive the tests and traps the island's inhabitants have set for them. Pgs. 45-64

Into the Drachensgrab Mountains! Hot on the trail of the marauding slavers, you and your fellow adventurers plunge deep into hostile hills. Spurred on by your past success, you now seek the heart of the slaver conspiracy. But hurry! Your must move quickly before the slavers recover from your previous forays and attack! This module was originally used for the official Advanced Dungeons & Dragons Tournament at Gen Con XIII and is the third of four in a series of related tournament modules. This module contains a challenging scenario, the tournament scoring system, plus nine pre-rolled, playtested tournament characters. Also included are large scale referee's maps, notes, and background information. A3 is a complete adventure in itself, but it is also a companion to A1 (Slave Pits of the Undercity), A2 (Secret of the Slavers' Stockade), and A4 (In the Dungeons of the Slave Lords). TSR 9041

The adventurers are asked to search for a local temple official who has not returned after leaving to search for a hidden treasure vault. On their way, they are attacked by some Kobolds and chase the fleeing monsters to the hidden entrance. The adventurers explore the ruins and discover what has become of the missing temple official.
The city is plagued by an affliction being called "stone sickness" or "the gorgon’s touch" that disorients people and turns them to stone. Those with, or suspected to have, the affliction are being banished from the city. Some demand a cure, but most are just scared for their loved ones. A ravenfolk woman named Spinel Larkdon, mother to a child with the gorgon’s touch, begs the PCs for assistance. An artifact known as the Shroud of Tiberesh, capable of curing any sickness, is locked away within The Umbers' vault of spoils below the city. Passionate, she is determined to save her son and all those afflicted. Fortunately for the player characters, completing the Umber’s Gauntlet alive means they are not only entitled entrance into the cult, but also a single item from its vault of spoils. The PC's only hope of procuring the Shroud is by traversing this initiation Gauntlet – a series of traps, monsters, and puzzles devoted to the demon-god Nakresh - and claiming the Shroud as their prize.

Heavy mists have plagued the area around Phlan for weeks, even after the reported death of Vorgansharax, the Maimed Virulence. People have been disappearing in those deadly fogs, and now dead bodies are turning up. A D&D Adventurer’s League adventure set in the Quivering Forest.
Jobel the genie was famous for his bejeweled creations. But when a job to build a wizard’s tower took a turn for the worse, Jobel was imprisoned in a massive gemstone and buried deep within the earth. For one hundred years, the genie plotted his escape, using subtle magics, and slowly, he was able to work the gem toward the surface, where he’d be much more likely to be found and freed.
A Scavenger Hunt? The adventure begins in the city-state of Zoa as the wizard Geolain tasks the player characters with a quest to gather three ingredients they will use to forge a magic coin to defeat an evil wizard. Which will be more dangerous to collect, the mysterious diamond touched by death, the blood of a devil spilled by a coward or a blue dragon's breath? As the player characters race around Reanaaria Bay ti find the rare items, their nemesis Daresh the wizard begins to grow in strength and wrest power from the Skryvalkkers of the Lands of Skaarna. Will the player characters find the ingredients and enchant the coin in time? They just might be Skaarna's only hope. Published by Kenzer & Company

In the Anauroch desert, darkness is growing. The followers of the Vile Spore Goddess Zuggtmoy have stolen the dreams of the Bedine Seeress Deja, trapping them in an eldritch artifact. Unless her dreams are returned, the Seeress will descend into madness, and her people along with her.

The first part of the Dreams of Red Wizards adventure path originally published for the D&D NEXT Playtest. Following the events Ghosts of Dragonspear Castle, a new set of adventurer's will see some of the repercussions of that adventure. This adventure is intended to be continued in the Dead in Thay adventure (Note that they Dead in Thay 5e adventure featured in Tales from the Yawning Portal is missing a significant portion of interlude that links Scourge of the Sword Coast to the events within the Doomvault). The adventurers arrive when Daggerford is crowded with refugees from outlying lands. Goblins, gnolls, and orcs have been raiding the countryside. Now, food is scarce and tension is high. Blame for a theft has fallen on the refugees, and the Duke of Daggerford has forbidden more of the displaced from coming into town. After overcoming difficulties to enter Daggerford, the characters learn more about the raids. As they fight against the humanoids and delve deeper in the darkness that encircles Daggerford, the characters learn of Bloodgate Keep. After a final fiendish ambush, they’re ready to confront the real threat to the area. DM Note: This adventure points the adventurers strongly towards Bloodgate Keep but that location does not appear until the Dead in Thay adventure; at several points the party may feel drawn to explore that location rather than continue their investigations around Daggerford. However, since Bloodgate Keep is only eluded to as a source of great evil power, it can serve to easily segue to an entirely different adventure path. As a NEXT Playtest adventure, Scourge of the Sword Coast uses milestone leveling and the included stat blocks for creatures do not necessarily match or even appear in the 5e Monster Manual, nor do they have XP values or challenge ratings. In some places it will reference rules used in the Playtest but dropped or changed in the 5e release, these are unlikely to substantially impact gampley with 5e rules.

Danger Lurks in the Lendore Isles. Bands of evil creatures prowl the hills overlooking the town of Restenford. Now you have come to this sleepy little village looking for adventure and excitement. You seek to fathom the unexplored reaches of Bone Hill and unlock the mysteries of Restenford. TSR 9045

Laugher’s Gorge occupies a stretch of the canyon that runs through the local badlands, named for the haunting laughter that occasionally erupts from its depths. When travelers using the road past the gorge become infected with cackle fever, it’s up to the party to find out what’s causing the mysterious laughing sickness. Though they find a pack of gnolls infesting the canyon, it’s no joke when they discover who (or what) is pulling the strings! Laughter and humor are central themes in No Laughing Matter. The players are met with the will of a prankster god, riddles to solve, and may be forced to come up with some jokes of their own. But this isn’t an adventure to take lightly. If the party underestimates Laugher’s Gorge, they may find themselves infected with cackle fever… and there’s nothing funny about that! Dungeons on Demand is a line instant dungeons you can drop into your campaign, each is designed for 4-5 player parties of specified levels, and each dungeon is complete with a back story, hand drawn maps, traps, puzzles, and reference information to monsters and treasure. You can customize each one to fit in your campaign however you wish, and each one can be played through in one or two gaming sessions.

Restore an Abandoned Temple Enter the catacombs near the desecrated Temple of Muir, Goddess of Paladins, and search for the lost tomb of Abysthor. Will your party be able to cleanse the evil that now inhabits these once-sacred halls, and recover the Stone of Tircople? Can your characters survive the traps of an undead sorcerer? Will your players discover the chamber of Living Rock and the secret power it holds? Adventure awaits! Gold and Glory! A fantasy adventure published for the D20 system, The Tomb of Abysthor is the first module in Necromancer Games Dungeon series and can be played as a stand-alone story or in conjunction with The Crucible of Freya and the forthcoming city supplement Bards Gate. What secrets lie hidden in the tomb of Abysthor?

Important: The adventure is 1e but it has monster conversion notes for D&D 4th edition The town of Highport, once a human community overlooking Wooly Bay from its perch on the northern coast of the Pomarj, fell prey to hordes of humanoids swarming out of the jungle-covered hills surrounding the settlement. Though the orcs, goblins, kobolds, ogres, and gnolls razed much of the place in their ferocious rampages, the smoldering ruins they left behind soon became a new kind of community, a place of trade between the humanoid “locals” and the unsavory human traders who have no compunction about doing business with them. Slaves are a commodity in ready supply in Highport’s market, since many pirates raid up and down the coast of the bay, putting fishing villages to the torch and filling their holds with captured refugees. Slavery has become a thriving business in the town, and rumors abound of a cartel of Slave Lords who run things from behind the scenes, filling their coffers in secret from the buying and selling of human chattel. The trade has become so prolific that the good folk to the north have grown tired of these depredations and decided to fight back. Forces of righteousness and honor have recently descended upon Highport, some openly and others in secret, in various attempts to destroy the machinations of the Slave Lords and abolish the abominable enterprise that has taken far too many loved ones from home and hearth. One such doughty servant of goodness is Mikaro Valasteen, a cleric of Trithereon. Mikaro slipped unnoticed past the crumbling walls of Highport with a single mission: to rescue and transport as many slaves to their freedom as possible. Mikaro and a handful of faithful assistants located a number of escaped slaves—as well as rescued a few more not sufficiently restrained and guarded—and shepherded them through the gates and beyond the reach of their humanoid tormentors, returning them to their lands and homes. This covert freedom brigade enjoyed remarkable success early on, since the servants of the Slave Lords were often lax in their vigilance and sloppy in their efforts to prevent loss of the “merchandise.” After one too many shipments never made its destination, the humanoids stepped up their security and the normal channels of escape from Highport closed to Mikaro and his team. He cannot risk exposure by smuggling the freed slaves through the gates as merchandise any longer, since shipments of goods are now regularly stopped and checked. No longer able to free the slaves in that manner, Mikaro began hiding his charges in an abandoned villa in a particularly rundown part of the town. Although they are safe for the moment, their numbers have grown unmanageable, and the priest fears it is only a matter of time before someone slips up and brings slavers to their doorstep. Ever more desperate to find a new means of escape from Highport, Mikaro has started work on a plan that is both daring and dangerous. He intends to use a series of old sewers coupled with natural caverns running beneath the town as an escape route to the sea beyond the walls. But he needs someone to clear out the creatures and pitfalls he knows lie within. Pgs. 2-27

The Village of Hommlet has grown up around a crossroads in a woodland. Once far from any important activity, it became embroiled in the struggle between gods and demons when the Temple of Elemental Evil arose but a few leagues away. Luckily of its inhabitants, the Temple and its evil hordes were destroyed a decade ago, but Hommlet still suffers from incursions of bandits and strange monsters. TSR 9026
An ancient palace constructed by the mighty Wind Lord Boreas has a new master: the gnoll sorcerous matriarch Odjanbago and her clan—the Archthieves. With the flying Sky Palace at her command, Odjanbago’s legendary clan of thieves and killers have cast a shadow of fear over the Southlands’ northwestern desert. All tremble in fear of the Archthieves, from the jinnborn tribes of the Dominion of the Wind Lords to the priests of Bastet in Nuria Natal. Even lords of Midgard’s Seven Cities grow uneasy at their mention. Whether they hail from the Southlands or elsewhere in Midgard, the PCs must shoulder the responsibility of ending Odjanbago’s reign of terror.

Just as the trail led from the STEADING OF THE HILL GIANT CHIEF to the frozen wastes where was found the GLACIAL RIFT OF THE FROST GIANT JARL, so the adventure in the latter place has let (or transported) the intrepid party to what they hope will be their last challenge. They are about to venture into the hot and smoking barrens which are in effect Muspelheim, the home of fire giants. This module contains background information, referee's notes, three level maps, and exploration matrix keys. It provides a complete module for play of ADVANCED DUNGEONS & DRAGONS, and it can be used alone or as the last of a three-part expedition adventure which also employs DUNGEON MODULE G1 (STEADING OF THE HILL GIANT CHIEF and DUNGEON MODULE G2 (GLACIAL RIFT OF THE FROST GIANT JARL). TSR 9018

Crippled, wingless, old and a thousand times more dangerous. Surely, a crippled dragon is less dangerous than a healthy one. Pgs. 35-45

It's a frigid New Year's Eve, and the heroes gather near midnight in a small condemned tavern wihtin the Free City-State of Gate Pass. Located in the mountain pass which separates two hostile nations. Gate Pass has been neutral since the end of their last war. That neutrality is about to be put to the test, as a scourge comes for the city from the nearby empire of Ragesia. By now, every magic-user in Gate Pass knows of the Scourge. The Emperor of Ragesia died barely a month ago, and a witch named Leska has moved to cementer herself as the next empress. Leska leads the Ragesian Inquisitors, clerics specialized in countermagic and has decreed ass disloyal mages to be tracked down and killed to prevent future threats to the empire. Their first target is Gate Pass, whose neutrality has long been viewed as an insult to the nation's honor. This is the first of twelve adventures in the War of the Burning Sky adventure path from E.N. Publishing.

Special Basic/Expert Transition Module Barely one day's march from Kelven, the uncharted tracts of the Dymrak forest conceal horrors enough to freeze the blood of civilized folk. Those who have ventured there tell how death comes quick to the unwary - for the woods at night are far worse than any dungeon. But you are adventurers, veterans of many battles, and the call of the wild is strong. Will you answer the call, or are you afraid of the dark terrors of the night? The campaign adventure is for characters just beginning Expert play (levels 2-4) and hurls them into the exciting outdoor world which awaits in the Expert rulebook. With a 64 page booklet, 2 double-panel covers, a double-sided, fold-out mapsheet and 120 die-cut counters, this super module provides all you need for epic wilderness and dungeon adventuring. Journey across the Grand Duchy of Karameikos in a desperate race against time and the forces of evil. This adventure is for use with the Dungeons & Dragons Expert Set, which continues and expands the D&D Basic Rules. This adventure cannot be played without the D&D Basic and Expert rules produced by TSR inc. TSR 9149