
After enjoying a bit of free time in Cullifield while some members of your party finish their training, you hear word of a quick trip out to sea. Further investigation leads you to understand a certain list needs fulfilled and a drunken sea captain is willing to split the profits. Well, no need to sit around on your hands…let’s hit the waves!

This adventure begins with a message delivery to the post commander in Penchant. Sadly for your PC Lt. Kateryn Hawtrey is gone and the PC will need to wait until her return. While wandering through town yelling is heard and someone is in trouble. Investigation reveals that a small child has fallen into one of the town’s wells and needs help getting out. While forming a rescue plan the child, CeCe, screams and disappears from sight. Is your player brave enough to venture into the darkness alone? As with all adventures in the Penchant series it can be difficult and not for the faint of heart!

A gnomish settlement is plagued by inexplicable earthquakes, the wrath of an Earth Elemental. Can the heroes save the gnomes? Do the greedy gnomes deserve to be saved? "Valanche's Eye" was inspired by a desire to write an adventure which blurs the line of who the bad guy actually is, or indeed whether or not there's a really tangible villain. It takes the "patron hires adventurers to clear dungeon" trope and twists it – the patron turns out to be a pretty rotten bastard, and the monsters in the dungeon are just trying to live their lives. It starts when gnome gem-miners strike the mother lode of emeralds and sapphires, only to find themselves run off their claim. First they accidentally broke through to the Elemental Planes of Earth and Fire, and mephits burst out to annoy them. When they were just about done dealing with the mephits, they disturbed an earth elemental who just wants to be left alone, and emeralds are its favorite snack. The mine boss hires the adventurers to come kill all the elementals. But should they?

Haedirn Lastlight is a respected elven wizard and sage. After the death of his lover Lyonthel, the elf has been overcome with grief and has locked himself away in his study- a small manor on the cliffs of Wailing Crag. Haedirn has not been seen for over a year now, and those that knew him are beginning to worry. Worse still, a band of ogres has been terrorizing the nearby town, slaughtering the town folk and haughtily boasting the elf wizard is dead. The PCs must put a stop to the ogres' attacks, make way to Wailing Crag to root out the rest of their gang, and lay Haedirn Lastlight's tortured remains to rest.

The Plains series wraps up with 150th Filbar offering Dominion of Sophicles the Virulent! This adventure starts with the PCs hearing of a town in trouble. After learning of trouble in the Village of Ardeth the PCs arrive via boat and quickly discover the community has been attacked by humanoid forces. A successful track will lead the party to one of the toughest adversaries in the land….Sophicles, the Green Dragon!

Deep below the surface lies an ancient beholder city called Ilth K'hinax. In times past, hundreds of beholders called it home - until simmering rivalries within their society exploded into warfare. The few survivors fled, leaving the city deserted for hundreds of years. However, the story of Ilth K'hinax's glory was passed down from one generation of beholders to the next. Now, after countless years of self-imposed exile, the beholders are back! After securing the city, the hive mother of Ilth K'hinax implemented a plan to wipe out all the beings living above it. Unfortunately for the beholders, several facets of the hive mother's plan have been revealed through the exploits of a party of adventurers. Now, this group of heroes must meet eye to eye with Ilth K'hinax's newest occupants in an effort to stop the hive mother's pernicious plan! "Eye to Eye" is the last of three adventures featuring the nightmarish beholder. It can be played as an individual mission or as part of the series that began with "Eye of Pain" and continued in "Eye of Doom." TSR 9536

If you but have the will Sonja, you may use your strength to make the world your home. You may become a wanderer, the equal of any man or woman you meet. (The Ring of Ikribu) Red Sonja #1 Steel met steel as Sonja slashed wildly before her. Sparks flew into the air; the mercenary's sword flew to the ground. Her arms vibrated with the contact and her hands grew numb as she tightened her grip on the mighty sword. Still they came - only four in all, but with deadly intent shining deep within theiir hungry eyes. What do these men seek? Why would they rather die than run? TSR 9183

When her father goes missing, a young adventurer has no other choice than to gather her friends and head for the city of Loudwater. Soon after she gets swept away in an obscure design threatening to drag the entire region into chaos and war. At the heart of this mystery, lies not only her father, but the long-forgotten history of her once-despised family and a primordial beast influencing events from the shadows, moving her family like pieces on a chess board. Visit www.perfumersdaughter.com for more information. You can also address me directly on The Perfumer's Daughter Q&A on Facebook. All battlemaps and dungeons are free to download for use in digital platforms (such as roll20) on the aforementioned site.

The party is enlisted to assist the Righteous Host, an army formed as a last resort to defend the world against the monsters of Elemental Evil. The host is greatly outnumbered. Its leaders send the party on a series of missions, each of which will give the Righteous Host an edge in the great battle to come. This epic adventure ends with the final push against the forces of Elemental Evil in the Meadows, and the outcome is informed by how effective the party is in their missions... and whether they are willing to risk putting themselves in the front lines. If the Righteous Host loses, players may decide to travel to Hommlet or other nearby towns to defend them. Whether the host is successful or not, players can decide to follow many different plot threads: exploring the Temple of Elemental Evil, finding the lich Kell the Eldest's lair and destroying his phylactory, or following the will of Bitbaern's Shield and discovering historical sites that were previously lost. Pgs. 44-69
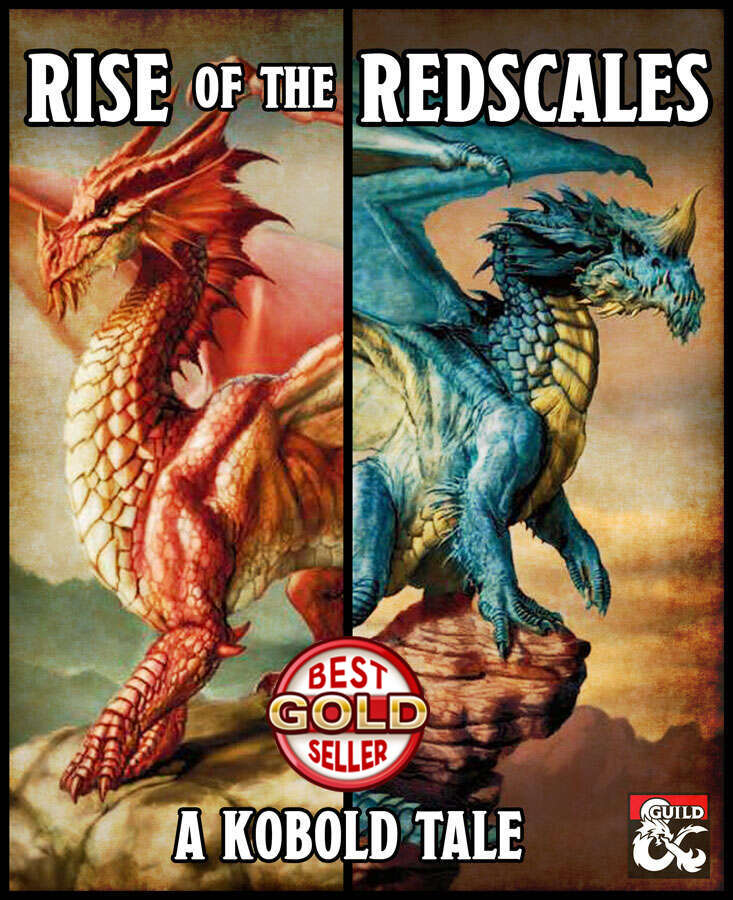
Two feuding kobold tribes have been left alone in their dragon queen's lair. Without supervision, surrounded by the wealth of nations and piles of magical artifacts. How long before things devolve into utter chaos? Set inside an enormous dragon's lair, the adventure allows players to take control of the best and brightest among the kobold tribe known as the Redscales. Their entire lives they have been the Dragon Queen's minions and her lair's caretakers. But the Dragon Queen has been gone for some time now and an ancient feud with another kobold tribe (the Bluescales) is about to be a rekindled. And the trap- and treasure-filled lair is to become their battleground. The gameplay is a mix of roleplaying, involving some tough moral choices (well, tough for kobolds), solving puzzles and wacky combat with kobolds wielding powerful ancient artifacts. There is an abundance of magic items, specially chosen for their potential to lead to hilarious situations.

You wake up in a pitch-dark cavern... The stench of bodies fills your nostrils. The crack of bone and the sound of teeth rending flesh are the only sound you hear. Something is feeding nearby...something you can't see. We Eat in the Dark is a deadly adventure for 3rd or 4th level characters. Navigate the caves of the Darkshard Abattoir, where light sources are muted and creatures hid invisibly in the dark. Fight for your life against troglodytes empowered by a mysterious artifact and other cavern hazards. Includes an appendix for limited starting gear for a more lethal challenge. A perfect murder-happy one-shot for your players to question your friendship.

The Ghost Tribe of Orcs were driven from their home under Wyvern Tor by some terrible evil. They marched to Phandalin and attacked, only to be defeated. Now the heroes will go beneath Wyvern Tor to discover the terror that chased out the orcs and perhaps find the source of the orc’ssardonyx. Journey to Beneath Wyvern Tor is the third of four parts in the After Lost Mine series. It will play out the journey to the orc’s former cave settlement and then into the darkness beneath. Part IV will have the party deal with the terror from the Underdark that drove out the orcs.

The Shades of Bodach Ridge Whitepeak has a dark history of black magic originating with the evil witch Skruul the Reaper. The dark rituals she conducted seemed sure to plague the region, until a plucky group of adventurers thwarted her plans sending her into a state of perpetual fractured undeath. Now souls scatter from her old haunt on Bodach Ridge. What could have set these souls free?

The party seeks out Commodore Krux at the Happy Beholder. After speaking with the patrons, the party learns that Krux has disappeared and gets a lead to check out his ship, the Second Wind. At the ship, the party learns from Fel Ardra and Flinch that Krux is being held prisoner by the Amoebros in a cave on the underside of the Rock of Bral. The party infiltrates the Amoebros’ lair, gets past the guards, and learns of the animal experimentation performed by the gang. In a final climactic scene, the party rescues Krux from Ripples, the wicked boss of the plasmoid gang.
Stories of misfortune are often exaggerated, especially when they have been retold many times. For that reason, most people aren't taking seriously the claim that a sea monster living along the coast is eating whole ships full of sailors and swallowing entire families. But there's no denying a few facts -- the town of Lochfell is losing its citizens to a sea monster (one that walks on water no less), someone is stealing that same town's dead, and ships are beginning to choose other ports for unloading their goods. Such a scenario could doom the residents of the small port town to either a monster's gullet or the poorhouse. No one seems to know whether the town's two ongoing problems are connected, but the sea monster never leaves behind a corpse to bury. Is it collecting bodies for some dark purpose? Or did some more powerful evil creature create the sea monster to do its dirty work? Someone in Lochfell knows the answer, and it's up to the PCs to find it out. Lochfell’s Secret is a short D&D adventure for four 15th level player characters (PCs). The story is set in and around the port town of Lochfell. You can place the action in any section of your campaign world where a coastal town on a bay might exist. If there is a small town that the PCs visited in a past adventure but haven’t returned to in quite a while, so much the better. As always, feel free to adapt the material presented here as you see fit to make it work with your campaign.
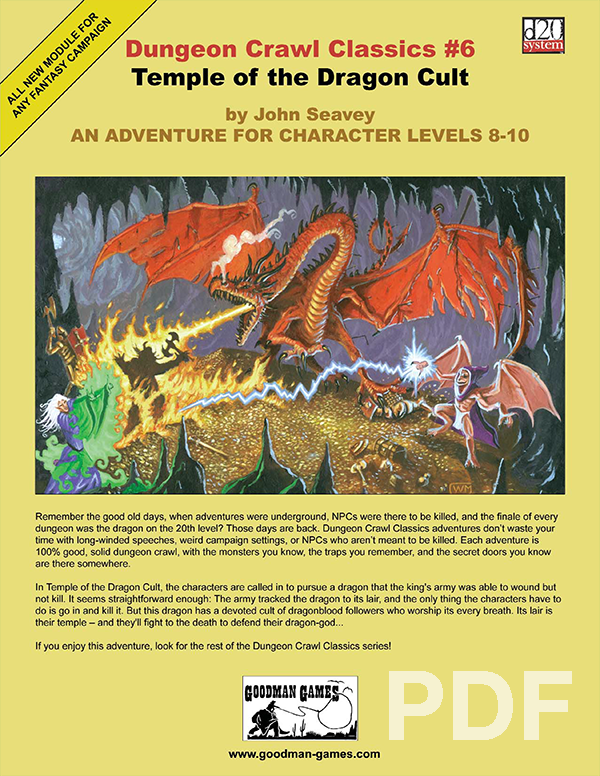
In Temple of the Dragon Cult, the characters are called in to pursue a dragon that the king’s army was able to wound but not kill. It seems straightforward enough: the army tracked the dragon to its lair, and all the characters have to do is go in and kill it. But this dragon has a devoted cult of dragonblood followers who worship its every breath. Its lair is their temple — and they’ll fight to the death to defend their dragon-god…
Lord Falcon’s nest holds a new brood of evil. Falcon’s Peak is an AD&D® game adventure for 5-8 characters of 1st-3rd level. The party should include a thief and at least one experienced cleric; a ranger would also be of help. The use of stealth and silvered or magical weapons is advised.
Pursued by wolves and worse, the party must fight a running battle to take refuge at the relative safety of the Bittermoon Inn, a decrepit old inn high in the mountains. But night is falling, can they uncover the secrets of the inn and use them to survive the night? This adventure can be played as a stand alone one-shot, or can be used as a drop-in side quest to almost any campaign. It is suitable for a party of about 5 characters at the First Tier (Levels 1-4). The players must fight a running battle with wolves to reach Bittermoon, then they must discover the secrets of the inn before escaping through a smuggler's tunnel. Finally they must face off against their unseen opponent at Skull Cavern. There are four encounter maps included with this title.

Halfling thief, Alton Lightheart, awakens to discover his shadow is gone! A child's doll kills its victims in a cruel and unexpected way. A sound-stealing sword is lost in a ruined volcanic temple. Among the witch’s valley mist, The Murk, sinister fey shadows terrorize the forest, demon spirits haunt old ruins, and undead howl from the volcanic shrine. Can the adventurer’s purge the vale of evil to gain its lost magic and riches? A three part adventure: 1. Alton’s Shadow: Delirious, bloodstained, alone. Halfing thief, Alton Lightheart, awakens to discover his shadow is gone! Will the adventurers help him to confront the unknown dread that awaits him? 2. The Vanishing at Rhu: Long Ago, the folk of Rhu made an agreement with a witch to save the thorp from destruction. She honored the agreement, but the folk broke their promise. One year later the village was razed. How? What wickedness lurks among the ruins of the fallen-tree village? 3. Stillness: A temple suffers a volcanic eruption. Believing it is the will of an angry god, all of its shaman are ritually slain. After years of disuse, the temple awakens as the zealots are reborn . . . as undead. Meanwhile, a magic sound-stealing sword is lost by explorers. Should an expedition seek the weapon and uncover the secrets of the lost shrine? Published by Wicked Cool Games

Some dozens of leagues to the north and west of the STEADING OF THE HILL GIANT CHIEF (Module G1 of this series), amidst the tallest mountain peaks, is the stronghold of Grugnur, Lord of Frost Giants. As frost giants have been amongst those who have been in the reaving bands, the party is to deal with them as the hill giants have been dealt with. Death and destruction are to be meted out to the frost giants in the same measure they gave to the peoples below. This module contains background information, referee's notes, two level maps, and exploration matrix keys. It provides a complete module for play of ADVANCED DUNGEONS & DRAGONS, and it can be used alone or as the second of a three-part expedition adventure which also employs DUNGEON MODULE G1 (STEADING OF THE HILL GIANT CHIEF) and DUNGEON MODULE G3 (HALL OF THE FIRE GIANT KING). TSR 9017