
A world unseen lies beyond a twisted, metal gate in a remote field of the Dhalpurna Mountains. Will the characters brave the alien monstrosities, technologies, and magic inside to learn the secrets that have been brooding in this strange place for millennia? Gate of the Lens Wizard is a science-fantasy exploration adventure and includes: -A gate that leads to the tunnels beneath a distant jungle moon -Intelligent spiders at war with glass-skulled astronomy wizards -An unfathomable artifact that can rewrite time itself -Combat cards for each monster, PC, and special treasure -High-quality digital maps for use with virtual table tops

Recent earthquakes have unearthed a small section of a lost dwarven fortress. The dwarves are long gone, but rumors suggest they might have left treasure or weapons behind. After a journey into the Underdark, the characters find a barred iron door bearing the names of several ancient dwarven clans. Pgs. 90-95

Figgy Puddin' Steals Christmas is a short adventure Designed for use with Shadowdark RPG. The adventure is designed for three to six characters of low to mid experience. The anticipated run-time is 2- to 4-hours. There's a bit of roleplay in this adventure, which may extend the playtime. Adventure Background A traveling jester known as Figgy Puddin’ and her Coal Smudge Gang have stolen Christmas presents and now hold them for ransom. While safe and secure in her lair, she awaits either a payment of an outrageous ransom, or a crew of heroes to claim the presents after they navigate her not-so-festive lair. What's the Adventure? After you introduce the hook, the adventure occurs in Figgy Puddin's lair - a refurbished kobold bunker consisting of eight rooms. As the characters explore the linear dungeon, they encounter new creatures, complete challenges, and are tested about their Christmas knowledge. However, the final confrontation with the naughty Figgy Puddin' could make for a very Unhappy and Unmerry Christmas for our heroes, the children of Thistleton, and their parents. Who Is Figgy Puddin’? Figgy Puddin’ was once a happy jester who loved Christmas. For years she traveled the realm, bringing fun and festive cheer to villages and children while preparing the way for Santa. However, times have become tough, and entertainment doesn’t always pay as well as one would like. As Figgy prepares for retirement, she’s learned she doesn’t have enough gold to last. During this time, she’s also decided that Santa doesn’t know who she is, let alone appreciate the work she puts in every year. Using her savings, extortion, blackmail, and other nefarious means, she’s convinced several mechanical geniuses and arcane specialists to help her refurbish her underground bunker with wondrous effects, creatures, and tests.
Lo! The corpse of poor, departed Scholar Zubayr, washed up on the shores of the River of Sand, lies in the charnel house…destined to become dinner for a cult of cannibals. Though distasteful in the extreme, this isn’t your concern—except that Princess Karima Gamila, the most beautiful gnoll in Per-Bastet, has begged you to rescue her friend’s body and help discover his fate. Still unmoved to action? Know then, adventurer, that the Scholar was hot on the trail of lost treasure! If you can claim his body from the cult and decipher the clues he left behind, long-buried riches and powerful magic might be yours. But nothing is simple in this city of dark wonders: others converge on the charnel house in pursuit of wealth, vengeance, or both. Can you out-fight and outwit vile cultists, undead catfolk, a cunning werecrocodile gnoll, and the deadly secrets that lie buried beneath the River of Sand? Set in the city of Per-Bastet in the Southlands Campaign Setting, it is meant for play either as the thrilling sequel to Cat and Mouse, or as a standalone treasure hunt! Also available in Pathfinder format.

Faced with an unusual alliance of giants raiding the countryside, the party must venture into the steading of hill giant chief Nosnra and uncover maps to the locations of the other giant strongholds. “Steading of the Hill Giant Chief ” can be run as a stand-alone adventure, or you can play it as the first part of a four-part series that continues with “Warrens of the Stone Giant Thane” (Dungeon 198), “Glacial Rift of the Frost Giant Jarl” (Dungeon 199), and “Hall of the Fire Giant King” (Dungeon 200). The adventure is part of the Against the Giants series originally by Gary Gygax, hence the writing credit.

The Hag's Hexes is a 66 page guide designed by Dungeon Masters Guild luminaries like JVC Parry and Janek Sielicki alongside rising stars and old stalwarts like Matt Butler, Matthew Gravelyn, and Tim Bannock. It was created with one thing in mind: to make hags more than the sum of their (often meager) Challenge ratings, giving them the mechanics, roleplay potential, and weird magic that can inspire campaigns, lay low kings and warlords, and potentially ensnare unwary Player Characters into campaign-changing curses or long-term bargains that force them into terrible moral quandaries! Split into five chapters, the authors have provided everything a DM needs to terrify their players for years to come. The Bestiary features over a dozen monsters; some are new hags, some are their minions or even their mobile lairs, and one of them -- the Shaitan AKA Desert Hag -- was featured in Monsters of the Guild! Bargains & Curses is a chapter filled with ideas that can kick-start campaigns, threaten valued NPCs, or put Player Characters' very existence and morality at stake. Chapter 3 includes two dozen items of wonderment, weirdness, and dread, ranging from fairy tale-inspired items of whimsy to terribly cursed items of horror. Chapter 4 is titled "Filthy, Vile & Downright Dirty" and provides dozens of roleplaying tips to make hags come alive, new mechanics inspired by and expanding on Volo's Guide to Monsters (coven spell lists, aunties, grandmothers, alternative coven members), and ends with useful combat tactics for each of the hags from the Monster Manual and Volo's Guide, as well as tactics for covens. Finally, Chapter 5 presents five encounter groups (with sub-encounters) to give you quick story seeds and monster lists that you can put together in minutes to create a single encounter or to inspire a full campaign, and ends with three full-length adventures -- each with 3-5 encounters -- that showcase many of the new monsters, rules, magic items, and so on that appeared in earlier chapters. Each of these adventures comes with an encounter map meant to act as inspiration for hag lairs, and they include useful mechanical ideas for terrain effects and descriptive keywords listed directly on the map for added inspiration and easy customization! Designed by Tim Bannock. Written by Matt Butler, JVC Parry, Janek Sielicki, and Tim Bannock. Edited by Matthew Gravelyn and Tim Bannock. Cover Art by Elena Naylor. Cartography by Tim Bannock using Inkwell Ideas' Dungeonographer (Dungeonographer is copyright Inkwell Ideas). Layout & Graphic Elements by Elena Naylor with Tim Bannock. Interior Art by Arcana Games, Bruno Balixa, David Lewis Johnson, Dean Spencer, Earl Geier, Filip Gutowski, Jacob E. Blackmon, Joyce Maureira, Petr Kratochvil, Jayaraj Paul, Brian Brinlee, and Wizards of the Coast.

This is the "Vecna: Eve of Ruin" + "Phandelver and Below: The Shattered Obelisk" crossover you didn't know you've been waiting for. As dusk settles over the village of Phandalin, a palpable sense of unease grips the villagers. Rumors spread that a hilltop keep has inexplicably materialized on the outskirts of town, and worse yet, the sun fails to rise come morning. Unbeknownst to the townsfolk, a powerful cult of Vecna-worshipping vampires has arrived, and the only hope Phandalin has is a ragtag pack of werewolves and a few brave heroes ready to make their mark on the world. While this adventure can be run as a standalone module, it can also seamlessly serve as a prequel to "Vecna: Eve of Ruin" or as a side quest for "Phandelver and Below: The Shattered Obelisk." This module can also serve as a sequel to "Phandalin Werewolves: Beasts of Her Moon" which is exclusively available over at the dmsguild. Designed for 4-6 players with an average party level ranging anywhere from 4 to 7, this adventure aims to create a backstory of bad blood between the cult of Vecna and the PCs. It includes a monster folio, tokens, as well as maps from the esteemed Tessa Create Maps, Dyson Logos, and Elven Tower.

The Therayle farm, which has been in the family for generations, was the best producing in the region. It now faces ruin. Hugh Therayle, the current owner, is at wit's end trying to reestablish even a modicum of control over the disrupted land. But, when Hugh saw the ancient doorway jutting up from the middle of the field where his corn used to be, he knew that this wasn't the type of problem a plow could solve. More than two centuries ago, a red wizard by the name of Houn made a discovery that shook the foundations of magic on Toril. Yet, due to a considerable amount of effort on his part, it never saw the light of day. The exact nature of this discovery is unknown but it involves the location of the skeletal fragments of an ancient being. The weave, which governs all magic on Toril, reacts strangely to the fragments. More information existed before Houn destroyed his research and fled Thay. His current whereabouts are unknown but many of his peers have attempted to track him down and steal his research for themselves.

A goblin warband has found the secret tunnel which leads from the dwarven keep of Hearth-Home to the nearby hills. The tunnel is intended to be a means of escape if the keep ever falls to attackers, but now it has provided goblins with an easy way into the Underkeep. So far, the goblins have confined their attentions to the various underground rooms that make up the Underkeep, but sooner or later they will find a way to the surface. They pose a serious threat to Hearth-Home - the goblins must be cleared out of the Underkeep so this breach in security can be repaired before the orcs hear of it and overrun the dwarven keep. This adventure is slightly more challenging than Red Hand Trail, and it is recommended that it is played after that quest and before Palace of Dread. However, the scenario in Trouble Below can easily be played independently from the rest. Part of TSR 1076 The Goblin's Lair

East of Beregost, nestled in the outskirts of the Wood of Sharp Teeth, Durlag’s Tower has intrigued and yet stymied adventurers for decades. Stuffed full of mechanical traps and arcane wards, and rumored to be inhabited by fiends, very few have managed to extract any REAL treasure from the former home of Durlag Trollkiller. However, a powerful item in the ancient fight against the giants is said to be housed there, and the cloud giant Baron Rajiram has committed significant resources toward recovering it. After a pleasant tea in her garden, Seer calls upon you to beat him there and put a stop to his efforts! Sequel to Durlag's Tower.
The city is plagued by an affliction being called "stone sickness" or "the gorgon’s touch" that disorients people and turns them to stone. Those with, or suspected to have, the affliction are being banished from the city. Some demand a cure, but most are just scared for their loved ones. A ravenfolk woman named Spinel Larkdon, mother to a child with the gorgon’s touch, begs the PCs for assistance. An artifact known as the Shroud of Tiberesh, capable of curing any sickness, is locked away within The Umbers' vault of spoils below the city. Passionate, she is determined to save her son and all those afflicted. Fortunately for the player characters, completing the Umber’s Gauntlet alive means they are not only entitled entrance into the cult, but also a single item from its vault of spoils. The PC's only hope of procuring the Shroud is by traversing this initiation Gauntlet – a series of traps, monsters, and puzzles devoted to the demon-god Nakresh - and claiming the Shroud as their prize.

In Feast of Goblyns, a party of adventurers is mysteriously transported from the lands they know to a dark and dangerous demiplane known as Ravenloft. Trapped in this realm of terror, they must use all their skills to escape the manipulations of one of Ravenloft's most powerful lords as they attempt to seek out the accursed Crown of Soldiers. If all goes well, they just might live long enough to escape this dread land and return to their homes. Also of note: As the first published adventure, is bundled with a DM screen for running games in Ravenloft. TSR 9298
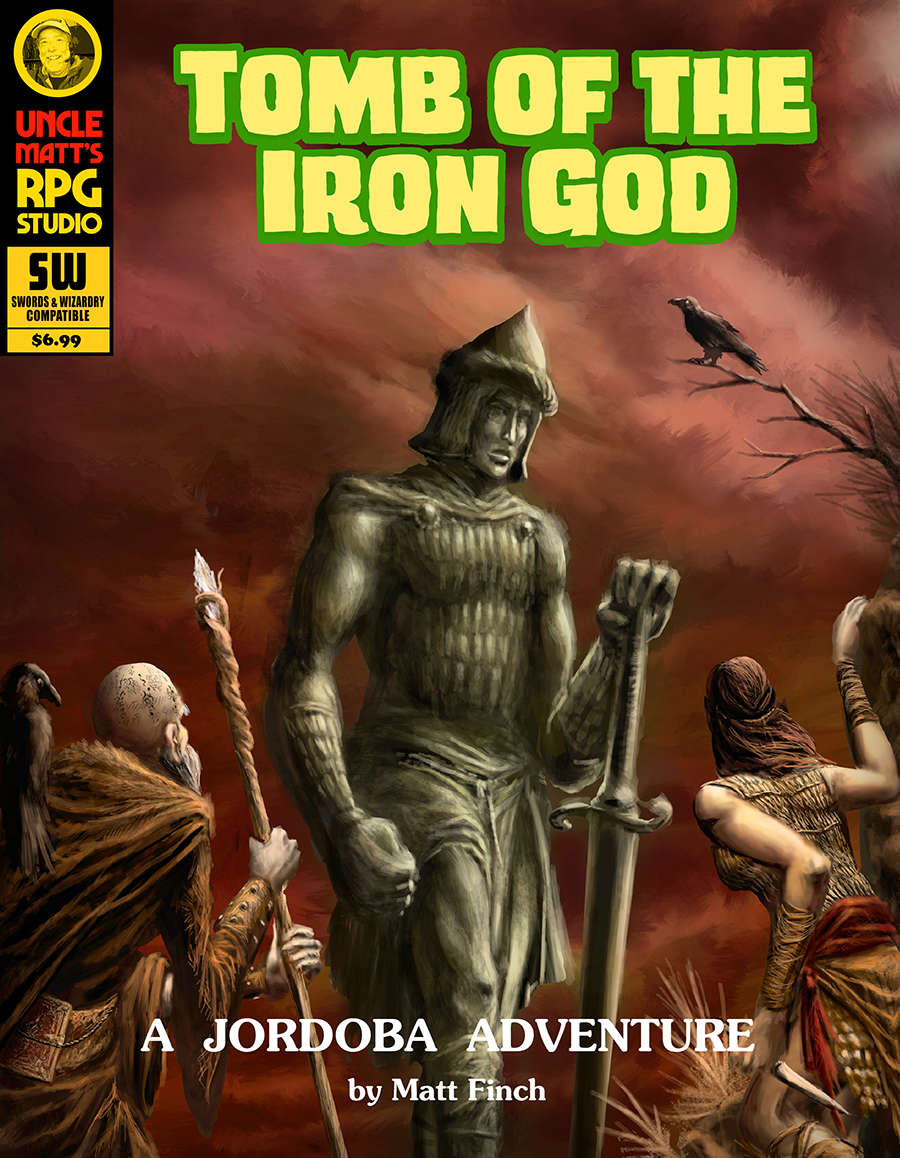
"A temple destroyed by divine wrath... An ancient, imprisoned evil and a powerful idol. Mysteries abound in the tombs below the temple of the Iron God, protector of the dead. Discover the dreadful fate of the Iron God's priesthood and the reasons behind their downfall in this intriguing adventure designed for low-level characters. Tomb of the Iron God covers a large catacomb area on two levels, with 58 keyed locations and six new monsters. This is a Swords & Wizardry (0e) dungeon crawl for four to five characters of 1st or 2nd level, by ENNIE-award winning author Matt Finch. The vengeance of an angry god, and treasures untold. The corruption and greed of the monks of the Iron God has brought divine vengeance upon their heads - the ancient monastery was recently destroyed in a cataclysm of fire and lightning, and only the tombs beneath remain intact. Somewhere in the catacombs lies the treasure the monks accumulated before they met their doom. An intrepid band of adventurers, willing to brave the perils of the unknown tombs, could gain riches beyond their wildest dreams. Do you dare to enter the burial catacombs and discover the chilling secrets of ... The Tomb of the Iron God?" Also available for 5E

This is the laboratory of High Alchemist Sureves Epans. He led a group of alchemists in research for many years, but recently there was a bit of a mishap. He discovered his wife was cheating on him with one of his employees and while in a drunken stupor trying to create a discreet potion to deal with the two of them, he let loose an infectious plague on the lab which turned all but a lucky few in the facility into shambling husks of their former selves., fused with their own creations as their minds turned to know but one thought - rage. This dungeon has rules to modify all encounters for a group of players levels 4 through 6 and is intended for a party of four. If you have more players, feel free to adjust the difficulty up one level for each additional player or simply tune the monsters to your needs. This dungeon contains many original enemies, a unique puzzle, and an environment that is meant to bring a sense of terror and anxiety on your players. I consider this to be the Horror-themed adventure of the module so feel free to add some creepy music and extra details along the way to bring the area to life (or death).

Clues discovered in Diamond Lake lead to the Dark Cathedral, a forlorn chamber hidden below a local mine. There the PCs battle the machinations of the Ebon Triad, a cult dedicated to the three vile gods. What does the Ebon Triad know about the Age of Worms, and why are they so desperate to get it started? "The Three Faces of Evil" is the second installment of the Age of Worms Adventure Path, a complete campaign consisting of 12 adventures, several "Backdrop" articles to help Dungeon masters run the series, and a handful of poster maps of key locations. For additional aid in running this campaign, check out Dragon's monthly "Worm Food" articles, a series that provides additional materials to help players survive this campaign. Issue #334 of Dragon provides comprehensive lists of all the things you can find for sale in Diamond Lake's (often) dubious shops. Pgs. 16-47

Beware of Baba Yaga and her infamous hut! Baba Yaga is an ancient crone who is said to have power over day and night itself. Many seek her out for her wisdom, which she has gleaned from centuries of travel through numerous worlds. Others, bolder and more foolish, search out the hut to plunder its treasures, which Baba Yaga has gathered from every corner of the multiverse. None, thief or scholar, who enter the Dancing Hut of Baba Yaga leave unscathed. How will you fare now that the great Baba Yaga is in your neighbourhood? TSR 9471
/pic4510372.jpg)
It begins in the marketplace or main square of a town when the calm, peaceful day is interrupted by a hulking golem trouncing through town, smashing objects, and attacking townsfolk. The party witnessing this should intervene and stop the rampaging golem with combat or by luring it into a nearby warehouse to trap it so it can be damaged and, eventually, destroyed by the town guards. When the party examines the golem’s remains, they find bones encased in the metal armor and the name 'Quartztoil' written in gnomish script. The town guard explain that this is the eighth construct they have encountered in the area in the past six months. The party can then go on to investigate the name 'Quartztoil', leading them to learn of an old, gnomish, aspiring artificer, Penaral Quartztoil, who had a lab and workshop in a tower in the nearby mountains, but who has not been heard from for close to a century. Published by Nord Games

Figgy Puddin' Steals Christmas is a short adventure for three to six characters, and optimized for 2nd level characters. We also include Scaling Suggestions, allowing you to run this adventure for lower- or higher-level characters. We anticipate a run-time of 2- to 4-hours. There's a bit of roleplay in this adventure, which may extend the playtime. Adventure Background A traveling jester known as Figgy Puddin’ and her Coal Smudge Gang have stolen Christmas presents and now hold them for ransom. While safe and secure in her lair, she awaits either a payment of an outrageous ransom, or a crew of heroes to claim the presents after they navigate her not-so-festive lair. What's the Adventure? After you introduce the hook, the adventure occurs in Figgy Puddin's lair - a refurbished kobold bunker consisting of eight rooms. As the characters explore the linear dungeon, they encounter new creatures, complete challenges, and are tested about their Christmas knowledge. However, the final confrontation with the naughty Figgy Puddin' could make for a very Unhappy and Unmerry Christmas for our heroes, the children of Thistleton, and their parents. Who Is Figgy Puddin’? Figgy Puddin’ was once a happy jester who loved Christmas. For years she traveled the realm, bringing fun and festive cheer to villages and children while preparing the way for Santa. However, times have become tough, and entertainment doesn’t always pay as well as one would like. As Figgy prepares for retirement, she’s learned she doesn’t have enough gold to last. During this time, she’s also decided that Santa doesn’t know who she is, let alone appreciate the work she puts in every year. Using her savings, extortion, blackmail, and other nefarious means, she’s convinced several mechanical geniuses and arcane specialists to help her refurbish her underground bunker with wondrous effects, creatures, and tests. To fund her retirement, she’s taken extreme measures to make some quick gold — holding Christmas presents for ransom.

It’s been a long few days of travel and the adventurers are tired of eating rations and sleeping on the ground. The road opens to a small town with an inviting tavern. The smells of grilling meat and ale fill their nostrils and the sounds of laughter and music float out the tavern’s door. Unlucky for the adventurers, they’ve stumbled upon Dragon’s Breath Tavern. What starts out as a pleasant evening of food, drink, and entertainment soon evolves into an adventure that takes the party into and under Dragon’s Breath Tavern. The adventure includes roleplay, exploration, combat, and a dice game called Demon Dice. Although written in a non-specific location, this adventure could be run as a one-shot during the WoTC official campaign – Curse of Strahd. The adventure includes an isometric map and a top-down map of Dragon’s Breath Tavern. Available as PDF or for Fantasy Grounds.

Deep in the Marsh of Chelimber lie the ruins of a great wizard’s tower. SEER has received intelligence, which she imparts via her emissary Hsing, that deep beneath the marsh in the remains of an old tower is knowledge of older magics. This could be just what Parnast needs to resist the onslaught of Bad Fruul and his armies!