
Surviving the shipwreck is easy; living through the wizardly bet afterward is not. Their game could mean your lives. A storm caused the PCs' vessel to sink and is now forcing them to seek shelter in the keep on the remote isle. Their goal is to locate a boat or some other means of transportation to return to the mainland after the storm has passed. But first, they must survive the tests and traps the island's inhabitants have set for them. Pgs. 45-64
![Cover of D&D Encounters Season 03 - Keep on the Borderlands: A Season of Serpents [Chapter 1-5]](https://www.drivethrurpg.com/images/44/121468.jpg)
At Restwell Keep, you've heard that fortune and glory await those bold enough to brave the dangers of the Chaos Scar, a valley carved ages ago by a fallen star. The same tales warn that this Chaos Scar draws wickedness to it. Perhaps you can help stem this tide... and gain treasure along the way. While the location is a different keep, this adventure is an homage to B2 Keep on the Borderlands(https://adventurelookup.com/adventures/b2-keep-on-the-borderlands)

5e Solo Gamebooks presents Drums at Daggerford, the fifth in our continual series of solo adventures set in the Forgotten Realms. This quest enables you to experience D&D without a dungeon master! Simply roll up a level 5 PC and get playing. Drums at Daggerford is the way you must experience solo adventuring. Players and DMs beware, a new standard has been set. This solo adventure continues the story arc first begun in Death Knight’s Squire, developed further in Tyrant of Zhentil Keep & Citadel of the Raven, and left in The Tortured Land. Drums at Daggerford’s ability to echo a Tolkien spirit reverberates throughout the narrative no matter which path you may choose. But choose wisely because a razor’s edge separates peril from glory. Over a year in the writing, this latest instalment in our solo adventure series is a mini sandbox campaign that will give you anywhere up to 8 hours of solo adventuring enjoyment. Completionists and those who like to replay these adventures will get even more gametime. There are mysteries to be uncovered, items and sidekicks to be gained, codewords to unlock and villains to conquer! With lots of exploration, meaningful decisions, hard fights, and a variety of rewards and stories, Drums at Daggerford will continue to resonate with you long after solving the big mystery behind Krond Vikkurk’s malevolent plans.

Designed for a party of five characters of at least 9th level, this adventure will challenge players seeking a powerful magic item of the GM’s choosing. A sphere of annihilation has been provided and is woven into several elements of the adventure, but any appropriately powerful item can be substituted if something else suits your campaign better. Though the adventure is designed to test every type of character class, a rogue who can deal with traps is essential, as is a wizard or sorcerer of at least 9th level. Larger groups will have an easier time; parties of four or fewer characters will be in for a very bad time unless you mitigate some of the tower’s more lethal traps and encounters. This adventure culminates in an encounter with devils and a sphere of annihilation. The sphere of annihilation is hidden deep within the tower-and-dungeon complex of Crane the Sorcerer. Originally set atop a high mountain in a secluded and wild part of the world, the tower and dungeon can be relocated to meet the situation in your campign. Crane, an introvert, stayed as far away from civilization as possible, as is detailed below. The tower above the dungeon doesn’t present many difficulties for a group of powerful characters or alert players. It might lull PCs into a false sense of security before they enter the areas where they’ll really be put to the test.
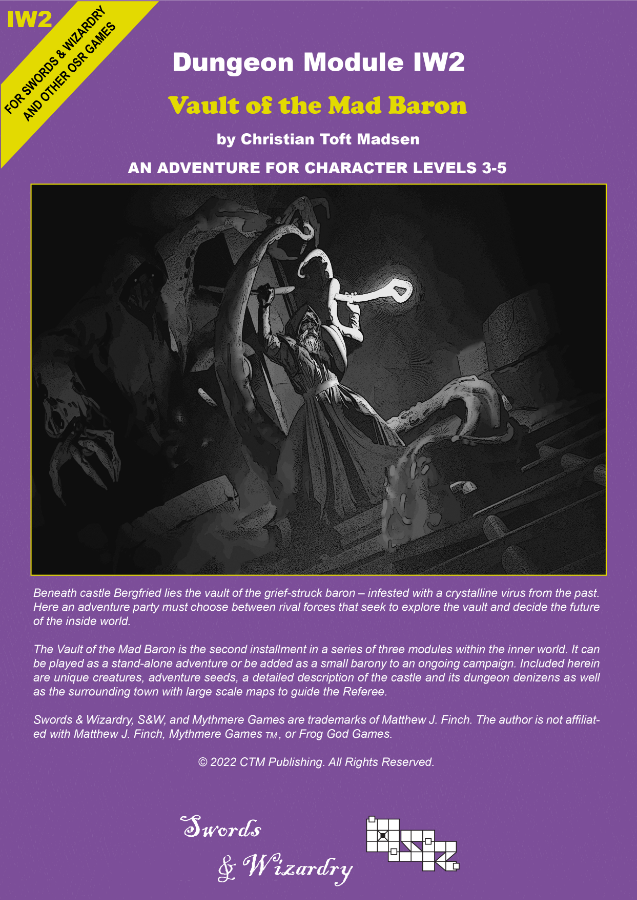
Beneath Castle Bergfried lies the vault of the grief-struck Baron – heavily infested with a crystalline virus from the past. Here an adventure party must choose between rival forces that seek to explore the vault and decide the future of the Inside World. ‘Vault of the Mad Baron’ is the second installment in a series of three modules in the Inner World. It can be played as a stand-alone adventure or be added as a small barony to an ongoing campaign. The scenario can be used with Swords & Wizardry or any other early variant of game rules and is suitable for PCs level 2-5. Inside you will find: A 60+ page old-school module with a layout optimized for fast and easy interfacing. An adaptable barony complete with town, castle and dungeon. Unique districts with encounters and sights. 6 major factions fully detailed with headquarter, plans, and missions for the PCs. Detailed description of a castle and associated dungeon levels. Downloadable maps for both players and the Referee. Locations allowing the PCs to travel to another era within the setting. Unique new creatures and magic items.
Beyond the mortal world, somewhere outside the bounds of the Astral Sea, the Far Realm yawns immeasurable. Beyond the reality of gods and mortals, this plane is a realm of contradictions, a mad place of fevered creation checked only by pointless extinction. The Outside is a sea of diseased possibilities, where the stuff of madness seethes in a soup of the incomprehensible and the unnamable—shuddering, squirming, and sentient. The Stormcrows, responding to the psychic cry from the stone, dispatched a force to retrieve it. The attackers descend on Wellspring, slaughtering and destroying in the search for their treasure. PCs can come to the town’s defense and repel the horde. A priestess of Ioun then turns to the heroes to find the item the monsters were seeking. From the recovering town, the heroes cross the wilderness to the Kaorti Temple. The trail ends at a ruined tower overlooking a deep ravine. Inside the tower, the heroes must overcome the terrible creatures in their search. In the end, they find the relic has been stolen.

The bustling metropolis of Saydown City is the largest settlement in the Denali land and home to the current ruler King Pellet. As your party reaches the watery entrance a huge iron statue guards the docks. Upon closer inspection you notice that the item is actually a golem. After continued investigation you discover that the ‘heart’ of the creature has been stolen and you accept the job to uncover the loss!

In response to a new but as-of-yet-unnamed threat, the factions have called upon adventurers to venture into the jungle in search of a location for a new base of operations. As such, you have been charged with scouting several locations to assess their viability. Surely something so trivial as a scouting mission couldn’t go wrong?
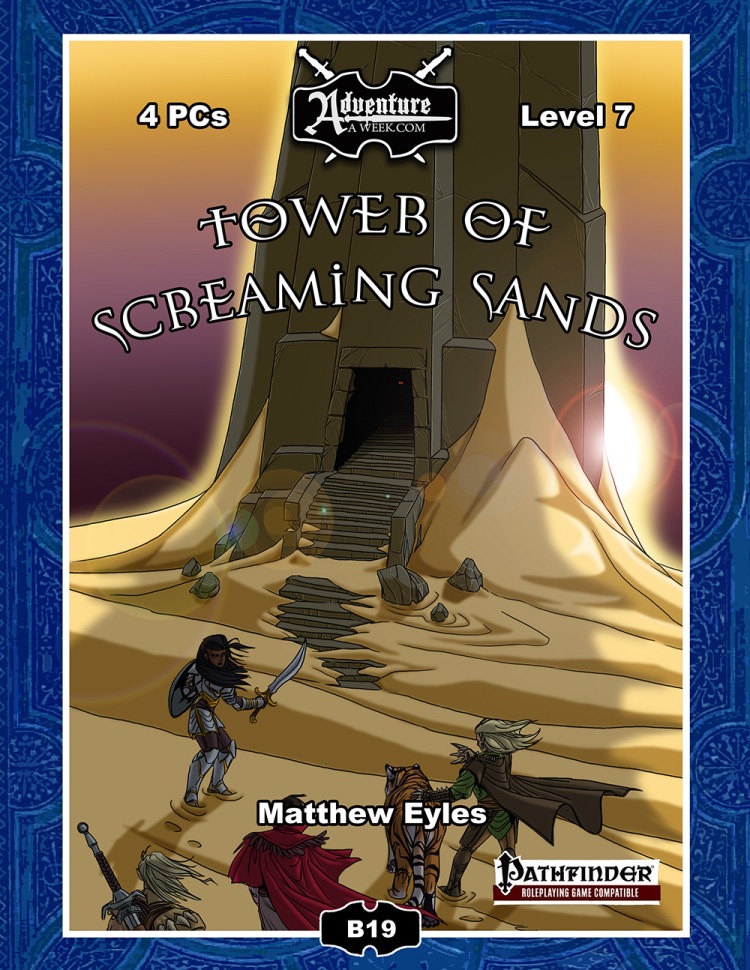
Deep within the blasted desert wastes a mysterious black tower has been sighted. The structure is not marked on any known map and has not been seen in this location by travellers in the region, yet there it stands. The adventurers set out to explore this ancient, isolated tower that appears ripe for the plundering. Within they face a gauntlet of insidious traps and supernatural horrors. The deeper the adventurers delve, the more secrets of the tower’s origins they uncover. The tower’s sinister creator does not rest easy in his arid grave – the adventurers must face him if they are to survive the Tower of Screaming Sands. Also included in “Tower of Screaming Sands”: Five deadly new traps: The Chamber of Ten Thousand Teeth, The God’s Grasp, Chamber of Flooding Sand, Hall of Arcing Blades and Descending Stone Block. A new monster – the scorpion swarm. Rules for whirlwinds, a new magical hazard GM tips for running overland travel.

𝐏𝐚𝐫𝐭 𝟒 of the Tower of Bondage “The Middle Tower” introduces Olive Slime and Slime Creatures from notable 1e AD&D fame as well as another of Aumvor’s tortured servants. In this adventure you will go deeper into the tower and find: ● 26 encounters ● More enslaved wraiths ● More traps ● More slime ● More phylacteries ● More danger Discover the Undying One’s library and find tools needed to defeat him, if your players are to escape the tower alive. This release also includes a side view of the tower to better understand the layout of the dungeons. 𝐀𝐥𝐬𝐨, 𝐟𝐨𝐫 𝐭𝐡𝐨𝐬𝐞 𝐰𝐡𝐨 𝐮𝐬𝐞 𝐑𝐨𝐥𝐥𝟐𝟎, 𝐜𝐨𝐦𝐢𝐧𝐠 𝐬𝐨𝐨𝐧: Roll20 Map Pack for Roll20, featuring plain maps for players, without the secret doors and other goodies marked. Coming very SOON. Look for it on DM’s Guild.

In this adventure, the heroes face the sinister Baron Metus, the vampire who took the life of Van Richten's son, Erasmus. Metus, with Daclaud Heinfroth, has been doing the bidding of the ghost of Madame Radanavich in her quest to destroy Rudolph van Richten. But Metus has his own reasons for seeing van Richten destroyed as well. Included in Bleak House: The Death of Rudolph van Richten TSR 1141
An embattled outpost at the edge of the wilderness has finally been overthrown. Strange creatures patrol the land. A local hamlet is in ruins. But just who-or what-has taken over this once mighty fortress?
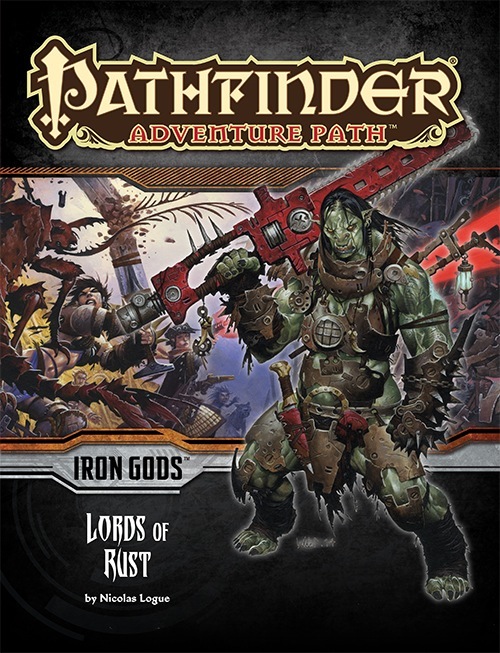
The heroes of the town of Torch follow a trail of clues to the sprawling junkyard known as Scrapwall, where bands of desperate and violent brigands vie for control of the technological remnants found within. The Lords of Rust dominate Scrapwall, and their swiftly rising power threatens more than just the town of Torch, for this gang has the support of one of the terrifying Gods of Numeria. What slumbers fitfully beneath the wreckage of Scrapwall could catapult the Lords of Rust into a new level of power if they're not stopped!
A monster amonkst us... The monastery of Montelegro was once a major center of academia, but it fell out of favor when its library burned to the ground some 20 years ago. (The fire is rumored to have been started by the candle of a monk who fell asleep while reading.) Without books to attract scholars and patrons, the order of monks that run the monastery has dwindled. Now the monastery is a mere shell, its once-thriving halls empty. Only 21 monks remain. The order that runs Montelegro supports a number of scribes dedicated to copying and illuminating books of all kinds. The most talented of these illuminators was Brother Abel of Corbone, a young monk fresh out of the university. A few days prior to the adventure, Brother Abel witnessed a miraculous sight. While walking about on the outskirts of the monastery, he beheld a vision of his god. The vision instructed him to build a well upon the spot where he stood. If Abel did this, the god promised prosperity would return to Montelegro. Unfortunately Brother Abel was unable to fulfill his god's vision and appears to have taken his own life.... Or was there Murder in the Monastery? Pgs. 8-17 & 55

The ship makes its way into the Corsair Mists, a region of the Halo Ocean said to devour ships and drive sailors mad. Somewhere in the oppressive fog, the White Ship awaits, but before the Adventurers can make it to their final desination, they must overcome the challenges of the mist. The fell necromancer Molo of the Thirteen Wives is still out there, still seeking to find his key to immortality and power that could jeopardize the entire Nameless Realms, and only the fearless crew can stop him. Join a sea elven ritual to hunt megalodon sharks, explore a long-cursed alchemist's tower made of blue crystal, and journey to the forge of Hyperion, Titan of Fire, himself. This adventure is formatted to both 1E & 5E gaming rules. Also available in PDF.

If absolute power corrupts absolutely, Matron Maelora best beware; her plans for total domination of the Underworld are already close to satisfactory completion, while attacks on the Upperworld have become increasingly successful. The other power-hungry drow families of Holoth may despise her but they know a true leader when they see one, and House Gullion has been revealed as the family to lead them all on the path to glory. With the entire Underworld in chaos and the Spider Goddess regularly communing with her chosen Matron, far greater dreams than mere regional conquest are within the grasp of the drow, as Maelora prepares her grand dark elf army for victory! With other mystical allies standing firm with the Matron, other Underworld races beneath her heel or cowering behind fortified walls, and every drow ready to play their part when she gives the word, what could possibly stop her from achieving her final triumph and fulfilling her destiny? But even the greatest of plans has a flaw if you look hard enough, and a party of stout heart and strong resolve can make a difference. At first, such a party may well believe it is on a smaller adventure, perhaps to win a few baubles or some small acclaim by rescuing a few kidnapped villagers. Soon, however, those adventurers will realise that much more is at stake, and that they are the ones who will need to make moves against the evil Matron Maelora and her increasing dominance if both the entire Underworld and Upperworld are to be saved. But how will they go about it? Can they ensure their own success when an entire city is standing against them? Only they have the chance to halt the Rise of the Drow! Published by AAW Games.

Lore of Aetherra: The Lost Druid is an award-winning 5th Edition adventure designed to bring characters from level one to five, and is the first in an expansive 4-book saga of science-fantasy adventures that will take your players to level 20. Fano. Things here haven't always been so grim. Time and chance have conspired to transform this once magnificent city upon the lake into a run-down sanctum for the destitute and depraved alike. Those who would see Fano renewed seek a lost druid who brings with him the hope to restore the city to its former glory and awaken the ancient technology hidden deep within its constructs. Could Fano's awakening usher in a new era of peace and prosperity, or will it unearth a conspiracy lurking in the shadows? Lore of Aetherra: The Lost Druid is a 5th Edition adventure designed to bring characters from level one to five, and is the first in an expansive 4-book saga of science-fantasy adventures that will take your players to level 20. A uniquely immersive RPG experience, The Lost Druid employs a myriad of digital content that can be experienced using the Alchemy RPG platform. Enjoy a cinematic storytelling structure, breaking chapters into scenes supplemented by expansive soundscapes, dynamic musical scores, voice-acted flavor text, and environmental motion graphics. 2023 IPPY Awards Winner: GOLD in Reference Product Contents: Over 250 Pages Over 2 hours of Audio Content 5 Premade Player Characters 6 Side Quests 7 Tavern Mini Games 35 New NPCs and Monsters Maps: 8 area, 1 city, and 1 region New Backgrounds, Spells, and Magic Items Over 60 NPC Profile Blocks AI Combat Tactics for Every Encounter Published by HITPOINT Press

Fresh-faced and more than a little hung-over our newly graduated mage of the great Dunromin College of Magic and his friends step into the tea-room next to the Porter’s Lodge and ask for something for a headache. Within minutes they find themselves accosted by the smiling figure of Malcolm Darkstar, Bursar of the College and owner of the tea-rooms, keen to ask them a favour… This is an introductory level set of scenarios designed to take a starting-level party on their first exciting adventures; The Lost Son; The Return of the Cauldron of Millent and the Murder at the Red Barn

A One-on-One Competition Module for Thieves Level 8 Your peaceful evening has been interrupted by an unusual request. As a thief, your skills are unmatched, but can you rise to the challenge of thieving for a powerful and frightening wizard? Do you have a choice? The Gem and the Staff is a special One-on-One competition module designed for one player and on Dungeon Master. The Module contains two separate scenarios, so you can switch roles with the other player after the first adventure. Scoring sheets and encounter summaries are provided for each adventure to make running competitions quick and simple. Character figures and a map book are also provided to help visualize the adventures. The player's maps are designed so you can see the rooms as they would appear. Complete DM's Maps are included. TSR 9050

The Ogre Magi of Jade Rock is a companion adventure made to go along with the events unfolding in Folio#16 (WS3 Distant Turtle City). It contains information needed to run a side adventure that will help characters in their journey through Distant Turtle City. The Ogre Magi of Jade Rock has invited the characters to reclaim his lost home, and in turn collect valuable supplies of magical healing that will certainly be required to win the day against the corrupted forces of the city's fortified castle. This adventure is formatted to both 1E & 5E gaming rules.