
The Merfolk Queen asks adventurers to help retrieve merfolk roe (eggs) from a sahuagin raiding party lead by a sahuagin priestess, with custom water-based magic items as reward. The adventure is for three to four 5th level adventurers at a hard difficulty. Pgs. 137-145

"Yea I knows of a job for the likes of you" the bartender says as he wipes off the table. "This wizard who lives near the shore about two or three days ride lost somethin' he was expected on the ship The Intrepid. I hear he wants the cargo back and is willing to pay good coin for it to any who'd chance going into the Lake of Chaos." A grizzled old man in the corner gasps and says “any would want to go into that sea gots to be crazy. Aye, that wizard is lookin' for some crazy people. That waters haunted by dead sailors". "Oh come on” Telkall the bartender continues "you know that’s just an old story to keep kids away from the water. I'm sure it’s going to be an easy job for the likes you. You all appear to be quite able to take care of yourself. Go down the coast road for about two days if yer on horses and you'll see a stone tower. Ask for Kresellus ... he's the one you'll be lookin' for. Oh, and tell him Wolfgar sent ya ... if you could." Well things were getting boring at the Dead Orc Inn anyway.
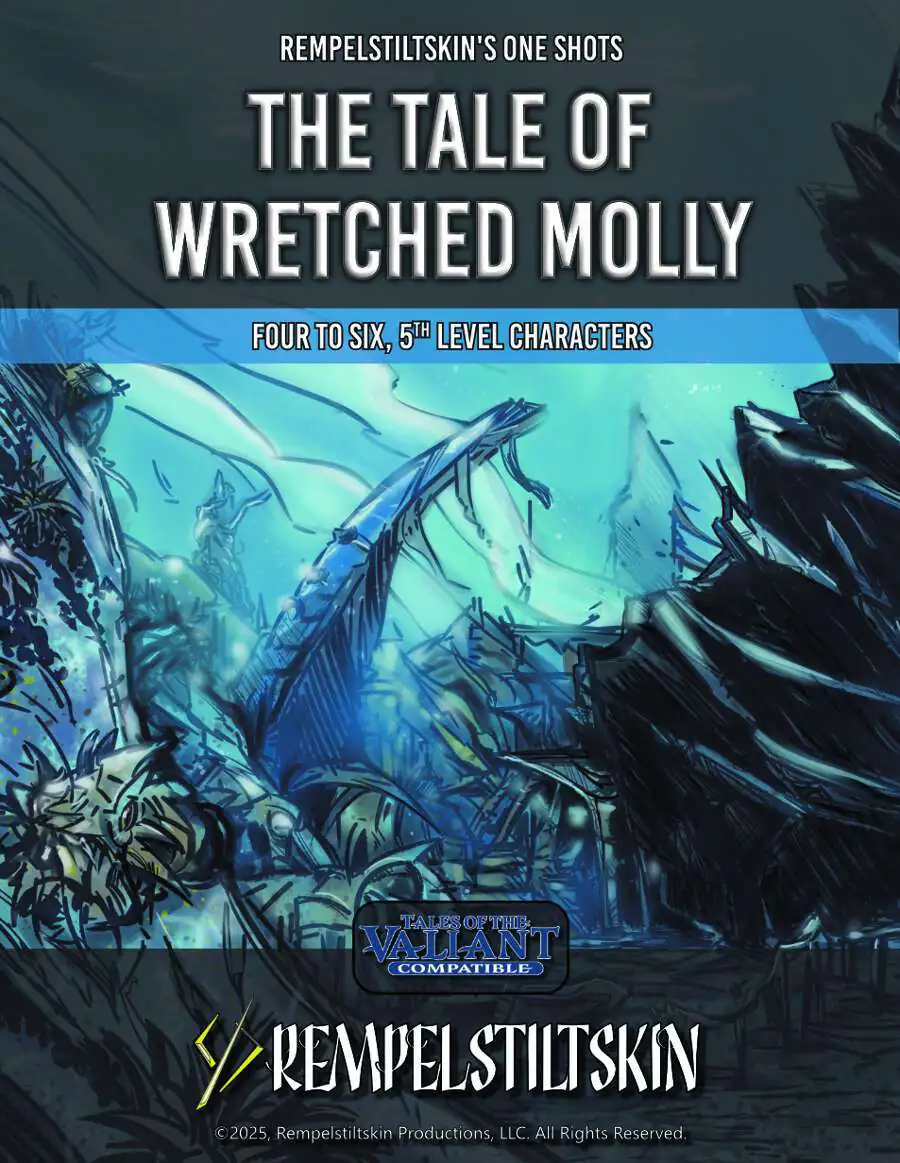
Terror Under the Sea The peaceful undersea village of Sequavia has been mysteriously abandoned. It looks like all of its Cheltarian residents have just stopped what they were doing and left. It’s up to a party of stalwart undersea adventurers to find where they all went, and bring them home. This Tales of the Valiant Compatible One Shot Adventure Provides: • A small dungeon for PC’s to explore • Statblocks for important NPCs. • 8 magic items that aren’t what they seem
"There's this huge fish in my mine," says the gnome, "and you've got one week to get rid of it." A little fishing trip - with you as the bait! A gnomish mine at the bottom of Whitelake is being terrorized by a giant pike. The party has a week to find a way to capture or kill the beast. However, once they do, another monstrous fish attacks. The party eventually finds a tribe of merrow has claimed a cave on the north shore and are releasing the fish to keep the gnomes away. Pgs. 8-15, & 64
Living pirates are a common enough hazard around the islands known as the Serpent's Teeth. A dead one is even more trouble- especially when his treasure has been stolen. Characters who successfully complete this adventure should be of sufficient level to tackle the award-winning Freeport trilogy, Death in Freeport, Terror in Freeport, and Madness in Freeport. Pgs. 84-103

The Submerged Spire of Sarpedon the Shaper lies to the west of the Isle of the Dismemberer. On the northwestern shore of this island, crumbling steps spill from the shore directly into the sea. There, a seaweed choked stone path can be glimpsed winding down into the depths. At low tide, a quarter mile along the path, a lone onion dome may be seen poking through the waves. In the twilight of the sorcerer lords, The Submerged Spire was the jewel of the Shattered Isles. Within his submarine redoubt, Sarpedon penetrated ever deeper into the organic mysteries. Now, its for- lorn dome the roost of seagulls, its secrets slumber beneath the waves.

"For Blibdoolpoolp!!" "The power of the mind and belief are wonderous, often leading us to manifest things that aren’t real. For the kuo-toa, this power is heightened, allowing their collective belief to manifest gods." Two tendays ago, a paladin of Torm was kidnapped by kuo-toa. In a strange turn of events, she was mistaken for a kuo-toa god, and whisked off to their underground lair. Barria has managed to pose as the god and now shakily leads a small faction of kuo-toa while trapped underground. With her influence being increasingly scrutinized, and with the different kuo-toa sects on the brink of civil war, it’s a dangerous time, even for a ‘god’… The heroes’ mission — rescue the paladin from the kuo-toa oceanic lair before she’s transformed into a kuo-toa god. The kuo-toa are an Underdark-dwelling race of fishlike humanoids. Different sects worship different god-like beings, each god manifested through the strength of a sect’s collective zeal. Such “gods” feature prominently in this adventure. Product Overview ♦ 4 to 8 hours for four to five characters. ♦ Scalable for 3rd-6th level. ♦ High-resolution maps of the Kuo-Toa lair. ♦ 9 new statblocks, including Dire Barnacles and Hypno-Cuddlefish! ♦ Includes plot hooks, handouts, rules for faction combat, and more!

The Pearl of Madness is a companion adventure made to go along with the events unfolding prior to the core adventure founding Folio #14 (WS1 ). It contains the information needed to run a side adventure that will help characters gain a degree of experience before setting out into the interior of the Isle of Jade. Thunder booms on the north of the isle and a dark rain falls on the inland swamps prompting the village chief to deny the characters canoes for their journey for another day. This respite offers the characters a chance to participate in a village tradition, the pearl dive. With whispers of great wealth at the bottom of a secluded cove, the players prepare for a dive that will provide more than the mundane. When the Isle of Jade begins to rumble, the islanders cancel the player's expedition to the inland. However, it is still a beautiful day for a pearl dive. Can the players find fortune in the tranquil waters of a hidden cove, or does something more sinister lurk there? This adventure is formatted to both 1E & 5E gaming rules.

So you want to be a Mage of High Sorcery? To join the esteemed organization, you must travel to the Tower of Wayreth and undertake the most important event in your life—the harrowing Test of High Sorcery! If you can survive where so many aspiring mages have failed, you will forever bind your soul to the Gods of Magic and gain access to untold arcane secrets. The Test of High Sorcery is the perfect adventure for new and veteran players looking to experience Dungeons & Dragons in a new way! It is a solo adventure, where your choices have meaningful consequences, but it also provides balanced rules to play with a group or a Dungeon Master. This 154-page tome features: - A sprawling adventure that fits perfectly as an expansion to any Dragonlance campaign, Dragonlance: Shadow of the Dragon Queen, or as a stand-alone replayable experience - A tale full of sorcerous intrigue, featuring many new characters alongside iconic favorites like Fistandantilus, Takhisis, Fizban the Fabulous, and the Gods of Magic - Innovative Destiny and Trait mechanics make your choices really matter—and ensure every mage’s Test of High Sorcery is a unique experience - Over 60 possible outcomes to determine which Order of High Sorcery you join and provide compelling new plot hooks for your character during future adventures - Dozens of unique locations with rich stories and sorcerous challenges that Dungeon Masters can use to create their own version of the Test of High Sorcery - New magic items and stat blocks, with mechanics that support clever use of enemies’ weaknesses and the environment against them - Four gorgeous sample characters, with interactive character sheets designed to be new-player friendly so that you can jump right into the story - A detailed primer on the history of Krynn and how it relates to the Mages of High Sorcery - A community survey when you finish to let you see how you compare to other mages taking their Tests of High Sorcery

Off the Coast of Clover Island and less than a league away from Corsair Bay is the wreck of the Golden Rose a ship of fame. The Tome Lord from Corsair Bay is looking for a few brave adventurers to go out, find the ship or what remains of it and locate a specific item for him. While the mysterious sage won’t explain what the item is he will tell you that it is protected by mighty magical glyphs of protection so simply obtain the box and bring it to him for the reward. Rumor has it the ship was laden with a great deal of treasure which is free for the party’s taking but the Tome Lord wants the box. Is your party up for a little underwater jaunt?

The Sea Witch is a short adventure for four 10th-level characters. The difficulty of the adventure can be adjusted by changing the level of main antagonist (Black Molly, the sea hag pirate) or by altering the number of her ogre servants. To tailor the encounter to groups of different levels, refer to table 4-1 in Chapter 4 of the DUNGEON MASTER’S GUIDE. The adventure is set off a lightly populated coastline known as Misty Bay, but adapts easily to any coastal region in existing campaigns. The sea hag known as Black Molly is a notorious pirate who has plagued the coastal cities for the better part of a decade. A successful Knowledge (local) check (DC 15) will reveal that Molly and her ogre crew have a filthy reputation as merciless killers who delight not only in plundering vessels for their riches, but also in destroying the ships themselves and sending all hands to the bottom of the sea. Now the villain and her followers have seized control of the Old Lighthouse of Misty Bay located off a lightly populated coastline. For generations the lighthouse beacon has protected the fishermen of this region, warning them of the dangerous rocks that lurk just below the level of the high tides. Recently, the hag has put out the beacon, darkening the lighthouse; misery and destruction are sure to follow as ships start to blunder into the rocks. Blackmail is apparently Black Molly’s aim in this venture: She conveyed a message to the nearest shore community, the fishing village of Poisson, demanding the princely sum of 50,000 gp. Until she receives this ransom, she intends to hold the lighthouse and its beacon hostage. The fate of the human keepers who tend the lighthouse is unknown to the seaside communities at this time, but they fear the worst. The Sea Witch is ostensibly a rescue mission: The PCs are pitted against the evil of Black Molly and the brawn of her savage ogre crew. It is the heroes’ task to retake the lighthouse and, if possible, free its captives from the clutches of their jailer. What neither the PCs nor the shore communities yet realize is that while she 1would be pleased to have the gold, Black Molly is in fact after bigger treasure. Molly has no intention of giving up the lighthouse — at least, not until she finds what her master sent her here for. Lying on the sea floor practically at the base of the rock on which the lighthouse sits is the wreck of the war galley Flying Cloud, which according to popular legend was captained by a cleric who wore around his neck an amulet of the planes. Black Molly wants this prize, but so far she hasn’t been able to find it. She’s scoured the wreck without finding any sign of the magic item. Now she’s trying to determine where to search next, for the item might well be somewhere near the wreck. If she can’t find it, she’ll start torturing her captives to find out if they have any useful knowledge about the amulet.

A sunken ruin deep beneath the bay of Mulmaster holds the key to unraveling the Cult of Glaugrax’s nefarious plans. Dare you brave danger and duplicity to plumb its depths? Part 2 of The Neverdusk Trilogy. A Two-to-Four Hour Adventure for Tier 2 Characters. Optimized for APL 8. The Sequel to Ooze There?, an ENnie Awards 2019 nominee in the Best Organized Play category! This adventure is Part 2 of "The Neverdusk Trilogy", and continues the tale of Fenaria Neverdusk, Sovad Klim, and the mysterious Cult of Glaugrax! Ooze Next? debuted at Lion City Conclave 2019 - a charity convention by the D&D AL Singapore Community. The v1.02 package includes: - Full color cover art by digital artist Lau Shang Hui (NezArt), with additional art inserts for key scenes - A high quality digital map pack for key encounter locations - A two (2) page cheat sheet with Jason's personal tips for running Ooze Next?

A short adventure meant to be inserted into Storm Kings Thunder set on the small island group known as Red Rocks along the Sword Coast. The adventure faces the players of against a coven of hag sisters who have been threatening the region for some time. Hags of the Red Rocks is a encounter and mini-dungeon meant to be dropped into the D&D Adventures League Season 5 - Storm King's Thunder, but can easily be an evenings play for any group travelling along a treacherous coastline.
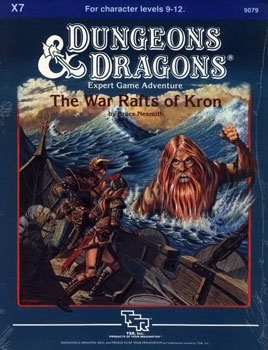
The lerendi princess, Corinna, has disappeared. She set sail aboard a ship of the Minrothad Guilds - the guilds whose ships have been pirated and plundered for many weeks. Trade is horribly disrupted as many ships leave, never to be seen again. The guild masters now call for adventurers of great skill and renown. They offer small fortunes to any who can help them discover who is pirating their ships. But most importantly, to any who can rescue the princess. Can you and your party of adventurers defeat the dangers that lurk in the dark depths of a terrifying sea? Or will you find a watery grave within the cold confines of a murky sea floor? This game adventure contains special rules for underwater adventuring. TSR 9079

The Sea of Fallen Stars connects the eastern and western sides of Faerûn. Many nations that border shorelines along its vast expanse also maintain major navies and trade fleets. A plethora of creatures and humanoid races typically found in the ocean depths live there, including sahuagin, sea elves, merfolk, and locathah. This is a story about what happens when a normally peaceful species is pushed to the point of open conflict. As elemental forces threaten the safety of the nearby locathah communities, heroes rise from among their number to strike back and defend their homes and families. Locathah Rising is a DUNGEONS & DRAGONS adventure designed for 9th-level characters.

Lore of Aetherra: The Lost Druid is an award-winning 5th Edition adventure designed to bring characters from level one to five, and is the first in an expansive 4-book saga of science-fantasy adventures that will take your players to level 20. Fano. Things here haven't always been so grim. Time and chance have conspired to transform this once magnificent city upon the lake into a run-down sanctum for the destitute and depraved alike. Those who would see Fano renewed seek a lost druid who brings with him the hope to restore the city to its former glory and awaken the ancient technology hidden deep within its constructs. Could Fano's awakening usher in a new era of peace and prosperity, or will it unearth a conspiracy lurking in the shadows? Lore of Aetherra: The Lost Druid is a 5th Edition adventure designed to bring characters from level one to five, and is the first in an expansive 4-book saga of science-fantasy adventures that will take your players to level 20. A uniquely immersive RPG experience, The Lost Druid employs a myriad of digital content that can be experienced using the Alchemy RPG platform. Enjoy a cinematic storytelling structure, breaking chapters into scenes supplemented by expansive soundscapes, dynamic musical scores, voice-acted flavor text, and environmental motion graphics. 2023 IPPY Awards Winner: GOLD in Reference Product Contents: Over 250 Pages Over 2 hours of Audio Content 5 Premade Player Characters 6 Side Quests 7 Tavern Mini Games 35 New NPCs and Monsters Maps: 8 area, 1 city, and 1 region New Backgrounds, Spells, and Magic Items Over 60 NPC Profile Blocks AI Combat Tactics for Every Encounter Published by HITPOINT Press

A museum of the Mad Archmage, it contains curiosities and treasures from all over the multiverse, and the challenges of the Watery Caves, which are a series of living caves connected by an underground river. This adventure can be used as an expansion to the Castle of the Mad Archmage mega-dungeon adventure, or as a stand-alone adventure. Published by BRW Games

After a successful mission for Earl Phenwick you return to receive your accolades. Upon your arrival it is discovered that the earl's child is missing. His daughter was last seen around a mirror of unknown power and an advisor believes that she may have made her way into a different world via the magical portal. Time to put on your hero hats!

This adventure picks up where AS1 – Artifact of Gegios left off. You return to the city of Gegios to divide treasure and determine what the strange wand is. Your return trip may have given you a clue in that travel to the east causes it to vibrate less while moving in a western direction causes it to shake more. What is the significance of this anomaly? Is your party ready to find out? Bring your water wings folks you’re probably going for a swim!
Provost Faurious has procured an Aethervane, an astrolabe-like instrument tied to Kythri that's used to navigate manifest zones. Unfortunately for the Provost, the Riedran ship that was carrying the Aethervane across the Sea of Rage to deliver it to their agent in Regalport fell victim to piracy. The player characters are dispatched to Regalport to meet up with the Provost’s agent there and petition High Prince Rygar for more information about the stolen cargo. When the characters dock in Regalport, they meet the Provost’s contact and are ushered into a meeting with High Prince Rygar. Wishing to show his intolerance for piracy, Rygar charters one of his own ships for the party’s use as they investigate the stolen cargo. Upon arriving at the crash site of the stolen cargo, the party is set upon by a fleet of pirates known as the Wind Whisperers. When things turn sour, a new surprise reveals itself as an unnatural storm rolls in, a stolen airship at its heart. The Wind Whisperers have found a way to convert the Aethervane to serve their own purposes. Seeking aid from Rygar and House Lyrandar, the heroes chase after the pirates by sail and airship. As they do, they are bedeviled by the Chaos Fleet—strange ships sailed by an even stranger crew that are drawn to the Aethervane and the chaos it brings. In a final airborne confrontation, the party boards the rogue airship and retrieves the sought-after artifact, with a chance to salvage or sink the stolen vessel in the process…