
Storms frequently blow from the Cloudscape Mountains, but never one like this: For weeks it has hung over the peaks, casting its dark shadow across the land. Its huge black clouds billow and writhe in an effort to smother the sun. Once so picturesque and enchanting, the Cloudscape Mountains have taken on a sinister appearance. Fear now stalks the land. A malignant entity is growing and festering high in the mountain peaks. With dark tendrils, it reaches out towards the lowlands. No one is safe. Caravans are not arriving at the village of Lurneslye. It is only a matter of time before the villagers fall prey to the dark clouds and the evil they conceal. TSR 9151
Excitement and unrest grip the land of Pellham. Two hundred years ago, the royal line of kings was deposed and replaced by a High Council. The current council is well-meaning but hopelessly incompetent. Everyone agrees that a drastic change is needed for the kingdom to survive. The ancient Prophecy of Brie foretells that in Pellham's darkest hour, a king from the past will return to restore the kingdom. The time of the prophecy is now. All is in readiness: the symbols of the ancient kings have been recovered, the keys to the royal tomb are in hand, powerful magics to revive the long-dead king have been secured at great cost. Only one problem remains... no one knows where the king is buried! The Bane of Llywelyn concludes the epic adventure of the Prophecy of Brie -- can YOU insure that the quest will be a success? The adventure can be played as a separate adventure or as the second part of the Prophecy of Brie series. TSR 9109

The High Hunt leaves the streets of Waterdeep and heads beneath the City of the Dead where monstrous criminal overlords compete for the favor of their mysterious master. It will take more than skill with a blade to cut through the web of deceit and treachery that surrounds the Vampire Master of Waterdeep. Do you have what it takes to survive the Dungeon of the Crypt? "Dungeon of the Crypt" is part two of the three-part Vampires of Waterdeep Campaign Arc. Pgs. 62-88

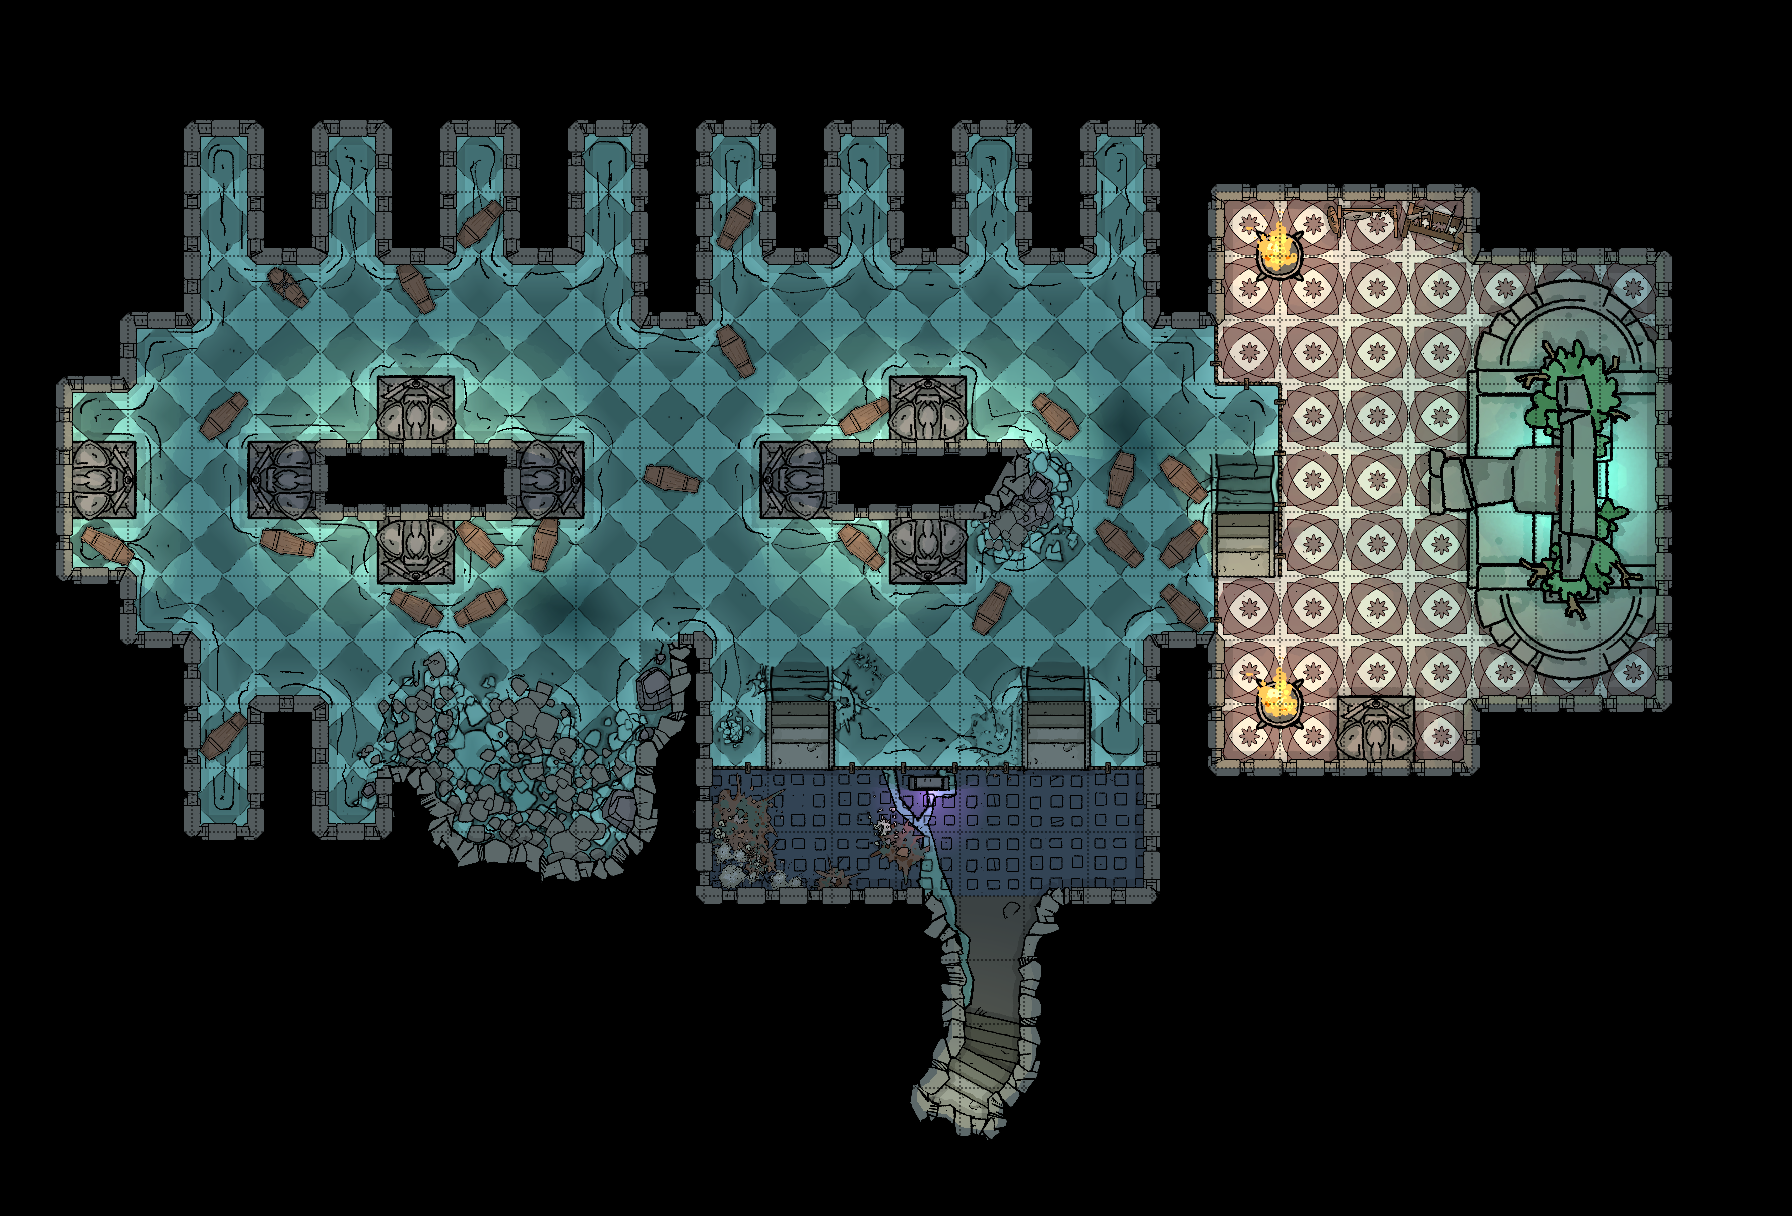
The Hag's Hexes is a 66 page guide designed by Dungeon Masters Guild luminaries like JVC Parry and Janek Sielicki alongside rising stars and old stalwarts like Matt Butler, Matthew Gravelyn, and Tim Bannock. It was created with one thing in mind: to make hags more than the sum of their (often meager) Challenge ratings, giving them the mechanics, roleplay potential, and weird magic that can inspire campaigns, lay low kings and warlords, and potentially ensnare unwary Player Characters into campaign-changing curses or long-term bargains that force them into terrible moral quandaries! Split into five chapters, the authors have provided everything a DM needs to terrify their players for years to come. The Bestiary features over a dozen monsters; some are new hags, some are their minions or even their mobile lairs, and one of them -- the Shaitan AKA Desert Hag -- was featured in Monsters of the Guild! Bargains & Curses is a chapter filled with ideas that can kick-start campaigns, threaten valued NPCs, or put Player Characters' very existence and morality at stake. Chapter 3 includes two dozen items of wonderment, weirdness, and dread, ranging from fairy tale-inspired items of whimsy to terribly cursed items of horror. Chapter 4 is titled "Filthy, Vile & Downright Dirty" and provides dozens of roleplaying tips to make hags come alive, new mechanics inspired by and expanding on Volo's Guide to Monsters (coven spell lists, aunties, grandmothers, alternative coven members), and ends with useful combat tactics for each of the hags from the Monster Manual and Volo's Guide, as well as tactics for covens. Finally, Chapter 5 presents five encounter groups (with sub-encounters) to give you quick story seeds and monster lists that you can put together in minutes to create a single encounter or to inspire a full campaign, and ends with three full-length adventures -- each with 3-5 encounters -- that showcase many of the new monsters, rules, magic items, and so on that appeared in earlier chapters. Each of these adventures comes with an encounter map meant to act as inspiration for hag lairs, and they include useful mechanical ideas for terrain effects and descriptive keywords listed directly on the map for added inspiration and easy customization! Designed by Tim Bannock. Written by Matt Butler, JVC Parry, Janek Sielicki, and Tim Bannock. Edited by Matthew Gravelyn and Tim Bannock. Cover Art by Elena Naylor. Cartography by Tim Bannock using Inkwell Ideas' Dungeonographer (Dungeonographer is copyright Inkwell Ideas). Layout & Graphic Elements by Elena Naylor with Tim Bannock. Interior Art by Arcana Games, Bruno Balixa, David Lewis Johnson, Dean Spencer, Earl Geier, Filip Gutowski, Jacob E. Blackmon, Joyce Maureira, Petr Kratochvil, Jayaraj Paul, Brian Brinlee, and Wizards of the Coast.

The task seems easy enough: accompany a mysterious traveler and her equally mysterious package from Waterdeep to Neverwinter. In the Jewel of the North, tasks are seldom easy, though. News travels fast and the Red Wizards of Thay have learned of the traveler and the object she carries. Now a Necromancer readies an ambush for the adventurers and their ward, intent on stealing the item for his own sinister purpose. A prelude to the Lost Crown of Neverwinter Encounters season and connected to the release of the Neverwinter Campaign Setting.

This side trek encounter challenges the heroes to recover a precious item from the lair of an evil hag. Estimated play time - 2 hours. This product contains a pair of encounters designed to challenge 4th level PCs. It also includes an extensive backstory, new monsters and new magic items to add to your campaign. The encounters are easily adapted to almost any campaign setting. The text includes optional changes that DMs may consider when running the adventure for their own campaigns. This side trek encounter is the final chapter of a three-part "Fey's Bargain" encounter series.

Encounters in the Savage Wilderness contains 19 encounters / mini-adventures, a few new creatures and items, and downloadable maps. We've also added suggestions on how to use the encounters in Eberron.

The world in which the air sailors still travel is a shrinking one, where each death is knowledge lost that will likely never be regained. There should be a sadness about that that penetrates all things in the Gun Kingdoms setting. The era of magic is coming to an end, and with it will go the skyships. This adventure is formatted to both 1E & 5E gaming rules.

This module contain three handy encounters for the time your players have to face a mighty river. The encounters are varied and can be faced with violence or wits, wathever you players choose to. The encounters leads from one to the other so you can run the three in the same session if you are lucky or you can save some for another river. The encounters are adjusted for characters level 1, level 3 or level 6. "You reach the bank of the river but the bridge is not there, your calculations were a little of. The river runs strong and wildly. What do you do?" -------------------------------------------- Este módulo contiene tres útiles encuentros para cuando tus jugadores se encuentren con un poderoso río. Los encuentros son variados y pueden ser enfrentados con violencia o con ingenio, lo que tus jugadores prefieran. Los encuentros pueden encadenarse uno tras el otro así que puedes tener la posibilidad de utilizar lo tres en la misma sesión o guardar alguno para algún otro río. Los encuentros están ajustados para jugadores de niveles 1, nivel 3 o nivel 6. "Leegan a la rivera y el puente que estaban esperando encontrar no está allí. Sus calculos fueron erroneos. El rio corre rapido y salvaje. ¿Que hacen?"
Freeport is a fantasy “free city” you can place in a fantastic setting. Its basic premise is a pirate city gone legit… at least on the surface. In truth, the pirate tradition is alive and well in Freeport, but camouflaged by a veneer of respectability. These days the city’s pirates are privateers, legalized pirates Freeport loans out to the highest bidder. You’ll learn more in the short history of the city that follows. This should help give you a taste of the flavor of Freeport before the adventure begins and the given background is all you need to run this adventure. It is an ideal starting place for a new campaign as the player characters find themselves stranded in Freeport after a deal goes sour. A seemingly simple job plunges them into the strange underside of the city, where they uncover secrets worth dying for. Death in Freeport is the first from the Freeport trilogy, together with Terror in Freeport and Madness in Freeport. Synopsis: Death in Freeport drops the player characters into the midst of political and magical intrigue, as the hidden Brotherhood of the Yellow Sign manipulates events to bring its dread god to the world. Freeport is still a bustling center of trade, but evil currents run beneath the surface. There are secrets here, and questions unanswered. The characters will undoubtedly learn there is more here than they expect in a simple seaport. The question is, will that knowledge kill them? As the adventure begins, the player characters (PCs) have just come to Freeport on a merchant ship. While on the docks, the PCs are attacked by a press gang, who mistake them for easy marks. The press gang is handily beaten off; since they are unused to real resistance. A bookish young man named Brother Egil then approaches the PCs. He says that he’s been looking for a group that can take of itself, and that he has a job for them if they are interested: finding a missing librarian. The missing man, Lucius, disappeared two days previously, and Egil is eager to find him. Egil gives the PCs some background on Lucius and his strange behavior. The PCs are then free to investigate: They are likely to visit Lucius’s home, the temple to the God of Knowledge, and an orc pirate ship. This should form a picture of Lucius as a man searching for his own past—who found something he wasn’t counting on. Following a trail of clues, the PCs learn about the Brotherhood of the Yellow Sign. With a little luck, the PCs can trail the cultists back to their hideout, penetrate the lair, and discover secret tunnels underneath it. Deep underground they find degenerate serpent people, and eventually Lucius himself. The librarian has been tortured badly and will die without aid. The PCs also have to deal with the leader of the cult, a man they may recognize from the temple. When the cult priest is slain, they are in for an even bigger surprise. He was not human at all, but a serpent man in disguise. What this means for Freeport only the gods can say.

Enter the ancient and corrupt city of Tyr, whose tyrannical sorcerer king has ruled for a millennium. As you wander the city, from the wreck of the Elven warrens to the sanguine splendor of the arena, you realize that the citizens of Tyr thirst less for water than they do for freedom. Now, after a century of slave labor, sorcerer king Kalak's great ziggurat nears completion. He has promised the city a grand celebration when the monument is done, complete with the most brutal arena spectacle in Tyr's long history. Rumors abound as to the nature of the spectacle: some believe it will bring with it the longed for manumission of countless slaves: others fear the annihilation of Tyr and her people as a sacrifice to Kalak's hunger for power; and a secret few believe it will be a day of revolution - a day of freedom. The adventure that introduces the Dark Sun setting as well as part of its metaplot. The adventure starts with the PCs being enslaved and forced to work on Tyr's ziggurat, where they make various connections that can affect things both in this adventure and the next in the series (Road to Urik). The finale takes place simultaneously with the finale of the Verdant Passage novel, and has something of a disaster movie feel - major events are happening, and the PCs are trying to survive in their shadow and (hopefully) save some people as well. Like many other Dark Sun modules, this adventure comes with a flip-book full of handouts as well as a few pre-generated starting-level characters. TSR 2401

Wicked forces conspire to usurp the power of the Raven Queen, god of death, by unraveling the foundations of reality. To prevent this cosmic coup, mighty heroes must survive an epic journey into the Shadowfell's timeless core, where all things find their end. The beginning of the end of the original 4th edition adventure path (although ties are very light to the heroic and elite tier adventures). The PCs must first prove themselves worthy to act as the Raven Queen's agents. They will then be sent to Death's Reach, a graveyard and dumping ground from the Dawn's War. There, they must fight through the Black Star Host- powerful elemental beings, to prevent Orcus was resurrecting a primordial, Timesus the Black Star. One notable encounter is a random encounter with the Worm of Ages. This huge worm has the ability to swallow and rules for moving creatures from its maw to its throat, gullet, and into the stomach.

Part 1 of an Expert-level quest into a hostile wilderness. This adventure takes place in the Known World of the D&D game, as outlined throughout the D&D game rule books and modules. The DM may find it useful to consult the Companion and Masters Sets, as well as most of the X-series of Expert Set modules. D&D Expert Set module X9, The Savage Coast, would be especially helpful, as Tortles of the Purple Sage could easily serve and continue that module's direction and plot like, adding a previously undescribed area (the Great Northway) to the Known World. The DM may also place the areas and events of this adventure within an existing campaign setting, as long as the geographical areas of the campaign match those set forth here. Pgs. 40-62
Someone kidnapped Lady Anilah Salhar—the Chelish wife of Dremdhet Salhar, one of Osirion's many Grand Ambassadors to Absalom—and sold her into slavery. With Salhar holding delve permits over the heads of the Decemvirute, the Pathfinders are sent to assist the Osirian Ambassador. Venturing into Absalom's darkest corners to save Lady Anilah, the Pathfinders must face the secrets of the Slave Pits to avoid becoming slaves themselves.
Long hidden away in remote vaults and guarded by powerful wards, the ancient Seven Swords of Sin have been stolen and brought together again for a terrible cause. Seven Swords of Sin is a lethal adventure that pits players against a vile enchantress, Tirana, in a trap-laden and monster-guarded dungeon. Only the brave (and perhaps foolish) can survive Tirana's lair and rescue the fabled Seven Swords of Sin from her heinous plot to unlock their deadly powers.
Play Tonight! Echoes Under Fort Thunder is the first of a collection of plug-and-play combat encounters for your 1st-Echelon Draw Steel campaign. These encounters are not strictly contextualized in any narrative. They are not adventures themselves, nor are they carved from any over-arching adventure. They're adventure-agnostic, so that you can just plug them into your own adventures and PLAY! Two encounters are enclosed. Each encounter consists of: - A map ready for use in VTT - A reference map for the Director - Some number of victory point conditions and mechanics of the encounter - Three monster tables (one for each level) for parties of 2-6 heroes. - Tips for monster tactics at each level In This Set: 001A: Secure Fort Thunder - Siege the fort against either goblins, gnolls, or time raiders! 001B: Silence the Echoes - Close the portal to Arcadia underneath the fort while battling both the undead knights and the invading creatures from all corners of the strange realm!

In the eastern desert stands the ancient tomb of Solomon III. Like all tombs, it is full of magical treasure and crawling with deadly creatures. But unlike other tombs, this one is screaming. Years ago, soldiers and wizards went in to silence the screams, and they succeeded, but they never returned. Now Solomon’s tomb is once again screaming out across the dunes, and no one knows why. Solomon’s treasure is still down there, but then, so is whatever is screaming. ADVENTURE TYPE: Small Linear Dungeon DESIGN NOTES: This adventure is intended for characters levels 5 to 7. It includes a desert wilderness area, an oasis, the tomb exterior, the tomb interior, and a cave system below the tomb to explore. Each area contains various NPCs, new monsters, old traps, shiny treasures, and strange magical items. There are many opportunities for (deadly) combat, and a few of them may be inescapable, but it is possible for players to have complex interactions and to experience very different consequences, depending on their choices. INCLUDES: Story hooks, dialogue prompts, creature stat blocks, dungeon overview map, and full-sized battle maps of each dungeon room that can be printed and used right on the table. KEYWORDS: Tomb, ghuul, ghoul, skeleton, ooze, demon, devil, thief, wizard, desert, sabercat, oasis, spider, viper
A side-quest adventure - An abandoned keep in the forest provides a exploration sidequest, and an excellent base of operations for your party once cleared. Includes a great new monster and mechanic to repair the keep. Published by Limitless Adventures

FQ3- Outpost of the Humanoids is the third adventure for the Filbar Quest Series. As you make your way to a meeting with the Baron of the Knolls you come across a roadside inn and a pair of old adventurers that have a small task for you near some old abandoned ruins. Sounds easy enough right? For some reason it never is easy, especially in Filbar!

The main road from the prior government is known as the Queen’s Road and spans the north-south axis of the land. While it has fallen into disrepair it is still used to get to the largest city in Provincia, Queen’s Point. This community sits on the Golleck’s Bay and is filled with opportunities for young adventurers…they just have to get there!