
Devastated in a war with a nearby wizards' school, the Fighters' Academy has since been surrounded by a foul and dank swamp - the Gloomfens. Since the climatctic battle between the wizards and fighters, the tower has decayed. The spirit of the head of the academy haunts the building, eternally plotting his revenge on the wizards who killed him. his loyal sutdents remain faithful to him even in death. Other foul undead have made their home in the rotting, spacious academy. From their lair, they make forays into farmsteads near the swamp in search of victims to feed their unspeakable appetites. The Problem of these terrible attacks by the savage undead will not stop until the evil that has found a home at the tower is burned from the face of the land forever. Will your party heed the call and help the town of Melinir? Will they be able to clear the former Academy of its undead? Lair of the Vampire Lord is the third in a three part adventure, The Haunted Tower. Or, it can be ran as a stand alone adventure. The choice is up to you. Part of TSR 1081 The Haunted Tower

Someone in the misty, wooded Moonshae isles needs hundreds of brand new swords taken under guard from Sword Coast smiths to a certain place on the Isles. The swords are needed so badly, and their safe arrival is considered so unlikely, that someone is willing to pay adventurers a lot of gold - someone fairly important. Adventures foolish enough to take assignments too good to be true (or merely desperate for coins) will soon find themselves embroiled in a dark and mysterious struggle against evil that will take them into sacred groves, crumbling castles, and through ancient magical gates to the halls of the High King - and beyond -- An adventure that takes place on the Moonshae Isles, in which a mid-to-high level party fights against the encroaching darkness of The Cult of Bane. Although helped by the Harpers, players will have to uncover the plans of the cult, and thwart them where possible. Preventing the summoning of the "Godson", a manifestation of Bane's evil. Part of the "Forgotten Realms Adventure" series, this is FA1 - Halls of the High King. FA2 is "Nightmare Keep" TSR 9301

Welcome to the picturesque village of Eveningstar, nestled at the foot of the Stonelands where the River Starwater winds down a gorge and snakes into the King's Forest. Here, the Knights of Myth Drannor began their famous adventures. Here, the Ladies of the Brazen Blade, The Company of the Singing Sword, The Steel Shield Band, and many other came, clutching royal charters from King Azoun with the ink scarcely dry on the parchment. Some fell, some went on to greatness-but they all came here first; to the Haunted Halls. Despite numerous infiltrations, the Halls have not yet yielded all their secrets or treasures. Many dangers lurk as deadly as ever in dark chambers herein, awaiting new companies of eager-eyed adventurers. Is it your turn to dare The Haunted Halls? Many come, but few survive to again see Eveningstar's beauty. Welcome, then. Enter in, and find in these pages: A challenging introductory level dungeon. A detailed countryside setting, including important local personages, local color, and guidelines for play. Suggested campaign plots and adventures. New spells. New magical items. New monsters. A splendid campaign can begin here. Adventurers in an ongoing campaign can stop by for a memorable visit. Those looking for an underground stronghold may even find a home in the Haunted Halls of Eveningstar. TSR 9354
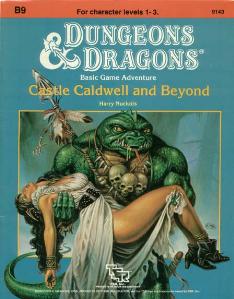
Five exciting short adventures to make your Basic campaign come alive! The Clearing of Castle Caldwell - A local merchant has recently purchased a small castle... but when he tried to move in, he discovered that the castle was already inhabited! Dungeons of Terror - A strange trapdoor in the floor of Castle Caldwell leads to a terrifying challenge! The Abduction of Princess Sylvia - On the eve of her wedding, the beautiful princess has been kidnapped! Can you save her in time? The Great Escape - Imprisoned in an enemy fortress, without armor or weapons, your situation seems hopeless. Yet there may be a way to freedom... The Sanctuary of Elwyn the Ardent - A mystical chime of great power has been stolen - but by whom? In the wrong hands, the chime can cause untold harm! But can you find and defeat this mysterious and powerful creature? TSR 9143

The renegade magic-user Bargle is wanted, dead or alive. Rumor holds that he dwells in the bowels of a nearby abandoned keep, performing all sorts of foul sorcery. Only the truly brave, or perilously foolish, would dare to challenge Bargle in his own domain. Expanded dungeon of the BECMI red box sample dungeon.
The best of intentions. Pay your taxes or go to jail - and don't even thing about using magic. Pgs. 8-23

A fallen clock tower holds components from an ancient artifact. Upon discovery of the components, competing agents look to launch expeditions to uncover additional components scattered across distant places—and times. The now-lost Temple of Moloch and the construction site of the legendary Tomb of Horrors are two of those locations. However great the risks, finding the components demands the effort, for whoever does so can reassemble the fabled Infernal Machine of Lum the Mad!
The abandoned Tower of Ulvarum Orvernus stands atop an asteroid nearly a quarter mile in diameter, located roughly 5 million miles from the planet’s surface. The asteroid maintains Earth-like gravity and a breathable atmosphere, with habitable temperatures. This is all sustained through the harnessed power of a bound Air Elemental and Earth Elemental. If either of these Elementals are freed, the asteroid’s environment will quickly become inhospitable. The PCs may find themselves drawn to the asteroid through a forgotten portal, seeking a way to return home. Alternatively, they might be lured there by rumors of a powerful item or hidden knowledge within the tower’s extensive libraries. A multi-level tower filled with traps and strange encounters including animated armor, alien plant life, giant spiders, and a doppelganger.

It is time to put a stop to the marauders! For years the coastal towns have been burned and looted by the forces of evil. You and your fellow adventurers have been recruited to root out and destroy the source of these raids. But beware, hundreds of good men and women have been taken by the slavers and have never been seen or heard from again! First part of Scourge of the Slave Lords (A1–4) TSR 9039

For months, the dreams of the people of Emystrell have become dark and terrible. It seems their nightmares have come to life as in recent weeks, people have mysteriously gone missing, vanishing in the night without a trace! Everyone is too paralyzed by their own despair to do anything or venture far from the safety of their homes. Emystrell is on the brink of collapse. The baron is offering a handsome reward to anyone who can show proof of the end of whatever evil curse that has taken hold of their town. This adventure is designed for a party of 3-5 heroic characters from the 2nd to 3rd level. It has elements of mystery and investigation in the first section which can be detailed and highly involved for groups that enjoy the process of searching for clues and solving mysteries or just as easily glossed over for groups that are more tactics focused. The second section of the adventure features the dungeon: a labyrinthine complex of an ancient elven crypt which the thieves guild has used as a base of operations for a decade...until the serpent worshipping cult arrived. The third section of this book is the detailed map and notes on the town and surrounding area of Emystrell. Roleplaying notes are kept light to allow for room for your own interpretations and details to NPCs remain as free to do with as you choose unless I felt inspired and hoped to give you a cool idea. This adventure has hooks for Dungeon Masters interested in a larger campaign involving the sinister plots of the Yuan-Ti (snake people) as well as other interesting adventure hooks (such as the giants in the nearby mountains or the stolen gem: The Eye of the Dragon). These plot points are intentionally left vague for you to fill in the gaps based on what your players seem interested in. You are invited to use this as a launch point adventure to lead your heroes on a larger adventure that might someday set them against an Anathema Serpent demigod, or it may simply be the adventure that begins their journeys and the evil of Yargoth stops here at Emystrell. If your campaign is set in a pre-published setting, this town of Emystrell can be replaced or fit into any campaign with a few tweaks to local gods and names. If you are playing in Dragonlance, you could replace Yargoth the Dread Serpent with Tiamat, or Dendar in Fearun. The local goddess, Tyr, could be the Tyr from the Forgotten Realms or even Norse myth if that is your campaign setting.

“The Temple Between” is an adventure for 9th level characters, and it is challenging enough to take them to 11th level by the time all is said and done. Although intended as the final chapter of the heroic tier portion of the Scales of War Adventure Path, it can be run as a standalone adventure, or as an adventure in a campaign of your own making, with a small degree of modification. It contains elements of urban investigation, dungeon delving, and even wartime conflict, making it a suitable adventure to players of many tastes and preferences. The western end of Elsir Vale has been greatly troubled in recent days. The threat of the orc hordes from beyond the Stonehome Mountains, though turned back at Bordrin’s Watch, still lingers in the people’s minds. Peculiar and hostile creatures of shadow lurk in the caverns and caves below. Political squabbling grows among the city’s powerful dwarf clans. All this makes the city particularly vulnerable to an enemy nobody saw coming - that nobody even imagined. This enemy has goals and objectives far beyond the ultimately unimportant Elsir Vale, but the first step is the utter subjugation of Overlook. An enemy who, at least in part, is already here. In this adventure the player characters start by investigating the strange behavior of the city's clergy. They swiftly discover hints of a conspiracy worming its way through the city hierarchy - some members are possessed while others have been replaced by dopplegangers. After trailing this conspiracy to its source they discover a portal that leads to an ancient temple in the mountains. Using the portal, the PCs go to the abandoned ancient temple where they must confront both a cadre of fey and a band of mercenaries, from whom they learn there is a plot for a full-scale invasion of the region! The PCs must them rush back to Overlook and cement their place as heroes as they face off against the invading forces. Pgs. 4-71
![Cover of D&D Encounters Season 03 - Keep on the Borderlands: A Season of Serpents [Chapter 1-5]](https://www.drivethrurpg.com/images/44/121468.jpg)
At Restwell Keep, you've heard that fortune and glory await those bold enough to brave the dangers of the Chaos Scar, a valley carved ages ago by a fallen star. The same tales warn that this Chaos Scar draws wickedness to it. Perhaps you can help stem this tide... and gain treasure along the way. While the location is a different keep, this adventure is an homage to B2 Keep on the Borderlands(https://adventurelookup.com/adventures/b2-keep-on-the-borderlands)

The Free City: a shining gem in the crown of cultured civilization. Beneath the surface of this bustling metropolis is a rot, festering in the darkness, manipulating the lives of those unaware of its presence. Now a small adventuring band from out of town may be in over their heads. Their actions in Diamond Lake have attracted the wrath of one of the city’s hidden masters. A gang of infiltrators and an enigmatic mastermind plot their destruction, and only tracing the rot to the root can stop the onslaught. "The Hall of Harsh Reflections" is the fourth installment of the Age of Worms Adventure Path, a complete campaign consisting of 12 adventures, several "Backdrop" articles to help Dungeon masters run the series, and a handful of poster maps of key locations. For additional aid in running this campaign, check out Dragon's monthly "Worm Food" articles, a series that provides additional materials to help players survive this campaign. Check out issue #336 of Dragon for five attractions to tempt your PCs to spend some of their hard-earned loot. This issue of Dragon also features an Ecology of the Spawn of Kyuss, one of the central creatures featured in this campaign. Pgs. 34-60

THE NEXT MARCH WASN'T DUE FOR ANOTHER 189 YEARS. TRY TELLING THAT TO THE MODRONS! On a regular schedule, the Great Modron March spills out of Mechanus, and the lawful automatons files their way around the Great Ring. No one knows why they do it, but everyone stays out of their way - because when the modrons march, they'll walk right over a berk who doesn't know enough to move aside. But this March has started decades before it was supposed to begin, and that's even more of a mystery. Caught unprepared, the planes shudder under the modrons' collective footsteps - and even the modrons themselves seem a little out of sorts. The Great Modron March anthology features 11 adventures for characters ranging from 1st to 10th level, as well as new information about the modrons of Mechanus. Each adventure can be played separely or linked together to form an extended campaign. The modron procession touches every Outer Plane in turn - and it isn't always welcome. On their unswerving path, the clockwork creatures will destroy celestial towns, be attacked by evil knights intent on using modron parts in foul experiments, and lead characters onto the deadly plains of the Abyss and into the famous prime-material labyrinth of Undermountain. Without help, they'll be lost in the swirling chaos of Limbo or even fail to complete the March entirely. And along their route, every blood on the planes seeks the answer to the most important question: Why have the Modrons abandoned their normal, lawful schedule to march years before they're due? TSR 2628

Part 1 of an Expert-level quest into a hostile wilderness. This adventure takes place in the Known World of the D&D game, as outlined throughout the D&D game rule books and modules. The DM may find it useful to consult the Companion and Masters Sets, as well as most of the X-series of Expert Set modules. D&D Expert Set module X9, The Savage Coast, would be especially helpful, as Tortles of the Purple Sage could easily serve and continue that module's direction and plot like, adding a previously undescribed area (the Great Northway) to the Known World. The DM may also place the areas and events of this adventure within an existing campaign setting, as long as the geographical areas of the campaign match those set forth here. Pgs. 40-62

Deep below the surface lies an ancient beholder city called Ilth K'hinax. In times past, hundreds of beholders called it home - until simmering rivalries within their society exploded into warfare. The few survivors fled, leaving the city deserted for hundreds of years. However, the story of Ilth K'hinax's glory was passed down from one generation of beholders to the next. Now, after countless years of self-imposed exile, the beholders are back! After securing the city, the hive mother of Ilth K'hinax implemented a plan to wipe out all the beings living above it. Unfortunately for the beholders, several facets of the hive mother's plan have been revealed through the exploits of a party of adventurers. Now, this group of heroes must meet eye to eye with Ilth K'hinax's newest occupants in an effort to stop the hive mother's pernicious plan! "Eye to Eye" is the last of three adventures featuring the nightmarish beholder. It can be played as an individual mission or as part of the series that began with "Eye of Pain" and continued in "Eye of Doom." TSR 9536

The players are invited to a Winter Gala in Waterdeep. After a guest is killed, investigations ensue to the fiendish nature of the home that the gala took place in. There are shopping opportunities on the way in.

The ancient ruined city of Tamoacha is familiar to a select few scholars and fortune seekers, who know of it but not always exactly where it is. Even more secluded, lying somewhere within or beneath the ruins, is a hidden shrine said to be dedicated to Zotzilaha, the vampire god of the underworld. Adventurers who catch wind of the place are likely to find its lure irresistible. Remake of the AD&D module by the same name.

The Pyramid of Amra is a challenging adventure designed for characters of at least 12th level. Due to the nature and numbers of undead enemies (vampires), having a cleric on hand with the ability to cast raise dead and greater restoration is advisable. The PCs should be rounded out with a wizard or sorcerer and a pair of front-line fighters. In this adventure, the PCs travel to the Pyramid of Amra and the ancient Monastery of Night, where they face one of the most dangerous of opponents they are likely to meet, C’nosretep the Champion of Set.

Continue the adventure inside the Dwarven Forge world of Mythras with the second part of this new gaming trilogy, The Hidden Valoria Campaign. Now entrenched in the tapestry of The Patina Court, the players must begin unraveling an even greater mystery that lies beneath the streets. Taking the adventure to the sewers, get ready to explore some of the locations that have made Valoria so famous among its players over the years This adventure is formatted to both 1E & 5E gaming rules. Also available in PDF.