
A great evil force descended on the town of Phlan years ago. The townspeople were all either killed or driven away, and Phlan became (literally) a ghost town. Fifty years later, the survivors are ready to reclaim their town. But they need a band of strong and brave adventurers to lead the fight-they need you. Ruins of Adventure is a set of connected short adventures written by James Ward, David "Zeb" Cook, Steve Winter and Mike Breault-four names familiar to all AD&D game fans. It uses the same setting, locations and characters as the classic computer game Pool of Radiance by Strategic Simulations, Inc. In fact, many of the scenarios here in Ruins of Adventure will provide important clues to the successful completion of Pool of Radiance. TSR 9238

An omnious encounter with a fortuneteller sends a party of adventurers on a 200-mile journey across the Lands of Intrigue. While traveling throught the towns and terrain (detailed here for the first time) that lie in their path, they hear rumors and obtain clues about their mission. Their ultimate destination is Castle Spulzeer, a once proud stronghold that has become a den of terror. When the heroes enter the haunted keep, they meet a terrifying trio of residents: a madman armed with stolen magical power, a liche whose secret laboratory houses untold horrors and treasure, and a furious ghost bent on revenge. These three ensnare the party in their fight over an ancient weapon. Each will stop at nothing to keep it from the other two. The heroes must choose with whom they will ally - and the wrong choice could lead to their doom. Castle Spulzeer is an adventure complete in itself. However, as a crossover story, it offers every Dungeon Master a choice between two endings. The first leaves the party in the Realms. The second transports the characters to the Demiplane of Dread, where the plot continues in the Ravenloft adventure The Forgotten Terror. For 4 to 6 Characters of Levels 8-12 This conversion guide allows DMs to run the original module with 5th Edition rules. To use this conversion guide you will need a copy of Castle Spulzeer, originally available in hard-copy and now for sale in digital format on the DMs Guild. Visit Classicmodulestoday.com for instructions on creating your own classic module conversions and selling them on the DMs Guild. Castle Spulzeer was originally scheduled for publication by TSR in June 1997. Then, near-bankruptcy caused a total failure of TSR's schedule, resulting in no books being published from February through the very end of July. Some books would be delayed for over a year, and others would disappear altogether, but Castle Spulzeer was relatively lucky: it was just delayed four months, until October 1997. The reason may well have been its theming, and its crossover with the Ravenloft line, which made Castle Spulzeer a great Halloween release. Castle Spulzeer has an even more far-reaching connection: its ending can lead players to the demiplane of Ravenloft and The Forgotten Terror adventure. This was probably intended as a bit of advertising for Domains of Dread (1997), the third edition of Ravenloft which was released in August 1997. In other words: in their last days, TSR was working very hard to cross-market their products, but they didn't live long enough to see the success of the Spulzeer-Intrigue-Dread connection.

In the Anauroch desert, darkness is growing. The followers of the Vile Spore Goddess Zuggtmoy have stolen the dreams of the Bedine Seeress Deja, trapping them in an eldritch artifact. Unless her dreams are returned, the Seeress will descend into madness, and her people along with her.

The first part of the Dreams of Red Wizards adventure path originally published for the D&D NEXT Playtest. Following the events Ghosts of Dragonspear Castle, a new set of adventurer's will see some of the repercussions of that adventure. This adventure is intended to be continued in the Dead in Thay adventure (Note that they Dead in Thay 5e adventure featured in Tales from the Yawning Portal is missing a significant portion of interlude that links Scourge of the Sword Coast to the events within the Doomvault). The adventurers arrive when Daggerford is crowded with refugees from outlying lands. Goblins, gnolls, and orcs have been raiding the countryside. Now, food is scarce and tension is high. Blame for a theft has fallen on the refugees, and the Duke of Daggerford has forbidden more of the displaced from coming into town. After overcoming difficulties to enter Daggerford, the characters learn more about the raids. As they fight against the humanoids and delve deeper in the darkness that encircles Daggerford, the characters learn of Bloodgate Keep. After a final fiendish ambush, they’re ready to confront the real threat to the area. DM Note: This adventure points the adventurers strongly towards Bloodgate Keep but that location does not appear until the Dead in Thay adventure; at several points the party may feel drawn to explore that location rather than continue their investigations around Daggerford. However, since Bloodgate Keep is only eluded to as a source of great evil power, it can serve to easily segue to an entirely different adventure path. As a NEXT Playtest adventure, Scourge of the Sword Coast uses milestone leveling and the included stat blocks for creatures do not necessarily match or even appear in the 5e Monster Manual, nor do they have XP values or challenge ratings. In some places it will reference rules used in the Playtest but dropped or changed in the 5e release, these are unlikely to substantially impact gampley with 5e rules.

“The Shadow Rift of Umbraforge” is a sequel to “Siege of Bordrin’s Watch” and the third part of the Scales of War Adventure Path. In “Siege of Bordrin’s Watch,” the PCs discovered that dark creepers had sold arms and tactical intelligence to the orc war chief Tusk, aiding him in his attack against the folk of the Stonehome Mountains. In this adventure, the PCs investigate the link between the orcs and the dark ones, stumbling into an armsrunning operation that takes them to the Shadowfell in order to finally confront the charismatic figure behind it. Pgs. 4-53
You found the treasure you were seeking. Now you have to escape from it. A change in perspective makes all the difference. Sheltering from a storm in a wayhouse, the PCs fall foul of a powerful magical relic. They must navigate their way through an unfamiliar environment populated with changed creatures in order to free themselves from its influence. Pgs. 42-63

Important: The adventure is 1e but it has monster conversion notes for D&D 4th edition The town of Highport, once a human community overlooking Wooly Bay from its perch on the northern coast of the Pomarj, fell prey to hordes of humanoids swarming out of the jungle-covered hills surrounding the settlement. Though the orcs, goblins, kobolds, ogres, and gnolls razed much of the place in their ferocious rampages, the smoldering ruins they left behind soon became a new kind of community, a place of trade between the humanoid “locals” and the unsavory human traders who have no compunction about doing business with them. Slaves are a commodity in ready supply in Highport’s market, since many pirates raid up and down the coast of the bay, putting fishing villages to the torch and filling their holds with captured refugees. Slavery has become a thriving business in the town, and rumors abound of a cartel of Slave Lords who run things from behind the scenes, filling their coffers in secret from the buying and selling of human chattel. The trade has become so prolific that the good folk to the north have grown tired of these depredations and decided to fight back. Forces of righteousness and honor have recently descended upon Highport, some openly and others in secret, in various attempts to destroy the machinations of the Slave Lords and abolish the abominable enterprise that has taken far too many loved ones from home and hearth. One such doughty servant of goodness is Mikaro Valasteen, a cleric of Trithereon. Mikaro slipped unnoticed past the crumbling walls of Highport with a single mission: to rescue and transport as many slaves to their freedom as possible. Mikaro and a handful of faithful assistants located a number of escaped slaves—as well as rescued a few more not sufficiently restrained and guarded—and shepherded them through the gates and beyond the reach of their humanoid tormentors, returning them to their lands and homes. This covert freedom brigade enjoyed remarkable success early on, since the servants of the Slave Lords were often lax in their vigilance and sloppy in their efforts to prevent loss of the “merchandise.” After one too many shipments never made its destination, the humanoids stepped up their security and the normal channels of escape from Highport closed to Mikaro and his team. He cannot risk exposure by smuggling the freed slaves through the gates as merchandise any longer, since shipments of goods are now regularly stopped and checked. No longer able to free the slaves in that manner, Mikaro began hiding his charges in an abandoned villa in a particularly rundown part of the town. Although they are safe for the moment, their numbers have grown unmanageable, and the priest fears it is only a matter of time before someone slips up and brings slavers to their doorstep. Ever more desperate to find a new means of escape from Highport, Mikaro has started work on a plan that is both daring and dangerous. He intends to use a series of old sewers coupled with natural caverns running beneath the town as an escape route to the sea beyond the walls. But he needs someone to clear out the creatures and pitfalls he knows lie within. Pgs. 2-27
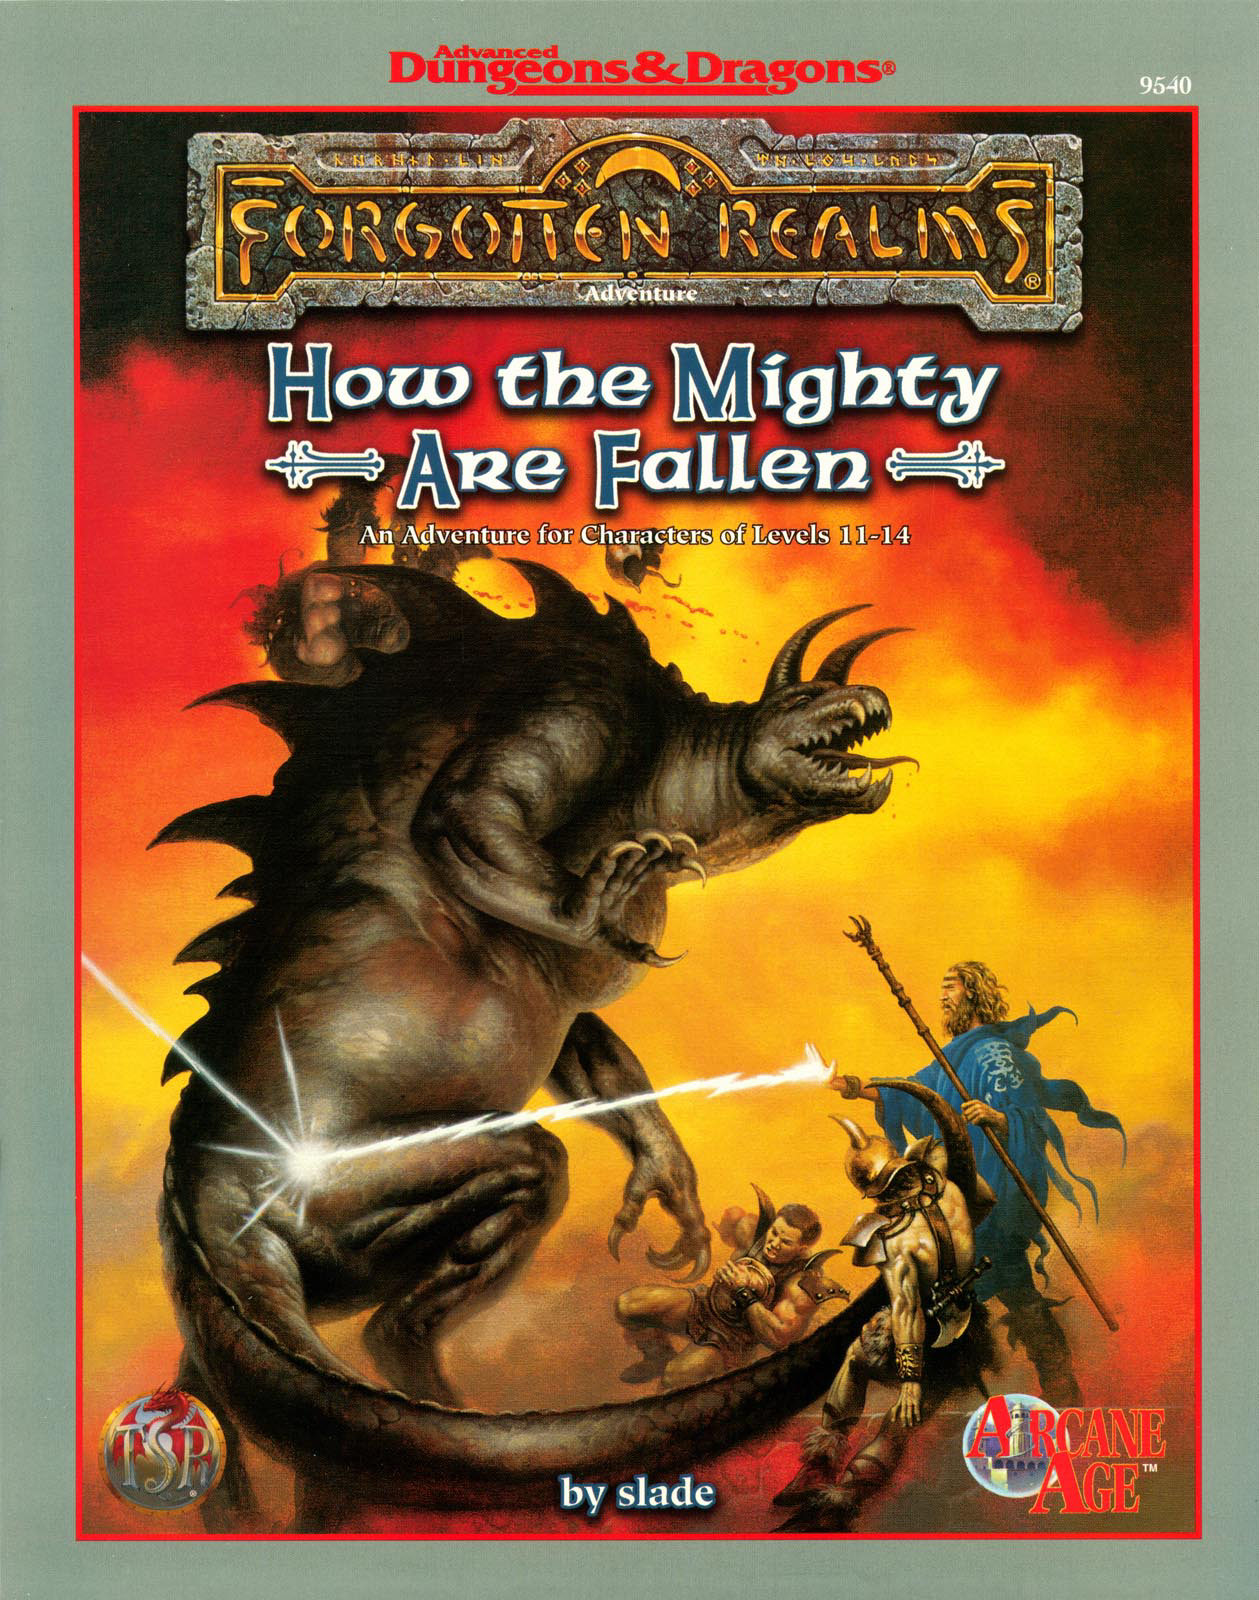
As the floating cities of Netheril hover peacefully in the air, the winds of intrigue boil all around them. The phaerimm continue to plot the downfall of the Netherese even as Karsus prepares for the casting of his greatest spell. Undead walk the land, driving orcs and humans before them. And somewhere below the greatest nation of Faerûn, the Tarrasque awakens from a long slumber. How the Mighty Are Fallen, is an adventure designed for use with the Netheril: Empire of magic boxed campaign setting (which is required to play this adventure). Within these pages, the final heroes of Netheril can : Gather the spell components, that Karsus requires for casting his "most wondrous" spell, the only 12th level spell ever known. He just needs a few body parts from two creatures - A gold dragon and the Tarrasque. Reuinte lost lovers after they have been separated by death. Nopheu's wife was killed in a magical explosions, and now he's finally saved enough money for her to be resurrected. Certainly a dead body couldn't pose a threat to a band of stalwart heroes?! Follow the winds of fate to wherever Tyche delivers them. Numerous side adventures allow players to take their characters to a variety of different locations. Some heroes might want to follow the trail of the missing nether scrolls, while others might want to join the resistance and fight Karsus and the other archwizards. But only the bravest hearts can take the first step... TSR 9540

Azaketh, a sly and industrious devil, prepares his revenge against his bitter enemy Zirkex. Naturally, the mortals affected by his schemes are mere pawns to further his goals. It is up to the heroes to stop Azaketh in his tracks before he takes control of a powerful weapon – Logrimm’s Tower Golem. The Tower Golem is an adventure designed for 3-7 2nd to 4th level characters and is optimized for five characters with an average party level (APL) of 3. It's the second and final chapter of the saga about Logrimm’s Tower Golem. The first chapter The Soulmonger isn't necessary to play The Tower Golem but it sets up the villian Azaketh and introduces NPCs that can help the characters conquer the Tower. The focus of The Tower Golem is set on roleplaying and interesting fights. In theory, the Tower is an infinite web of rooms and portals that the characters may never escape. However, eventually, the characters reach the end for one final encounter. You can change, interweave, or exchange the different parts as you see fit. There are several proposals and fully fleshed out levels in this document, but you may add your own adventures to the list!

A vast, sprawling mega-dungeon beneath the ruins of a nearby castle. Reports have surfaced of stockpiles of wealth within the passages. Regions previously devoid of monsters are reported to teem with renewed activity. Magical and mundane traps have brought foolhardy explorers to their doom. Changes within the passages and chambers have rendered old maps and knowledge dangerously unreliable if not outright useless. To the bold and daring, only one message needs to be heard: the castle and its dungeons are once more ripe for exploration, and new legends are ready to be made. Note: This adventure requires three books for it to be complete (sold as a package): Adventure Book, Map Book, and Illustration Book. Published by BRW Games

The heroes arrive at the eponymous Keep on the Borderlands, a fortress on the edge of civilization built to stave off the chaos and evil of the wilderness. Using it as a home base, a party can make forays into the surrounding wilderness, encountering monster and marauder alike. The centerpiece of the adventure is certainly the CAVES OF CHAOS, a network of tunnels and caverns found in the walls of a nearby but isolated ravine. It is here that hordes of evil humanoids have made their home. Through combat and negotiation, the players can try to explore and map out these caves, perhaps with the aim of accumulating valuable treasure or even cleansing the land of evil creatures. However, even the Caves are not all they seem. Beyond the goblins and kobolds lurk dark horrors: cults dedicated to fiendish chaos and a Minotaur's enchanted labyrinth await the unprepared adventurer. But for the hero who is brave, clever, and fortunate in equal and sufficient measure, great treasures and glory await in the Caves of Chaos that lie beyond the Keep on the Borderlands! TSR 9034

“Den of the Destroyer” is the sequel to “The Lost Mines of Karak,” continuing the unfolding story of the Scales of War adventure path. In this adventure, the PCs are called back to Brindol by a surprising summons. There they learn that a platinum sword they had collected back in "Rescue at Rivenroar" is no mundane item - the blade is sentient! The blade charges the PCs to undertake a dangerous mission to an abandoned githzerai fortress in order to perform a ritual to awaken the blade's true form. Along the way, they must deal with bounty hunters hired by an old enemy (from "Shadow Rifts of Umbraforge"), and confront a vile gang of gnolls terrorizing Elsir Vale. Pgs. 14-54

We saw it—don’t turn your heads. Up near Hilltop Crossroad and the temple. It walked south; the trees fell in its path. Even the moon hid. Gods help Father Dren . . .
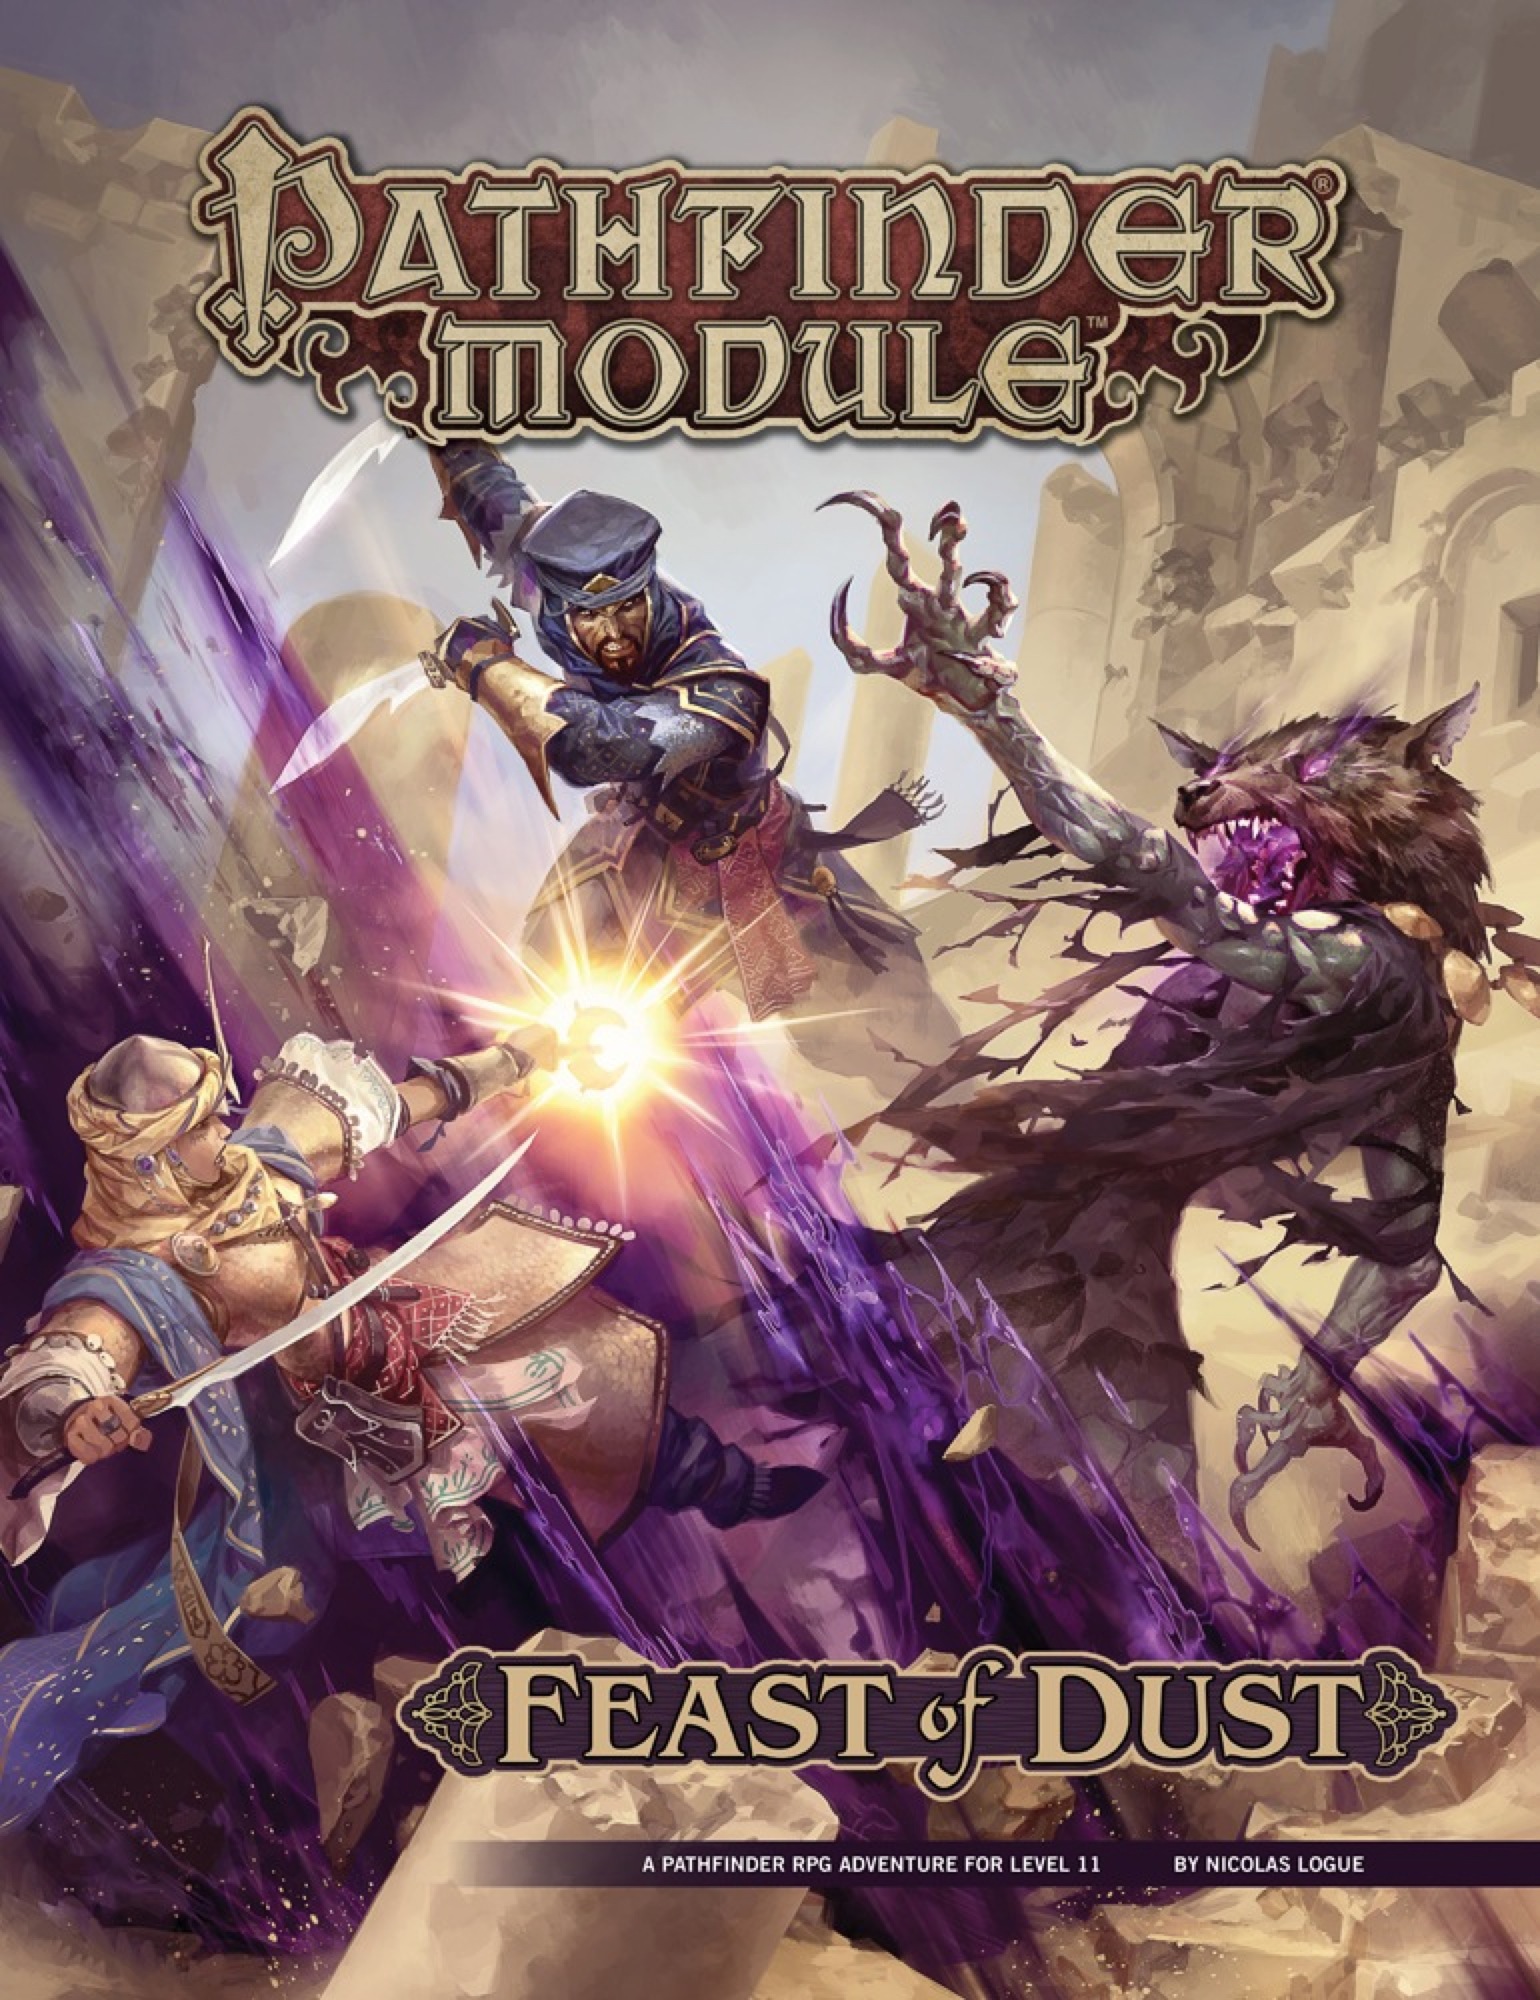
A deadly curse known as the Feast of Dust spreads rapidly through the Meraz Desert, driving its victims mad with hunger and a burning desire to flee into the sands. To find the source of this strange affliction, the heroes must investigate the plagued city of Dimayen, challenging fearsome gnoll tribes, nihilistic daemons, and the walking dead to discover the secret of a long-forgotten evil—a powerful daemon harbinger called the Jackal Prince of Famine. Despite the efforts of an ancient secret society, this twisted, unholy monstrosity walks the world again, threatening to spread his apocalyptic curse across all of Golarion! To stop the demigod's return, the heroes must uncover his three vile siblings, now bound within malevolent artifacts, and use their combined powers to stop the Jackal Prince before the entire world feels his corrupting touch.
The city is plagued by an affliction being called "stone sickness" or "the gorgon’s touch" that disorients people and turns them to stone. Those with, or suspected to have, the affliction are being banished from the city. Some demand a cure, but most are just scared for their loved ones. A ravenfolk woman named Spinel Larkdon, mother to a child with the gorgon’s touch, begs the PCs for assistance. An artifact known as the Shroud of Tiberesh, capable of curing any sickness, is locked away within The Umbers' vault of spoils below the city. Passionate, she is determined to save her son and all those afflicted. Fortunately for the player characters, completing the Umber’s Gauntlet alive means they are not only entitled entrance into the cult, but also a single item from its vault of spoils. The PC's only hope of procuring the Shroud is by traversing this initiation Gauntlet – a series of traps, monsters, and puzzles devoted to the demon-god Nakresh - and claiming the Shroud as their prize.

Surviving the shipwreck is easy; living through the wizardly bet afterward is not. Their game could mean your lives. A storm caused the PCs' vessel to sink and is now forcing them to seek shelter in the keep on the remote isle. Their goal is to locate a boat or some other means of transportation to return to the mainland after the storm has passed. But first, they must survive the tests and traps the island's inhabitants have set for them. Pgs. 45-64

Desolate and abandoned, the evil alchemist's mansion stands alone on the cliff, looking out towards the sea. Mysterious lights and ghostly hauntings have kept away the people of Saltmarsh, despite rumors of a fabulous, forgotten treasure. What is its sinister secret. Made for 5-10 character of levels 1-3, contains maps, handouts and encounter descriptions. The Sinister Secret of Saltmarsh is the first installment in a series of three modules designed and developed in the United Kingdom for beginning adventures with the AD&D rules. TSR 9062

The adventurers are asked to search for a local temple official who has not returned after leaving to search for a hidden treasure vault. On their way, they are attacked by some Kobolds and chase the fleeing monsters to the hidden entrance. The adventurers explore the ruins and discover what has become of the missing temple official.
Powerful Magics are Loose in Karameikos! You and your companions are starting on your first adventure and you've been swept into the intrigues surrounding the infamous Black Eagle Barony. To prevent the evil Baron von Hendricks from gaining more power, you and your cmpanions must retrieve the magical Eye of Traldar from the wizard's tower at Fort Doom. Can you escapes the clutches of the armed garrison? Will the Baron gain the powerful artifact and use it for evil? You and your friends make the choices and affect the entire Grand Duchy of Karameikos. This module is particularly recommended for novice Dungon Masters and players who want to try their hand at overland adventuring. Recommended for four to six characters, levels 1-2 Handouts and pregenerated characters provided Suitable for use with the Dungeons & Dragons Game box and conventional D&D Game rules Features simple rules on outdoors travelling for exclusive players of the D&D Game box Adventure in the monster-filled caverns and dungeons beneath Fort Doom. TSR 9271

The Raiders’ Hideout is a series of underground chambers (or perhaps the interior of a pyramid) that serves as a base of operations for a band of gnoll desert raiders. The PCs have come to exact a measure of justice for recent brutal caravan raids. They’ve tracked the gnolls to their lair, where they intend to end the threat to desert trade once and for all. Pgs. 30-35