
The ancient ruined city of Tamoacha is familiar to a select few scholars and fortune seekers, who know of it but not always exactly where it is. Even more secluded, lying somewhere within or beneath the ruins, is a hidden shrine said to be dedicated to Zotzilaha, the vampire god of the underworld. Adventurers who catch wind of the place are likely to find its lure irresistible. Remake of the AD&D module by the same name.
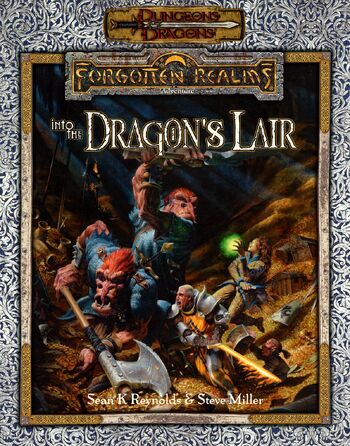
Into the Dragon's Lair takes place in the Forgotten Realms setting, and takes place after the novels The High Road and The Death of a Dragon by Troy Denning. The nation of Cormyr tries to rebuild after the death of King Azoun IV, and seeks the treasure hoard of a dragon to fund these efforts and keep the kingdom from falling into chaos. The player characters must find this treasure before all the other seekers.

The legendary spellcaster Emirikol the Chaotic has turned the region into a wild magic zone, a place where all magic goes awry. The only way to put things back to normal is to retrieve the source of the problem deep inside the Ooze Chambers of Emirikol! This adventure is for 4th level characters and can be run on its own or as part 3 of the Litany of Arrows adventure path. This adventure contains, 2 pages of new magic items, 8 new monsters and NPCs, a full write-up of Bwimb II, the Paraelemental Princess of Ooze, an entity referred to in many D&D products but never fully fleshed out and stats for the 3rd edition iconic heroes Regdar and Mialee, who play a major role in this adventure. It's got over 10 pieces of original art, full color maps, tagged and untagged, and a special handout for the player who obtains the Ooze Fist of Emirikol. This adventure builds on the story begun in the platinum-selling Castle of Corellon and the follow-up, Warpath of Gruumsh.

The town of Oallhelm is small and remote – for years they’ve been prosperous, peaceful, and self-sufficient. That's why it was such a surprise when the hobgoblin Thetch Blindeye led a war band of goblins into town and started terrorizing Oallhelm’s citizens! The PCs are on the outskirts of Oallhelm when they learn town square is overrun with the invaders – the goblins are now feasting in the streets, starting fires, setting traps, and terrorizing anyone left behind. They must drive out these mischief makers to save the town!

A top the crown of the Isle of Dread, a hateful monster broods. Spawned by the Price of Demons, the architect of the shadow pearls dwells deep under the ruins of ancient Thanaclan. As long as this vile monster lives, the threat of the savage tide remains, looming dark on the horizon. "City of Broken Idols" is the seventh chapter of the Savage Tides Adventure Path, a complete campaign consisting of 12 adventures appearing in Dungeon magazine. For additional aid in running this campaign, check out Dragon magazine's monthly "Savage Tidings" articles, a series that helps players and DMs prepare for and expand upon the campaign. Issue #354 of Dragon magazine features the totemic demonslayer, a new prestige class that focuses on fighting and defeating demons, be they at the heart of the Isle of Dread or encountered in the depths of the Abyss itself. The central mesa of the Isle of Dread is taboo to the locals, a place shrouded in mystery and cloaked in rumor. The time has come to confront the evil that dwells atop the island’s savage crown. Pgs. 54-84

The PCs are singled out by happenstance as prophesied heroes who will find and return a great wizard to his family. Once brought back to the the family chateau, they are brought on as paid companions and free to explore the location as they wish. This is a large sandbox style adventure with several plots going on, including assassination, a wedding, false accusations of murder, and many machinations of the nobles to solidify or gain power. Whole this is going on the PCs are dropped into dream sequences where they learn more about the missing wizard and learn how and where to find and free him
The Fate of Faerûn Lies in Shadowy Darkness! Daggerdale is reeling from a sudden series of murderous drow raids. As a grave threat to the entire surface world develops in the war-torn dark elf city of Maerimydra, intrepid heroes must discover its source and destroy it, if they can.

Devastated in a war with a nearby wizards' school, the Fighters' Academy has since been surrounded by a foul and dank swamp - the Gloomfens. Since the climatctic battle between the wizards and fighters, the tower has decayed. The spirit of the head of the academy haunts the building, eternally plotting his revenge on the wizards who killed him. his loyal sutdents remain faithful to him even in death. Other foul undead have made their home in the rotting, spacious academy. From their lair, they make forays into farmsteads near the swamp in search of victims to feed their unspeakable appetites. The Problem of these terrible attacks by the savage undead will not stop until the evil that has found a home at the tower is burned from the face of the land forever. Will your party heed the call and help the town of Melinir? Will they be able to clear the former Academy of its undead? Towers of Evil is the second in a three part adventure, The Haunted Tower. Or, it can be ran as a stand alone adventure. The choice is up to you. Part of TSR 1081 The Haunted Tower

The Gommurg Clan rarely deal with outsiders. These hill dwarves have isolated themselves for centuries to work on their craft and guard an ancient and sinister structure. Unfortunately, the world around them does not rest easy. An exile of the clan has inadvertently brought terrible woes to his ancestral home, and now he frantically seeks help to save his people.

The Therayle farm, which has been in the family for generations, was the best producing in the region. It now faces ruin. Hugh Therayle, the current owner, is at wit's end trying to reestablish even a modicum of control over the disrupted land. But, when Hugh saw the ancient doorway jutting up from the middle of the field where his corn used to be, he knew that this wasn't the type of problem a plow could solve. More than two centuries ago, a red wizard by the name of Houn made a discovery that shook the foundations of magic on Toril. Yet, due to a considerable amount of effort on his part, it never saw the light of day. The exact nature of this discovery is unknown but it involves the location of the skeletal fragments of an ancient being. The weave, which governs all magic on Toril, reacts strangely to the fragments. More information existed before Houn destroyed his research and fled Thay. His current whereabouts are unknown but many of his peers have attempted to track him down and steal his research for themselves.

An adventure included in the Essentials Kit (2019). The party starts in Phandalin, the starting town for the Starter Set (2014) adventure, Lost Mine of Phandlever. Various jobs are posted by Harbin Wester, townmaster, which the PCs can pursue. These jobs culminate in a raid on Icespire Hold, where Cryovain, a young adult white dragon, has recently claimed as its lair.

A nearly-penniless merchant wants heroes to secure and return priceless heirlooms. But can they do it with goblins all around, raiding and pillaging? Can the heroes reach a peaceful settlement with the raiders, or will they wreak mayhem and slaughter? Find out in Eastbarrow! This package (adventure, maps, and handouts within) forms a complete module for use with DUNGEONS & DRAGONS® 5TH EDITION RULES. It is especially designed for Dungeon Masters to initiate play with a minimum of preparation. Also includes full-sized maps for the VTT of your choice! Old School Look and Feel!

Encounters in the Savage Wilderness contains 19 encounters / mini-adventures, a few new creatures and items, and downloadable maps. We've also added suggestions on how to use the encounters in Eberron.

An interesting and atypical adventure in its writing style. For one the module contains insightful "When things go Wrong" sections and DM guidance for sticking close enough to the rails for the story and fun's sake. Lots of DM hints about how to handle PCs' choices. Overall the story is fine too - a traditional hook, a mystery, some twists. There's a tower, a surprise pocket-dimension context, and a dungeon. It's mirror of life trapping, isn't it? Well, yes and no. People go in, and they don't come out. Nor can you talk with anyone inside. Somehow, that's not quite the way you remember those mirrors work. This Skarda fellow showed up a few years ago with a band of raiders, and no one in the land has been safe since then. Whole villages have disappeared into this Skarda's mirror. Your band is approached by relatives of one of the victims?and adventurer like yourselves. You have to get into that mirror of whatever-it-is, find this man, and get him out in one piece. The reward is more that adequate. Only problem is, no one out here can tell you what to expect once you get in? or even how to get there. TSR 9188
The Demesne of Rangers is at war with the Horde of the Black Blood – an alliance of rampaging tribes of goblinkin. It is the heart of winter and the forest sleeps uneasily under a white veil. This is a time to huddle before the fire, not be out in the cold fighting a war but the heroes have no choice but to infiltrate the occupied territory in order to find and destroy the dreaded Goatskull Helm. Hope for victory hinges on the success of this quest and the call goes out for heroes to gather. The Goatskull Helm is an adventure module compatible with the Fifth Edition. This 35-page adventure is designed for a party of 1st level characters and will see them through to the 3rd level. This adventure is set in a fantasy medieval world with the mythological flavour of Ancient Greece. However, it can be easily adapted to any other medieval fantasy setting. This adventure includes entries for familiar monsters that are modified to better fit the setting as well as five new monsters and new equipment and magical items.

Fort Akor has come under attack by a dragon, but when the PCs seek out the beast in the surrounding jungle they discover the dragon may be the least of the fort’s troubles. The Pcs travel to Fort Akor, where they learn that the fort has been under attack by a dragon (which is really a tyrannosaur). Prince Henri asks the PCs to slay the dragon attacking his fort before it causes further damage. If the PCs investigate the fort before setting out after the tyrannosaur, they may discover the hidden corpse of its hatchling. They may also discover the truth behind the fort's dark history. Tracking the "dragon" to its lair and slaying it for Prince Henri forces the characters into conflict with a faction of the centaurs living in the jungle, who disposed the hatchlings corpse at the fort. Discoveruing the truth of the prince's conflict with the jungle natives might lead to an alliance. Pgs. 16-41

For the past several days, dozens of strong earthquakes have rocked the coastal area surrounding the underground Temple of Poseidon. Since the first quake, there have been a growing number of reports of strange events and macabre occurrences throughout the area. Several families near the temple have abandoned their farms and refused to return. They claim to have been terrorized by inhuman specters who prowled about their farms late at night. One of the farmers says he found a farm animal crucified and eviscerated in a ritualistic fashion on his front porch. Following the first tremors, all communications with the Temple of Poseidon, seemingly the center of the troubled area, were cut off. Messengers dispatched to the temple to request guidance from the Holy Oracle located there have not returned. Now the darkness has spread to this town. Unnatural births have occurred. Strange cries can be heard in the night, and there is a cowl around the moon. Magical divining has proven useless in naming the dark forces that invade. Many of the townspeople have already abandoned their homes and those who remain have but one recourse left: They have sent out a cry for hardened adventurers, experienced in dispatching evil. They must travel to the temple to discover the fate of the men there, and, if possible, elicit their help in destroying the growing heinous power. Pgs. 31-46
In the far reaches of the world, under a lost and lonely hill, lies the sinister Tomb of Horrors. This labyrinthine crypt is filled with terrible traps, strange and ferocious monsters, rich and magical treasures, and somewhere within rests the demilich. Remake of the original AD&D adventure.

Important: The adventure is 1e but it has monster conversion notes for D&D 4th edition The town of Highport, once a human community overlooking Wooly Bay from its perch on the northern coast of the Pomarj, fell prey to hordes of humanoids swarming out of the jungle-covered hills surrounding the settlement. Though the orcs, goblins, kobolds, ogres, and gnolls razed much of the place in their ferocious rampages, the smoldering ruins they left behind soon became a new kind of community, a place of trade between the humanoid “locals” and the unsavory human traders who have no compunction about doing business with them. Slaves are a commodity in ready supply in Highport’s market, since many pirates raid up and down the coast of the bay, putting fishing villages to the torch and filling their holds with captured refugees. Slavery has become a thriving business in the town, and rumors abound of a cartel of Slave Lords who run things from behind the scenes, filling their coffers in secret from the buying and selling of human chattel. The trade has become so prolific that the good folk to the north have grown tired of these depredations and decided to fight back. Forces of righteousness and honor have recently descended upon Highport, some openly and others in secret, in various attempts to destroy the machinations of the Slave Lords and abolish the abominable enterprise that has taken far too many loved ones from home and hearth. One such doughty servant of goodness is Mikaro Valasteen, a cleric of Trithereon. Mikaro slipped unnoticed past the crumbling walls of Highport with a single mission: to rescue and transport as many slaves to their freedom as possible. Mikaro and a handful of faithful assistants located a number of escaped slaves—as well as rescued a few more not sufficiently restrained and guarded—and shepherded them through the gates and beyond the reach of their humanoid tormentors, returning them to their lands and homes. This covert freedom brigade enjoyed remarkable success early on, since the servants of the Slave Lords were often lax in their vigilance and sloppy in their efforts to prevent loss of the “merchandise.” After one too many shipments never made its destination, the humanoids stepped up their security and the normal channels of escape from Highport closed to Mikaro and his team. He cannot risk exposure by smuggling the freed slaves through the gates as merchandise any longer, since shipments of goods are now regularly stopped and checked. No longer able to free the slaves in that manner, Mikaro began hiding his charges in an abandoned villa in a particularly rundown part of the town. Although they are safe for the moment, their numbers have grown unmanageable, and the priest fears it is only a matter of time before someone slips up and brings slavers to their doorstep. Ever more desperate to find a new means of escape from Highport, Mikaro has started work on a plan that is both daring and dangerous. He intends to use a series of old sewers coupled with natural caverns running beneath the town as an escape route to the sea beyond the walls. But he needs someone to clear out the creatures and pitfalls he knows lie within. Pgs. 2-27
Into the shadows. You must brave the perils of the Shadow World to keep a tighmaevril weapon from the wicked clutches of the Gorgon. PCs are recruited to help a noble and his halfling friend find a weapon with immense power, called bloodsilver. Includes a sidebar for adapting the adventure to another setting, an overland map, and a map of the ruins Pgs. 8-31 & 69