
While you search for treasure, others search for you. A treasure vault without guards or traps - can it be true? Pgs. 16-30

Giants have been raiding civilized lands in bands, with giants of different sorts in these marauding group. Death and destruction have been laid heavily upon every place these monster have visited. This has caused great anger in high places, for life and property loss means failure of the vows of noble rulers to protect the life and goods of each and every subject--and possible lean times for the rulers as well as the ruled. Therefore, a party of the bravest and most powerful adventurers has been assembled and given the charge to punish the miscreant giants. Remake of the original series of AD&D adventure.

A strangely delivered advertisement has led you to a sage named Demetrios. He needs a rare component to complete a desperately needed potion. The journey to retrieve it will take you through a large, unexplored swamp to a ruined keep, the former headquarters of a vile cult that once claimed the lives of many innocent youths. You cautiously accept the mission... To solve the mysteries of "Baltron's Beacon," the characters must excel in handling wilderness, building ruins, traps, puzzles, and new monsters. This adventure, originally designed for tournament use, is now available for your own campaign. TSR 9152

An Introductory Adventure for Storm King's Thunder. As evening approaches, you spot a wooden signpost next to a trail that heads north into the hills. Nailed to the post are three arrow-shaped signs. The two marked “Waterdeep” and “Daggerford” follow the High Road but point in opposite directions. The third, marked “Nightstone,” beckons you to follow the trail. If memory serves, Nightstone is roughly ten miles up the trail. This is Chapter 1 of the greater story available for free on the Dungeon Master's Guild.

Alton Lightheart, a lhalfling thief, went looking for a magic sword at the Storm-Sun Cliff. He & his two comrades were ambushed by a dusk (collective term) of malign shadows. He was knocked out and nearly killed. Before the shadows could consume Alton, a giant owl pair chased them away. Later, he awoke badly injured, not knowing his allies’ fate (they became shadows). Shaken, Alton saw he no longer cast a shadow! Disturbed, he fled to the village of Croy. Alton’s freed shadow, Kra, and its dusk now stalk him, longing to devour him in the dim light. This chapter starts in Croy. As the PCs arrive, an exhausted Alton sits in the Dragon’s Claw Tavern, back to the wall, skittishly watching. He ask PCs for help to face these terrifying monsters before his essence fades away. Published by Wicked Cool Games

After the first expedition to locate an ancient tomb was prematurely ended by monsters, the Search and Locate Treasure Consortium is doubling down. Camp established, they are looking for adventurers to make their dreams come true, but the leader of the Consortium is hiding something. Will the characters be able to avoid the Man Slayer tribe that destroyed the first expedition, help Larazmu settle his internal struggles, and locate the tomb that they have been searching for without getting into Moor Trouble?

Greatwall is in peril - not from military forces of Iuz, but from lack of goods and supplies. Caravans from Willip have ceased thanks to increased dangers on the Willip Critwall Grabford Trail. As the key fort positioned to contain the Iuzian flood, Greatwall is a strategic necessity. Its failure would mean a major incursion along the border. Your characters are hired to escort a caravan from Greatwall to Willip; if its merchants are afraid to come to the fort, the fort will go to them. This should be simple, cut and dried guard job. Right? Of course not. There are many surprises in store for your little caravan, and your characters will need to keep their wits about them day and night in order to make it to the other end. Secret plans are afoot, conspiracies are brewing, and nothing is as it seems while on the Border Watch. This module uses information presented in the From the Ashes boxed set and the Iuz the Evil accessories. However, ownership of these two products is not necessary to play this module. TSR 9406
A short adventure for the Midnight campaign setting from Fantasy Flight Games. An important resistance member has been captured by the Shadow, and the adventurers are called upon to ensure--through any means necessary--that the information he knows is not passed on to the enemy.
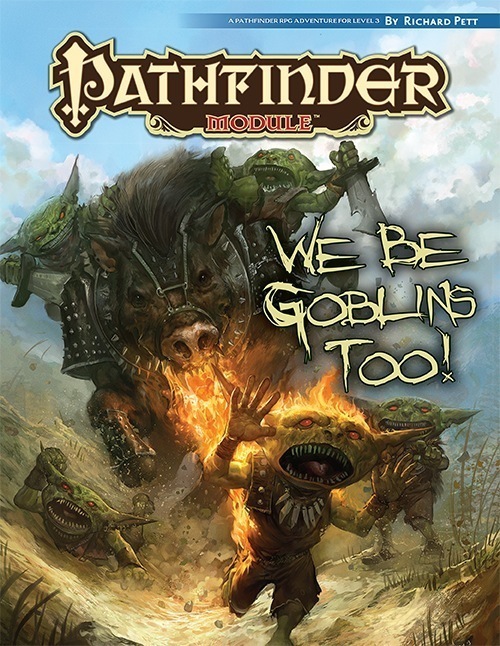
The Licktoads, once the great and fierce goblin tribe in Brinestump Marsh, were defeated by human adventurers! All that remains of the tribe are its four goblin "heroes". Homeless and bored, they left their swampy homeland to join the neighboring goblin tribe, the Birdcrunchers. The good news is that the Birdcrunchers are willing to let the goblin heroes join their tribe. The better news is that the Birdcrunchers have heard of these four, and want one of them to become their new chieftain. The bad news is that before the goblins can join, they'll need to endure a series of dangerous and humiliating tests. Very dangerous. Very humiliating. The worse news is that lately Birdcruncher chieftains have had really short lifespans—they're being killed by the pet fire-breathing boar of a local ogre who wants the Birdcruncher land as his own. Part 2 of the We Be Goblins series.

Indomitable it stood for centuries, a symbol of order in a world of chaos. Bastion of the pass through the Kamph Mountains, the very stones of the Keep of Adlerweg were the stuff of legends. What evil power had strength enough to take it? How were its defenses swept aside? Fell creatures now attend the battlements that overlook the only pass between Berghof and the sea. This is not a pretty problem to be solved by the militia of the local villages. These and more may be needed to withstand the mayhem stirred up by the fall of the keep. Indeed, if the Keep is not retaken, and retaken soon, the Hold of the Sea Princes itself may not be secure. Now is the time for heroic action. Aided by the Sentinel, former protector of the legendary Guardians of Adlerweg, have you the courage and the determination to rid the keep of its sinister occupants? UK3: "The Gauntlet" (1984), by Graeme Morris, is the third UK-series adventure and the second half of the two-part Adlerweg series. It was run as the final round of the GamesFair 1983 AD&D Open (and won by a RuneQuest fan!). It was then published in 1984. TSR 9111

In this adventure, the PCs discover that not all souls rest easy, particularly those spirited away to Nightwyrm Fortress. To learn the truth, players must pierce death's veil itself and enter the Shadowfell, where sinister echoes of life wing through eternal gloom. This adventure can be run as a stand-alone adventure or as Part Three of a three-part series of adventures (starting with P1 King of the Trollhaunt Warrens(TM) and P2 Demon Queen's Enclave(TM)) that spans 10 levels of gameplay.

With the Heart of Light secured, the adventurers now pursue the Ebon Stone, hidden in a remote keep. Part 2 of 2. Part 1 titled The Heart of Light. Pgs. 43-52

The Sea Witch is a short adventure for four 10th-level characters. The difficulty of the adventure can be adjusted by changing the level of main antagonist (Black Molly, the sea hag pirate) or by altering the number of her ogre servants. To tailor the encounter to groups of different levels, refer to table 4-1 in Chapter 4 of the DUNGEON MASTER’S GUIDE. The adventure is set off a lightly populated coastline known as Misty Bay, but adapts easily to any coastal region in existing campaigns. The sea hag known as Black Molly is a notorious pirate who has plagued the coastal cities for the better part of a decade. A successful Knowledge (local) check (DC 15) will reveal that Molly and her ogre crew have a filthy reputation as merciless killers who delight not only in plundering vessels for their riches, but also in destroying the ships themselves and sending all hands to the bottom of the sea. Now the villain and her followers have seized control of the Old Lighthouse of Misty Bay located off a lightly populated coastline. For generations the lighthouse beacon has protected the fishermen of this region, warning them of the dangerous rocks that lurk just below the level of the high tides. Recently, the hag has put out the beacon, darkening the lighthouse; misery and destruction are sure to follow as ships start to blunder into the rocks. Blackmail is apparently Black Molly’s aim in this venture: She conveyed a message to the nearest shore community, the fishing village of Poisson, demanding the princely sum of 50,000 gp. Until she receives this ransom, she intends to hold the lighthouse and its beacon hostage. The fate of the human keepers who tend the lighthouse is unknown to the seaside communities at this time, but they fear the worst. The Sea Witch is ostensibly a rescue mission: The PCs are pitted against the evil of Black Molly and the brawn of her savage ogre crew. It is the heroes’ task to retake the lighthouse and, if possible, free its captives from the clutches of their jailer. What neither the PCs nor the shore communities yet realize is that while she 1would be pleased to have the gold, Black Molly is in fact after bigger treasure. Molly has no intention of giving up the lighthouse — at least, not until she finds what her master sent her here for. Lying on the sea floor practically at the base of the rock on which the lighthouse sits is the wreck of the war galley Flying Cloud, which according to popular legend was captained by a cleric who wore around his neck an amulet of the planes. Black Molly wants this prize, but so far she hasn’t been able to find it. She’s scoured the wreck without finding any sign of the magic item. Now she’s trying to determine where to search next, for the item might well be somewhere near the wreck. If she can’t find it, she’ll start torturing her captives to find out if they have any useful knowledge about the amulet.
The Lantanese have lost their magical ship, but they aren't willing to fight for it. That's where your heroes come in. She's expecting you. A party of adventures has gone missing, and the inhabitants of a local town have been acting strangely it is up to the party to figure out what is going on and stop whatever force are at work on the towns people Pgs. 8-23 & 47

The PCs begin in the port city of Luskan, where they're hired on by a caravaning merchant to perform guard duty for the long, dangerous journey over the Spine of the World Mountains. If the heroes do well, they reach the small town of Targos, where they hear rumors of a dead mage's lost tower out on the tundra. In order to find it, the PCs must overcome numerous obstacles but may find allies in the peoples of the Ten-Towns region, including a barbarian prince, a sly halfling, and a unique ranger. Not all is as it seems, though, nor can all smiling faces be trusted. Can the PCs separate the truth from the lies, locate the Accursed Tower, determine all its secrets, and survive?

A retired adventurer approaches our heroes with a mission - help find a former comrade, a talented young wizard who went missing twenty years ago. The quest takes them into a magical underground lair, where every room reveals something as remarkable as it is deadly. But they soon realise that finding the wizard was the easy part...

The PCs answer a call for heroes by the Church of Traladara, asking for help in finding an ancient relic- the Shield of Halav. This is located in a lost temple, and the PCs must locate this temple, and brave its dangers to recover the shield before two competing teams from other churches find it first. Part one involves setting up the adventure, doing research, following clues, and discovering the site of the lost temple. Part two; once the site is known (ruins under a modern town) the heroes must travel there and find the entrance. Part three is braving the lost temple, filled with traps, puzzles, and other dangers, to find the missing shield, and then culminating in a climatic showdown with the completing teams.

THE FIRST SET OF DUNGEONS ON DEMAND ADVENTURES! The first volume of Dungeons on Demand includes the first four dungeons: Bandit's Nest - Level 1 Adventure Dungeon Insidious Experiments - Level 4 Adventure Dungeon Fierce Tempers - Level 8 Adventure Dungeon Lord of Gloomthrone - Level 12 Adventure Dungeon It also includes the following supplements: New Twists on Old Monsters - Gaming Supplement Imbued with Magic - Gaming Supplement The bundle includes hundreds of pages worth of materials and supplements sure to keep your gaming sessions busy!

The frost giants of the Ice Mountains have long held to the belief that a great Jarl will one day step forward to unite the families as Konung (king). With the Ordning shattered, Jarl Ryndölg believes that if he can locate Hartkiller’s Horn, a legendary artifact among giant-kind, he could be the one. He may very well have found what he is looking for. A great clarion call has echoed across the Hartsvale for two days, and the giants are all marching north, has Ryndölg done just that? A Four-Hour Adventure for 5th-10th Level Characters This adventure consists of three Parts, as follows: Part 1. The adventure begins with the characters having already arrived in Stagwick (whether sent by their faction or by their own, individual search for adventure and wealth) and have been briefed before preparing for an important journey to the north Part 2. From Stagwick, the players discover their guide has been killed and must make their way through the deadly cold fingers of the Ice Spires alone—either by skill or luck. Part 3. Once at Ise Festing, the group discovers it’s been inhabited by a troupe of Shatterblood Ogres whom they must defeat to gain access to the redoubt’s observation deck.

The Cult of the Dragon, along with its dragon allies and the Red Wizards of Thay, seek to bring Tiamat from her prison in the Nine Hells to Faerûn. To this end, they are sweeping from town to town, laying waste to all those who oppose them and gathering a hoard of riches for their dread queen. Continued in The Rise of Tiamat.