
The Well of Souls. . . That's what Zugzul babe the Afridhi call the evil artifact that he had taught them to make. They must call it the Well of Souls, and they must carry it before them into every battle? and they would be mighty. Thus said the god of the Afridhi, Zugzul the One. So the Afridhi did as they were bade. Seeking the volcano called the Hill of the Hammer in the far Barrens of Karsh, they built in its heart a great forge. There, as Zugzul had promised, efreet came to help them make the mighty artifact. There, amid vile, unholy rites, they bound the souls of men into its very substance, and, for the red-handed work that must surely follow hard upon its completion. Many were the men who guarded the Hill of the Hammer during the days of making? for their foes in hated Blackmoor would try to unmake that which they had wrought. Yet, it was not men that would keep the Well of Souls from destruction, but a prophecy? that the artifact would be unmade only by the hand of one as yet unborn! TSR 9205

How dangerous is a wounded dragon? A black dragon has seized Ravenglade Keep, though not without resistance! Badly wounded in the fight, the Warriors of Sehanine have fled their home and now turn to the outside world for help. There’s no time to lose! Can you arrive at Ravenglade Keep in time and discern allies from foes on the way? Warriors of Sehanine is a Dungeons & Dragons adventure module for a party of four to five characters from 3rd to 5th level. • Experience the Wood of Sharp Teeth on the way to Ravenglade Keep in a 12 to 16 hour adventure of 38 pages, written by Mithral Best Selling creators Florian Emmerich, JVC Parry and DMsGuild Adept Ashley Warren • Rock the (virtual) table with four breathtaking maps by Dean Spencer & Erin Harvey that come with player and DM versions • Bring the adventure to life with stunning artwork and player handouts by Raluca Marinescu,Henrik Rosenborg & Nathalie Lehnert • Show the NPCs with selected exclusive Trash Mob Minis

A Ravaged Land... Villains that really are larger than life... A time for heroes... A decade ago, the land of Geoff was overrun by a horde of giants, ogres, and evil humanoids, its people either slain, enslaved, or driven into exile. Now at last the tide has turned. The time to free the people of Geoff from their servitude to the giantish tyrants has come! But don't forget to watch your step when you confront the true masters behind the giant Clans! Contains the full text of three classic adventures by Gary Gygax: G1, Steading of the Hill Giant Chief; G2, The Glacial Rift of the Frost Giant Jarl; and G3, Hall of the Fire GIant King. Details Eighteen new encounter sites in the war-torn land of Geoff, linked together to form a grand campaign. Provides dozens of hours of gameplay as the heroes struggle to free an entire country from the grasp of giant overlords. TSR 11413
a baron recruits the party to find a set of magical swords as well as explore a mine shaft that connects to the under dark

The prince's godmother commissions you to retrieve the prince's jade crown, held in the tower of the vampire! The vampire's tower has three levels, and the three-level dungeon below 45 rooms. The party must be wary! Lethal traps abound. Marching order is important. A straight-forward dungeon crawl with many Gygaxian rooms and encounters. No roleplaying to speak of. Pgs. 4-18

Questing through the forest, you will be tested. Which side will you take between a wizard and the Keepers of the Veil? Will you be able to find the materials necessary to help cure your friend of the ancient evil that assails him? And when it comes down to it, what are you willing to sacrifice for your beliefs? Third Time’s the Charm picks up where Second Glance left off and invites the PC to find a wizard who can help heal the Crystalline Curse slowly paralyzing the PC’s friend and protector. As the party grows closer on this adventure, learning to depend on one another, they must also navigate the Veiled Wood’s changing landscape, deciding who they can trust and who they will help as much lies in the balance. Though this was written as the third installment in the Crystalline Curse Trilogy, this adventure can be inserted into any campaign setting and scaled accordingly. Third Time’s the Charm is part of our mission to bring you high-quality, ready-to-play material that supports adventuring parties of 1 Player and 1 DM. This adventure is written for a third-level character in a one-on-one 5th edition D&D campaign. Everything you need for your own two-person game is inside! This product includes: -A 3rd or 4th-level adventure adaptable to any setting -Stat blocks for one new creature and two NPCs -A region map, two sitemaps, and a hand-drawn dungeon map to aid the PC’s investigations -A fully realized forest region with fleshed-out NPCs and places to explore -Detailed backstory for the ancient warrior sheltered inside the PC’s treasured amulet -Four custom magical items And helpful tips for DMing a one-on-one game This adventure is perfect for those looking to begin or continue their duet campaign. Published by D&D Duet.

The final confrontation with the giant, King Snurre, and the entry of mighty adventurers into the caverns under his stronghold (DUNGEON MODULE G3, HALL OF THE FIRE GIANT KING) discovered the Dark Elves, the Drow, had instigated the giant alliance and its warfare upon mankind and its allied races. This module contains background information, a large-scale referee's map with a matching partial map for players, referee's notes, special exploration and encounter pieces, a large map detailing a cavern area, encounter and map matrix keys, and an additional section pertaining to a unique new creature for use with this module and the game as a whole. A complete setting for play of ADVANCED DUNGEONS & DRAGONS is contained herein. This module can be played alone, as the first part of a series of three modules (with SHRINE OF THE KUO-TOA, D2, and VAULT OF THE DROW, D3), or as the fourth part of a continuing series of modules which form a special progressive campaign scenario (DUNGEON MODULES G1, G2, G3, D1, D2, D3, and Q1, (QUEEN OF THE DEMONWEB PITS). TSR 9019
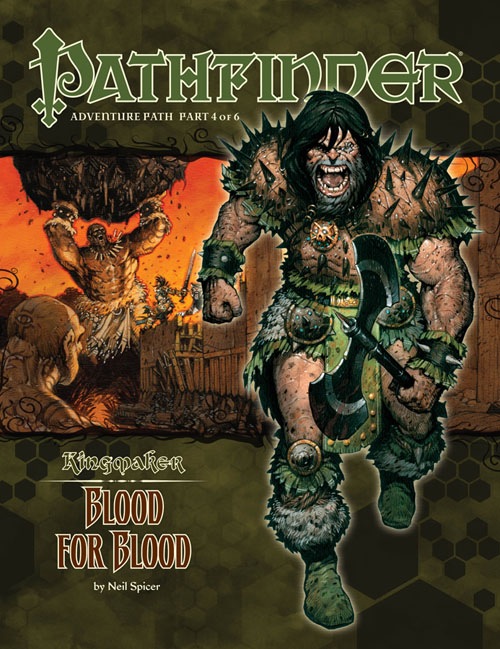
A Pathfinder Roleplaying Game adventure for 10th-level characters, this volume of Pathfinder Adventure Path is part 4 of 6 of the Kingmaker Adventure Path, in which the heroes win and defend a small kingdom from threats foreign and domestic. PCs should advance to 13th level by the end of this adventure. “Blood for Blood” begins with the PCs having returned home from solving the mystery of the Varnhold Vanishing. Shortly after their arrival, they learn that new problems have developed during their absence—there are rumors of an army marching toward their nation!The PCs race to the village of Tatzlford, where they help defend the village from an attack by a small but earnest force of bandits, barbarians, and several lumbering trolls after being warned in advance by a troubled woman who has fled from Fort Drelev to the west. Following the skirmish, she pleads with the PCs to save her father and sister from peril.From there, the PCs strike out into the swamplands of the Slough to the west, exploring new lands and finding opportunities to make new allies and eliminate long-term threats to the region. Their initial goal, though, should be infiltrating Fort Drelev, where they’ll have a chance to confront the traitor Drelev with his crimes and rescue the Fort’s beleaguered settlers. During this time, the PCs learn where Armag’s tribe has been holding the daughters of Drelev’s senior officers hostage. Arriving at the ancient site, the PCs attack Armag’s barbarian encampment and overcome the sinister powers of the Black Sisters to free the girls. Then, entering the tomb, they face deadly traps, ancient undead horrors from a war-torn age, and the trials of the tomb’s immortal, divine guardian. In the final chamber, the PCs encounter Armag himself, armed with the ancient sword of his namesake.

The small fishing village of Fairmarsh runs along the riverside of the Winding Water. An ancient tomb holding a dangerous trophy has been disturbed, unleashing a long-forgotten enemy on an unsuspecting village.
An ancient gate to the abyss lies undisturbed in the Valley of Obelisks. Sinister forces seek to reactivate the gate for their own ends, can the heroes stop them in time?

Lots of stronghold assaults and shipboard travel/encounters in this one. This adventure's deep political basis might be seen as an introduction for the domain-focused adventures of Companion-level play. This adventure is for use with the Dungeons & Dragons Basic, Expert, and Companion Rules, and includes the intrigue of engaging with nobility's lands and agendas. Intro: All is not well in the kingdom of Vestland. Not only is the king dead and the holy Sonora Crown missing, but the heir to the kingdom was lost at birth and no on knows where to find him. As if this wasn't bad enough, the forces of the Ethengar Khanate, never on the best of terms with Vestland, are now massing on the borders, hoping to take advantage of Vestland's plight. To complete the rosy picture, traitors from within also threaten to speed the downfall of the High Kingdom. Sounds like a job for you. You must find the long-lost heir to the kingdom and recover the Sonora Crown, the mystical device without which a king cannot be crowned. Standing in your way are traitors and spies from within and invaders from without the kingdom of Vestland. Time is running out! Can you save Vestland from disaster? TSR 9218

Szass Tam, the lich lord of Thay, and his Red Wizards threaten to dominate all of the Sword Coast. The Bloodgate, an elemental node of power, must be destroyed in order to stop him. Remake of the original 4th Edition adventure.
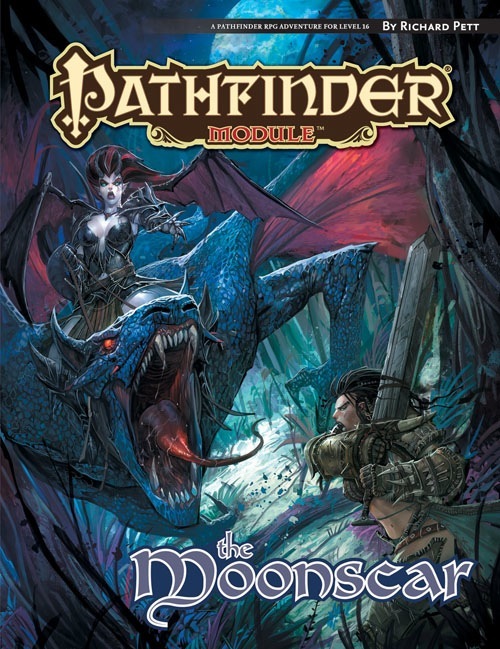
For millennia, a complex plot has brewed in a demonic jungle on the surface of the moon—a plan by the patient and sinister succubi of the Moonscar to kidnap and brainwash the people of Golarion. Now a long-dormant portal linking the moon to Golarion has returned to life, accelerating the demon queen’s designs. Only the brave PCs can venture to the surface of the moon, navigate the treacherous Abyssal jungle called the Moonscar, and delve into the depths of the Insatiable Queen’s subterranean palace of torture, seduction, and depravity.

Something is rotten in Rhoona... When the grotesque god, Cretia, casts his ugly shadow over the town, strange things start happening. First, Duke Stephen vanishes. Then bizarre proclamations begin coming out of the Ducal Palace... Dwarves are outlawed... taxes must be paid in beer... horses must be ridden backwards. Soon the entire town is in an uproar and a Dwarven army is marching on Rhoona. This is the situation when you and your part of valiant adventurers arrive in the suffering town. There you find... A ragged beggar who prowls the streets offering cryptic advice. A mysterious black-garbed cleric planning treachery. A trusted soldier plotting his master's overthrow. A sinister jewel casting its evil emanations over the town. You and your party are Rhoona's only hope. Only YOU can unravel the dark mystery that plagues the town and save Rhoona from...the Curse of Xanathon. TSR 9056

Having put down a rising of giants, it was discovered that the motivating force behind their depredations was that of long-forgotten evil - the Dark Elves. Determined to seek out these creatures, a body of doughty adventurers mounted an expedition to learn the strength of the Drow and bring retribution to them (DUNGEON MODULE D1, DESCENT INTO THE DEPTHS OF THE EARTH). This module contains background information, a large-scale referee's map with a matching partial map for players, referee's notes, special exploration and encounter pieces, a large map detailing a temple complex area, encounter and map matrix keys, and an additional section pertaining to a pair of unique new creatures for use with this module and the game as a whole. A complete setting for play of ADVANCED DUNGEONS & DRAGONS is contained herein. This module can be played alone, as the second part of a series of three modules (with DESCENT INTO THE DEPTHS OF THE EARTH, D1, and VAULT OF THE DROW, D3), or as the fourth part of a continuing scenario (DUNGEON MODULES G1, G2, G3, D1, D2, D3, and Q1, QUEEN OF THE DEMONWEB PITS). TSR 9020, From 1978

Sinister, twisting images...Horrific nightmares lurking at the corners of the mind...These are descriptions used to tell the tales of the Labyrinth of Madness. But these tales of the labyrinth are only legends, really, nothing more than stories used to frighten children at night - until a mysterious scepter is found, bearing within its crystal head a visage of insanity and terror, and also delivering a message: "Disturb not the Labyrinth of Madness again, and live a while longer." Now a powerful temple suffers from a tragic curse that is somehow linked to the labyrinth. Does there exist a group of heroes who can penetrate this dark and terrible place to life the curse...and survive? Labyrinth of Madness is a multiple-level, three- dimensional dungeon adventure, a puzzle within a puzzle, that commemorates 20 years of gaming with TSR. TSR 9503

Continue the adventure inside the Dwarven Forge world of Mythras with the second part of this new gaming trilogy, The Hidden Valoria Campaign. Now entrenched in the tapestry of The Patina Court, the players must begin unraveling an even greater mystery that lies beneath the streets. Taking the adventure to the sewers, get ready to explore some of the locations that have made Valoria so famous among its players over the years This adventure is formatted to both 1E & 5E gaming rules. Also available in PDF.

The rubble-strewn passageway twists and turns, winding ever deeper into the mountain, lower and lower into the bowels of the ancient, forbidding halls of long-dead dwarves. The torchlight flickers, threatening to succumb to the oppressive darkness. Creeping along one striated granite wall, Arikus the warrior moves cautiously toward the great cavern ahead, its sides and walls disappearing into the gloomy distance. Cocking his head to one side to listen, he holds his hand up for a moment, demanding unconditional quiet from from his companions. Then , his arm relaxing in relief, he waves everyone forward and moves into the open. Before him, scattered to the far walls of the enormous cavern, are piles upon piles of glittering treasure - coins from countless kingdoms, sparkling gems, exquisite jewelry, and items of wondrous power - enough for twenty kings' ransoms. Arikus laughs gleefully, thrusting both hands into the nearest cache of coins to let them runs through his fingers. At that moment, a monstrous shadow looms threateningly over him. Looking up, Arikus blanches and stumbles back in horror before the terrible visage of a Great Red Wyrm. The fearsome dragon opens its razor-filled maw and spews forth a gout of white-hot flame, engulfing the hapless warrior.... The ultimate Dungeon Master Fantasy! This is the most deluxe dungeon. Designed to appeal to discriminating and demanding role-players. Adventurers, beware. This is more than just a dragon hunt. Within the lair of the beast lie cruel and deadly traps, befuddling conundrums and puzzles, and cunning minions that will be the end of overconfident or careless adventurers. Comprised of three 64-page books, for two adventures that link to one super-campaign 12 full-color reference cards 16 special player handouts Eight Monstrous Compendium sheets A Sheet of cardstock standups with 24 plastic bases. Six full-color poster maps, two of which link together to make a giant tactical playing surface for use with miniatures or the included cardstock figures. TSR 1089

The king requests your presence in the honorable kingdom of Norwold. If you're worthy, you may be appointed lord of a dominion filled with friendly villages, sturdy fortresses, and raging band of monsters. Raging bands of monsters? Well, yes, and you may have to lead your forces into a war or two. But you'll be ready for the challenge. You'll be ready for treacherous spies who conspire to steal you land. You'll be ready for a foul band of giants that raids your dominions. And you'll be ready for the inevitable clash of empires, the outcome of which may alter the fate of millions. You'll be ready! Won't you? Test of the Warlords includes a complete campaign setting, several new NPCs, and dungeon and wilderness encounters, and guidelines for running a war between empires. TSR 9117

In the Yatil Mountains south of Perrenland there is rumored to be a magical hoard of unsurpassed value, a treasure of such fame that scores of adventurers have perished in search of it. Find the perilous Lost Caverns of Tsojanth and you may gain the hidden wealth of the long-dead arch-mage-- if you live. Module S4, this contains a brief wilderness journey to the caverns, but the bulk is underground. The caverns are noted as a previous lair of the Arch-mage Iggwilv- though she is long gone, her Demonomicon remains. This module marks the first appearance of several monsters and items that would later appear in the Monster Manual 2 and Unearthed Arcana. A labyrinth features in the caves. TSR 9061