
Nestled on the coast of the Azure Sea is Saltmarsh, a sleepy fishing village that sits on the precipice of destruction. Smugglers guide their ships to hidden coves, willing to slit the throat of anyone foolhardy enough to cross their path. Cruel sahuagin gather beneath the waves, plotting to sweep away coastal cities. Drowned sailors stir to unnatural life, animated by dark magic and sent forth in search of revenge. The cult of a forbidden god extends its reach outward from a decaying port, hungry for fresh victims and willing recruits. While Saltmarsh slumbers, the evils that seek to plunder it grow stronger. Heroes must arise to keep the waves safe! Ghosts of Saltmarsh combines some of the most popular classic adventures from the first edition of Dungeons & Dragons including the classic ‘U’ series and some of the best nautical adventures from Dungeon magazine: The Sinister Secret of Saltmarsh Danger at Dunwater The Final Enemy Salvage Operation Isle of the Abbey Tammeraut’s Fate The Styes All adventures have been faithfully adapted to the fifth edition rules of Dungeons & Dragons. Furthermore, this book includes details on the port town of Saltmarsh, as well as plenty of hooks to kick-off each adventure. Play through each story in a seafaring campaign leading characters from level 1 through level 12, or pull out sections to place in ongoing campaigns in any setting. The appendices also cover mechanics for ship-to-ship combat, new magic items, monsters, and more! “The Saltmarsh series consistently ranks as one of the most popular classic D&D adventures,” said Mike Mearls, franchise creative director of D&D. “With its ties to ocean-based adventuring, it was an obvious step to augment it with additional sea-based adventures and a robust set of rules for managing a nautical campaign.” Hoist your sails, pull up anchor, and set a course for adventure!

An unceasing rain has settled over the hamlet of Holmford and with it a darkness has fallen. Minister Scrim is dead, livestock and crops wither and rot and now a child is missing. Whispers of an old hate returning feed fear and paranoia. All the while the Hornwood looms hiding it’s vile secret. Light must return to Holmford before history repeats and more innocents perish.

Evil is stirring in the tiny village of Akeley - an evil that reaches out to minds that drift through the inky void between the stars. However, not all that comes from the skies comes with malice. A band of rather unusual warriors have are resolved to deal with the infestation before it can spread, though they cannot conquer it alone. Perhaps it’s blind chance that brings together the players in this strange and terrible drama, or perhaps it was written in the stars long, long ago. Note: This adventure is intended to work with Mordenkainen's Tome of Foes, and requires a copy of the book to run succesfully.

Are long journeys through Wildspace getting you down? Too much time on your hands? Sick of catching the same old Scavvers? Why not pay a visit to Starfish Bay! Break out one of the five new lures and see what bites! With 25 new fish to catch you'll be busy for weeks! But watch out, not all of them are so easy to hold onto! This small sidequest has 8 new monster stat blocks along with 1 encounter with some 'hungry' Hadozee!
"A series of disturbances plagues the Dyn Singh Night Market, an endlessly changing maze of stalls filled with incredible wares, enticing smells, and magical lights. Accusations fly as the characters become entangled in a feud between the well-respected Tyenmo and Xungoon merchant families of the Siabsungkoh valley. To prevent the families' conflict from escalating, the characters must earn the trust of the market's vendors and gain their help to unmask who's behind a rash of vandalism and thefts."

Gnomish denizens of Berribury are terrorized by flooding. Their only hope is for adventurers to summon the archfey of their domain; Tiddy Mun, to take the waters away. A Two-Hour Adventure for Tier 1 Characters. Optimized for APL 3
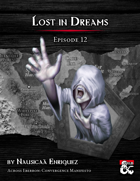
Can you navigate fairy-tale intrigues among fey and living nightmares without getting trapped in the tale? Fight your dreams in the twelfth adventure of the Across Eberron: Convergence Manifesto adventure path with this adventure for 7th level characters. Written for use with either Eberron: Rising from the Last War or the Wayfinder's Guide to Eberron by Keith Baker. Adventure Summary: Using his recently acquired Aethervane, Provost Faurious locates the only connection between the material plane and Dal Quor, a feyspire called Taer Lian Doresh that exists simultaneously in both planes. The player characters are sent to retrieve a powerful artifact, the Mind’s Eye, the petrified eye of a kalaraq quori. As the party enters the feyspire and negotiates with its eladrin lord, what are they willing to give up in return? Negotiations unveil a far deeper story, centered around the machinations of the Inspired of Riedra and the kalashtar they persecute. Can the characters navigate the shifting stories of nightmares and dream-touched fey for possession of the Mind’s Eye?

A lone king arrives at the city's bustling harbor with hopes of negotiating peace for his people in a distant land. But an assassination attempt puts his mission in danger and reveals the king's hidden enemies. Can the characters protect King Rami and help him gain the political influence needed to achieve a lasting peace treaty? Treaty of the Tiger King is a diplomacy-focused, urban one-shot for 1st-3rd level characters. It take about 3-4 hours to complete and includes: -Social events, intrigue, and hidden assassins -Respect-earning mechanics that influence a treaty negotiation -Combat cards for each monster, PC, and special treasure -High quality digital maps for use with virtual tabletops

The Gommurg Clan rarely deal with outsiders. These hill dwarves have isolated themselves for centuries to work on their craft and guard an ancient and sinister structure. Unfortunately, the world around them does not rest easy. An exile of the clan has inadvertently brought terrible woes to his ancestral home, and now he frantically seeks help to save his people.

Six murders in a single night! A major city in the Forgotten Realms is rocked by a series of gruesomely bizarre deaths of notable citizens. What mysterious murderer could have slain six people in different corners of the city? Why did the criminal leave a playing card at each scene? Could a high-stakes card game that happened ten years ago explain the goings-on? And, most importantly, is the goddess of misfortune personally involved?

Step into the nightmarish bog where there are only two options: fight for your freedom... or be doomed to wander endlessly in through these dreadful wastes until your death. Do you have what it takes to defeat the vengeful hag and break free from this prison?
Goblin attacks have always plagued the farmers and merchants who live and travel along the roads leading to Whitesparrow. But a recent rash of new attacks are something different. The goblins of one particular tribe have gotten particularly smart, attacking with careful tactics and cunning ambushes. The village guards haven’t been able to outwit the goblins, even when laying traps of their own and hiring mercenaries to stop them. Even as goblins go, Rosethorn isn’t much to look at. He’s small and runty, and yet a lucky break placed him in charge of the Brownleaf goblin tribe. When he claimed a powerful magic relic from a dead wizard three months ago, Rosethorn found his intellect multiplied many times over. The world began to make a more intricate kind of sense to him, and he saw patterns in the ways other folk traveled the roads. After hiring a spy in Whitesparrow to tell him which wagons to pursue, Rosethorn cunningly bribed the wagons’ guards to throw battles in the goblins’ favor. He then moved the lair of the Brownleaf tribe away from their dank caves and into the ruins of the Bearded Man—an enormous dead tree at the center of the Howling Wood. There, Rosethorn continues his campaign of ambush against the foolish villagers, increasing his wealth and power with each robbery.

This third installment of the Aumvor saga includes: ● 19 encounters ● Stats for Living Zombies (converted from 3.5e) ● and an introduction to the tower The adventure continues as your PCs make their way to the upper reaches of the tower and learn of the danger involved in moving deeper into Aumvor's dark realm. For centuries Aumvor the Undying has fed upon the life force of innocent folk who stumbled upon his portal traps. For centuries he has planned for and prepared for the eventual return of Netheril as a power in the world. That hope has now faded, and he has returned to his vault to regain strength and begin anew. Even now, he is deep in his tower vault plotting. 𝐁𝐞 𝐬𝐮𝐫𝐞 𝐭𝐨 𝐜𝐡𝐞𝐜𝐤 𝐨𝐮𝐭 𝐓𝐡𝐞 𝐓𝐨𝐰𝐞𝐫 𝐨𝐟 𝐁𝐨𝐧𝐝𝐚𝐠𝐞 𝐩𝐚𝐫𝐭 𝟏 “𝐀𝐮𝐦𝐯𝐨𝐫𝐬’ 𝐖𝐞𝐥𝐜𝐨𝐦𝐞” 𝐚𝐧𝐝 𝐩𝐚𝐫𝐭 𝟐 “𝐅𝐚𝐧𝐞 𝐨𝐟 𝐭𝐡𝐞 𝐉𝐚𝐢𝐥𝐞𝐫𝐬”.

"Men and women walk the streets of Stonefoot, but the laughter of playing children is nowhere to be heard. Over the past year, the village's children have gone missing in the middle of the night. Who will uncover the mystery of these disapearances and stop the curse before it leaves Stonefoot without a future?" From the DMsguild description. The party is tasked with saving the last child in the village and eventually retrieving the kidnapped children. The villains first appear to be goblins, but after a hunt and a fun teleportation maze, they find out a human mage is behind it. The mage has been transmuting the children into human-goblin hybrids.

Melvaunt is a city of merchants and metalsmiths. The docks are constantly filled with ships from Hillsfar, Mulmaster, and more distant ports. The northern coast of the Moonsea is an inhospitable place, and its people have a reputation for being rough and unfriendly. But they don’t go around murdering one another in the streets. At least, not usually. Was that a scream you just heard? Part One of The Chaos in Melvaunt.
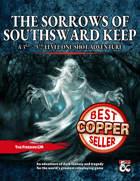
A one-shot adventure of dark fantasy, tragedy, and horror... - 4-6 hour adventure for 3rd - 5th level characters. - 24 pages of an elegant, easy to read PDF. - 4 custom handouts that pair with the adventure. - 2 custom monsters. - 10+ trinkets and magic items for handing out to your players. - 6 gorgeous free battle maps that can be found here: https://www.dmsguild.com/product/434359/Map-Pack-01--The-Sorrows-of-Southsward-Keep

This adventure is light and comedic and is indeed a heist adventure! It is designed as a one-off side quest for an established party but can be tweaked to work as an introductory adventure for characters meeting one another for the first time. This is ideal for a well-rounded party in which each player can show off and play a vital role in the mission’s success as they rob an evil potion master blind! Players can obtain potions of Heroism, Invisibility, Flying and Mind Reading. This adventure is perfect for DMs looking to fill a shorter session or injecting some light humor after an intense end-of-the-world campaign.

Putting a Krampus in the Holiday is a tongue in cheek adventure for a group of low level PCs. This scenario takes place during the Filbar holiday of “Giftus” a ten day celebration that culminates in a gift exchange. This year’s holiday is threatened when a jolly Gnome finds a few items that turn a happy holiday into a potential nightmare! A short little adventure that can be played after your own holiday celebration!

The party seeks out Commodore Krux at the Happy Beholder. After speaking with the patrons, the party learns that Krux has disappeared and gets a lead to check out his ship, the Second Wind. At the ship, the party learns from Fel Ardra and Flinch that Krux is being held prisoner by the Amoebros in a cave on the underside of the Rock of Bral. The party infiltrates the Amoebros’ lair, gets past the guards, and learns of the animal experimentation performed by the gang. In a final climactic scene, the party rescues Krux from Ripples, the wicked boss of the plasmoid gang.
This adventure has a lighter tone but isn’t completely out of place in a serious campaign. The challenges include combat, puzzles, traps and a legendary monster; Jack, in a Box. Does the party need to find something that an evil (and possibly mad) mage may have secluded away in an extra-dimensional space, and ordered an evil Jack-in-the-box and his toy army to protect it at all costs? Well that’s convenient because that is exactly the kind of situation that "Trapped in the Toybox" can help you with. Alternatively maybe that Dragon fight went a little too well for your party, maybe this “cursed chest” could help teach them a little humility. This adventure is designed for 4 (1d6 + 1) adventurers of 8th level who are in possession of a sense of humour. The toybox was created by a chaotic yet playful wizard, in order to hide an enchanted amulet under the protection of Jack. The adventurers should find themselves trapped inside the toybox, and they're in Jack's world now. Jack is the master of this domain and protector of both the amulet he has been entrusted with and the only exit of the toybox. There are a number of ways the adventurers may have come to be inside this toybox, e.g., the toybox may be found as part of the adventurer's loot in a dungeon or dragon's hoard, upon investigation it drags the adventurers inside. Note: This module commemorates our first themed week of Reddit's /r/Monsteraday and ties together this week's monsters in a dungeon designed for four 8th level adventurers. https://www.reddit.com/r/1d6Adventurers/comments/61axk3/trapped_in_the_toybox_adventure_module/ Published by 1d6Adventures