The hunter becomes the hunted. Monsters prowl the hills, but you never see more than one at a time. The players will need to hunt down a polymorph monster. In order to confront it, they'll need to fight through its lair. Pgs. 4-13

At the end of the Hateful Wars, Lord Sandor led his army into the Barrier Peaks in pursuit of a host of goblins and orcs. He and his army vanished, and now a group of adventurers follows his footsteps to discover what doom fell upon him and his men. Pgs. 30-46
Greger’s Grotto is a community of pirates and other criminals, hidden away on a desolate coastline. The players are slaves sold to the Grotto’s owning family and used for manual labour and bloodsport in the arena. In this adventure, the players will need to: * survive harsh prison conditions, including the rivalry between prisoner factions: human, orc, goblin and hobgoblin * fight in arena battles against prisoners and beasts, often with strange twists to entertain the crowd * explore small mini-dungeons attached to the prisoners’ caverns * ultimately escape; whether by force, alliance with fellow prisoners, stealth, cunning or any combination of these Features of this adventure: * Pay-what-you-want (even nothing). * Illustrated with art by Setvasai. * Designed to fit into most campaign worlds. * Simulationist or story-driven: includes information for both. Use random rolls to determine what happens when, or take inspiration from various story hooks. (Or do both.) * 11 unique NPCs, including members of the Grotto’s owning family and leader of the prisoner factions. * Full maps of the Grotto, its arena and prisoner caverns, totalling over 40 rooms.

With rumors of disappearances running rampant in the area, your group comes into the small community of Morla Dale with more questions than answers. Several wanted posters during your journey have shown a criminal called Sukits the Butcher. Perhaps this strange individual is behind the abductions?

Trapped in the dungeons of the Slave Lords! The hardy adventurers must find a way out, with only their wits and courage to help them. But can they do it before everything is destroyed by the dreaded Earth Dragon? This module contains a challenging scenario for experienced players, the tournament scoring system, and nine fully-equipped playtested characters. Also included are large-scale referee maps, playing aids, notes, and background information. A4 is a complete adventure in itself, but can also be used in conjunction with A1 (SLAVE PITS OF THE UNDERCITY), A2 (SECRET OF THE SLAVERS' STOCKADE), and A3 (ASSAULT ON THE AERIE OF THE SLAVE LORDS). TSR 9042

Having put down a rising of giants, it was discovered that the motivating force behind their depredations was that of long-forgotten evil - the Dark Elves. Determined to seek out these creatures, a body of doughty adventurers mounted an expedition to learn the strength of the Drow and bring retribution to them (DUNGEON MODULE D1, DESCENT INTO THE DEPTHS OF THE EARTH). This module contains background information, a large-scale referee's map with a matching partial map for players, referee's notes, special exploration and encounter pieces, a large map detailing a temple complex area, encounter and map matrix keys, and an additional section pertaining to a pair of unique new creatures for use with this module and the game as a whole. A complete setting for play of ADVANCED DUNGEONS & DRAGONS is contained herein. This module can be played alone, as the second part of a series of three modules (with DESCENT INTO THE DEPTHS OF THE EARTH, D1, and VAULT OF THE DROW, D3), or as the fourth part of a continuing scenario (DUNGEON MODULES G1, G2, G3, D1, D2, D3, and Q1, QUEEN OF THE DEMONWEB PITS). TSR 9020, From 1978

Beneath the fetid roots of a noisome swamp linger the pathetic remnants of a once proud and noble tribe. Laid low by a powerful narcotic administered by their ambitious (but wildly paranoid) mistress, the lizardfolk of the Dark Oak are but a shadow of their former greatness. Now, in the fetid caverns below the slumbering body of a diseased treant she plots to bring bloody slaughter to the folk of the nearby villages before her followers forget their proud heritage and sink into a lethargy from which there is no escape.
A free adventure for the Pathfinder RPG, focusing upon a city ravaged by a natural disaster and besieged on all sides. Party levels 4-5 will face off against a half-dragon, half-demon overlord known as Ymial, a demonic seductress, goblin warbands, and drow slavers beneath the ground all while trying to discover the secrets of the city of Fairhaven. Works well for players who are looking to visit a large town and face off in a high-stakes conflict even at low levels. Includes lots of details on the town, from rumors to residents.

With your first set of adventures firmly under your belt you are relaxing and basking in the glory of a job well done. While at the local tavern imbibing in some well-earned spirits, a commotion can be heard outside. As you step outside the villagers are pampering two children who apparently just rode into town on a very sweaty and tired pony. An arrow is sticking out of the mount’s flank. As the animal is removed the townspeople pepper the children with questions as both are obviously afraid. It would appear the drinks will have to wait.
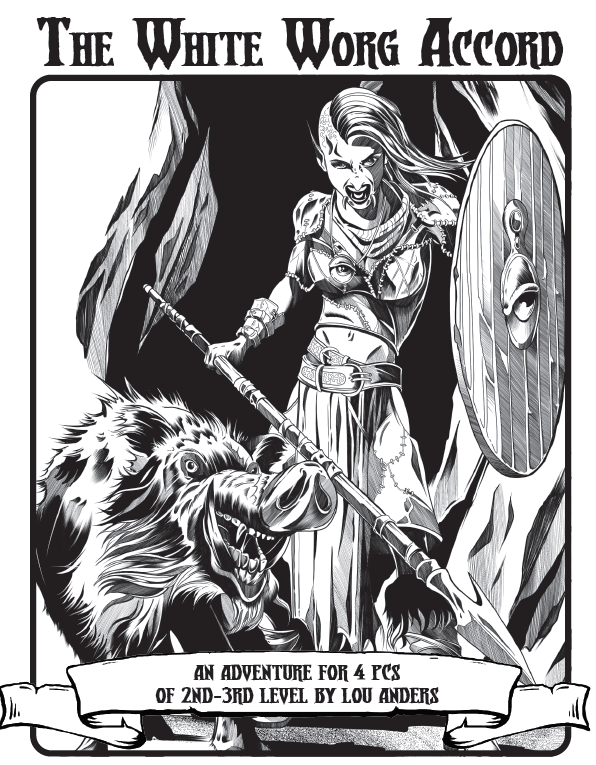
The noble dwarf Wulfstan vom Meer seeks adventurers to travel on his one remaining ship to the clan’s village, and to protect his vessel against any threats at sea. When they meet the White Worg Reavers, he wants the party to negotiate for the loan of two longships and their crew. Vom Meer offers 500 gp to anyone willing to undertake this task. It seems like easy money. However, the Wolfheim clan has troubles of its own—a group of trollkin bandits known as the Mossback Raiders have been competing with the White Worgs for territory west of Wolfheim. Their rivalry is coming to a head. When the PCs arrive at the White Worg homestead, they learn that the reaver dwarves are recovering from a recent attack. Their homestead has been sacked and vom Meer’s kinsman, Knud Stoneson, has been slain. Without a family connection, the clan’s chief will agree to vom Meer’s proposal only if the PCs will help rid them of that troublesome band of trollkin. If the PCs are to succeed in their task and help vom Meer, then a reavin’ they must go! This adventure for the 5th Edition of the world’s first RPG is meant for four 2nd and 3rd-level characters. Designed by Lou Anders, with cartography by Dyson Logos and cover art by Phil Stone.

What it says on the tin! You are after GLAXORZIS, THAT SORCEROUS CREEP, who wronged you somehow. Kidnapped your friend, stole your shiny artifact, played a stupid prank on you. Follow him underground into a complex of 21 rooms spread out over three levels. This is a barebones thingie, printable/foldable as a pocketmod. No stats. For fantasy adventure games where you die in a hole. Published by: Eldritch Fields

Six kids, one heartfelt promise, one incredible exploration! First Adventure is a one-shot designed to be played as a long session of five hours or two shorter sessions of 2-3 hours each. Keep the promise you made to your dying mother! Journey to an old, abandoned mine to search for the gateway to the Faerie Realm! Fail in your first attempt and regroup again 17 years later to keep the promise! A well balanced mix of exploration, role-playing, riddles, combat and tons of fun suited for both DnD newbies and veterans!

This module features 5 locations ready to be put in any D&D 5e game. It features these 5 locations: - An old warehouse (lvl 1) An old building occupied by a gang of Kenkus that are trying to build a mechanical way to fly. - Ruined Sanctum (lvl 2) A decayed temple lost to time, some decades ago it was breached by some blights and they still use it as a resting place and a trap for adventurers. - The Lunar dove (lvl 3) A small and secretive brothel used by the elites. Unbeknownst to them, however, the Owner spies and hoards secrets to use to their advantage. - Cave of Mending (lvl 4) A cave with a magical healing lake, protected by a Druid that uses it to heal the wildlife from the surrounding area. - The temple to Xotarr (lvl 4) A hidden temple to an evil God where the cultists partake in calculated sacrifices.

A Four to Six Hour Adventure for 11th-16th Level Characters in Dungeons and Dragons 5E The Adult Green Dragon Valturnax has attacked the nearby village of Hartsvale, threatening to destroy them completely if they do not submit to his rule by nightfall. To save the town, adventurers must ascend the mountain by climbing through the caves housing the dragon’s minions and face him in his lair – and they need to do so before the sun sets. This adventure is meant to be quite challenging. Enemies know the adventurers are coming and have had time to prepare, and they do so intelligently. This adventure draws some inspiration from Tucker's kobolds. As an added bonus, this adventure is available completely for free.

Into the Drachensgrab Mountains! Hot on the trail of the marauding slavers, you and your fellow adventurers plunge deep into hostile hills. Spurred on by your past success, you now seek the heart of the slaver conspiracy. But hurry! Your must move quickly before the slavers recover from your previous forays and attack! This module was originally used for the official Advanced Dungeons & Dragons Tournament at Gen Con XIII and is the third of four in a series of related tournament modules. This module contains a challenging scenario, the tournament scoring system, plus nine pre-rolled, playtested tournament characters. Also included are large scale referee's maps, notes, and background information. A3 is a complete adventure in itself, but it is also a companion to A1 (Slave Pits of the Undercity), A2 (Secret of the Slavers' Stockade), and A4 (In the Dungeons of the Slave Lords). TSR 9041

Blackstone Cave was once a smugglers’ lair, but it was cleared out decades ago. Now there are strange noises coming from the cave, and local authorities are afraid smugglers and bandits have taken up operations again. What will the adventurers find? More importantly, will they be able to survive the machinations of the Mad Dragon Priestess? A straightforward dungeon crawl with combat and opportunities for role-playing. The party is tasked with investigating strange noises coming from Blackstone Cave, an abandoned smuggler's lair. They find kobold cultists have moved in, but they're not the average dragon cultists.

Meaningful decisions, unexpected twists and memorable characters are the foundations of this dark 4-hour adventure for 5th to 10th level characters. A chance encounter on an unassuming road leads to a dangerous and lucrative opportunity. But what seems simple on the surface turns out to be much more below. Thrust into a world where every enemy has an enemy and everyone has their own dark motive, the only chance to survive is to ally with the right foe. Sometimes “doing the right thing” comes only in shades of black. Six Summoned Swords is a stand-alone adventure that begins on the side of the road leading to Phlan and can be easily accessed by any adventurers traveling through the Moonsea region. In addition to a world full of intrigue and complex character choices, purchasing this adventure includes: An Official Adventurers League magic item certificate Printable portrait cards with roleplaying tips for important NPCs Gridded reference maps for combat encounters Condition icons to help track character status Special Certificate Holder ideal for event play NEW: Season 8 Item Unlock Handout - prints 9 to a page, one for every player! * Looking for an adventure to run at your special game day or convention? This adventure includes a “certificate holder” that features specially created art of the adventure’s magic item. When printed in colour and on card stock, it perfectly frames the official AL magic item certificate from this adventure and makes for an unforgettable souvenir. About the Swords Below the Moonsea Saga The saga consists of three adventures, with this adventure serving as a stand-alone prelude. The series continues with Six Striking Swords and Six Swords Unbound, the two of which should be played in tandem.

This week’s Filbar offering is an introductory level adventure pitting fresh adventurers against a variety of opponents. As they head out to make a name for themselves the young group will first need to pass by the Horn of Delmar. This mountain landmark was once home to a mighty fortress felled centuries before hand. While many have adventured to the top they have returned ravaged with injuries and reports of strange and foul creatures. This adventure features an old tower, bandits, undead, and an old dungeon complex for those who search hard enough.

A short adventure meant to be inserted into Storm Kings Thunder set on the small island group known as Red Rocks along the Sword Coast. The adventure faces the players of against a coven of hag sisters who have been threatening the region for some time. Hags of the Red Rocks is a encounter and mini-dungeon meant to be dropped into the D&D Adventures League Season 5 - Storm King's Thunder, but can easily be an evenings play for any group travelling along a treacherous coastline.

*THIS IS A D&D NEXT/5E PLAYTEST ADVENTURE* Imani, a Turmishan wizard and former adventurer, seeks the aid of heroes to infiltrate Dretchroyaster’s lair and recover the Diamond Staff of Chomylla—the key to powerful magic and wisdom locked away for thousands of years. In addition to his own sagely interest in the lore of lost Uvaeren, Imani recognizes the dangers of such powerful magic falling into evil hands. The dracolich has secured the staff in his lair’s cen- tral chamber, using ancient wards of protection that can be bypassed only by four artifact-idols once belong- ing to a cult of Bhaal. Each group of adventurers enters the dungeon through a different section of the dun- geon—a forgotten temple of Bhaal, a vast underground lake, a troglodyte village, or Dretchroyaster’s vaults. Dretchroyaster’s lair is no simple set of caverns and ancient ruins. It sits atop a source of great power and energy, which the dracolich and his Cult of the Dragon allies hope to use to unlock the secrets of the staff. Only by undertaking a unified assault against Dretchroyas- ter’s lair can the adventurers hope to recover the Diamond Staff and survive the dracolich’s fury. The adventurers must make their way through the lair and recover the Bhaalite idols that will help unlock the Diamond Staff, all the while dealing with the lair’s creatures and avoiding the dracolich as he pur- sues intruders. Entering the Chamber of the Diamond Staff, the heroes must overcome its magical wards and claim the staff before being slain by the dracolich and his servants.