
He wanted a scabbard - but got the shaft. If the book is to believed, there's a magical sword - completely unguarded! - ripe for the taking. This short adventure starts with the players finding a diary describing the final resting place of Hrothgar and his powerful intelligent sword. In a quest for the sword, the players investigate a small cavern system and find the sword in a gelatinous cube. Pgs. 32-37

The king has hired adventurers to investigate the sudden rash of giant attacks and strange phenomena around the town of Bywater. Meanwhile the townsfolk believe an evil witch is directing the attacks and only the magic sword of the town's founder can defeat her.

To stop a devastating rampage of giants across the land, the party must venture into the lair of the stone giant thane Arnak to uncover the truth about why he has broken his peace with the neighboring dwarves. In the process, they will have the opportunity to retrieve important symbols of the fight against the giants and uncover a dangerous excavation. The adventure is part of the "Against the Giants" series originally by Gary Gygax, hence the writing credit.
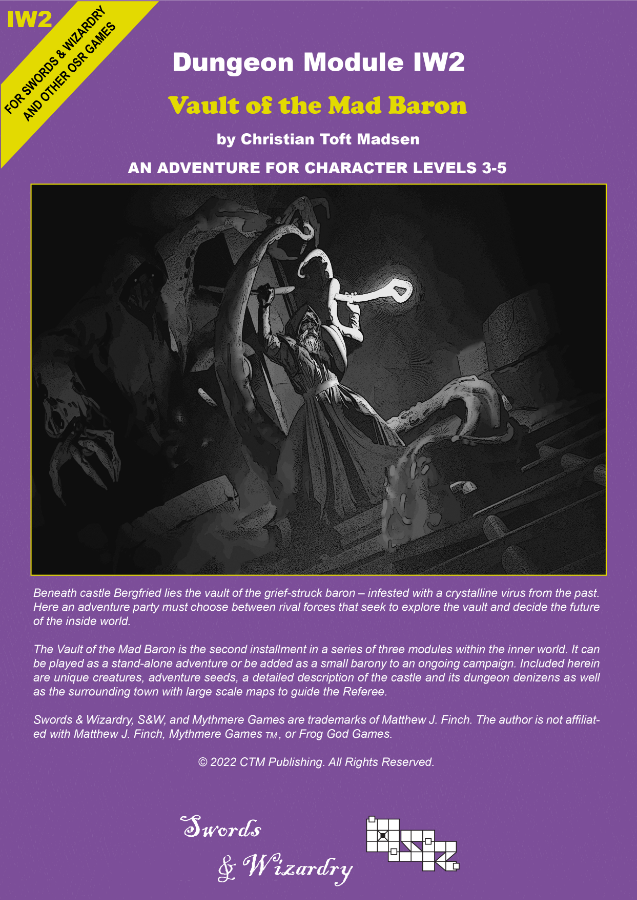
Beneath Castle Bergfried lies the vault of the grief-struck Baron – heavily infested with a crystalline virus from the past. Here an adventure party must choose between rival forces that seek to explore the vault and decide the future of the Inside World. ‘Vault of the Mad Baron’ is the second installment in a series of three modules in the Inner World. It can be played as a stand-alone adventure or be added as a small barony to an ongoing campaign. The scenario can be used with Swords & Wizardry or any other early variant of game rules and is suitable for PCs level 2-5. Inside you will find: A 60+ page old-school module with a layout optimized for fast and easy interfacing. An adaptable barony complete with town, castle and dungeon. Unique districts with encounters and sights. 6 major factions fully detailed with headquarter, plans, and missions for the PCs. Detailed description of a castle and associated dungeon levels. Downloadable maps for both players and the Referee. Locations allowing the PCs to travel to another era within the setting. Unique new creatures and magic items.

*THIS IS A D&D NEXT/5E PLAYTEST ADVENTURE* Imani, a Turmishan wizard and former adventurer, seeks the aid of heroes to infiltrate Dretchroyaster’s lair and recover the Diamond Staff of Chomylla—the key to powerful magic and wisdom locked away for thousands of years. In addition to his own sagely interest in the lore of lost Uvaeren, Imani recognizes the dangers of such powerful magic falling into evil hands. The dracolich has secured the staff in his lair’s cen- tral chamber, using ancient wards of protection that can be bypassed only by four artifact-idols once belong- ing to a cult of Bhaal. Each group of adventurers enters the dungeon through a different section of the dun- geon—a forgotten temple of Bhaal, a vast underground lake, a troglodyte village, or Dretchroyaster’s vaults. Dretchroyaster’s lair is no simple set of caverns and ancient ruins. It sits atop a source of great power and energy, which the dracolich and his Cult of the Dragon allies hope to use to unlock the secrets of the staff. Only by undertaking a unified assault against Dretchroyas- ter’s lair can the adventurers hope to recover the Diamond Staff and survive the dracolich’s fury. The adventurers must make their way through the lair and recover the Bhaalite idols that will help unlock the Diamond Staff, all the while dealing with the lair’s creatures and avoiding the dracolich as he pur- sues intruders. Entering the Chamber of the Diamond Staff, the heroes must overcome its magical wards and claim the staff before being slain by the dracolich and his servants.

"Gnolls have captured the heroes! After stripping the characters of all equipment except their armor and clothing, the gnolls drag them to an expansive briar maze known as the Twisted Thickets and set them loose. Then, armed to the teeth, the gnolls hunt down their prey. The characters must survive the hunt and outwit their pursuers. Stripped of your armor and weapons, you are cast into the Twisted Thicket and hunted like rabbits. If you want revenge, you must first survive Yeenoghu's evil Hunters. After dealing with the gnoll hunters, the heroes can try to reclaim their lost equipment and exact revenge on the tribe, which lairs in the caves beneath Dead Gnoll’s Eye Socket." Pgs. 2-14

A job has come up for your party straight from the leader of Phoenix! A trade deal is desired with the leader of an island chain known for Ioun Stones. The Zephyr has requested that your party go and use your skills to negotiate the deal. Upon arrival, your talents serve you well but King Homa requires that your talents serve him...
Stories of misfortune are often exaggerated, especially when they have been retold many times. For that reason, most people aren't taking seriously the claim that a sea monster living along the coast is eating whole ships full of sailors and swallowing entire families. But there's no denying a few facts -- the town of Lochfell is losing its citizens to a sea monster (one that walks on water no less), someone is stealing that same town's dead, and ships are beginning to choose other ports for unloading their goods. Such a scenario could doom the residents of the small port town to either a monster's gullet or the poorhouse. No one seems to know whether the town's two ongoing problems are connected, but the sea monster never leaves behind a corpse to bury. Is it collecting bodies for some dark purpose? Or did some more powerful evil creature create the sea monster to do its dirty work? Someone in Lochfell knows the answer, and it's up to the PCs to find it out. Lochfell’s Secret is a short D&D adventure for four 15th level player characters (PCs). The story is set in and around the port town of Lochfell. You can place the action in any section of your campaign world where a coastal town on a bay might exist. If there is a small town that the PCs visited in a past adventure but haven’t returned to in quite a while, so much the better. As always, feel free to adapt the material presented here as you see fit to make it work with your campaign.
Sometimes it is the simplest of tasks which end up taking much more of time and energy than they should. When the party is asked by the local sage to collect some rare flora, it feels like relatively easy money; a journey into the woods they’ve traveled before, a conversation with someone they’ve met before and then on to gather the crop. The characters can hear the Thirsty Serpent tavern calling them after a brisk afternoon’s work. But the PCs’ plans go awry when it turns out nothing is quite that straightforward. Deals have to be struck, foes defeated, anger and scorn dealt with and then the whole process gone through again. When there is duplicity at every turn and double-crossing is done with relish, the PCs have to keep their wits and weapons equally sharp. Dealing with someone who is prepared to cross the line between humiliation and harm at a moment’s notice is a tough challenge; this quickly becomes about much more than mere mushrooms!

The Tranquil foothills of the Sword Mountains are quickly plunged into chaos, as a series of earthquakes spread their way through the region. Adding to this danger, bands of vicious, flesh-eating monstrosities have clawed out of the shattered earth, attacking travellers and local residents. Rumours of wealth and riches have drawn the adventurers to the area; little do they know that it is not gold and jewels these monsters protect, but a volatile portal into the Underdark with a disturbing secret.

Missing relics and a mysterious well. These are the things that have drawn your party to this idyllic region of the land. Why would someone take sacred objects, what do they have to do with each other…and why does the trail lead to a well in the middle of a lake?
A search for the ghostly dragon of the Deadwaters. The sage's deal is simple: The more you learn about the dragon, the richer you get. In this adventure, the bard Rondelle offers players rewards for learning all they can about a mysterious dragon that has been sighted in the area. Pgs. 22-38

The Cave on Foggy Hook is the first of three connected adventures in the village of Hookholm and is aimed at busy or first time Dungeon Masters. This adventure is designed for 3-5 1st level characters and can be played in a single 3-5 hour session excluding character creation. In this adventure the party will find themselves in Hookholm, a small coastal village rebuilding after a devastating storm almost wiped it off the map. The village is located on the inner curve of the Foggy Hook, a spit of marshy land jutting into the Grey Sea. Beset by the sort of calamities that new adventurers will be able to sink their teeth into and will offer opportunities for roleplaying, puzzle solving, exploration and combat. Includes 5 maps in a number of variations, a brand new monster in the vicious Kuo-toa Feral, and a new chase complications table for chases through swamps or marshes.

"The Pirates' Cove" is the lair of a blasphemous cult, suitable for four or five 5th level characters. This adventure can be finished in a single session.

Conquest, not beauty, is in the eyes of this beholder. A promise of adventure and riches, with a hint of total annihilation. The party should also have several powerful magical items, since the challenge that it faces is great. The geographical background and the local population are left vague so that the adventure can fit any campaign setting. Pgs. 39-44

The game is afoot in the royal palace. A thief prowls the dwarven palace, but even more goes on than meets the eye. Set in in a dwarven kingdom, a peace treaty with an aggressive rival kingdom is to be signed with ceremonial gifts exchanged to mark the occasion. However the treaty is put in jeopardy when the ceremonial sword that was gifted to the kingdom is stolen before the signing. The adventure begins when the characters receive a vision that directs them to help the kingdom. They must investigate the mystery of the missing sword, navigating a diverse cast of palace dwarves in order to preserve peace in the kingdom. A tale of intrigue, can the heroes find the sword before it is too late? Pgs. 16-32
The enemy you hunt may not be the enemy you find. A midnight encounter with a halfling guerilla and a vengeful magic-user. Pgs. 33-38
The best of intentions. Pay your taxes or go to jail - and don't even thing about using magic. Pgs. 8-23

Trapped in the dungeons of the Slave Lords! The hardy adventurers must find a way out, with only their wits and courage to help them. But can they do it before everything is destroyed by the dreaded Earth Dragon? This module contains a challenging scenario for experienced players, the tournament scoring system, and nine fully-equipped playtested characters. Also included are large-scale referee maps, playing aids, notes, and background information. A4 is a complete adventure in itself, but can also be used in conjunction with A1 (SLAVE PITS OF THE UNDERCITY), A2 (SECRET OF THE SLAVERS' STOCKADE), and A3 (ASSAULT ON THE AERIE OF THE SLAVE LORDS). TSR 9042
When devils slay the knightly leader of Arwyll Stead and orcs from the Hell's Fury tribe attack the town, all hope seems lost for the brave people living on Lastwall's border. The coincidental arrival of the mysterious half-orc Vegazi also raises unsettling questions, and it's up to the heroes to make sense of these events and end the Hell's Fury tribe's threat to Arwyll Stead once and for all. What does Vegazi have to do with the raiders' diabolical plot? Who will rally Arwyll Stead now that the town's icon has been cut down? And who is the mastermind orchestrating the orc tribe's alliance with devils from beyond?