
Putting a Krampus in the Holiday is a tongue in cheek adventure for a group of low level PCs. This scenario takes place during the Filbar holiday of “Giftus” a ten day celebration that culminates in a gift exchange. This year’s holiday is threatened when a jolly Gnome finds a few items that turn a happy holiday into a potential nightmare! A short little adventure that can be played after your own holiday celebration!
Freeport is a fantasy “free city” you can place in a fantastic setting. Its basic premise is a pirate city gone legit… at least on the surface. In truth, the pirate tradition is alive and well in Freeport, but camouflaged by a veneer of respectability. These days the city’s pirates are privateers, legalized pirates Freeport loans out to the highest bidder. You’ll learn more in the short history of the city that follows. This should help give you a taste of the flavor of Freeport before the adventure begins and the given background is all you need to run this adventure. It is an ideal starting place for a new campaign as the player characters find themselves stranded in Freeport after a deal goes sour. A seemingly simple job plunges them into the strange underside of the city, where they uncover secrets worth dying for. Death in Freeport is the first from the Freeport trilogy, together with Terror in Freeport and Madness in Freeport. Synopsis: Death in Freeport drops the player characters into the midst of political and magical intrigue, as the hidden Brotherhood of the Yellow Sign manipulates events to bring its dread god to the world. Freeport is still a bustling center of trade, but evil currents run beneath the surface. There are secrets here, and questions unanswered. The characters will undoubtedly learn there is more here than they expect in a simple seaport. The question is, will that knowledge kill them? As the adventure begins, the player characters (PCs) have just come to Freeport on a merchant ship. While on the docks, the PCs are attacked by a press gang, who mistake them for easy marks. The press gang is handily beaten off; since they are unused to real resistance. A bookish young man named Brother Egil then approaches the PCs. He says that he’s been looking for a group that can take of itself, and that he has a job for them if they are interested: finding a missing librarian. The missing man, Lucius, disappeared two days previously, and Egil is eager to find him. Egil gives the PCs some background on Lucius and his strange behavior. The PCs are then free to investigate: They are likely to visit Lucius’s home, the temple to the God of Knowledge, and an orc pirate ship. This should form a picture of Lucius as a man searching for his own past—who found something he wasn’t counting on. Following a trail of clues, the PCs learn about the Brotherhood of the Yellow Sign. With a little luck, the PCs can trail the cultists back to their hideout, penetrate the lair, and discover secret tunnels underneath it. Deep underground they find degenerate serpent people, and eventually Lucius himself. The librarian has been tortured badly and will die without aid. The PCs also have to deal with the leader of the cult, a man they may recognize from the temple. When the cult priest is slain, they are in for an even bigger surprise. He was not human at all, but a serpent man in disguise. What this means for Freeport only the gods can say.

When a wizard makes a mistake, he makes a MISTAKE. Hirward the Wizard has a little problem on his hands - and it's destroying his fortress, followers and future. A good mix of character types is strongly advised, but paladins, rangers, dwarves, and gnomes may not be comfortable sparing the lives of Hirward’s kobold assistants. A generally neutral party composed of humans and half-orcs will stand the best chance of completing Hirward’s Task. This not a standard "hack-and-slash” adventure. The PCs will have to do some fighting to he successful in completing the module, but most of the time they must use their brains to figure out the best way to complete their mission. Pgs. 45-64

Your expedition to the wastelands proved fruitless until you came across a group of Bedouins. The locals report that they may have found a tomb hidden below the swirling desert sands. Intrigued, you and your group examine the site unaware that you are about to stumble into the deadly Gonnagetcha Tomb!
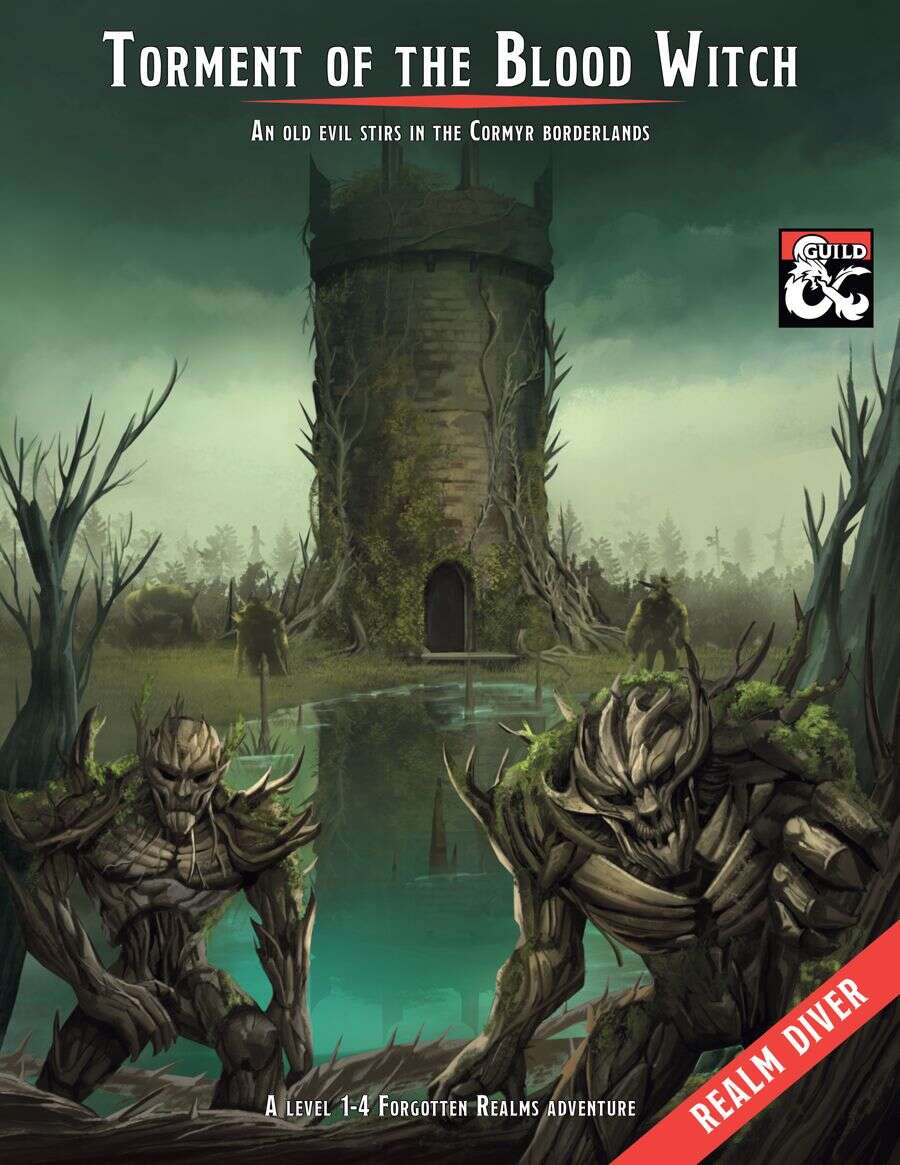
The town of Proskur has been cut off from the rest of the kingdom of Cormyr by a terrible storm, just as its people begins to suffer from a feinting sickness. Now the crops are failing. Are these the acts of a vengeful god? Or something more sinister? While aiding the good peoples of Cormyr in their plight against goblin hordes, the restless dead, a band of cut-throat pirates and the wilds of the Gritstone Moorland, the adventurers must investigate the true cause behind these calamities while uncovering a century old past, following in the footsteps of a legendary band of knights. Will they bring the fight to the evil hag, Bad Blood Hattie in her accursed Bloodtower lair? Or doom Proskur to become a blighted ruin?

The infamous Scorpion Prince ruled his domain centuries ago, but the lands are still desolate, a testament to his poisonous influence. His terrified subjects rejoiced in his death but also feared he would return if not interred properly. To ensure the prince's happiness in the afterlife and his tomb's security, his people erected a great monument and created trap-filled chambers to house and protect his body and his wealth.

Beginning in the prison of the Castellan of Whitecliff, this campaign arc takes the players from level one to four, presented as a sandbox area in a lonely and gritty peninsula full of villains and opportunities for the players to explore. Much like Stonehell, but for regional play. Published by Coldlight Press

Eberron Gothic: Curse of the Thornwood is an intricate, character-driven mystery set against the sins of the past. On a journey to Arythawn Keep at the edge of the Mournland, the adventurers stop for the evening in the Thranish village of Brightdawn where they discover that there are dark secrets hidden in the wilds nearby. . .
Inspired by the "Happy Fun Ball" from the web series Critical Role, The Cube of Vanya is a magical adventure through demi-planes created by an ancient wizard, now destabilized by a malevolent dragon. The adventurers find themselves trapped within a series of themed planes with no idea how they got there. Navigating these planes to find a means of escape, they uncover the secrets of the cube while piecing back together their own memory. During the campaign the adventurers may fight shadow demons in an inn which is really a prison, flee a tornado while perched perilously in the sky, forge a weapon within a volcano, and much more. The module is structured in a non linear manner allowing the adventurers to choose their own way, or for the DM to pick and choose their favourite bits to highlight. The adventure was written with four level 5 players in mind but it would be easy to tweak for different sized groups around that level.
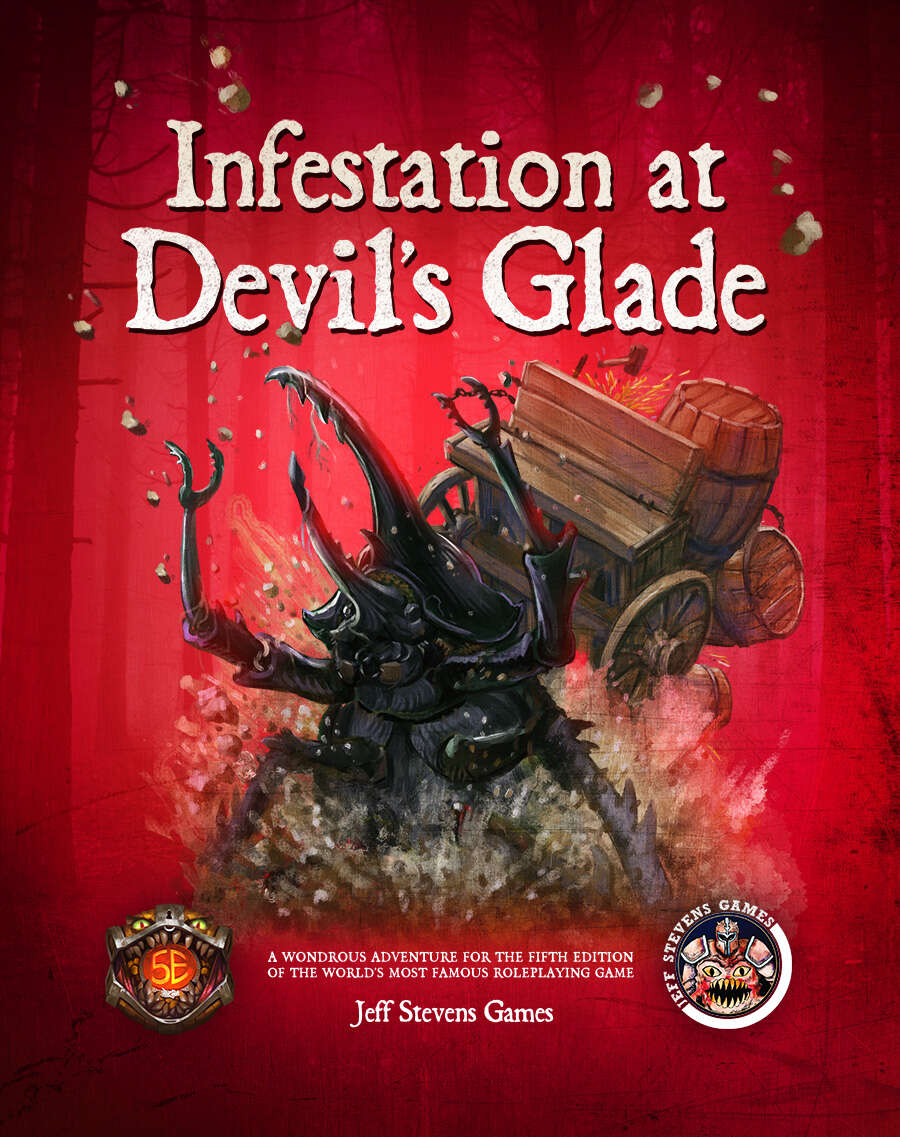
The town of Devil's Glade is under attack! Swarming insects have driven the residents out of their homes and businesses, and giant insects patrol the town square. Who or what has brought these creepy-crawlies to Devil's Glade? What's their motive? Are your heroes brave enough to put an end to the infestation? Infestation at Devil's Glade is a 2- to 4-hour adventure designed for four to five characters of 1st to 4th level, and is optimized for 2nd level characters. Scaling Suggestions are included, allowing you to play this adventure with characters of 5th to 6th level. Infestation at Devil's Glade isn't just a short adventure. We provide you with a location to which your heroes can return, or even use as a home base. The Supplement Includes: Adventure. The main adventure focuses on the heroes cleaning the town of the infesting insects and the villains who brought them. Beginning at The Fork (a tavern where many of the residents have made camp), the characters learn about the infestation of Devil's Glade, and are hired to look into the matter. NPCs. The adventure is filled with fun and engaging NPCs. During the characters' time at The Fork, they have the opportunity to talk with NPCs, help them, and learn more about the infestation. After the heroes return Devil's Glade to normal, the merchants and residents return, giving your characters unique shops to explore and quests to complete. Cursed Mask. The crux of the problem - a cursed mask that slowly transforms the attuned creature into a giant, insect monstrosity, and gives them power over insects. To end the infestation, the adventurers must confront the partially transformed person wearing the mask. Shops & Services. Devil's Glade contains shops and services the characters can explore, including therapeutic mud baths, a diner specializing in eggs, a trinket shop, a candle maker, and a dentist. Side Quests. We provide several side quests for before and after the main adventure, allowing you to increase the main adventure's run-time, and provide you with material for after the main adventure. Maps. The adventure contains maps for the main locations and major side quests. Each map is hand-drawn by Jean Lorber. Art. NO AI! The book is filled with fantastic, original artwork by Matt Morrow Art. Also Included: Map Files. Both grid and non-grid maps are included and available to download. Special VTT Tokens and Assets. Several custom tokens and art assets are included for VTT play.

Having put down a rising of giants, it was discovered that the motivating force behind their depredations was that of long-forgotten evil - the Dark Elves. Determined to seek out these creatures, a body of doughty adventurers mounted an expedition to learn the strength of the Drow and bring retribution to them (DUNGEON MODULE D1, DESCENT INTO THE DEPTHS OF THE EARTH). This module contains background information, a large-scale referee's map with a matching partial map for players, referee's notes, special exploration and encounter pieces, a large map detailing a temple complex area, encounter and map matrix keys, and an additional section pertaining to a pair of unique new creatures for use with this module and the game as a whole. A complete setting for play of ADVANCED DUNGEONS & DRAGONS is contained herein. This module can be played alone, as the second part of a series of three modules (with DESCENT INTO THE DEPTHS OF THE EARTH, D1, and VAULT OF THE DROW, D3), or as the fourth part of a continuing scenario (DUNGEON MODULES G1, G2, G3, D1, D2, D3, and Q1, QUEEN OF THE DEMONWEB PITS). TSR 9020, From 1978

God of Ore is a 3rd-level adventure that takes the characters from the quiet, mountainside town of Miners’ Refuge into the heart of the Stoneheart Mountains in pursuit of a failed pilgrimage to discover a phony religious relic deep inside legendary Mithral Mountain. The dark, twisting tunnels that bore into the fabled mountain soon reveal that some mysteries are not what they first appear to be.

The Pathfinder Society seeks the ancient ruby ring of the salamander and it falls to a team of Pathfinders to find it. Last seen in the Tri-Towers Yard, a once elite academy for the youth of Absalom, the ruby ring is now lost in the Drownyard, all that remains of Tri-Towers after it was destroyed a decade ago in the great quake. The Pathfinders must risk the strange black ichors and salty brine to find their prize—will they risk their very souls as well?

This adventure is more of a classic dungeon crawl, themed around the accidentally terrifying dreamscape of an elven girl trapped in a nightmare of her own making. The dungeon shifts and exits move about as the party explores, making each run through the dungeon a unique experience and allowing for infinite replays of the same adventure.

Exploring Baba Yaga's Dancing Hut. This adventure design to test high level PCs can be used in a variety of scenarios as the DM sees fit.
Most adventurers like to think that when their number is finally up, their colleagues will bring them home, either to be raised or at least returned to their families for a proper burial. But how far will the PCs go in order to do right by a fallen adventurer? And will they draw the line at hauling his coffin out of the Underdark? Pgs. 20-40

A Gritty OSR Fantasy Setting by Travis Legge The mortal lands are divided. A dozen kingdoms lie scattered across the world, separated by dangerous wilds filled with bandits and monsters. The bravest mortals act as adventurers, guiding travelers between the kingdoms, killing monsters to thin their numbers, and plundering ruins in search of the lost treasures of the golden age. This is the world of Odysseys & Overlords! The party are traveling west through the Untamed Gauntlet, on their way to somewhere else and using a stream to guide their steps. They step out from under the eaves of the forest to spy looming before them a cliff, a tall wall of stone which stretches away to either side as far as they can see. A waterfall cascades onto sharp rocks into a pool from which pours the stream they were following. The sheer cliff is easily 100 feet high, and too wet and slick to climb safely, though it can be tried. Atop the cliff is a bare stone hill which looks like it was at one time worked by intelligent hands; a look-out post of sorts has been carved into its southernmost peak. The map says it’s called “Wyvernseeker Rock,” but it doesn’t say why. The hill appears deserted. A long age ago, beyond mortal memory, a forgotten people built a watching post and refuge atop and within Wyvernseeker Rock. A hundred years ago, an adventurer named Olaf Wyvernseeker claimed the Rock for his own and set out with companions to clear the lands thereabouts. They were never heard from again. The upper chambers of the Rock are a convenient lair for a Giant Rhadogessa and its spider servants. Still, it’s got to be safer than climbing the cliff. Right? Published by Aegis Studios

A half-marilith, half-medusa druidess lich known as the Hate Blossom lairs in this dungeon, having been run out of mortal society and shunned by demonkind. She possesses the petrified-yet-still-living body of Melenkir, the first human arch-mage and the single creature to remember a ritual that may save the realm from an extraplanar threat. Only slaying Hate Blossom or convincing her to lift the curse will revive Melenkir. Published by Defy Danger and Save Verses Death

This dungeon is suitable as a one-shot or drop-in for characters between levels 12 and 17. Taken from the Against the Idol of the Sun high-level hexcrawl campaign, the Death Knight's Tomb is a location-based exploration adventure. It features increasing localized time distortions that ultimately pit the party in a fight against an ogre Death Knight and his minions who just destroyed an elven time lab over ten millenia ago, which is just a few seconds ago in relative terms at the bottom level. There are six distinct sections to the dungeon containing four combat encounters of increasing difficulty. As written, the party enters the structure to rescue an overly adventurous Scorpionfolk couple and their rescuers, but they can be omitted or rewritten to any other species.

North Sordack Valley is set northeast of Commerstance and was originally slated for the Filbar Dual series but the players didn’t go in that direction. This area is filled with individual challenges synonymous with the Filbar Area series. This ‘sandbox’ style adventure has multiple different encounters can be used in a variety of ways. The general setting allows you to customize it for your own campaign! This adventure setting was designed for 1st/2nd Edition AD&D for the Filbar Dual Campaign for various level groups of adventurers. This adventure is easily adaptable to most any game and system. Save yourself some time and utilize it for several one shot adventures or a continuing campaign setting! Don’t forget to follow us on Twitter @FilbarRPG for extra information.