
None know from where the Heresiarch first came, but all remember the night that it did. It rode down from the bleeding stars on a great serpent, hurling bolts of obsidian lightning that shattered the monuments and capitols of every nation. Its infernal army swept aside the defenses of the mortal empires in a single hour, decimating legions once thought to be the invincible fist of humanity's god-kings. Faceless priests - each bearing the symbol of the trident - drifted through the fallen cities and scorched villages on a frigid wind, and when they rose to greet the huddled men and women ringed by their festering, bloated dead, they spoke a single, simple offer: worship the Heresiarch or die. Thousands of crusaders fell tonight so that you might be given this chance. In a last stand that, for the first time, united all of the empires of humanity as brothers and sisters, a way was cleared into an infernal stronghold said to contain a gate to the Heresiarch’s fane. All is silent save for the clangor of distant battle. Surrounded by grim-faced knights and teary-eyed peasants – their hands clasped in desperate hope – you step through the glowing, churning doorway, knowing there will be no help and likely no return. Published by Defy Danger and Save Versus Death

When you read the posting for this job, you knew what you were getting yourself into. "Lady of means requires the assistance of a stalwart group of adventurers willing to undertake a mission of the utmost importance. Discretion is required." Words like that never mean that the woman in question is looking for someone to weed her Garden - unless, of course, it's full of man-eating plants. Those are the kinds of words you only post if you are really in a bind. If it's a matter of life and death. If you're desperate for help and willing to pay for it through the nose. It just so happens that you've made yourself quite a reputation lending just that kind of aid to people in just that kind of need. And the money hasn't hurt you any either. So when Lady Elena Zadrian tells you that her father - the near legendary alchemist Sir Timoth Zadrian - has gone missing, well, you're not all that surprised. Lady Elena looks upon you once again, brushing the long blonde hair from her bright blue, tears soaked eyes. "My father lives outside of a village only four days ride from here, a sleepy, little place called Cuthder," she says. "He comes to see me every 4 months. He's a forgetful, old man, but I could set my clock by his visits." She chokes back a sob. "It's been eight months since I last saw him. I fear something has gone horribly awry. Either brigands have robbed his tiny castle, or one of his experiments may have left him dead - or worse." The lady stares you straight in the eye, and you can almost taste her desperation." My father is a good man, wise and Noble, but if word of this disappearance were to get out, it would hurl my household into a shambles. I need you to travel to his castle and learn for me what has happened to him, quickly and quietly." "Please," she begs of you, her Ruby painted lower lip beginning to quiver. "I need your help. And I'm willing to pay - handsomely." She has your attention.

Mimic Madness is a psudeo-adventure with four interesting mimic encounters. These four encounters are structured in a way that they can be used together as one adventure, or each individually dropped into any adventure from EL4 to 7. The encounters vary the mimic's tactics significantly, such as by having them we a weapon rack that wields the weapon it holds, pretending to be animated furniture using its ability to speak, and pretending to be a floor covering a pit; none of them rely on the typical chest or door mimics. Pgs. 24-25
Tall tales of hidden riches are common in the pirate-infested taverns of the Shackles, but when Captain Varossa Lanteri claims to know the location of the secret treasure hoard of legendary Captain Jemma Redclaw, it seems she may be telling the truth. Captain Lanteri hires the PCs on as crew to help her assemble the magic key that will open the door to Redclaw’s treasure... and the ancient cyclops stronghold in which it’s hidden! Can the PCs survive long enough to claim their share of the lost loot, or will their enemies—or their allies—send them to a watery grave?

In this town, nothing goes like clockwork. A voice in the darkness offered him power, with only one string attached: first he had to find some adventurers. A fiend and minions of the plane of fire have set up shop beneath a small town, and have been attracting evil minions to their lair! In this town of Jenkel, the religious leader (named Broderick) is secretly under the influence of the demon and has been doing her will out of his own greed for power. A tilted pyramid appeared in the town years ago, and is actually the tip of a tower buried in the town. The tower leads to a dungeon and a shrine where the party can fight off the demon and rid the town of the evil influence. Pgs. 18-31

5e Solo Gamebooks presents Drums at Daggerford, the fifth in our continual series of solo adventures set in the Forgotten Realms. This quest enables you to experience D&D without a dungeon master! Simply roll up a level 5 PC and get playing. Drums at Daggerford is the way you must experience solo adventuring. Players and DMs beware, a new standard has been set. This solo adventure continues the story arc first begun in Death Knight’s Squire, developed further in Tyrant of Zhentil Keep & Citadel of the Raven, and left in The Tortured Land. Drums at Daggerford’s ability to echo a Tolkien spirit reverberates throughout the narrative no matter which path you may choose. But choose wisely because a razor’s edge separates peril from glory. Over a year in the writing, this latest instalment in our solo adventure series is a mini sandbox campaign that will give you anywhere up to 8 hours of solo adventuring enjoyment. Completionists and those who like to replay these adventures will get even more gametime. There are mysteries to be uncovered, items and sidekicks to be gained, codewords to unlock and villains to conquer! With lots of exploration, meaningful decisions, hard fights, and a variety of rewards and stories, Drums at Daggerford will continue to resonate with you long after solving the big mystery behind Krond Vikkurk’s malevolent plans.

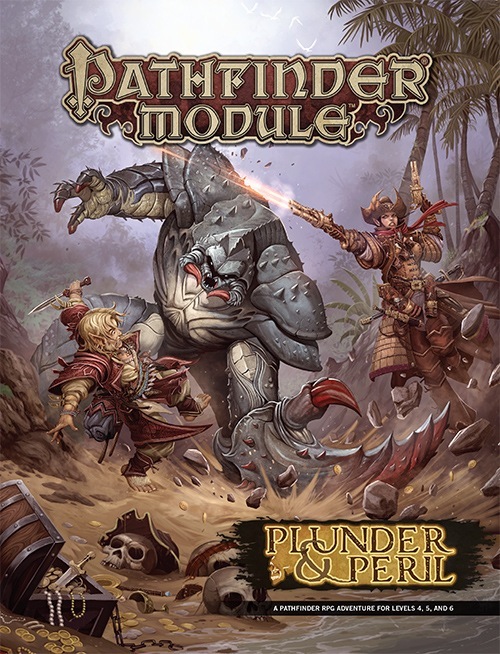
A wealthy sea-trader hires the PCs to solve a pirate problem and recover stolen supplies. Almost 100 pirates have made base in a treacherous cove. When the PCs arrive, most of the pirates are at sea on a mission. A large host of pirates remain in the base and force PCs to be creative with their approach, as a direct attack would be met with an overwhelming swarm of pirates. Unknown to the player's as they scheme is that the ship will soon return with its massive crew. The treasure cave is guarded by the dead sailors foolish enough to try and steal from the captain, who is the only one who can enter the cave safely. Players must be creative to deal with the pirates in the base and the approaching ship while still securing the plundered supplies in the treasure cave.

The colony of Farshore has survived on its own for years, a secluded and struggling hamlet perched on the western shore of the tiny island of Temute. An island dwarfed by the savage landscape across the narrow channel to the north, a landscape of rugged mountains, tangled jungles, and trackless swamps. This is the Isle of Dread, and its resources and hidden treasures are matched only by its peril. Yet for all these dangers, what may bring doom to Farshore is not an invasion of inhuman monsters from the mainland, but an invasion of all-too-human monsters from across the sea. "Tides of Dread" is the fifth chapter of the Savage Tides Adventure Path, a complete campaign consisting of 12 adventures appearing in Dungeon magazine. For additional aid in running this campaign, check out Dragon magazine's monthly "Savage Tidings" articles, a series that helps players and DMs prepare for and expand upon the campaign. Issue #352 of Dragon magazine features rumors of Farshore, a helpful list of improvements the PCs can make to the colony, and other features to help get PCs oriented in their new home on the Isle of Dread. The destruction of a pirate ship signals the beginning of a Crimson Fleet invasion. The PCs must race against time to prepare for the onslaught before an old enemy can release another savage tide. Pgs. 28-59 Also see Pgs. 60-71 Backdrop: Farshore City of Hope.

Rumor has reached your ears that the legendary Amulet of Rafael is in this region. Further investigation has revealed that a reclusive nobleman in the north called Xantus is currently in possession of the item. While details are sketchy about the item, it is well known that quite powerful in the hands of a mage. You decide that you will go north and locate the “Ice Lord” and see if he is willing to part with the item.

Your cousin Rolph is dead - and while there is cause for sadness, there is also cause for celebration. As his heir, you were willed his dominion: Fenhold. Of course, the Deep Swamp is threatening to engulf all of your new holding. People are seeing ghosts and disappearing mysteriously. Animals die without reason, and crops are suddenly blighted. The farmers don't like the swampdwellers, the swampdwellers don't like the farmers, and no one likes the halflings. The entire civil service of the dominion seems to have either worked for the failure of the dominion or resigned due to actions of the others. It's going to be tough task to make all this ship-shape once again, but you're 15th level now. Isn't it about time you settled down? TSR 9210

Barbarian forces are handing out trouble to the combined forces of the Inydo Federation and your assistance has been requested! You have been told that the aggressive forces are being bolstered by a rumored, powerful wizard. The general of the military has asked you to skirt around the major engagement areas and attempt to locate and capture/kill the troublesome wizard. A major windfall will be given to the PCs as Xalo Mendas, leader of Helvana is known to add treasure to agreements if handled “effectively”.

Thail Donnodol, an eleven scholar, has been imprisoned for crimes he did not commit. The law is no refuge. Only by breaking into the fortress prison of Granite’s End can the player character save Thail from a lifetime of misery. There’s only one problem: Thail Donnodol does not want to be saved. At least not until he finds the Vengeance of Olindor. Part 3 of the Olindor Trilogy.
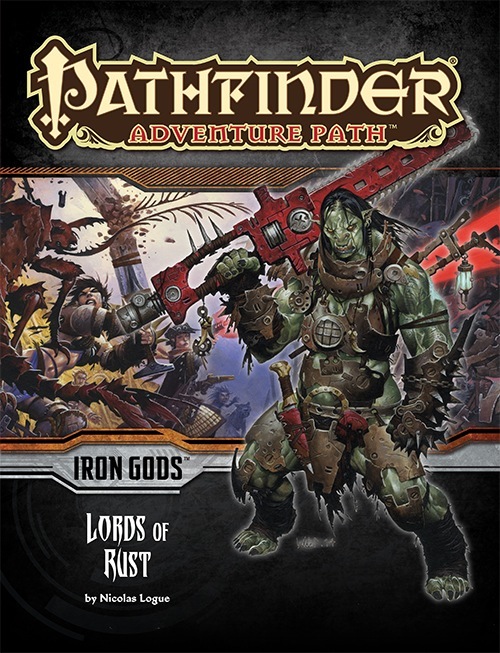
The heroes of the town of Torch follow a trail of clues to the sprawling junkyard known as Scrapwall, where bands of desperate and violent brigands vie for control of the technological remnants found within. The Lords of Rust dominate Scrapwall, and their swiftly rising power threatens more than just the town of Torch, for this gang has the support of one of the terrifying Gods of Numeria. What slumbers fitfully beneath the wreckage of Scrapwall could catapult the Lords of Rust into a new level of power if they're not stopped!

East of Beregost, nestled in the outskirts of the Wood of Sharp Teeth, Durlag’s Tower has intrigued and yet stymied adventurers for decades. Stuffed full of mechanical traps and arcane wards, and rumored to be inhabited by fiends, very few have managed to extract any REAL treasure from the former home of Durlag Trollkiller. However, a powerful item in the ancient fight against the giants is said to be housed there, and the cloud giant Baron Rajiram has committed significant resources toward recovering it. After a pleasant tea in her garden, SEER calls upon you to beat him there and put a stop to his efforts! Continued in Durlag's Tomb.

To Hell and Back Again is the perfect adventure for new players and veterans looking to experience Dungeons & Dragons in a new way! It's written as a solo adventure, where choices have gigantic consequences, but it also provides balanced rules to play with a group or a Dungeon Master as well! This 80 page adventure features: - A heart-pounding origins story that fits perfectly as either a prequel to Descent Into Avernus, a stand-alone adventure, or into your ongoing fantasy campaign. - Beloved characters like Lulu the hollyphant, Mad Maggie and her redcap gang, the archdevil Zariel, and many others brand new to this adventure. - Infernal War Machines, and exciting encounters with unique stat blocks. - Innovative Destiny and Traits mechanics that make your choices really matter. - A ton of possible outcomes that will fuel your character's many adventures to come! - Four gorgeous sample characters, with interactive character sheets designed to be new-player friendly so that you can jump right into the story if you'd like. - A community survey when you finish so that you can see how your outcomes and choices compared to other players!

Blinsky's Toyshop is our take on what happens to Blinsky and Piccolo during, or after the Curse of Strahd campaign. Blinsky, the toymaker in Vallaki with the cute monkey wearing a pink tutu, received a large inheritance from a long-time client. The client, Obtavius Swat, a retired adventurer and avid collector of toys, left his entire estate to Blinsky. The estate included coin, precious gems, art, and his collection of toys, some made by Blinsky and others he acquired during his travels. Blinsky used the fortune to pay a wizard to create a small island in the middle of Lake Zarovich, located just outside of Vallaki. He then paid masons and workers to build a fantastic new toyshop, which he designed to be an experience for both the young and old alike. Though the number of children in Barovia was increasing, mostly imparted to the devil Strahd’s downfall, Blinsky wanted to touch the inner child of the adults in the city. He wanted happiness. He wanted smiles. He named the castle Blinsky’s Toyshop of Marvels. One of the toys, a small silver tiara kept in a black satin-lined ivory jewelry box, was such a lovely piece. Blinsky couldn’t stand the thought of leaving it in the box. He already had enough gold and losing the small tiara wouldn’t be a large loss, so he decided to give it to his monkey – Piccolo (see Creatures of the Toyshop). He smiled at the thought of her running around in her pretty, shiny tiara. Sadly, as Barovian luck would have it, trapped inside the tiara is the sole of an evil gnome wizard named Aribetha Strangge. In his old age, Obtavious Swat forgot that he and his fellow adventurers used the tiara to imprison the gnome’s soul. Yesterday, when Blinsky placed the tiara on Piccolo’s head, silver tendrils cascaded from the tiara and into poor Piccolo’s skull, allowing Aribetha to control the monkey. Now, Aribetha has incapacitated Blinsky in the toyshop’s tower, brought many of the toys to life, and imprisoned or killed many of the workers and customers. The adventure includes costumes (which the character may wear), Strahd Hand Puppets, and a possessed Piccolo.

Devastated in a war with a nearby wizards' school, the Fighters' Academy has since been surrounded by a foul and dank swamp - the Gloomfens. Since the climatctic battle between the wizards and fighters, the tower has decayed. The spirit of the head of the academy haunts the building, eternally plotting his revenge on the wizards who killed him. his loyal sutdents remain faithful to him even in death. Other foul undead have made their home in the rotting, spacious academy. From their lair, they make forays into farmsteads near the swamp in search of victims to feed their unspeakable appetites. The Problem of these terrible attacks by the savage undead will not stop until the evil that has found a home at the tower is burned from the face of the land forever. Will your party heed the call and help the town of Melinir? Will they be able to clear the former Academy of its undead? Lair of the Vampire Lord is the third in a three part adventure, The Haunted Tower. Or, it can be ran as a stand alone adventure. The choice is up to you. Part of TSR 1081 The Haunted Tower

The Ogre Magi of Jade Rock is a companion adventure made to go along with the events unfolding in Folio#16 (WS3 Distant Turtle City). It contains information needed to run a side adventure that will help characters in their journey through Distant Turtle City. The Ogre Magi of Jade Rock has invited the characters to reclaim his lost home, and in turn collect valuable supplies of magical healing that will certainly be required to win the day against the corrupted forces of the city's fortified castle. This adventure is formatted to both 1E & 5E gaming rules.

The Last Point is a prison and outpost of the Corrive Empire, a realm ruled by a cruel green dragon named Lady Corrive. The Corrivians are well known for their hatred of magic users, and their extensive slave trade industry. A forest realm with coasts on three sides and mountains running through the center, Corrive is rich with a variety of resources. However, the rocky northern coast is out of the way of their navy and relies heavily on hired ships to help transport various goods including prisoners and slaves to isolated outposts, training centers, and slave colonies. The northwest coast of Corrive is rocky and many parts of it are elevated, making it isolated from much of the mainland. The Last Point is a recycling center where captives meant for death row who are either deemed “not important enough” to execute publicly or “too disgraceful” to execute publicly are sent to be tortured and then killed. The place seems to operate on sort of a “well, we have too many so some have to go now” policy. The Last Point has no official deadlines for killing.

Dracula, the Lord of Shadow and Darkness, has covered the land in shadow and dispatched armies of monsters and undead from his magical castle. His armies threaten to overrun major cities and plunge the world into a literal Dark Age. The last of the vampire-hunting clan that traditionally opposed him has disappeared, and still the armies advance. He must be stopped. If that's not enough motivation, it is well-known that his castle is full of magical items and great riches... but also great danger. If you've ever wanted D&D and Castlevania to meet, look no further. This adventure is exactly what you wanted. Every area of the castle poses different and unique challenges to keep the party engaged and on their toes. Written for the DM as a ready-to-run adventure, it is designed for four to six characters. The adventure starts at level 3 at the outer defenses of the castle, and ends with the party advancing to level 13 after defeating Dracula in an epic battle. The adventure includes documentation to help even a new DM succed, including suggestions for how to run each of the area "boss" monsters in combat. There are approximately 50 new enemies and over 3 dozen new magical items. It also comes with a list of suggested music for many areas of the castle, and a 25-page campaign log recounting an actual tabletop play-through of this adventure from the DM's perspective.