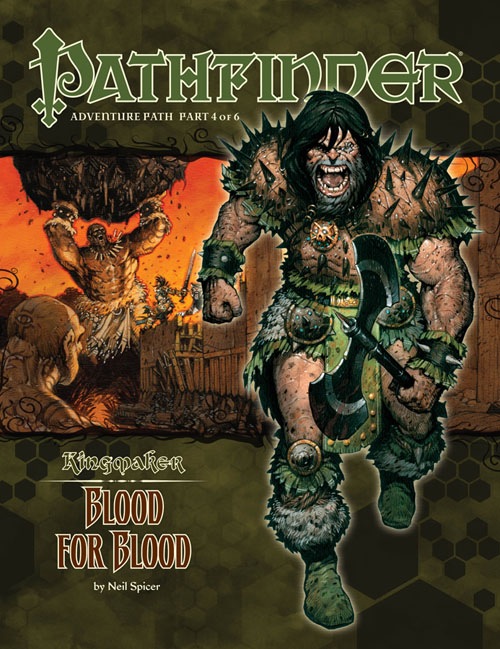
A Pathfinder Roleplaying Game adventure for 10th-level characters, this volume of Pathfinder Adventure Path is part 4 of 6 of the Kingmaker Adventure Path, in which the heroes win and defend a small kingdom from threats foreign and domestic. PCs should advance to 13th level by the end of this adventure. “Blood for Blood” begins with the PCs having returned home from solving the mystery of the Varnhold Vanishing. Shortly after their arrival, they learn that new problems have developed during their absence—there are rumors of an army marching toward their nation!The PCs race to the village of Tatzlford, where they help defend the village from an attack by a small but earnest force of bandits, barbarians, and several lumbering trolls after being warned in advance by a troubled woman who has fled from Fort Drelev to the west. Following the skirmish, she pleads with the PCs to save her father and sister from peril.From there, the PCs strike out into the swamplands of the Slough to the west, exploring new lands and finding opportunities to make new allies and eliminate long-term threats to the region. Their initial goal, though, should be infiltrating Fort Drelev, where they’ll have a chance to confront the traitor Drelev with his crimes and rescue the Fort’s beleaguered settlers. During this time, the PCs learn where Armag’s tribe has been holding the daughters of Drelev’s senior officers hostage. Arriving at the ancient site, the PCs attack Armag’s barbarian encampment and overcome the sinister powers of the Black Sisters to free the girls. Then, entering the tomb, they face deadly traps, ancient undead horrors from a war-torn age, and the trials of the tomb’s immortal, divine guardian. In the final chamber, the PCs encounter Armag himself, armed with the ancient sword of his namesake.
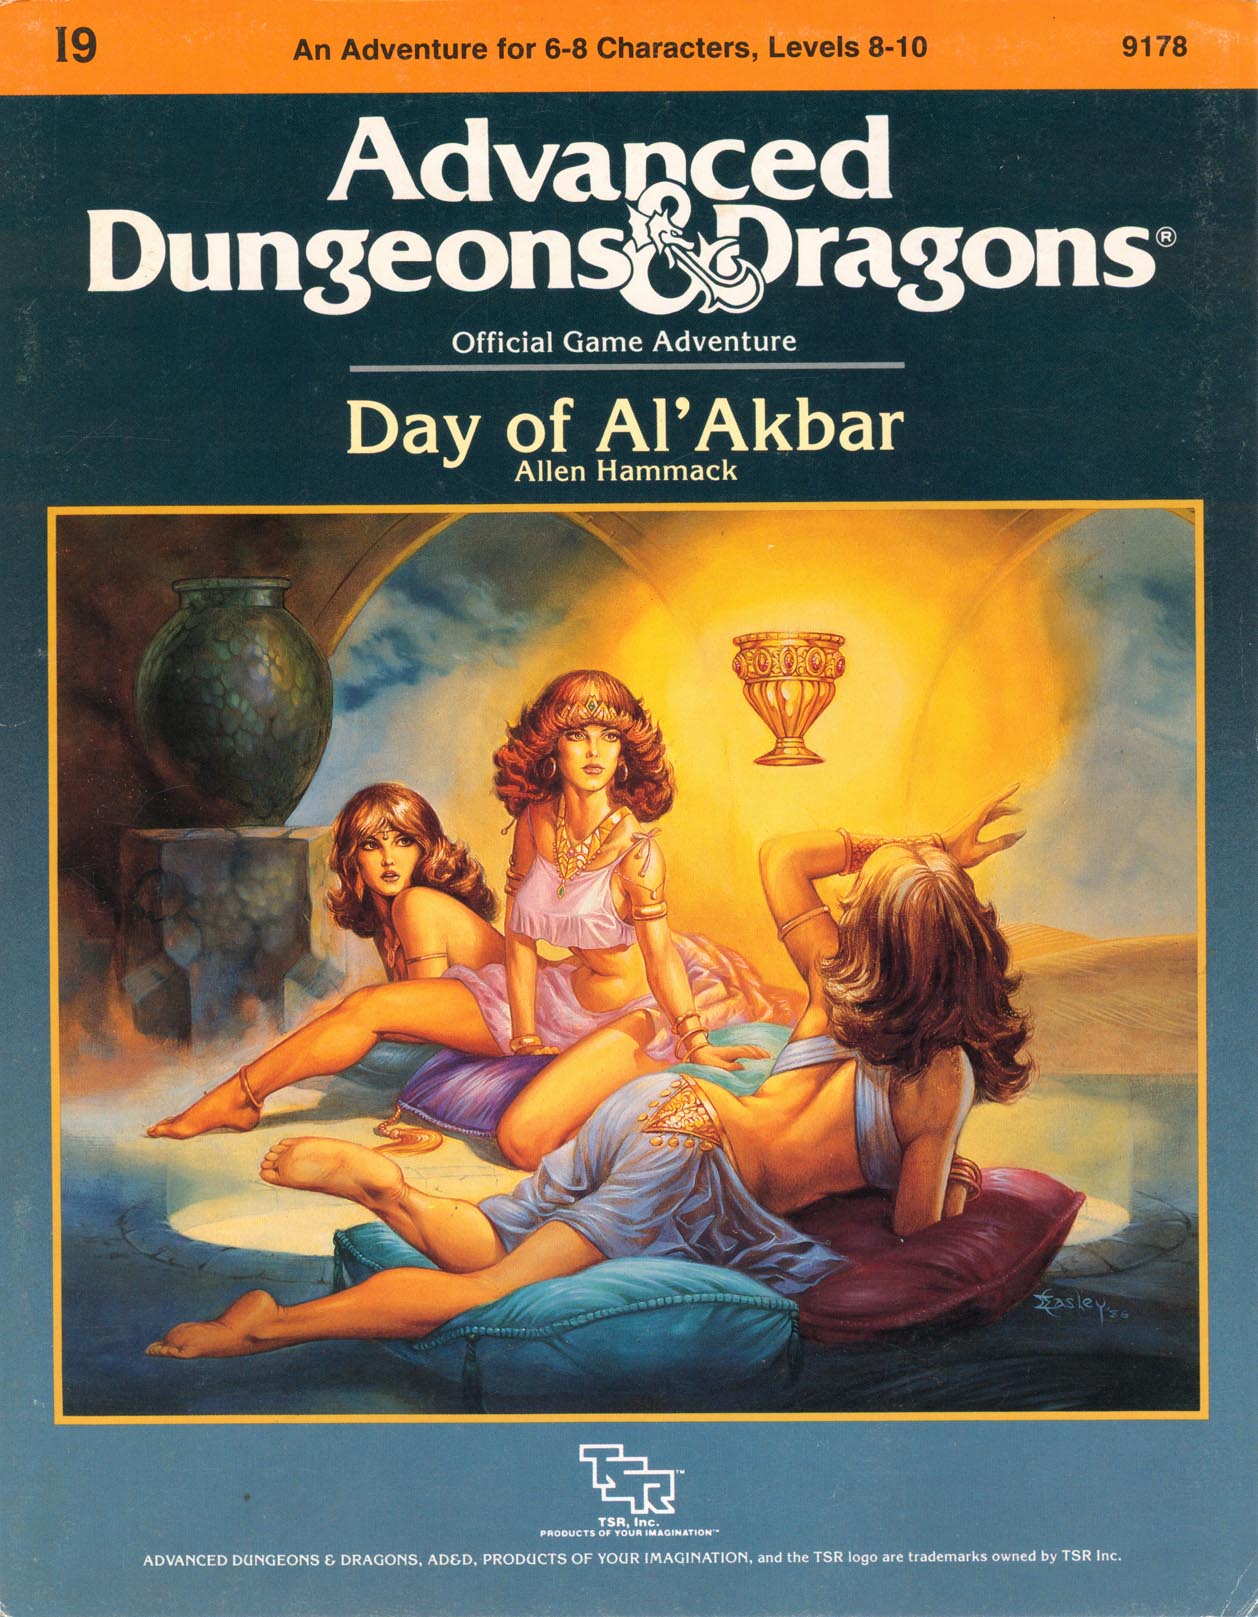
The land of Arir - a once peaceful desert country, dotted with oases, teeming with caravans - fell into the hand of infidels. The ruler, the dearly loved Sultan Amhara, was killed in the battle for the capital city of Khaibar. He left behind one of the greatest treasure stores ever amassed - jewels and coins, more than anyone had ever seen before or since - and in addition, the Cup and Talisman of Al'Akbar. A deadly plague sweeps your land. The holy men say that if only they had the Talisman, they could create cures for this dread disease. Many adventurers have tries and failed to find the Cup and Talisman. Now it is your turn. Find these treasures, and save your people! The journey is exciting, but treacherous. Do not be distracted by exotic sights and sounds, the strange foods. You must avoid being discovered by Al'Farzikh and his brigands, as you infiltrate the palace. Be wary - what is most beautiful may be most deadly, and what seems useless may be priceless. TSR 9178
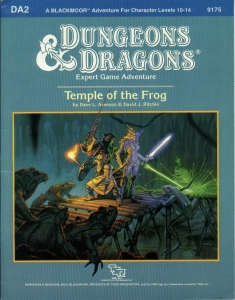
Green Death... That's what old hands call the Great Dismal Swamp. For centuries, this tangled maze of sluggish watercourses, stagnant ponds, and festering marshes has defended Blackmoor's southwestern frontier. Large armies and smaller parties have disappeared altogether inside its vast, dripping, claustrophobic corridors. Among those who have dropped from sigh in this arboral hell is young Rissa Aleford, one of Blackmoor's most important leaders. Carried off to the sinister City of the Fron, she is now being held by the eccentric Monks of the Swamp. By making the baroness captive, the deranged monks have serioulsy weakened Blackmoor at a time when enemies already threaten it from all sides. Yet, even as the Froggies gloat, the king of Blackmoor dispatches a small band of bold adventures to the rescue. Deep into the Great Dismal Swamp they must go - far from sunlight and sanity - there to seek and save the swamp, there to find the Temple of the Frog. TSR 9175

Not even memories of past glory live on in the gentle hills around the village of Kusnir. Today its people have more concern for commonplace things, like the harvest, trade, and the threat of death in the night! Kusnir is beset by a skulk. The attentions of such a creature are a curse on any community. Streets and alleys which ring to the voices of children by day become fearful, shadowy places by night. Men go abroad armed and in groups, while women and children stay behind locked doors and even there are not safe. But life goes on. The lot of the peasant is always hard, what cannot be prevented must be endured and, of course, things could be worse. Much worse. The skulk has begun to visit the village more and more often. Sometimes it kills, yet just as often it spares a victim, leaving clear signs of what it might have done had it wished. Its visits are now marked by strange and illegible symbols scrawled in blood on the walls of the buildings. The people are worried, helpless, and desperate. Desperate enough to welcome adventurers. UK2: "The Sentinel" (1983) is the second UK-series adventure, the fifth TSR UK adventure overall, the first solo effort by Morris, and the first half of the two-part Adlerweg series (whew!). It was run as a tournament at the GamesFair '83 Open, then published later in 1983. TSR 9101

While investigating rumors of a dangerous blue dragon wreaking havoc in the deep desert, the heroes tumble under the sands into the magically sealed dome of an ancient palace. The temporarily weakened dome reseals above them, and they are left to explore the golden palace of Zahadran, once seat of power for the legendary Caliph Ardishir the Magnificent. But the dome is weak because it has been assaulted by the mythical storm demon Azi Dahaka and his trapped minions, evil creatures that were sealed under the magical dome to keep them from ravaging an unsuspecting world.

Introductory Adventure that came bundled with some versions of the Holmes Basic version of D&D. Two powerful adventurers, Rogahn the Fearless and Zelligar the Unknown, have apparently deserted the stronghold they once occupied. The PCs have discovered a map which leads to it. First published in 1978, this is a basic dungeon crawl introducing players to many of the dungeoneering tropes. Location descriptions are provided but it is up to the DM to fill in the actual monsters and treasure for each one. TSR 9023

Follows DLQ1 Knight's Sword. Rumors are circulating that Flint's axe has been seen around Hillhome. It is up to the player characters to solve the mystery and find the legendary battle axe of one of the Heroes of the Lance. TSR 9382
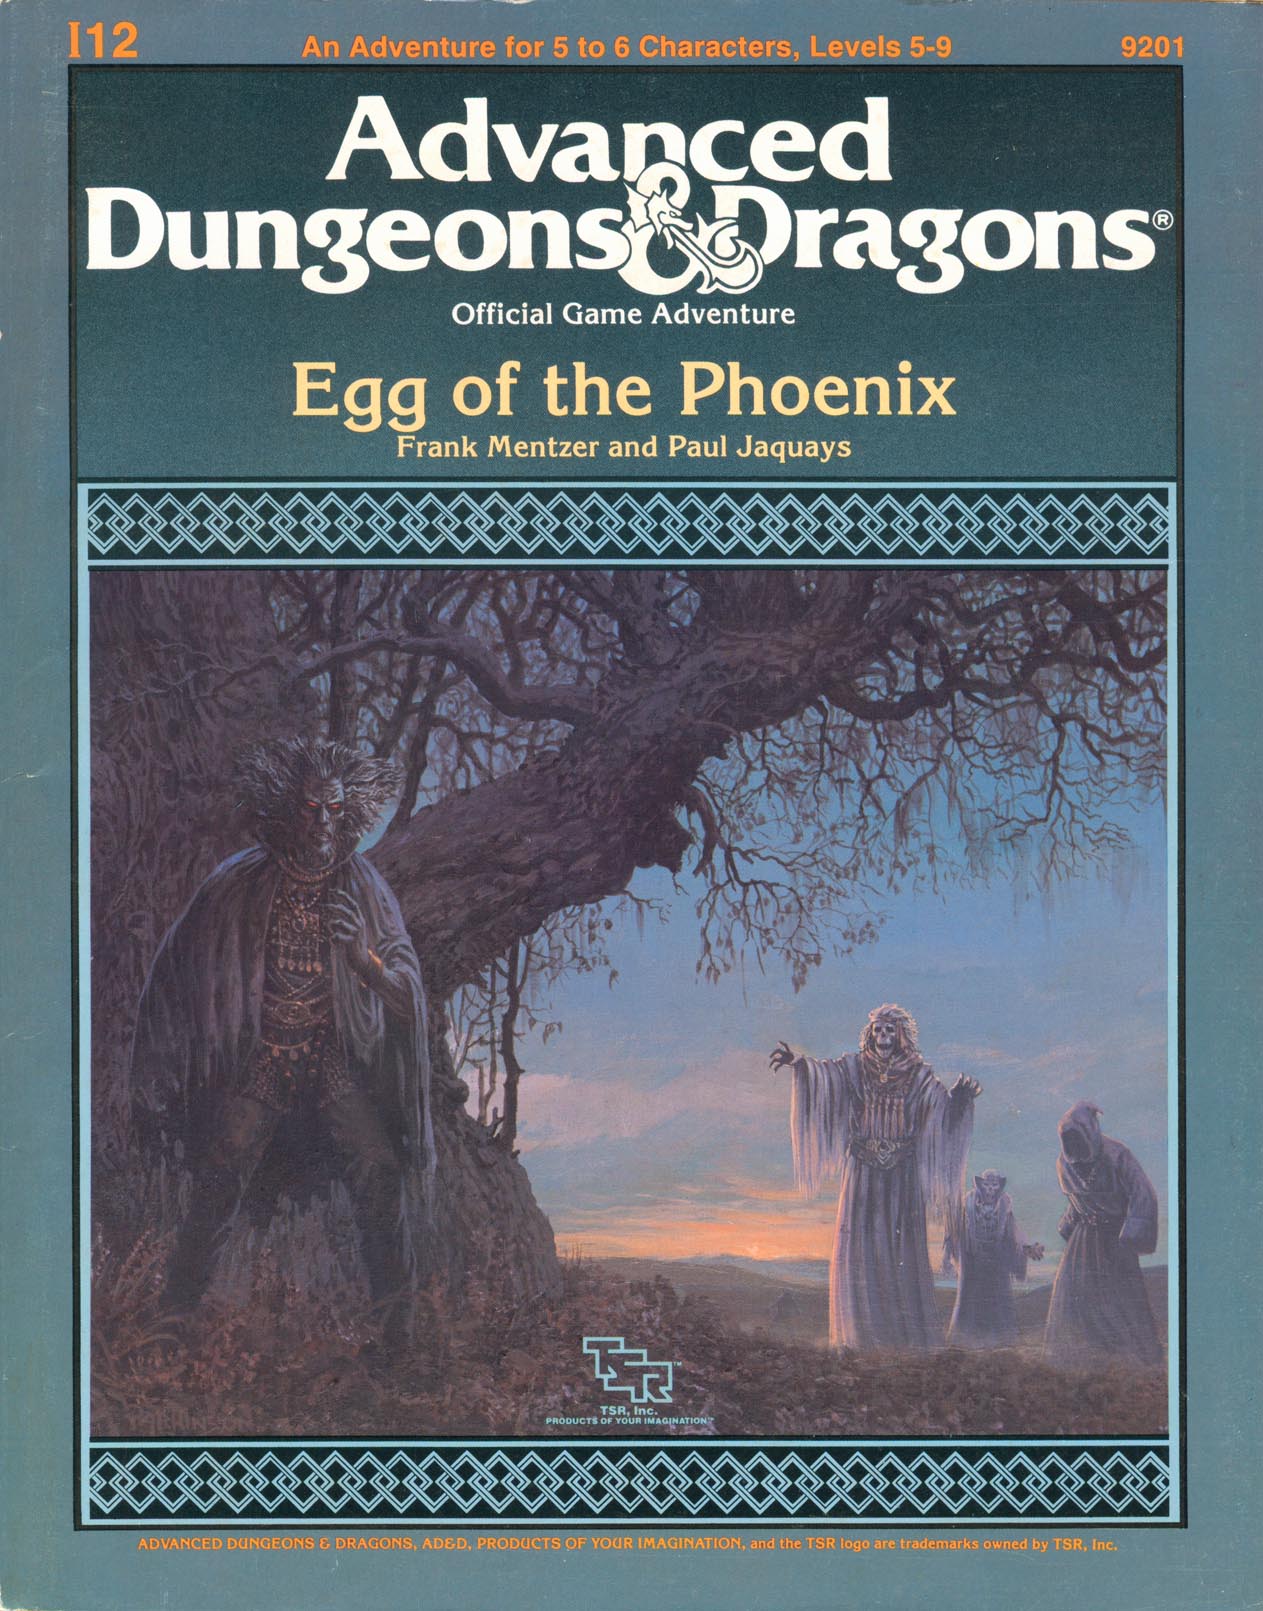
"Come on," they said, "It won't be so tough, just stopping a slavery ring," they said. "I don't know," you said. "Those slaves aren't even entirely human! How do we know they won't try to kill us?" But you went, and now you're having second thoughts. There were the thieves in the lost crypts of Empyrea, raising hundreds of - no, that's too disturbing to think about. There were the three daughters who - no, that's too painful to remember. Now there's this Egg of the Phoenix. What does that have to do with anything? This was supposed to be a cut-and-dried stop-the-slavers job. Who said anything about retrieving lost artifacts? Trudging through forests, traipsing through castles, trotting throug dungeons, traveling through other planes: this has turned into more than your run-of-the-mill adventure. The compensation had better be worth it! Provided, of course, you're around at the end to collect your share. TSR 9201

This quest is for a party looking to regain a character’s soul. A character whose soul has been claimed by another entity cannot be resurrected through standard means. To regain the lost soul, the characters involve themselves in a conflict between a master thief and an archdevil. This quest assumes that the PCs would be willing to form a contract with an infernal entity. Includes a quest-related NPC that a player can control if they're waiting for their character to be resurrected.
When an injured child collapses in the street, will you venture into the cellar he fled from to discover what hides, creaking in the dark? Published by Nord Games
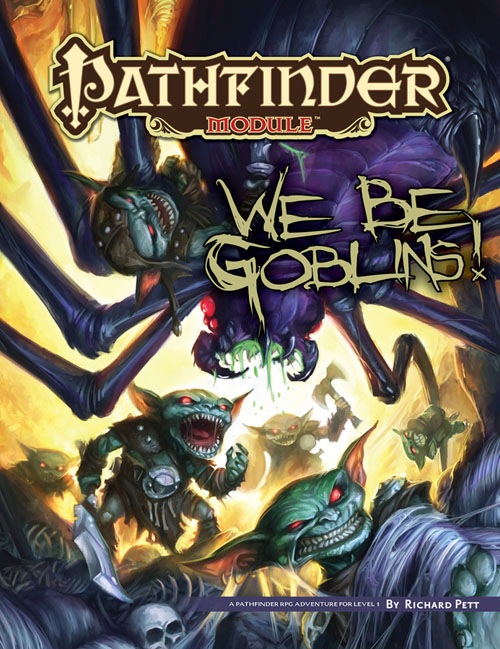
The Licktoad goblins of Brinestump Marsh have stumbled upon a great treasure—fireworks! Yet unfortunately for them, the tribe member responsible for the discovery has already been exiled for the abhorrent crime of writing (which every goblin knows steals words from your head). To remedy this situation, the Licktoads’ leader, His Mighty Girthness Chief Rendwattle Gutwad, has declared that the greatest heroes of the tribe must venture forth to retrieve the rest of the fireworks from a derelict ship stranded in the marsh. The PCs play as a group of freaking goblins! What more do you need to know? Part 1 of the We Be Goblins series.

The Eaves of Mirkwood: a 32-page adventure that makes a perfect introduction to Adventures in Middle-earth for new players, or a handy episode to drop into your existing campaign. The Company finds themselves setting out from Woodmen-town to travel through the Eaves of Mirkwood towards Lake-town. When the Journey goes awry they must draw swords in aid of a village beleaguered by the dreaded Greymuzzle Hob. Using cut down rules and offering lots of advice, Eaves of Mirkwood is a great starting point for your Adventures in Middle-earth. Published by Cubicle 7 Entertainment.
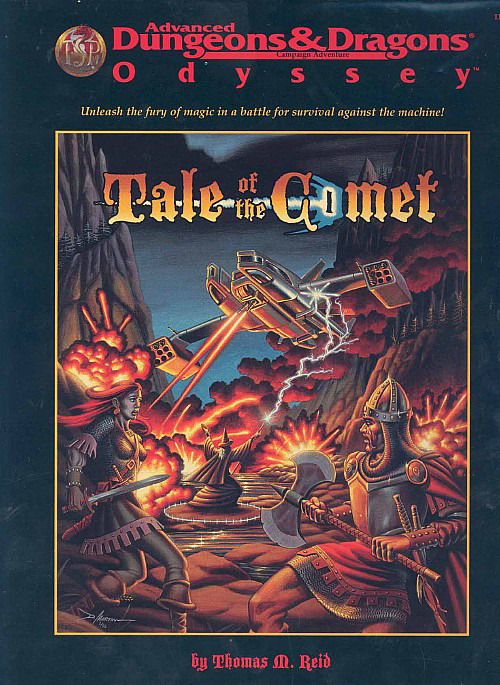
Strange lights in the sky, prophecies of doom, and a threat unlike any other draw the heroes to Aston Point. In this small frontier town, the fate of the world will be decided. If the heroes and their strange new allies defeat the invaders, they must then pass through a portal to another battleground, a metal city on a far-distant world, where aliens fight desperately against death machines that threaten to overwhelm all organic life. So trade in your sword for a blaster rifle, your sling stones for a few high-explosive grenades, and see what happens when you mix magic with high technology. This box contains A 32-page book, The Cast and Props, describing new, high-tech equipment, detailing the battleground of the Rael-Overseer war, and explaining how to mix fantasy and science under the AD&D game system. Two 64-page books, The Tale Begins and Crossing Over, presenting the grand adventure that is the Tale of the Comet. Eight sheets of charts, maps, art, and statistics for the players and the DM. Two posters, one a double-sided map of the regions where the action takes place and the other an illustration of all the technological terrors the heroes will have to face in the course of the adventure. TSR 1143, From 1997
This adventure can be used as stand-alone or continuing the arc started by Death in Freeport. Terror in Freeport leads the PCs deeper into the intrigue they began to glimpse in Death in Freeport. The investigation takes them from the corridors of power to the bowels of the underworld, with terrifying insights into who really controls the city. They discover that the Brotherhood of the Yellow Sign has its claws in the town's power elite, but thanks to some clever camouflage by Sea Lord Drac. they may not find out just whom the serpents control until it's too late. As the adventure begins, the PCs are contacted once more by a very nervous Brother Egil. He tells them that while staying with Lucius one evening, he awoke to find a burglar in the roomstealing a scroll. Egil is certain that the Brotherhood have penetrated further into Freeport than anyone imagines. He wants the PCs to investigate Milos's other ties to the city and find out what's being done about the temple of the Unspeakable One. The PCs search the cultist's lodgings and discover it has been carefully gone over, and several possibly incriminating books are missing. But the burglars overlooked one thing: a Tome with a diagram of the Lighthouse of Drac sketched onto the back page, marked with the letter V. Upon leaving Milos's lodgings, the PCs come upon a gang of orcs beating up a hapless messenger. They lend a hand, only to discover they've been tricked - the messenger makes off with Milos's book! A chase through the back streets leads them to the boarded-up building the y discovered in Death What they find isn't encouraging. There is a guard posted out front, courtesy of "V"- -Verlaine. head of the Captains' Council. Meanwhile, down below, the cultists continue to have the run of the caverns-— in fact, they have been shipping their unholy relics to Verlaine's own home!

Into the Drachensgrab Mountains! Hot on the trail of the marauding slavers, you and your fellow adventurers plunge deep into hostile hills. Spurred on by your past success, you now seek the heart of the slaver conspiracy. But hurry! Your must move quickly before the slavers recover from your previous forays and attack! This module was originally used for the official Advanced Dungeons & Dragons Tournament at Gen Con XIII and is the third of four in a series of related tournament modules. This module contains a challenging scenario, the tournament scoring system, plus nine pre-rolled, playtested tournament characters. Also included are large scale referee's maps, notes, and background information. A3 is a complete adventure in itself, but it is also a companion to A1 (Slave Pits of the Undercity), A2 (Secret of the Slavers' Stockade), and A4 (In the Dungeons of the Slave Lords). TSR 9041

Warchief Grog Bloodloaf has sounded the horn of war. Elf scum have stolen orc lands and the tasty halfling herds. For generations the Maggotsmasher Clan has watched and waited from the icy caves of the frozen mountains but that wait is over. Warchief Bloodloaf needs only the totem of leadership, the Dragon Crown of Durge Maggotsmasher, to unite the clans and begin his war. Five misfits have answered the call to brave the Caves of Throllorat and return with the crown. With a little luck, these five maggots will kill a few of the beasts within Throllorat before dying, making it easier for real warriors to complete the quest. The Misfit Maggot Five is a comdedic adventure where five rejects from the Maggotsmasher Clan are called upon to retrieve the famed Dragon Crown of Durge Maggotsmasher from the dreaded caves of Throllorat. Each of the characters are fully developed with their own unique personality that will give any Dungeons and Dragons group hours of laughs! The Misfit Maggot Five is a 5th edition comedy adventure for 2nd level monstrous humanoid characters. Published by The Pickled Dragon Press

This adventure works best after going through the original trilogy (Death, Terror, and Madness in Freeport). After exposing the madness and corruption of the previous Sea Lord, a succession crisis is upon Freeport. There are no heirs to the seat of power, leading the Captains' Council to overturn the Law of Succession. But opening up succession plunges the city into chaos as various factions vy for the title. The PCs will need to survive riots and secret plots to make sure the right man (or woman) ends up with the job.
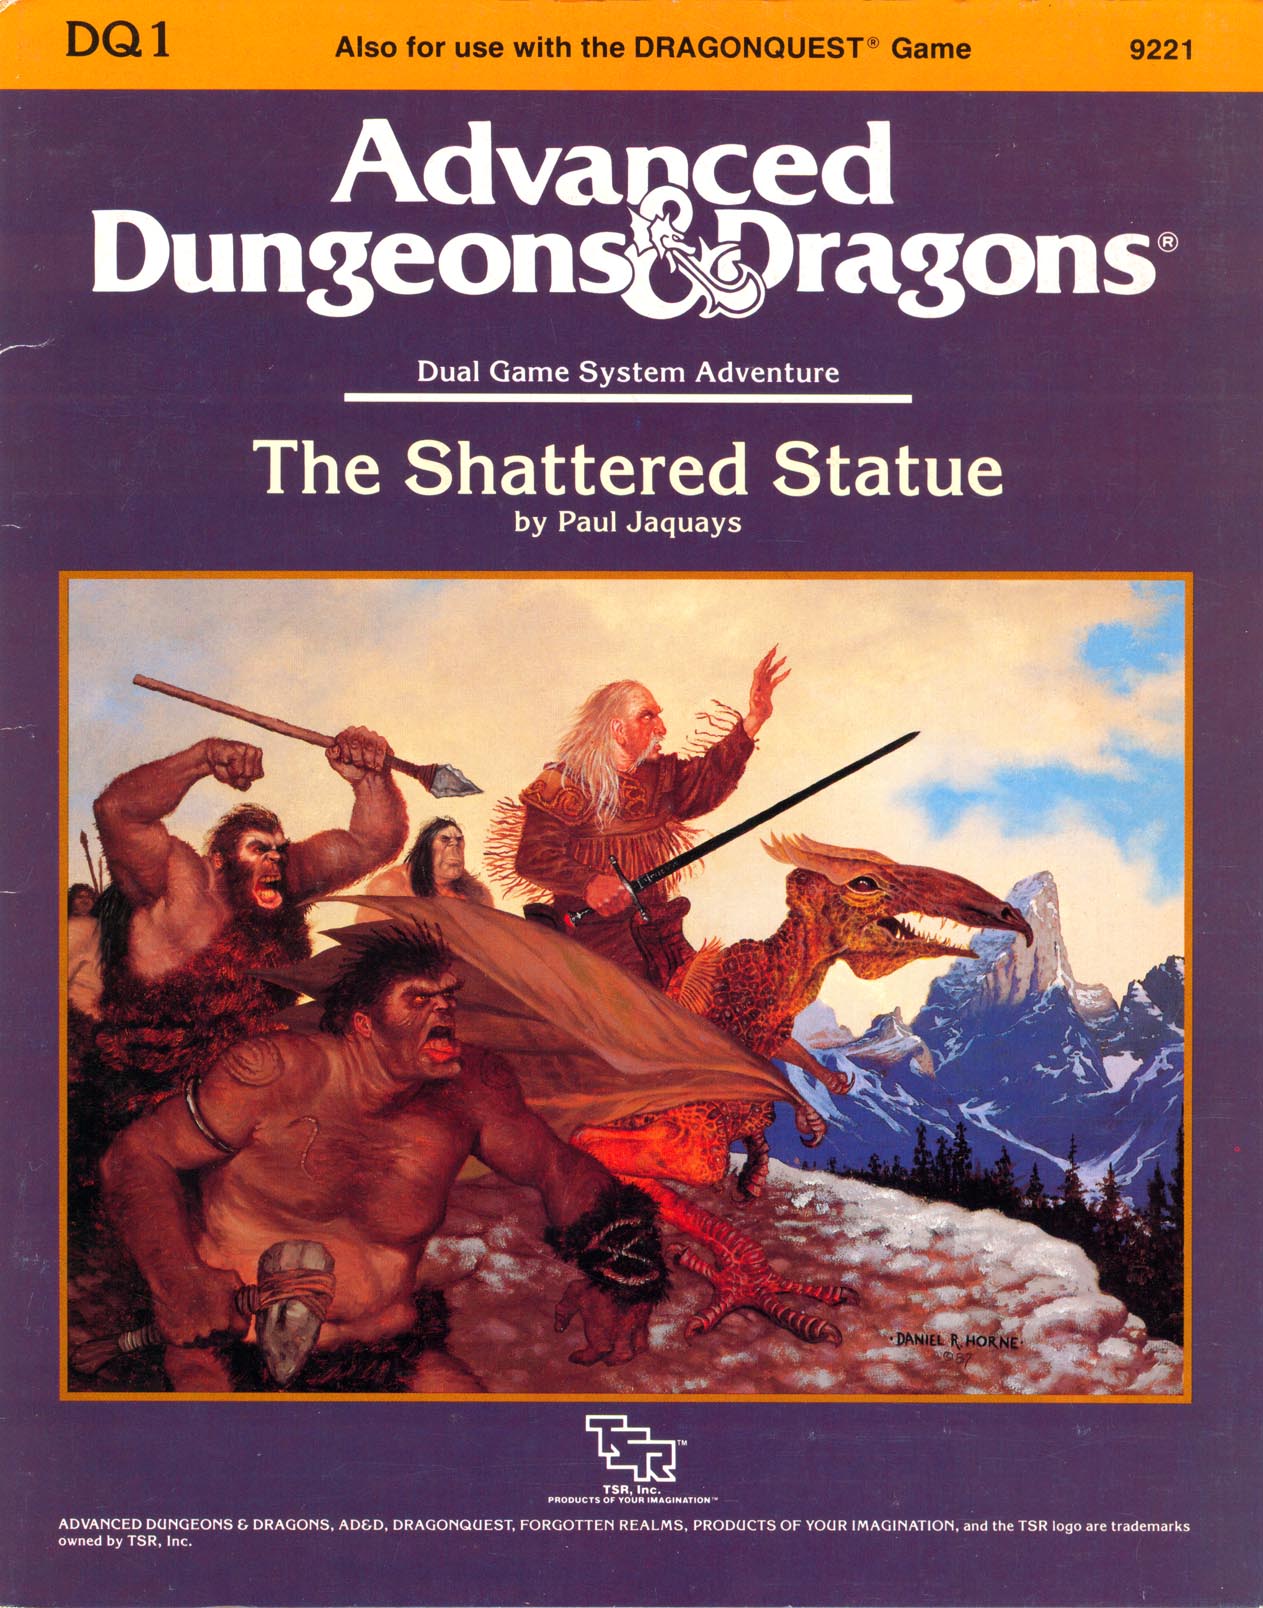
"A mutual friend has praised your skills highly. If you seek rich reward and the opportunity to delve into mysteries ancient and lost, bring this bottle forthwith to my demesne in the village of Volkumburgh. Together we may seek to bring mankind the lost wonder of the awtawmatawn." A mysterious note, a disappearing 5-foot-long religious relic, and the ruins of two magical schools. What do these things have in common? How deeply are your party members involved in all this? "The Shattered Statue" is the first dual-game-system module of its kind. Players of both the AD&D game system and DRAGONQUEST game system can use this adventure. It is suitable for use with FORGOTTEN REALMS campaign setting. TSR 9221

Enter the ancient and corrupt city of Tyr, whose tyrannical sorcerer king has ruled for a millennium. As you wander the city, from the wreck of the Elven warrens to the sanguine splendor of the arena, you realize that the citizens of Tyr thirst less for water than they do for freedom. Now, after a century of slave labor, sorcerer king Kalak's great ziggurat nears completion. He has promised the city a grand celebration when the monument is done, complete with the most brutal arena spectacle in Tyr's long history. Rumors abound as to the nature of the spectacle: some believe it will bring with it the longed for manumission of countless slaves: others fear the annihilation of Tyr and her people as a sacrifice to Kalak's hunger for power; and a secret few believe it will be a day of revolution - a day of freedom. The adventure that introduces the Dark Sun setting as well as part of its metaplot. The adventure starts with the PCs being enslaved and forced to work on Tyr's ziggurat, where they make various connections that can affect things both in this adventure and the next in the series (Road to Urik). The finale takes place simultaneously with the finale of the Verdant Passage novel, and has something of a disaster movie feel - major events are happening, and the PCs are trying to survive in their shadow and (hopefully) save some people as well. Like many other Dark Sun modules, this adventure comes with a flip-book full of handouts as well as a few pre-generated starting-level characters. TSR 2401
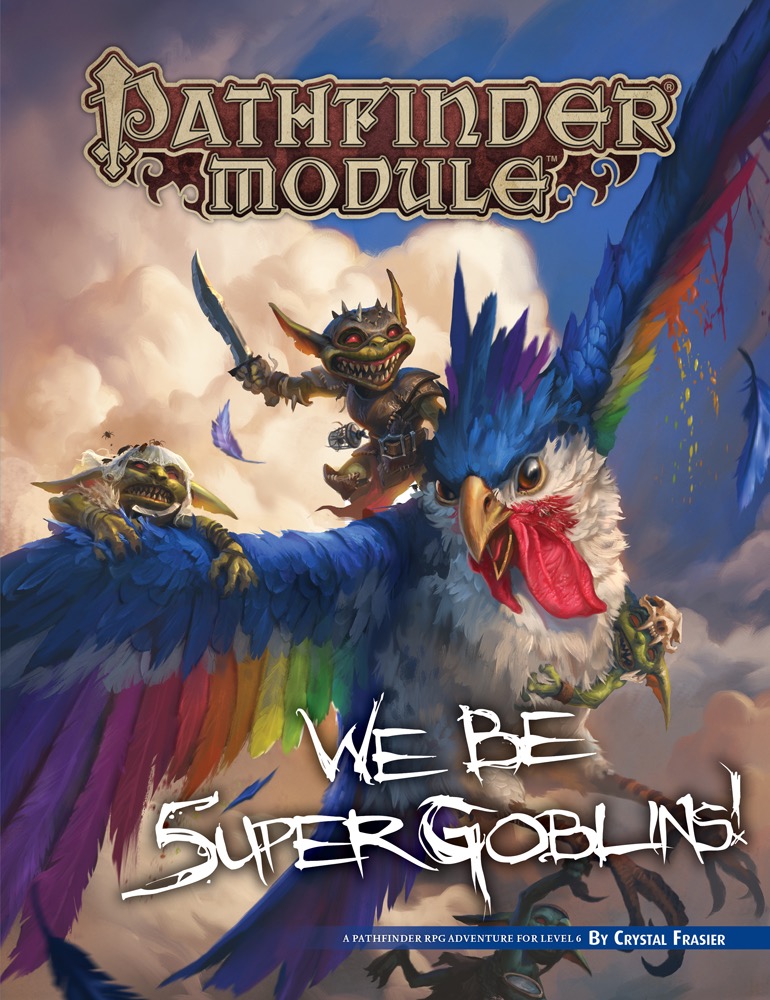
We Got it in the Bag! The Birdcruncher goblin tribe has risen to remarkable heights under the leadership of its four goblin "hero-chiefs"—Reta Bigbad the fighter, Chuffy Lickwound the rogue, Poog the cleric of Zarongel, and Mogmurch the alchemist. But these legendary goblins have outgrown their tiny fiefdom, and they want to explore beyond the same, boring corner of Varisia they've known all their lives. Luckily for them, their minions have brought them something new and interesting to help cure their relentless boredom. A mysterious magic bag offers more adventure than even the goblin chieftains originally realized! After an evening of drunken revelry, the goblins awaken to discover the most precious member of the tribe, the pig Squealy Nord, has gone missing! Both Nord and a trio of precocious goblin warriors vanished during the night, and the only clue to their whereabouts is a trail of footprints leading into the magic bag. The Birdcruncher chieftains must venture inside the mysterious bag, from which few things have returned, if they're to have any hope of seeing their beloved pig again! We Be 5uper Goblins! is an adventure for four 6th-level goblin characters, written for the award-winning Pathfinder Roleplaying Game. The adventure takes place in both the land of Varisia and a bizarre demiplane within the Pathfinder campaign setting, and it serves as a sequel to the modules We Be Goblins!, We Be Goblins Too!, We Be Goblins Free!, and We B4 Goblins!, Paizo's popular series of Free RPG Day adventures!