
The Assassin's Knot is a sequel to The Secret of Bone Hill, picking up on themes from that module and shifts them to a new locale. The player characters must solve the mystery of who killed the Baron of Restenford, with evidence pointing to somebody from the town of Garrotten. The scenario describes the town and its castle. The Assassin's Knot module is different from most of its contemporaries in that it contained no dungeon or dungeon-like area. The longer the players take to find the murderer, the more unfortunate events occur in the village. The village, Garrotten, is reputed to be the place to go to have someone killed. The entire village shuts down when the Baron of Restenford is found dead, mutilated beyond the possibility of magical restoration. Three small clues are all the player characters have to unravel the mystery. TSR 9057

Tired and sore, you struggle over the burning sands toward the long-forgotten city. Will you reach the place in time to save yourselves from the evil efreeti? The sun beats down, making your wounds stiff and worsening the constant thirst that plagues anyone who travels these waterless wastes. But there is hope - are those the ruins over there? In the midst of broken columns and bits of rubble stands a huge statue. This is the place! You've found it at last. Gratefully, you sink onto the sand. But there is no time to lose. You must hurry. So with a quavering voice you say the magic words. And then you wait... A hush falls over the ruins, making the back of your neck prickle. Then, out of the east, a wind rises, gentle at first but quickly growing stronger and wilder, until it tears at your clothes and nearly lifts you off your feet. The once clear sky is choked with white and grey clouds that clash and boil. As the clouds blacken day turns to night. Lightning flashes followed by a menacing growl of thunder. You are beginning to wonder if you should seek shelter, when all of a sudden there is a blinding crash and a bolt of lightning reduces the statue to dust. For a moment, silence. The, out of the statue's remains, soars a blue flame. Its roar deafens you as higher and higher it climbs, until it seems about to reach the clouds. Just when you think it can grow no larger, its shape begins to change. The edges billow and soften, their roar lessens, and before your eyes materializes a gigantic blue man. This adventure can be played alone or as the second part of the Desert of Desolation series. For characters level 6-8. TSR 9053

Revolt of the Gladiators! The corrupt Thyatian senator, Helenites Osteropolus, his latest scheme smashed by the adventurers and their gladiator allies, hatches a new plot to destroy the influence of the Order of the Sands (even, perhaps, to attack the Emperor himself!) Yet greater dangers lie ahead. If his plot succeeds, it will remove the guardians that protect the city from the creatures that lurk in the caverns and catacombs below. Can the players block his gambit? Will the wheel of justice grind small, or will the greasy palm of political corruption reach out and save the senator once again? You decide, in the chaotic swirl of the Thyatian capital's politics. This module is designed especially for the DM who wants to sharpen his interactive skills. Recommended for four to six characters, levels 3-4 Includes map of a realistic catacomb complex below Thyatis City Unique role playing climax tests players' integrity and skill New information on the military Legions of Thyatis This module is a stand-alone sequel to DDA1 Arena of Thyatis. TSR 9296
Giants and ghost trees and foul undead beasties... What happens when elves, giants, and a mysterious witch all decide only you can settle their troubles. Strange new tree species! A hobgoblin fort! Unexplained noises during the day and different noises at night! Investigate and explore the Bretonwood to get to the bottom of its problems. The adventure provides an overland open-world style map of the Bretonwood which the players are encouraged to explore. Many set and random encounters are provided. There are opportunities for combat in this area, but players should be ready to handle some problems out of combat to get the most satisfying experience. Pgs. 22-43
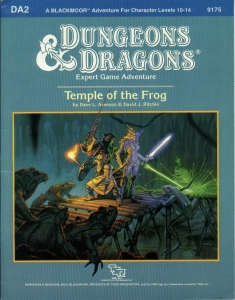
Green Death... That's what old hands call the Great Dismal Swamp. For centuries, this tangled maze of sluggish watercourses, stagnant ponds, and festering marshes has defended Blackmoor's southwestern frontier. Large armies and smaller parties have disappeared altogether inside its vast, dripping, claustrophobic corridors. Among those who have dropped from sigh in this arboral hell is young Rissa Aleford, one of Blackmoor's most important leaders. Carried off to the sinister City of the Fron, she is now being held by the eccentric Monks of the Swamp. By making the baroness captive, the deranged monks have serioulsy weakened Blackmoor at a time when enemies already threaten it from all sides. Yet, even as the Froggies gloat, the king of Blackmoor dispatches a small band of bold adventures to the rescue. Deep into the Great Dismal Swamp they must go - far from sunlight and sanity - there to seek and save the swamp, there to find the Temple of the Frog. TSR 9175

The rubble-strewn passageway twists and turns, winding ever deeper into the mountain, lower and lower into the bowels of the ancient, forbidding halls of long-dead dwarves. The torchlight flickers, threatening to succumb to the oppressive darkness. Creeping along one striated granite wall, Arikus the warrior moves cautiously toward the great cavern ahead, its sides and walls disappearing into the gloomy distance. Cocking his head to one side to listen, he holds his hand up for a moment, demanding unconditional quiet from from his companions. Then , his arm relaxing in relief, he waves everyone forward and moves into the open. Before him, scattered to the far walls of the enormous cavern, are piles upon piles of glittering treasure - coins from countless kingdoms, sparkling gems, exquisite jewelry, and items of wondrous power - enough for twenty kings' ransoms. Arikus laughs gleefully, thrusting both hands into the nearest cache of coins to let them runs through his fingers. At that moment, a monstrous shadow looms threateningly over him. Looking up, Arikus blanches and stumbles back in horror before the terrible visage of a Great Red Wyrm. The fearsome dragon opens its razor-filled maw and spews forth a gout of white-hot flame, engulfing the hapless warrior.... The ultimate Dungeon Master Fantasy! This is the most deluxe dungeon. Designed to appeal to discriminating and demanding role-players. Adventurers, beware. This is more than just a dragon hunt. Within the lair of the beast lie cruel and deadly traps, befuddling conundrums and puzzles, and cunning minions that will be the end of overconfident or careless adventurers. Comprised of three 64-page books, for two adventures that link to one super-campaign 12 full-color reference cards 16 special player handouts Eight Monstrous Compendium sheets A Sheet of cardstock standups with 24 plastic bases. Six full-color poster maps, two of which link together to make a giant tactical playing surface for use with miniatures or the included cardstock figures. TSR 1089

The characters are summoned by the Norse gods to track down two dwarves, one of whom has made a weapon for the giants to use against the gods. The mission takes the characters to Jotunheim, on the plane of Gladsheim, to take the god-slaying weapon from the giants.

At just 8 pages, with lots of illustrations, this adventure is much shorter than most TSR-published modules of the era (mid-90s). It is a very simple D&D adventure. It features a macguffin quest that immediately pushes the players into a dungeon crawl through the five-and-a-half-page "Dungeon of the Mad Warlock". The idol of old, The Jade Hare, as been taken from the Dar el-Tamyya, stolen by Goblins, who strangely enough killed no one. Abdullah, the old man who cared for the statuette remembered that about a month ago a stranger has asked if he might purchase the Jade Hare. Though he offered much gold, Abdullah of course refused the offer. Whom Abdullah describes the other villagers recognize as Abu-Ghabar, the mad warlock who lives in the hills. He is rumored to have built a dungeon there. Who knows what strange purposes the mad warlock has for the Jade Hare? In any case, the precious statuette's theft is an intolerable strain on the honor of the village and all the tribe therein. A party must be assembled to confront the warlock. This party may consist of none other than yourselves. Won't you save Dar el-Tamyya's ancient honor, and thwart whatever sinister plans the warlock has? TSR 9259

A goblin warband has found the secret tunnel which leads from the dwarven keep of Hearth-Home to the nearby hills. The tunnel is intended to be a means of escape if the keep ever falls to attackers, but now it has provided goblins with an easy way into the Underkeep. So far, the goblins have confined their attentions to the various underground rooms that make up the Underkeep, but sooner or later they will find a way to the surface. They pose a serious threat to Hearth-Home - the goblins must be cleared out of the Underkeep so this breach in security can be repaired before the orcs hear of it and overrun the dwarven keep. This adventure is slightly more challenging than Red Hand Trail, and it is recommended that it is played after that quest and before Palace of Dread. However, the scenario in Trouble Below can easily be played independently from the rest. Part of TSR 1076 The Goblin's Lair

Tyger, tyger... A search for a small child in the woods outside of the town of Launise, a case of mistaken intentions, and the despoiled ruins of a forgotten goddess of magic. Cursed is the beast that stalks the Black Forest in... Orange and Black! Pgs. 66-71

Someone in the misty, wooded Moonshae isles needs hundreds of brand new swords taken under guard from Sword Coast smiths to a certain place on the Isles. The swords are needed so badly, and their safe arrival is considered so unlikely, that someone is willing to pay adventurers a lot of gold - someone fairly important. Adventures foolish enough to take assignments too good to be true (or merely desperate for coins) will soon find themselves embroiled in a dark and mysterious struggle against evil that will take them into sacred groves, crumbling castles, and through ancient magical gates to the halls of the High King - and beyond -- An adventure that takes place on the Moonshae Isles, in which a mid-to-high level party fights against the encroaching darkness of The Cult of Bane. Although helped by the Harpers, players will have to uncover the plans of the cult, and thwart them where possible. Preventing the summoning of the "Godson", a manifestation of Bane's evil. Part of the "Forgotten Realms Adventure" series, this is FA1 - Halls of the High King. FA2 is "Nightmare Keep" TSR 9301

Stopping an undersea war wasn't in your contract. The seas will boil with war, and you're going to be right in the middle of it. Pgs. 34-47

The king summons the heroes to investigate the death of a knight, and the final fate of the king's long-missing son. The knight and his entire order was killed by a Dragon! Yay we get to fight a dragon in the first issue of Dungeon Magazine! Much travel over many different terrain types featuring avalanches, volcanoes spewing lava, and many random encounters (not detailed here) before the heroes reach their real goal: A lake with a ruined wizard's tower and dragon's cave. Opens with a particularly byzantine Background section for the DM involving a prince you never meet, pirates you never meet, knights you never meet, and deep gnomes you never meet. See Out of the Ashes in Dungeon #17 for sequel to this adventure. Pgs. 42-60

The heroes arrive at the eponymous Keep on the Borderlands, a fortress on the edge of civilization built to stave off the chaos and evil of the wilderness. Using it as a home base, a party can make forays into the surrounding wilderness, encountering monster and marauder alike. The centerpiece of the adventure is certainly the CAVES OF CHAOS, a network of tunnels and caverns found in the walls of a nearby but isolated ravine. It is here that hordes of evil humanoids have made their home. Through combat and negotiation, the players can try to explore and map out these caves, perhaps with the aim of accumulating valuable treasure or even cleansing the land of evil creatures. However, even the Caves are not all they seem. Beyond the goblins and kobolds lurk dark horrors: cults dedicated to fiendish chaos and a Minotaur's enchanted labyrinth await the unprepared adventurer. But for the hero who is brave, clever, and fortunate in equal and sufficient measure, great treasures and glory await in the Caves of Chaos that lie beyond the Keep on the Borderlands! TSR 9034

Sinister, twisting images...Horrific nightmares lurking at the corners of the mind...These are descriptions used to tell the tales of the Labyrinth of Madness. But these tales of the labyrinth are only legends, really, nothing more than stories used to frighten children at night - until a mysterious scepter is found, bearing within its crystal head a visage of insanity and terror, and also delivering a message: "Disturb not the Labyrinth of Madness again, and live a while longer." Now a powerful temple suffers from a tragic curse that is somehow linked to the labyrinth. Does there exist a group of heroes who can penetrate this dark and terrible place to life the curse...and survive? Labyrinth of Madness is a multiple-level, three- dimensional dungeon adventure, a puzzle within a puzzle, that commemorates 20 years of gaming with TSR. TSR 9503

Conquest, not beauty, is in the eyes of this beholder. A promise of adventure and riches, with a hint of total annihilation. The party should also have several powerful magical items, since the challenge that it faces is great. The geographical background and the local population are left vague so that the adventure can fit any campaign setting. Pgs. 39-44

The beginning adventure to the Dragonlance, War of the Lance series of adventures, upon which the Dragonlance novels are based. The companions meet in the Inn of the Last Home to discover a barbarian couple with a mysterious staff. The PCs journey to discover the staff's history which leads them to a ruined temple to the Forgotten Gods. Includes a full map of Xak Tsaroth and overland maps, some color. Art by Jeff Easley. TSR 9130

For decades, the city of Chala, nestled on the banks of the Leal River, boasted a prosperous fishing business. The community's life revolved around the wide, slowly rolling river that meandered miles northward into the Blackweed Swamp Now the city faces misfortune, pestilence, and decay, because the sacred Tefnut statue has been stolen. All clues suggest that the sacred object was carried into the heart of nearby Blackweed Swamp. But who, or what, would commit such a crime? Whoever is responsible, the statue must be recovered, at any cost. TSR 9424
Nothing living guards this island - that's the problem. The party must clear a burned out abbey, only recently the home to a group of evil clerics.
The Northmen and their allies play hardball. The Northmen are on a rampage, and only the duergar know why. Discover the secret of the iron orb. In the lands of the Northmen, near the city of Tallborg a mysterious relic was uncovered in a mine: a perfect orb of black iron. The orb was taken to the temple. When Ulvmard, high priest of Odin lifted the orb it revealed its true nature. The orb levitated from his hands, floating before him. The orb had changed Ulvmard, bestowing him great powers. The orb spoke to him with flattery and advice. As he became reliant on the orb, its power over him extended, bending him to its will and taking control. It used him to further its agenda: destruction of the dwarven race and restoration of the duergar! Claiming to be acting on Odin's behalf, Ulvmard lead the Northmen to rise up against the dwarves, and ordered raids to pillage the southern kingdoms for the materials he would need to construct a colossal iron warrior to defeat the dwarves. This adventure has viking and norse mythology influences. Pgs. 50-71