
Figgy Puddin' Steals Christmas is a short adventure for three to six characters, and optimized for 2nd level characters. We also include Scaling Suggestions, allowing you to run this adventure for lower- or higher-level characters. We anticipate a run-time of 2- to 4-hours. There's a bit of roleplay in this adventure, which may extend the playtime. Adventure Background A traveling jester known as Figgy Puddin’ and her Coal Smudge Gang have stolen Christmas presents and now hold them for ransom. While safe and secure in her lair, she awaits either a payment of an outrageous ransom, or a crew of heroes to claim the presents after they navigate her not-so-festive lair. What's the Adventure? After you introduce the hook, the adventure occurs in Figgy Puddin's lair - a refurbished kobold bunker consisting of eight rooms. As the characters explore the linear dungeon, they encounter new creatures, complete challenges, and are tested about their Christmas knowledge. However, the final confrontation with the naughty Figgy Puddin' could make for a very Unhappy and Unmerry Christmas for our heroes, the children of Thistleton, and their parents. Who Is Figgy Puddin’? Figgy Puddin’ was once a happy jester who loved Christmas. For years she traveled the realm, bringing fun and festive cheer to villages and children while preparing the way for Santa. However, times have become tough, and entertainment doesn’t always pay as well as one would like. As Figgy prepares for retirement, she’s learned she doesn’t have enough gold to last. During this time, she’s also decided that Santa doesn’t know who she is, let alone appreciate the work she puts in every year. Using her savings, extortion, blackmail, and other nefarious means, she’s convinced several mechanical geniuses and arcane specialists to help her refurbish her underground bunker with wondrous effects, creatures, and tests. To fund her retirement, she’s taken extreme measures to make some quick gold — holding Christmas presents for ransom.

With a series of torrential rains, the soaked soil has weakened and an opening to a forgotten tomb has been discovered. You and your associate prepare to venture into the lost Kalar's Crypt! This scenario is useful for a beginning campaign or just a side adventure when most of the group can't participate.

Sometimes protecting the cargo is easy but getting the pay not so much. The caravan is already on its way, some disagreement with the guards makes them leave the cargo without protection midway. You are just in the right place to catch up fast and guard the wagons the last stretch home.

Avast me hearties! FT33 – Port Plunder is our first offering of March and, as always, free! This pirate haven is one of two home bases for the Pirate Lords. The community is everything you would expect from corsairs complete with an active tavern district! If your campaign is in need of an island retreat, look no further…grab it, rename it, use it, and enjoy it!

Anamdael is a small town remarkable only for its peacefulness. However, the town harbors a dark secret: Long ago, a resident entered into a pact with a Night Hag, whose services come at a price. Travelers who once gave little thought to Anamdael now hear rumors of a strange cult in its woods. Your party is hired to locate and return a missing person, last known to be traveling to Anamdael. Before you may enter “Mother’s” land, you face your first test. Your responses determine more than you know and set the stage for an eerie adventure.

Deep within a forgotten temple lies the Storm's Eye, a powerful sapphire coveted by the monstrous Behir, Krykzor. In The Storm's Eye, adventurers must navigate deadly traps, confront ghostly knights and phase spider minions, and solve a lightning-powered puzzle, all while racing against time to escape a collapsing temple. Designed for a party of levels 6-7, this one-shot adventure offers thrilling combat, intricate puzzles, and dynamic challenges as players face the storm and claim the treasure—or risk being lost forever.

Gnomish denizens of Berribury are terrorized by flooding. Their only hope is for adventurers to summon the archfey of their domain; Tiddy Mun, to take the waters away. A Two-Hour Adventure for Tier 1 Characters. Optimized for APL 3

A dwarven laboratory forgotten for many centuries has finally been rediscovered, but there is sure to be danger lurking within. It turns out some of the other machines within are still active, as are some of the traps and puzzles. Prepare your party for a blend of challenging puzzles and diverse fights in the dungeon that was home to my first player kill.

A fiend lurks among the Black Blade goblins. A shapeshifting barghest fashioned by the General of Gehenna to exact revenge on all goblin-kind. It’s aim: to kill as many goblin leaders as possible… A masked goblin approaches the party asking for help. Two tribe leaders are dead. But a rival for chief has control of the crime scene. Will the party discover the barghest among the goblin ranks? Can they stop this imposter before it strikes again? Adventure Overview The adventure’s story is spread over 4 parts and takes approximately 4 hours to play. The adventure begins with a Call to Action scene. Part 1: Goblin Politics. Krill sends his emissaries to implore help from any strong intermediary. The party is asked to investigate the murder of Thrawn in Dringly’s lair. This is Story Objective A. Part 2: The Opposition. Gain entry into Dringly’s lair and investigate the murder of Thrawn. Gather enough evidence to find the killer. This is Story Objective B. Part 3: To The Lair! Now that the players have determined the barghest (Yeep) is to blame, they need to get to Krill’s lair quickly as he is in imminent danger. This is Story Objective C. Part 4: The Barghest.When the players arrive at the lair, they need to get to Krill and expose and defeat the barghest. This is Story Objective D. Adventure Background A barghest named Yeep has begun its onslaught of attacks against the Black Blade goblins. Starting with Chief Gnar, then his second in command Thrawn, the barghest is moving methodically down the line of command. Krill is now chief. But he has some problems: Two leaders of the Black Blades are dead. Who killed them and why? Is he next? Dringly, the next in command, has decided to take his lair for himself, declaring himself Chief of the Black Blades. Who are the Black Blades? The Black Blades are a tribe of goblins in the local area. They are known for dipping their blades in a dark black substance. It is rumored these blades are poisonous. The Black Blades regularly attack passersby on the road to rob them. The Black Blades have two lairs, one run by a chief who leads the whole tribe, and another overseen by a boss lieutenant. The Black Blades have a well-established pecking order which is how Krill stands to become chief. The next in line is Dringly, who has also declared himself chief and wants Krill dead. Krill suspects that there is something suspicious about two leaders being killed within a day of each other, but he has already burned Gnar’s body without any investigation. He needs to investigate the body of Thrawn, but it is in Dringly’s lair. Krill wishes to avoid direct confrontation with Dringly at the present for three reasons: 1) Any violence would only kill his own tribe members and further divide the lairs. 2) He believes there is still hope for negotiation to reunite the Black Blades. 3) He believes that if he were to attempt negotiations himself, Dringly would kill him. This adventure features: Two maps. Ready for your favorite Virtual Tabletop. A full color pdf. A black and white pdf. One custom monster, a reprint of barghest, all others available in the Monster Manual. Four hours of entertainment involving: roll playing a goblin bard, investigating a murder scene, tracking down a barghest before it strikes again. Applicable to any setting.

The water pounds the base of the cliff with the relentless power of time. Jagged rocks appearing and disappearing in the foam of the sea like gnashing teeth. Above it all on the top of the black cliff sits a small house and the dark light tower. The magistrate has sent your party to investigate why the light has gone dark.

Characters explore a dangerous, but sparsely populated temple in search of the Staff of the Dragon. They will encounter traps, environmental hazards, and a nest of lizardfolk. The characters are rewarded for a 'look but don't touch' approach to the temple's features. The real highlight, though, is the closing encounter. Once the staff of the dragon is retrieved, it can transform the characters into dragons for a set period of time. As they exit the temple, they are beset by an ancient dragon and the stage is set for an epic brawl as the characters take to the sky in dragon form. Can be completed as a one-shot.

Hushed Hills is an adventure location set in a haunted town nestled in hilly woodlands. It doubles as a toolbox with encounters and NPCs to support DMs in running a gothic horror adventure. You can use it in three ways: 1. Run the Hushed Hills as a Tier 1 adventure that takes one, two, or three 5-hour sessions (based on the starting quest you select). 2. Select the best encounters and NPCs to add to your game. 3. Use the presented content as fuel to inspire your ideas. This toolbox is packed with assets and consists of: • 50 encounterswith 4 quests to tie them into an adventure. • 21 NPC outlines (including eldritch chimeras), • 3 multi-phased boss battle against the Godless Chimeras. Assets are grouped into 3 regions, including Crestfall Abbey, Town of Kletva, and Mirage Forest. Each region has a high-resolution map and each NPC a portrait. Published by: Immersive Adventuring
/pic4510372.jpg)
It begins in the marketplace or main square of a town when the calm, peaceful day is interrupted by a hulking golem trouncing through town, smashing objects, and attacking townsfolk. The party witnessing this should intervene and stop the rampaging golem with combat or by luring it into a nearby warehouse to trap it so it can be damaged and, eventually, destroyed by the town guards. When the party examines the golem’s remains, they find bones encased in the metal armor and the name 'Quartztoil' written in gnomish script. The town guard explain that this is the eighth construct they have encountered in the area in the past six months. The party can then go on to investigate the name 'Quartztoil', leading them to learn of an old, gnomish, aspiring artificer, Penaral Quartztoil, who had a lab and workshop in a tower in the nearby mountains, but who has not been heard from for close to a century. Published by Nord Games

For the past several days, dozens of strong earthquakes have rocked the coastal area surrounding the underground Temple of Poseidon. Since the first quake, there have been a growing number of reports of strange events and macabre occurrences throughout the area. Several families near the temple have abandoned their farms and refused to return. They claim to have been terrorized by inhuman specters who prowled about their farms late at night. One of the farmers says he found a farm animal crucified and eviscerated in a ritualistic fashion on his front porch. Following the first tremors, all communications with the Temple of Poseidon, seemingly the center of the troubled area, were cut off. Messengers dispatched to the temple to request guidance from the Holy Oracle located there have not returned. Now the darkness has spread to this town. Unnatural births have occurred. Strange cries can be heard in the night, and there is a cowl around the moon. Magical divining has proven useless in naming the dark forces that invade. Many of the townspeople have already abandoned their homes and those who remain have but one recourse left: They have sent out a cry for hardened adventurers, experienced in dispatching evil. They must travel to the temple to discover the fate of the men there, and, if possible, elicit their help in destroying the growing heinous power. Pgs. 31-46

Synopsis: Goblin Bathwater, a magical drug, has taken hold in a sleepy coastal town at the edge of the Empire. As the characters investigate the origin of the drug, they uncover an international criminal conspiracy, wild and ancient magic, and a threat to reality itself. Contents: This beautifully made, 54-page adventure offers: A fully fleshed out, setting-agnostic starter area, brimming with colourful NPCs and hooks for adventure. Balanced encounters to bring characters to level 2; then some more devious encounters on their way to level 3. Three mini-dungeons built on the design philosophy of the "5 room dungeon method" Multiple big, cinematic set-piece boss encounters what will make your players feel epic. A facetted intrigue, which does not immediately suggest a simple, ready-made solution but invites the players to come up with their own, personal approach. Why pick this adventure? Hey, my name is Marius. This is my first time publishing on the DMs Guild but I wouldn't call myself a newcomer. I started playing Pathfinder 1e back in 2014. When I took over as our group's DM in 2019, we swapped over to 5e. We have run many, many modules and adventures since. Currently I play three games a week. In short: You could say I'm hooked. I created The Goblin Bathwater Incident as the ideal adventure for in-between your big modules, but it isn't a simple little adventure. With a playtime of about 30 hours, it still manages to hit that sweet-spot, where it establishes context, makes you grow fond of NPCs, and makes those big bossfight wins so much sweeter, all without taking more than a few sessions. The Goblin Bathwater Incident is different from many of the 1st tier adventures in that it pits the characters against traps and monsters, but also asks difficult, open-ended ethical questions, where a simple strategy of "apply sword to head of bad guy" will not cut it.

An ancient power has started to rise and threatens a small town. Venture into dark caves and put an end to the power creating the skeletons within. Intended for 6 characters level 5-10 Approximately 6 hours of play Featuring 7 new monsters A transforming boss encounter Easily set in your own world, Theros, or Ferun Can be run with the basic rules Full of unique art a map handout for your players and maps for your VTT You can lean into horror or you can keep it PG. Suitable for gamers young and old for one long session or three shorter sessions.
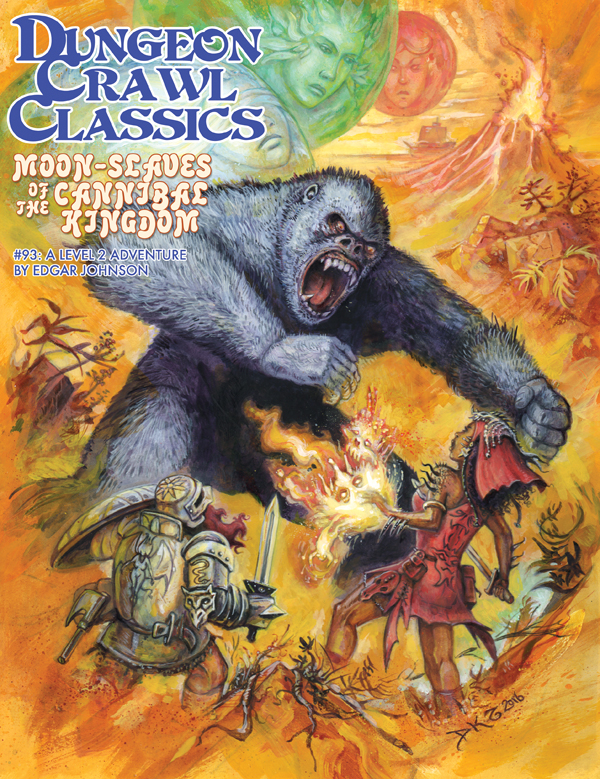
Far to the west, beyond civilized lands, lie the Tolomak Islands— volcanic peaks covered in pestilential jungle and bestriding sunken ruins. The legends say the Tolomaks are home to treacherous witches, ferocious cannibals, moon demons, and worse! Wise are those who steer well away from these accursed jungle isles, but not everyone is wise… For the legends also speak of power unimaginable and treasures beyond the limits of mortal avarice. Now, under the light of the triple moons, a band of intrepid adventurers sails ever nearer the islands. With luck, they will escape with a fortune; without it, they may not keep their souls.
The first part of two lairs—a ratfolk warlock lair and a rattok demon lair—suitable for four or five 3rd-level characters. The lairs can be run separately or together as one longer adventure. Demon Lord of Rats is looking to corrupt the city with his influence. They have grown in number and now seek to infiltrate and influence the guilds of the city.

Akeni was born a servant to a powerful drow family deep underground, but her personality was anything but servile. When she was caught in an affair with the house matron's mate, she killed the matron and her own paramour and fled, eventually stumbling into the lair of a powerful beholder mage named Ormathulak. Akeni knew immediately that the creature was just the ally she needed to wipe out her hated family. Pgs. 56-60
A dangerous beast - but one with a mission. Even the gods slip up now and then, but few dare remind them of it. Ri Conn's son was killed by the white boar of Kilfay, and he has passed sentence of death upon it! What starts as a hunting expedition for the PCs ends up being a grand adventure through the forest. Several interesting set pieces on the path of the boar's rampage are included in the adventure. The path of destruction leads through a goblin camp and ends in the tower of a now-dead mage (which still holds the target of the boar's ire, a mutated bulette that the mage bred). Will the party help the boar kill the bulette mutation, or let it free? Pgs. 32-47