
Every priest in the city dreamed last night of a forgotten temple carved into the side of a nearby mountain. In the dream, a storm raged deep within the temple, and the dreamers knew instinctively that evil forces sought to unleash that storm upon the surrounding lands. Pgs. 120-125

One of the original D&D classics, "The Isle of Dread" is a hex crawl wilderness adventure. It focuses on surviving primitive beasts, dinosaurs, and pirates while uncovering the mystery of the island's inland city, where a great treasure awaits. From the cover: "This module contains maps and background material for the Isle, fifteen new monsters, and suggestions for further adventures. In addition, The Isle of Dread contains a map and background information for a large continent, and eleven smaller maps for encounters on the island itself. In this module, players will push their way through dark jungles and treacherous swamps to discover the lost plateau, and the final secrets of - the Isle of Dread!" TSR 9043

The sequel to the DMs Guild best-selling Tales from Frozen North returns better than ever with almost 4 times more content! What you will find inside: * 36 random encounters (plus 4 mini random encounters within random encounters! Encounter-ception?!) * Chapter 1: Carnival Encounters. 6 Short encounters for any carnivals and fairs in the Feywild. * Chapter 2: The Summer Court. 10 Encounters that are short and whimsical, or featuring creatures common to the Summer Court. * Chapter 3: The Gloaming Court. 10 Encounters that are short and wicked, or featuring creatures common to the Gloaming Court. * Chapter 4: The Feydark. 10 Short encounters in the subterranean world of the Feydark. * Scaling guide provided for most encounters (Tiers 1-2) * Puzzle Encounters (The Fey do love their puzzles, especially if it infuriates others) * New Fey-themed Magic Items * New Creatures! Including but not limited to: * Tooth Fairy (you might want to hold on to your teeth with this one!) * The Dawn Growlers — a team of superhero hounds?! * and a totally innocent and harmless small white rabbit…yes… harmless

“The Temple Between” is an adventure for 9th level characters, and it is challenging enough to take them to 11th level by the time all is said and done. Although intended as the final chapter of the heroic tier portion of the Scales of War Adventure Path, it can be run as a standalone adventure, or as an adventure in a campaign of your own making, with a small degree of modification. It contains elements of urban investigation, dungeon delving, and even wartime conflict, making it a suitable adventure to players of many tastes and preferences. The western end of Elsir Vale has been greatly troubled in recent days. The threat of the orc hordes from beyond the Stonehome Mountains, though turned back at Bordrin’s Watch, still lingers in the people’s minds. Peculiar and hostile creatures of shadow lurk in the caverns and caves below. Political squabbling grows among the city’s powerful dwarf clans. All this makes the city particularly vulnerable to an enemy nobody saw coming - that nobody even imagined. This enemy has goals and objectives far beyond the ultimately unimportant Elsir Vale, but the first step is the utter subjugation of Overlook. An enemy who, at least in part, is already here. In this adventure the player characters start by investigating the strange behavior of the city's clergy. They swiftly discover hints of a conspiracy worming its way through the city hierarchy - some members are possessed while others have been replaced by dopplegangers. After trailing this conspiracy to its source they discover a portal that leads to an ancient temple in the mountains. Using the portal, the PCs go to the abandoned ancient temple where they must confront both a cadre of fey and a band of mercenaries, from whom they learn there is a plot for a full-scale invasion of the region! The PCs must them rush back to Overlook and cement their place as heroes as they face off against the invading forces. Pgs. 4-71

An ancient legend, a missing wife, and a broken heart that time won’t mend. Part 4 of the Evenflow Saga
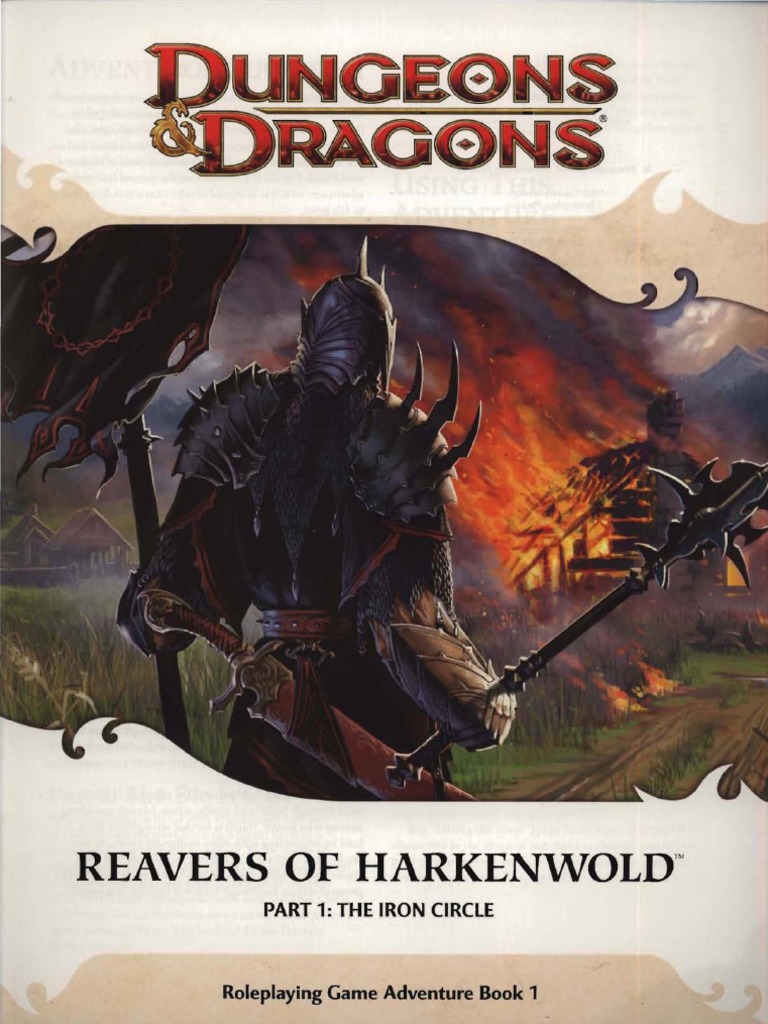
Reavers of Harkenwold pits the heroes against the Iron Circle, a company of cruel mercenaries that has seized control of the small land of Harkenwold. In this adventure, the heroes become daring rebels and lead the folk of Harkenwold against their oppressors.

The Lamenting Lighthouse is a four-hour adventure for 5th-10th level characters, designed for Dungeons & Dragons 5th Edition, with a nautical theme, heavy undead and horror elements, and mysteries to solve! One lonely lighthouse shines the way through the rocks and shoals that deny entry to the northern Moonshae Isles. But when the party’s transport approaches, a horrific gale at their backs - no light is in sight... The party must venture ahead of their vessel in a race against the storm to the restore the beacon before their ship is lost. What has befallen the keepers, and what dark secret does the lighthouse hold? Will the heroes prevail, or will they join the lighthouse's lament? This adventure can easily be inserted into a run-through of Ghosts of Saltmarsh. This one-shot can also serve as a nautical interlude in any on-going campaign where the characters have to take to the sea. Included with this adventure are: + 6 original custom creatures, the dread wraith, the dread wight, the swarm of seagulls, the captain, the rating, and the sailor + 12 player hand-outs with notes that shed light on the mystery of the lamenting lighthouse, with a randomization mechanic that ensures a degree of replayability + 9 original fleshed out NPCs, including personality traits and roleplaying tips + 2 original magical artifacts + 7 hand-drawn maps of important locations + a story reward and 2 story hooks for continuing the adventure (depending on how the adventure resolves)
A Giant Ransom is a short adventure for four 11th-level characters. There are opportunities for diplomacy, stealth, and combat, based on the choices the PCs make, so any mix of classes is appropriate. The adventure can be set in any campaign world, in a frontier region near glacier-covered mountains. In the story thus far, the PCs have been tasked by Duke Ambrinigan, a local lord, to recover a stolen statue of a golden lion. The lion was stolen in transit by frost giant raiders, and was to be ransomed back to the Duke for 10,000 gp. The PCs were sent to perform the exchange. The giants, however, were attacked by the white dragon Whildenstrank, who stole the statue and retreated to his lair in the middle of a nearby glacier. The PCs encountered the remaining giants, and then set off westward toward the dragon's lair. They traveled across the flat part of the glacier, encountering the frost giant ranger Velg the Dragon Tamer, as well as some burrowing bulettes. Then they braved the hazards of frost worms and remorhaz in the Ice Canyons: a maze of twisting passageways surrounding the black spire of rock that the dragon calls home. The PCs now stand at the edge of an open space, looking at the towering edifice in front of them.

Aumvor is aware of the intruders and sends a warning with a powerful fire ball. Satisfied that the party has lost interest, Aumvor returns to his vault where he can safely leave his remains and travel the planes in search of greater power. Perhaps the PCs that survive the blast may have the upper hand. Growing closer to the final chapter, the party of adventurers will find that the only way out is into the tank for a swim. Aumvor the Undying has hidden here in this dungeon for centuries, waiting for his chance to resurface as the emperor of Netheril. The time has passed slowly and Aumvor’s powers are waning. He has hidden phylacteries well, but what use will they be if he has no vessel I which to dwell. Aumvor makes a final effort to kill the party before returning to his vault to wait in ambush for them. In “𝐏𝐚𝐫𝐭 𝟓 The Lower Tower”, you will find the secret at the bottom of the tower, 16 exciting and deadly encounters, and a lot of zombies floating in cadaver soup. Ever fight zombies while swimming and dodging specters? Here is your opportunity. Also coming soon, Roll 20 Map Pack for The Tower of Bondage.

Wanderers emerge out of the desert in the dead of night, bending low against the driving sandstorm. They are adventurers, heroes whose tale has yet to begin. And they are in trouble. For he last three days, a raging sandstorm has harried you. Your faces and hands are rubbed raw by the driving sand. Worse, not once has the sun risen in that time: 3 days worth of unbroken night. Finally, something rises out of the yellow-black haze. A massive structure, outlined in moonlight. The heroes are TRAPPED in a cursed land, harried by sandstorms. They stumble apon a ruined city and a DARK TOMB that lies beneath. Can they find a way to escape this land? Or are they doomed to be drowned in the SORROW OF THE SAND LORD?

The first part of the Dreams of Red Wizards adventure path originally published for the D&D NEXT Playtest. Following the events Ghosts of Dragonspear Castle, a new set of adventurer's will see some of the repercussions of that adventure. This adventure is intended to be continued in the Dead in Thay adventure (Note that they Dead in Thay 5e adventure featured in Tales from the Yawning Portal is missing a significant portion of interlude that links Scourge of the Sword Coast to the events within the Doomvault). The adventurers arrive when Daggerford is crowded with refugees from outlying lands. Goblins, gnolls, and orcs have been raiding the countryside. Now, food is scarce and tension is high. Blame for a theft has fallen on the refugees, and the Duke of Daggerford has forbidden more of the displaced from coming into town. After overcoming difficulties to enter Daggerford, the characters learn more about the raids. As they fight against the humanoids and delve deeper in the darkness that encircles Daggerford, the characters learn of Bloodgate Keep. After a final fiendish ambush, they’re ready to confront the real threat to the area. DM Note: This adventure points the adventurers strongly towards Bloodgate Keep but that location does not appear until the Dead in Thay adventure; at several points the party may feel drawn to explore that location rather than continue their investigations around Daggerford. However, since Bloodgate Keep is only eluded to as a source of great evil power, it can serve to easily segue to an entirely different adventure path. As a NEXT Playtest adventure, Scourge of the Sword Coast uses milestone leveling and the included stat blocks for creatures do not necessarily match or even appear in the 5e Monster Manual, nor do they have XP values or challenge ratings. In some places it will reference rules used in the Playtest but dropped or changed in the 5e release, these are unlikely to substantially impact gampley with 5e rules.

The night air is chilly, but the crackling fire you've started warms your bones comfortably. Crickets chirp, and you smile up at the stars, glad for the quiet evening. There is a loud roar, and you are blinded momentarily as the campfire suddenly surges up into the air. The flames split down the middle, revealing an abyss that leeches the warmth from your soul. Out of this hellish place stumbles a black-cloaked figure clutching a scythe. Quickly, you reach for your weapons. The strange apparition staggers for a moment. Then, gathering its strength, it pulls back the hood on its cloak. Beneath is a bleached skull with stars for eyes. "I am Azrael, Lord of the Undead," it hisses. "Or rather, I will be Azrael, after time itself has died." Even as Azrael speaks, decay begins to eat away at its body, and the god shudders. Holding one arm up to watch as tiny fissures form in its bones, the deity sighs, "Ah, sweet Entropy, come to claim me at last." It's gaze sweeps back to you. "But no, not just yet. First, I must set events in motion." Weakness begins to overcome Azrael, and it sinks to one knee. "Long ago, I became the most powerful of all the gods, in spite of my enemies' efforts to stop me. Delirious with power, I destroyed the other gods and eventually fell to feasting upon the souls of their worshipers. After devouring every living creature, I consume the planets and, eventually, the stars themselves, until I was left alone, in darkness." The god struggles to finish its message as its bones turn to dust and blow away, "Unexpectedly, I felt remorse for what I had done. I grieved for the universe I had destroyed, but I lack the power to recreate it. So, I have come to you, to beg you to do what I cannot." Azrael reaches into its cloak and produces a leather sack. "Take these items and use them." As Azrael dissolves, it gasps out, "Kill me tonight, or tomorrow will never dawn." All that remains is a pile of dust and a leather bag.
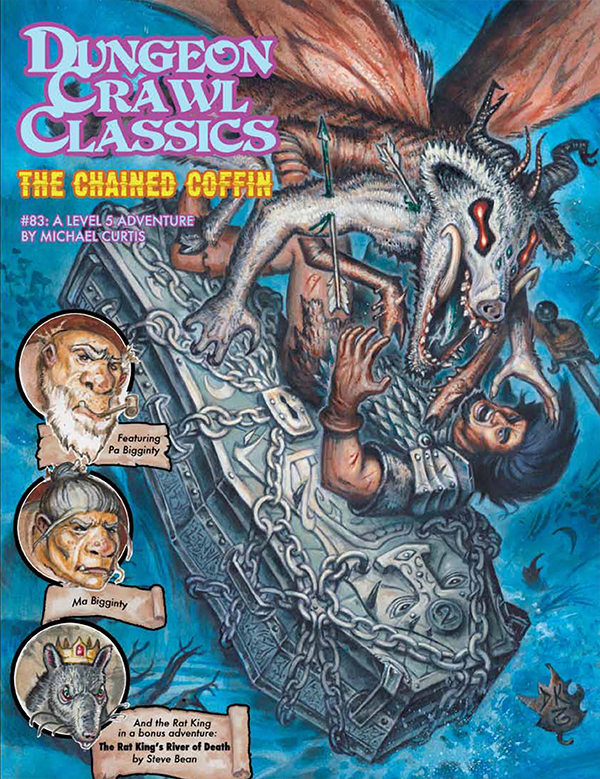
A whispered voice calls from a coffin bound in chains, urging the heroes into the depths of the Shudder Mountains, a place rife with superstition and forlorn secrets. In the shadowy, pine-grown valleys of the Deep Hollows lurk mysteries of a bygone age and a new evil emerging from the ruins of the past. The adventurers must plumb the mountains’ secluded reaches to root out this rising terror before its power comes to fruition. Standing in their path are cackling witches, subtle devils, lingering spirits, and a foul thing that moves in the night. Can the heroes appease that which lies within the Chained Coffin and thwart the dawn of a new and terrible age?

A sunken ruin deep beneath the bay of Mulmaster holds the key to unraveling the Cult of Glaugrax’s nefarious plans. Dare you brave danger and duplicity to plumb its depths? Part 2 of The Neverdusk Trilogy. A Two-to-Four Hour Adventure for Tier 2 Characters. Optimized for APL 8. The Sequel to Ooze There?, an ENnie Awards 2019 nominee in the Best Organized Play category! This adventure is Part 2 of "The Neverdusk Trilogy", and continues the tale of Fenaria Neverdusk, Sovad Klim, and the mysterious Cult of Glaugrax! Ooze Next? debuted at Lion City Conclave 2019 - a charity convention by the D&D AL Singapore Community. The v1.02 package includes: - Full color cover art by digital artist Lau Shang Hui (NezArt), with additional art inserts for key scenes - A high quality digital map pack for key encounter locations - A two (2) page cheat sheet with Jason's personal tips for running Ooze Next?

The people of the Linsholm fear orcs are about to raid their small farming village. For the past several days, they have been seeing orcs in the hills and forests around the village. They don’t realize that something much worse than this small band of orcs is out there. For now, it’s hunting the orcs. But if the townsfolk aren’t careful, they could be next. Protect the village of Linsholm, but perhaps not from what they fear. Discover that not all orcs are evil. Reunite the fractured orc clan, and broker peace between them and the villagers. Uncover what is hunting the orcs, and the secret to their power. A 6-8 hour adventure optimized for a party of 4th level characters.

A gang of ogres is raiding a farming community, stealing crops and livestock, and advancing closer and closer to the town, and the townsfolk need your help!

The yuan-ti anathema, Hessatali, calls out to his yuan-ti faithful from his prison in the Abyss. His network of vipers has uncovered the ruins of ancient Ss’tatha’lass and the Fane of Hessatali, a fountain of pure venom that will return the demi-god to life. Above the buried ruins of Ss’tatha’lass, yuan-ti agents have moved to control the politics of Scornubel. The characters fall into a complex yuan-ti plot that spans the breadth of the realm, pits the heroes against the forces of the Abyss, and explores the culture of the yuan-ti.

In this scenario, the adventurers pass through magical portals into a series of interlinked chambers. The characters are encouraged by a young scholarly mage to voyage into the Sea of Pastures, to explore a mysterious island connected with a number of recent shipwrecks and disappearances. The island is grassy and windblasted, but eventually the characters discover a stone door leading into a subterranean complex. There, they discover 18 rooms linked by secret passages and magical portals. Most of these rooms have been ransacked by a variety of other survivors, human and monstrous. These survivors are likewise trapped within the labyrinth and are either eking out a miserable existence there or else desperately searching for a means of escape. Also within the building are a number of extraplanar creatures, collectively known as gingwatzim, who can shift between various forms: an energy form (glowing ball of light), an inanimate form (usually a magical weapon), and an animate form (an animal or monster). Eventually the characters may find the exit, and are once again deposited on the dreary islands to await rescue. TSR 9110
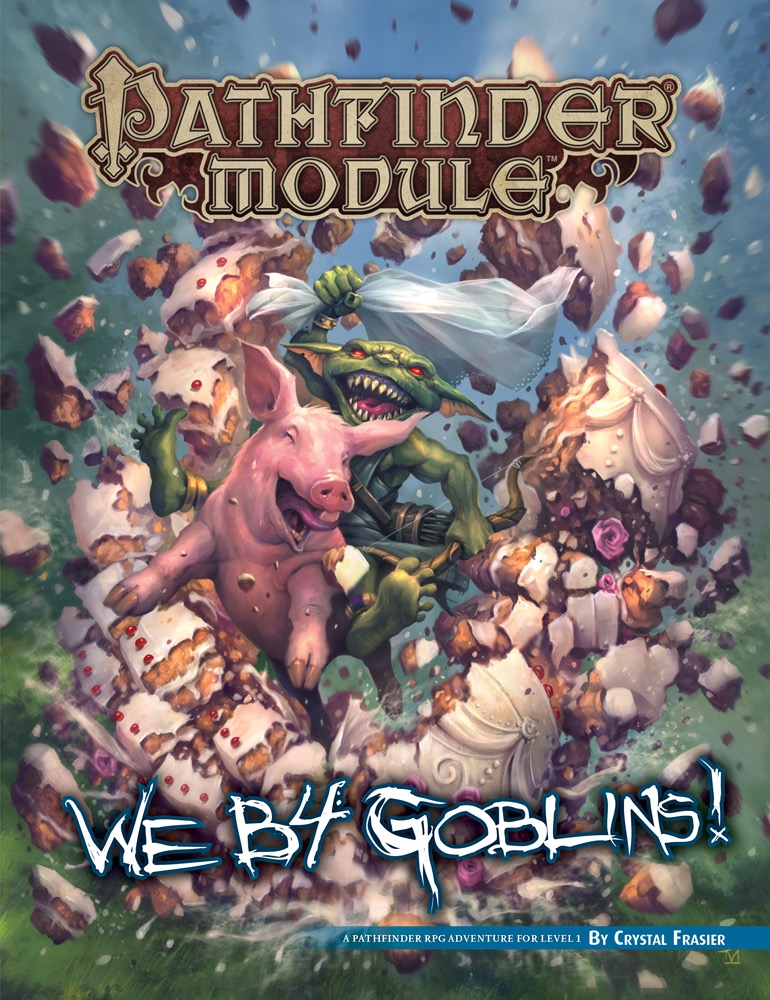
As whelps of the Licktoad tribe just out of their swaddling cages, the goblins Chuffy, Mogmurch, Poog, and Reta must prove themselves by undergoing a series of challenges, from tying a string to a large spider and shouting insults with hot rocks in their mouths to facing off against a goblin bully and his dimwitted minions. As a final test of their mettle, they must make a dangerous (and smelly) trek to claim a toad from the nearby swamp and present it to the terrifying presence that lurks within the Cave of Darkfear, only after which can they truly call themselves goblins! Part 4 of We be Goblins series

You and your cohorts have pulled into Free Haven, a port city in the northern reaches to settle down for the season. Your respite is short lived as word reaches the city that a small community further north has been attacked by humanoid raiders! Refugees from North Port have arrived and report their community has been sacked. There is little hope of survivors and the fear is that Free Haven may be next. With little else to do, it is time for the party to put on their “hero caps” and save the day!