
The fabled mines of Dhol Kuldhir once showered the Dalelands, Cormyr, and points beyond with precious gems and expertly crafted jewels. Operating from a hidden complex in the Thunder Peaks, their exquisite craftsmanship was said to rival that of even Thunderholme. Almost as quickly as it rose to prominence it vanished, along with all of the dwarven miners, crafters, and untold riches. Some speculate that the mine ran dry, and the inhabitants abandoned it for a more plentiful location. Others believe that they probably fell victim to one of the many goblin tribes plaguing the area. The truth, however, is much more grave. Centuries later, the nearby town of Keen is beset upon by unlikely thieves, the local innkeeper charges a small band of unlikely allies to investigate the string of burglaries. What they uncover leads them to the long-lost dwarven mine. In the darkness, they will have to brave insidious traps, cunning monsters, and the dreaded new lord of Dhol Kuldhir.

Decades have passed since Sokol Keep was reclaimed, and a small garrison placed there along with a beacon to help guide ships. Now, that beacon has gone dark, and the garrison has disappeared. In Phlan, rumors circulate that something ancient was discovered in the grounds beneath the keep, dating to before the clerics of Tyr built the small fortress. Uncover the secrets of Sokol Keep! An adventure for 1st-4th level characters.

This quest is for a party looking to regain a character’s soul. A character whose soul has been claimed by another entity cannot be resurrected through standard means. To regain the lost soul, the characters involve themselves in a conflict between a master thief and an archdevil. This quest assumes that the PCs would be willing to form a contract with an infernal entity. Includes a quest-related NPC that a player can control if they're waiting for their character to be resurrected.

Myriad, a city originally devoted to magical research, has been hidden and isolated for nearly a thousand years. Now, it has rejoined the world and an unseen struggle is taking place within its walls. A party of adventurers has been invited to enter the city and assist in its reintegration. Myriad's secrets, however, run deep and dangerous.

In this adventure, the player characters discover the illegal actives of an ambition Red Wizard operating out of an enclave in a small town. This adventure is short and a great way to introduce players to Red Wizards. For a group willing to use diplomacy fighting they can cut down there combat. The adventure is found on pages 284-287

Yonder lies the Shrine of Lucien Harpell, greatest mage of this or any other age. In the arts of golemancy, artificery and necromancy, his equal has never been known, nor will be again. Cursed are those who enter this tomb. Cursed are those who look upon this statue. Cursed are those who seek his riches. Know that your demise is certain – your lives will be short, and your deaths slow. Read this, fools, and despair! The Shrine of Lucien Harpell is the stuff of legends - full of hideous traps and strange monsters, but guarding fabulous treasures. It was lost for generations beneath the grim and lonely Starmetal Hills, but has now been found again. Will any dare enter? Little Shrine of Horrors contains over 20 encounters and is full of puzzles, tricks, traps, roleplaying and combat. Do your players have what it takes to outwit Lucien Harpell?

An offer of exploration and adventure leads to a chilling underground dungeon. A mystical object is being asked to be retrieved by the local Wizard. This is the second adventure in a miniseries with the following adventures being: A Chance Encounter An Urgent Rescue A Dark Veil Falls

Your foe seeks to unlock the Iron Door beneath the Peaks of Flame and open the way for the Eater of the World. You must find your way through the maze of tunnels and stop them, or it will be the end of all things. Part Four of the Broken Chains Series.
A wasting sickness creeps through city streets, powerful spells and cures only pausing the disease. Talona’s name is called out in anger as the possible culprit and in prayer for the disease to be cured. Only she knows the truth: An ancient deity’s corpse, sequestered millenia ago by Talona, floats in the astral sea and is the source of this affliction. Will adventurers be able to stop this sickness at its source? And what will they do with the knowledge they discover?

This adventure is written with the intent that it takes place in the subterranean world called the Underdark in the world of Forgotten Realms, although it may be placed in other settings. Within the Underdark, Cyrog's lair can be placed anywhere though it is stated to be thousands of miles east of Gravenhollow. If you are running Out of the Abyss, you may want to have your players see the vision Cyrog Lives! Hail Orcus! (OOTA, 158). Additionally, it is recommended that this adventure be used for a party of 4 to 6 players, level 9 to 12. While merely hinted at through visions in Out of the Abyss, Orcus is roaming the Underdark unchallenged with an army of mind flayers at his disposal. Cyrog, the elder brain of a mind flayer colony in the Underdark has died. The demon lord Orcus has reanimated and taken control of it. The hive of mind flayers is now bent to Orcus's will through Cyrog as he strives to make all life in the multiverse into a vast undead horde under his control. The adventurers are contacted by a patron who gives them a special item (such as brain worms) to suppress their brain waves and make it possible to infiltrate the Cyrog's Lair without immediate detection. The adventurers must defeat or otherwise subdue mind flayers and a few guards, override the elder brain's mechanical defense system, and slay Cyrog.

𝐏𝐚𝐫𝐭 𝟒 of the Tower of Bondage “The Middle Tower” introduces Olive Slime and Slime Creatures from notable 1e AD&D fame as well as another of Aumvor’s tortured servants. In this adventure you will go deeper into the tower and find: ● 26 encounters ● More enslaved wraiths ● More traps ● More slime ● More phylacteries ● More danger Discover the Undying One’s library and find tools needed to defeat him, if your players are to escape the tower alive. This release also includes a side view of the tower to better understand the layout of the dungeons. 𝐀𝐥𝐬𝐨, 𝐟𝐨𝐫 𝐭𝐡𝐨𝐬𝐞 𝐰𝐡𝐨 𝐮𝐬𝐞 𝐑𝐨𝐥𝐥𝟐𝟎, 𝐜𝐨𝐦𝐢𝐧𝐠 𝐬𝐨𝐨𝐧: Roll20 Map Pack for Roll20, featuring plain maps for players, without the secret doors and other goodies marked. Coming very SOON. Look for it on DM’s Guild.
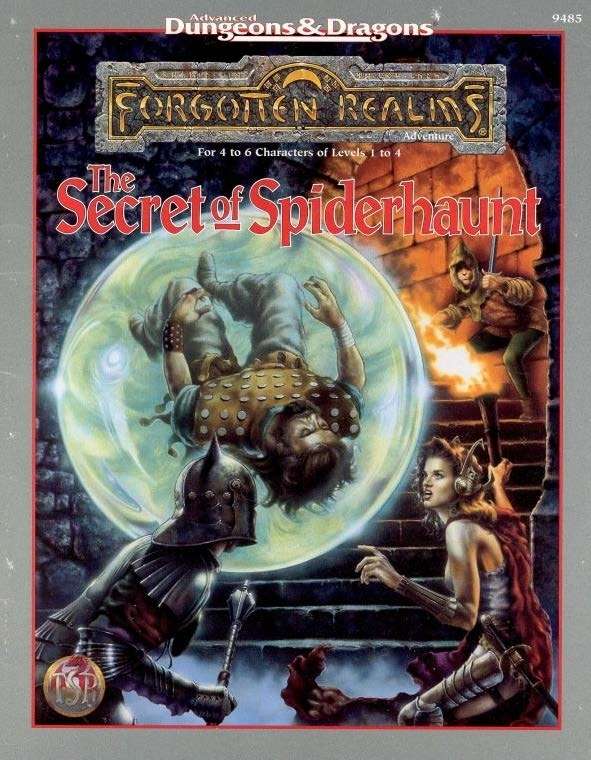
The infamous Sword of the Dales has always held a certain fascination in the eyes and hearts of the citizens of the Dalelands. Thus, it was no surprise when Randal Morn, rebel leader of Daggerdale, led an expedition into the crypt of a long-dead wizard to recover the weapon. Shaevyn the weapons-mage had created the Sword long ago, and it stood to reason that the blade would be waiting within his tomb. Perhaps the Sword of the Dales woulld allow Randal Morn to rule Daggerdale once again. But Randal Morn never returned from that fated party. Only tales of terror told by a lone survivor held any clues as to Randal's fate. A brave hand of heroes accomplished what Randal Morn's group failed to do in part one of this adventure trilogy, "The Sword of the Dales." Battling through the tomb's undead inhabitants, those heroes reached the burial crypt of Shraevyn. There, resting in the center of the coffin, was the Sword of the Dales, its azure glow filling the chamber. However, there was no sign of Randal Morn. Only a note signed by his hand held any clue as to his fate. "Seek me in Spiderhaunt," it proclaimed. "The fate of Daggerdale is in your hands." This is the second part of a trilogy of modules that began with "The Sword of the Dales." The saga concludes with "The Return of Randal Morn." TSR 9485

With land trade threatened, the city of Melvaunt is relying on sea trade to get goods into and out of the city. An island rises out of the Moonsea just outside of Melvaunt Harbor, and initial exploration indicates the island is a threat. The origins and nature of the island must be ascertained before trade is shut down completely. The characters explore a mysterious island and help 'living souls' disrupt a ritual being performed by cultists of Cyric. Part Three of the Misaligned Trilogy

In the hills near the Sword Coast is an old, abandoned temple to the goddess Mystra. A young halfling wizard named Raoul Footpad finds the abandoned temple and converts it into a laboratory. One day, Raoul returns home to the village of Prairiedale, only to find his parents gravely ill. With few options for their recovery, Raoul becomes obsessed with creating a magic spell to cure them. He and his assistant work feverishly to find the right magic, but instead they release calamity upon this portion of the world. Raoul is transformed into a hideous monster, and undead now inhabit the laboratory. 𝐍𝐞𝐞𝐝 𝐭𝐨 𝐠𝐞𝐭 𝐲𝐨𝐮𝐫 𝐩𝐥𝐚𝐲𝐞𝐫 𝐜𝐡𝐚𝐫𝐚𝐜𝐭𝐞𝐫𝐬 𝐭𝐨 𝐚 𝐡𝐢𝐠𝐡𝐞𝐫 𝐥𝐞𝐯𝐞𝐥 𝐛𝐞𝐟𝐨𝐫𝐞 𝐛𝐞𝐠𝐢𝐧𝐧𝐢𝐧𝐠 𝐲𝐨𝐮𝐫 𝐧𝐞𝐱𝐭 𝐚𝐝𝐯𝐞𝐧𝐭𝐮𝐫𝐞? 𝐖𝐚𝐧𝐭 𝐚 𝐰𝐚𝐲 𝐭𝐨 𝐠𝐞𝐭 𝐬𝐨𝐦𝐞 𝐥𝐨𝐨𝐭 𝐢𝐧𝐭𝐨 𝐭𝐡𝐞 𝐡𝐚𝐧𝐝𝐬 𝐨𝐟 𝐲𝐨𝐮𝐫 𝐩𝐥𝐚𝐲𝐞𝐫𝐬 𝐛𝐞𝐟𝐨𝐫𝐞 𝐭𝐡𝐞𝐲 𝐬𝐭𝐚𝐫𝐭 𝐲𝐞𝐭 𝐚𝐧𝐨𝐭𝐡𝐞𝐫 𝐥𝐨𝐧𝐠 𝐚𝐝𝐯𝐞𝐧𝐭𝐮𝐫𝐞? 𝐎𝐫 𝐝𝐨 𝐲𝐨𝐮 𝐣𝐮𝐬𝐭 𝐧𝐞𝐞𝐝 𝐚 𝐥𝐢𝐭𝐭𝐥𝐞 𝐦𝐨𝐫𝐞 𝐜𝐨𝐧𝐭𝐞𝐧𝐭 𝐢𝐧 𝐭𝐡𝐞 𝐜𝐚𝐦𝐩𝐚𝐢𝐠𝐧 𝐲𝐨𝐮 𝐚𝐥𝐫𝐞𝐚𝐝𝐲 𝐡𝐚𝐯𝐞 𝐠𝐨𝐢𝐧𝐠? 𝐓𝐡𝐞𝐧 𝐒𝐰𝐨𝐫𝐝 𝐂𝐨𝐚𝐬𝐭 𝐒𝐢𝐝𝐞 𝐐𝐮𝐞𝐬𝐭𝐬 𝐢𝐬 𝐟𝐨𝐫 𝐲𝐨𝐮! This adventure also features a new creature: The Greater Nothic! This adventure module is meant to assist the DM with providing content to their players. This adventure is intended to run in the Forgotten Realms Campaign Setting, but it can be compatible with any campaign setting, especially Ravenloft. This module is intended for 4 to 6 players, 3rd level characters.

The Heartland Scouts – brave defenders of the Coast Way – have been captured! What their captors haven’t counted on is the adventurers’ feisty animal companions. Left behind, they are nevertheless bound to spell trouble! In this entirely unique adventure, players take on the roles of trusty animal companions and familiars on a quest to rescue their adventurer masters. Surely leaving behind a druid’s harmless badger friend is no threat to one of the great evil powers of the world – or is it? Rescue: A Familiar Tale features a story and challenges designed especially for the animal companions. Players choose and customize their animal companion from over 20 options, with illustrated character sheets included for each one. This adventure does not require existing player characters and can be enjoyed by players of any experience level with the game. While it makes for a perfect “something different” one shot, Rescue can also serve as a session zero for any new campaign and includes guidelines for a fun and surprising way to create inspired new characters at the adventure’s end!

The Tower of Bondage 𝐏𝐚𝐫𝐭 𝟐 “Fane of the Jailers” takes you deeper into Aumvor the Undying’s dungeon of terror. As your players draw closer to the tower below, they will meet new horrors that include: ● 15 encounters with dark denizens including undead ● New Monster, “Walking Ooze” ● Margoyles of the AD&D era converted for 5th Edition. This adventure is part two of a six-part series that comprises six levels of dungeon and culminates in the PC’s escape from an underground prison of torture and madness, and if they choose, the destruction of the Lich known as Aumvor the Undying. In early 1320 DR Aumvor the Undying collected the greatest of all of the relics and lore of the Netherese Empire and secreted it away in his domain in Endless Caverns. There he awaited the return of the City of Shade. He did not have to wait long for it was but thirty eight years when it appeared. The undying one saw this as his long awaited opportunity to return and bring the Netherse Empire to its full glory. As quickly as it rose, it also fell, for even Aumvor could not foretell the advent of the second sundering. This change in the weave left him weakened and the nations placed under his yoke, rebelled. By 1487 DR the City of Shade fell and the end of Netheril was not far behind. From the ashes of an empire two times fallen, Aumvor the Undying plots again to restore Netheril. His ancient portal traps still in operation, he feeds on the living and grows strong again. Who can stop him? 𝐅𝐨𝐫 𝐦𝐨𝐫𝐞 𝐨𝐧 𝐀𝐮𝐦𝐯𝐨𝐫𝐞 𝐭𝐡𝐞 𝐔𝐧𝐝𝐲𝐢𝐧𝐠 𝐚𝐧𝐝 𝐭𝐡𝐞 𝐡𝐢𝐬𝐭𝐨𝐫𝐲 𝐨𝐟 𝐭𝐡𝐞 𝐄𝐦𝐩𝐢𝐫𝐞 𝐨𝐟 𝐍𝐞𝐭𝐡𝐞𝐫𝐢𝐥, 𝐜𝐨𝐧𝐬𝐮𝐥𝐭 𝐂𝐡𝐚𝐦𝐩𝐢𝐨𝐧𝐬 𝐨𝐟 𝐕𝐚𝐥𝐨𝐫 𝐚𝐧𝐝 𝐒𝐰𝐨𝐫𝐝 𝐂𝐨𝐚𝐬𝐭 𝐀𝐝𝐯𝐞𝐧𝐭𝐮𝐫𝐞𝐫’𝐬 𝐆𝐮𝐢𝐝𝐞. This exciting series presents the dungeons of Aumvor the Undying after the second sundering, desperately clinging to what little he has left. This may be the time to strike him down once and for all.

A short plug in adventure that can be used as part of a larger campaign or run as a one shot for 3-4 Tier I or II characters. The Twin Temple was once a place where the people of the city can come to and get help and guidance, but change has come to the Twin Temple now. The characters seek to find what poisons this well and how they can get to the bottom of it and who is responsible. This adventure is ideal for for 3-4 tier I and II characters. Playable as a one shot or the start of a larger campaign. The characters are sent to investigate the Twin Temple and see if they can find the root cause of trouble with various clues and encounters in most rooms this adventure is customizable and adaptable to fit into most campaigns as needed.
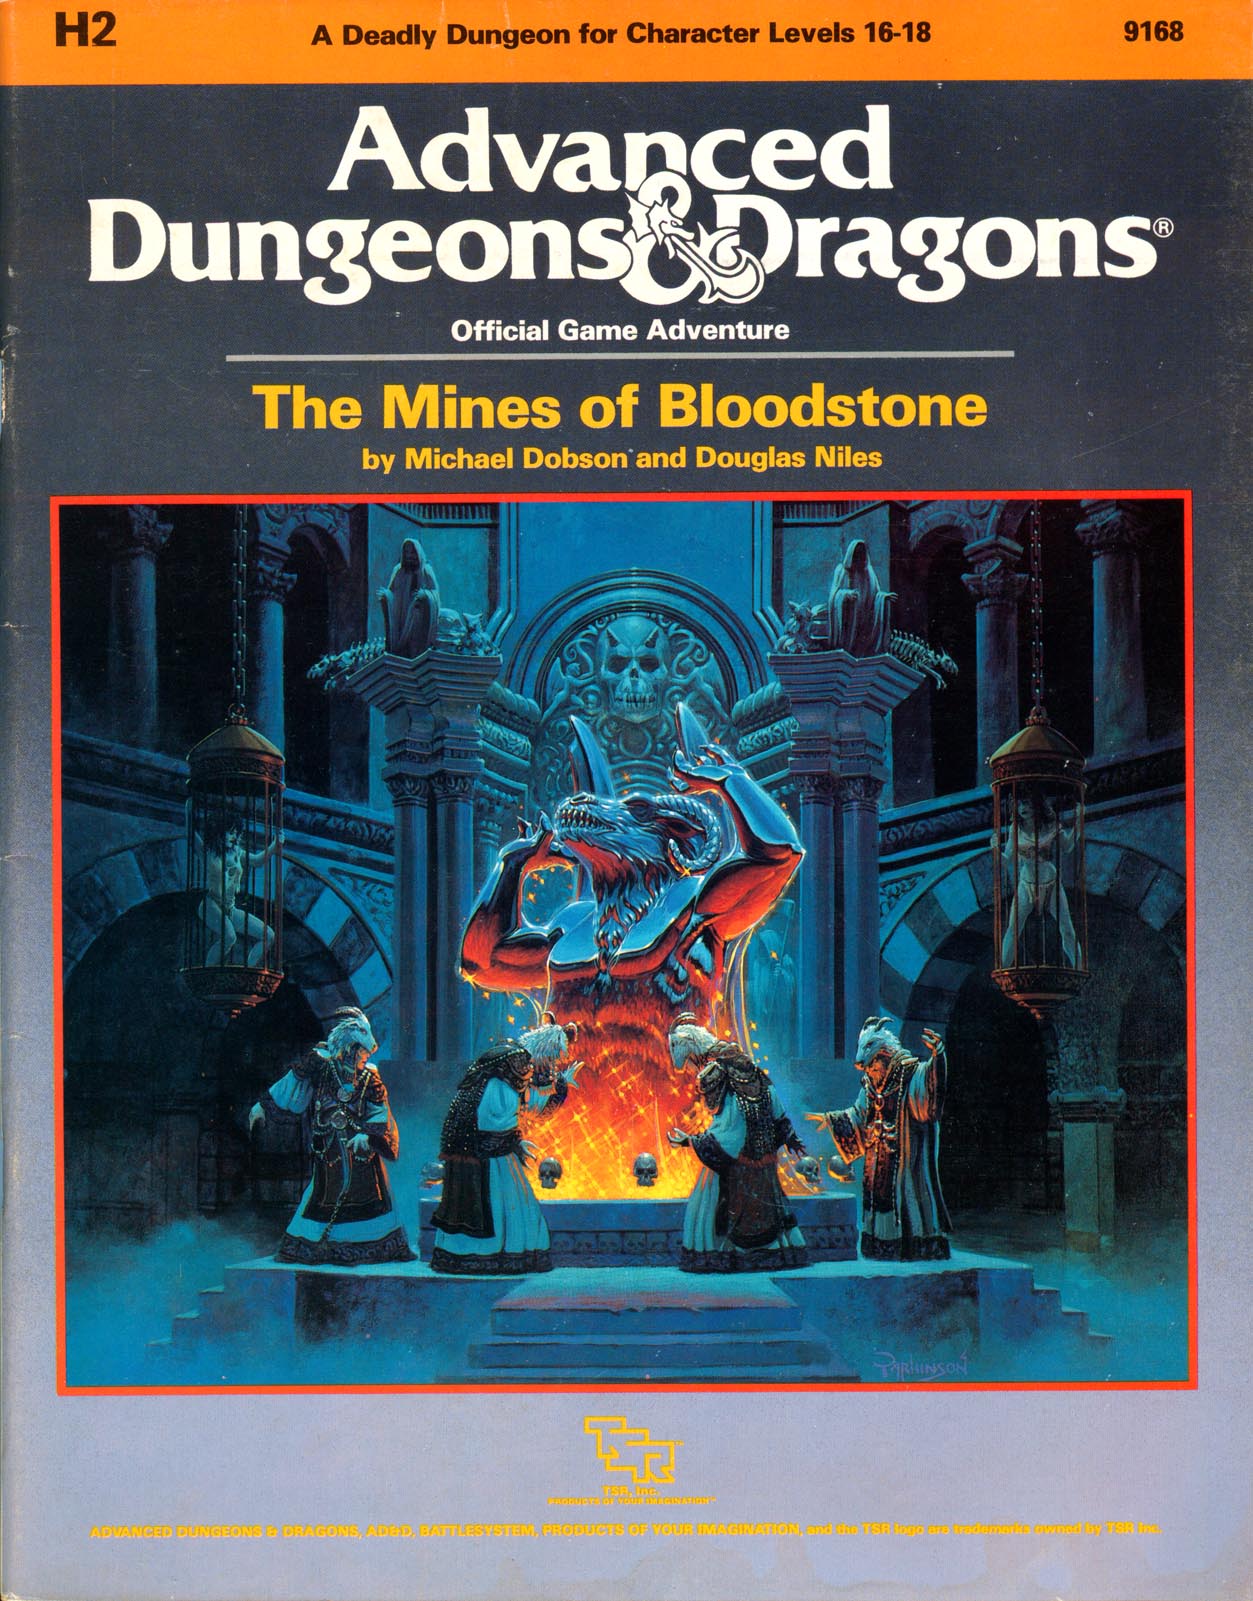
The most deadly dungeon ever devised! High-level characters brave the unexplored corridors of Deepearth to confront perhaps the most feared adversary in the AD&D game. The second chapter of the Bloodstone Pass saga follows the conclusion of the desperate war against the bandit army. A cold and bitter winter drives the villagers to the edge of starvation, and numerous horrors strike the town of Bloodstone Pass. Join the adventure as the heroes explore the depths of the ancient bloostone mines, now inhabited by fearsome demons. There they hope to uncover the fantastic treasures rumored to exist in the unknown darkness. But deep within the mines, all is not what it seems.... This module uses the new rules from the Dungeoneer's Survival Guide and Wilderness Survival Guide. The adventure also includes optional BATTLESYSTEM scenarios fought entirely underground. These supplementary products are not required to play the adventure, however. TSR 9168

A dark and grievous peril has befallen the peaceful free-village of Peppermint as the forces of undeath raised by Senerith Wildblossom, ravage the land. An eon ago he was a proud elven healer of great renown in Duskwood Dell, that has been reduced to a mere husk of his former self, becoming a manifestation of pure evil, intent on wreaking havoc and mayhem to all the living – a Zombie Lord. The players are called to assist Peppermint village and investigate the nearby woodcutting hamlet of Snakewood. The hamlet has been destroyed by the despicable zombie lord, and his forces are now underway to attacking Peppermint too! The players will have to travel to Snakewood hamlet as well as what used to be Duskwood Dell, and then make a mad rush against time while also carrying an injured Halfling, to warn and defend the unsuspecting villagers.

A storm of unparalleled fury has been ravaging the peaks of the Earthspur Mountains for a tenday, and the Monastery of the Yellow Rose sits in its eye for now. Some monks have fled the monastery to the safety of Mulmaster and beseech you to convince their more obstinate brothers to retreat to the city before the eye of the storm shifts, and the monestary is in terrible danger. Can you brave the elements and convince the monks to escape?