
Moonless Night is an adventure module composed of short adventures which are compatible with both the first and second editions of the Advanced Dungeons and Dragons game.

Built high on cliffs overlooking the confluence of two rivers, Gurthap Keep was a bastion of strength and a haven for the Cult of the Red God. Here, priests of old sacrificed over the tomb of long dead Kha M Thir, honoring him for his long service to the Red God. They added bastions to the keep, walls, a temple and barracks. From there they terrorized the surrounding country, raiding the villages of Alice, Greenbriar and Ends Meet until at last the rangers gathered against the Cult and overthrew it. They drove them from their walls and those they did not slay, fled into the Darkenfold to the south. The castle has sat thus ever since, a grim testament to the gods of the old world. The forest has consumed it and only the memories of men keep it alive. But within its abandoned walls lie the shadows of yesteryear. For the tomb of Kah M Thir was never found and the secrets of the priests of the Red God never fully revealed.
:strip_icc()/pic2633965.jpg)
When the Purple Planet began its slow decline, factions arose to vie for the final resources of the dying world. In the days of the Last Wars, the Ascendant Masters used their knowledge of cybernetics and genetic engineering to create increasingly powerful and grotesque biological weapons. One such weapon was Sotark the Destroyer of the long lost House Memniscene. Damaged and placed in a cryogenic regeneration capsule, Sotark has slept away the ages while the House above him eroded away under the weirdling sun. Over time, the capsule has failed, but still Sotark sleeps on, diminished, but not destroyed.
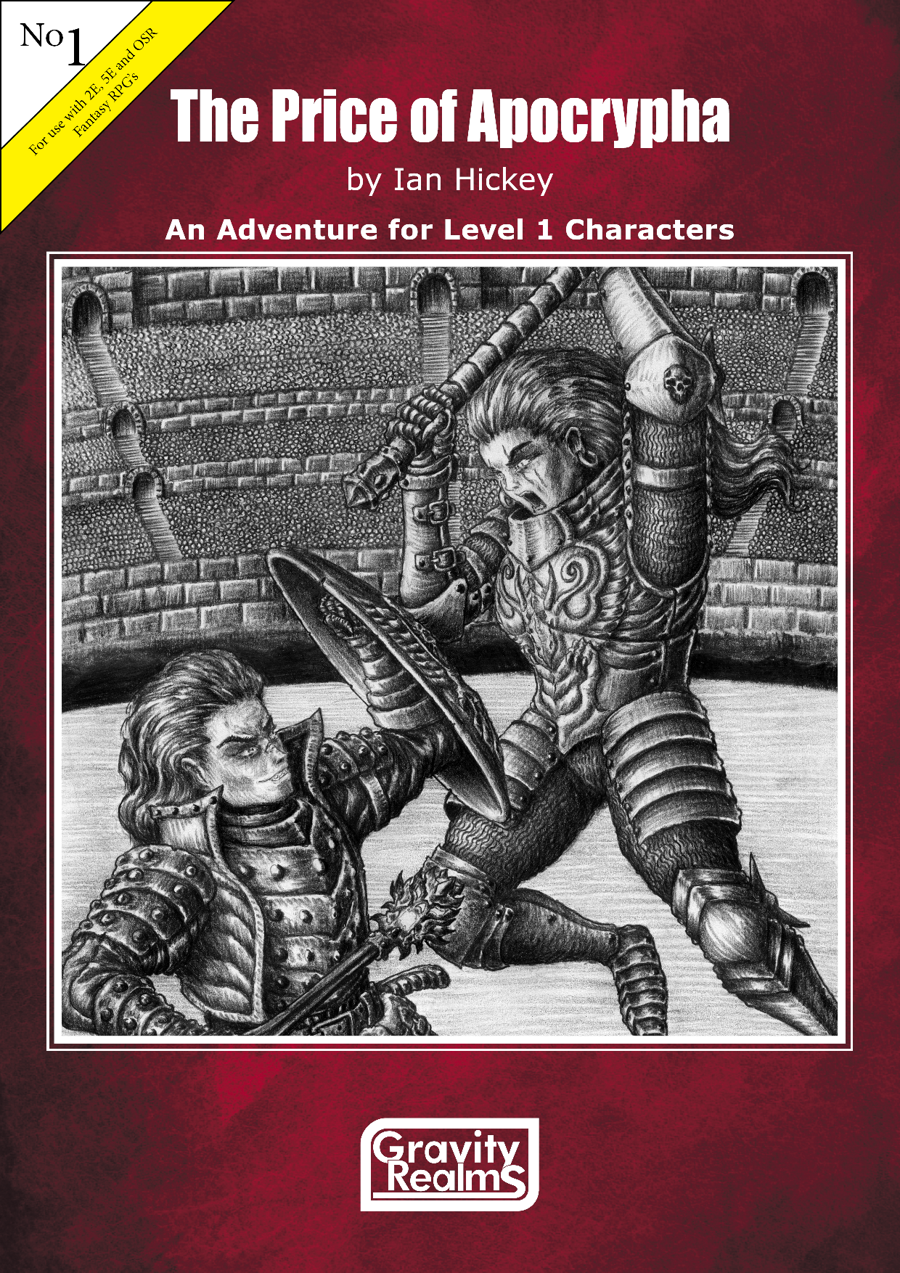
Everyone in the city eagerly anticipates The Arena's opening at the end of every month. This month, an unexpected change to the lineup just days before is rife with rumours! The most feared and respected gladiator in history, Imhullu, the Dragon of Marduk, has issued a challenge to an unknown rival—a fight to the death on charges of heresy. Rumours of insults and slander are spreading throughout the Great Market, though the truth remains inscrutable. The crowds gathered outside The Arena are beyond belief; people must have come from every dimension. Gaining entrance to The Arena is going to be next to impossible. Also, you don't have a ticket! Fortunately for you, you haven't spent your youth in a particularly productive manner! Centred around a gigantic arena full of gladiators, your adventurers must brave the depths of The Pits evading and fighting strange, horrifying creatures, in order to gain entrance. Once inside, they must hold strong against social and political pressures in the hopes of finding a seat in time to watch the main event! But have they gotten themselves caught up in secrets best left alone? There’s only one way to find out!
A short adventure for the Midnight campaign setting from Fantasy Flight Games. The adventurers must contact a recently-captured resistance fighter to uncover the identity of a traitor.

Peren, a guildless Devkarin collector of obscure relics has gone missing. The elf of shadow is in deep debt to the Orzhov as well as to the Rakdos performer, Ophyira. To discover Peren’s fate the party must descend into the Undercity of District Four, within the territory of the Golgari Swarm. Continuing the story which began with Off to a Weird Start, and picking up where The Palace of Pain’s Pleasures left off, this adventure is designed to be part of an ongoing campaign. For Dungeon Masters who wish to incorporate The Felicity Triskelion independently from the ongoing story, 10 Adventure Hooks (one for each guild) are included, giving The Felicity Triskelion flexibility for one-shot play or for inclusion in your own campaign!

𝐓𝐡𝐞 𝐁𝐥𝐚𝐜𝐤𝐟𝐥𝐚𝐦𝐞 𝐂𝐮𝐫𝐬𝐞 𝐇𝐚𝐬 𝐑𝐞𝐭𝐮𝐫𝐧𝐞𝐝! Step into a town where darkness has taken root, and every shadow hides a deadly secret. In The Return of the Blackflame Curse, you and your party will unravel the twisted mysteries of Whitethorn Rose, a cursed town teetering on the edge of doom. 𝐄𝐱𝐩𝐥𝐨𝐫𝐞 • 36 rooms across 4 floors (Basement, 1st Floor, 2nd Floor, Attic) • 5 detailed maps with day/night and transparent variants Explore the haunted Huxley Manor, a sprawling, intricately detailed estate with 36 rooms and 4 floors, each filled with terrifying encounters and bone-chilling secrets. With 5 beautifully illustrated maps, including day/night variants, you’ll be fully immersed in a tale of fear and survival. 𝐅𝐢𝐠𝐡𝐭 • 13 monster statblocks, each with their own lore • A intense boss fight with the vengeful Morgana Blackflame Face off against 13 custom monsters, each with unique abilities and terrifying backstories. From creeping apparitions to vengeful spirits, every encounter will test your players’ courage and strategy. And when it comes time for the ultimate showdown? Prepare for a climactic boss fight with Morgana Blackflame herself, a ghost hellbent on consuming the town in flames once more. 𝐃𝐢𝐬𝐜𝐨𝐯𝐞𝐫 • 13 tragic ghosts, each with chilling backstories • 8-page Ghost Hunting Compendium as a player handout • Solve mysteries and exorcise spirits to lift the curse But it’s not just monsters you’ll have to worry about. The town itself is alive with haunted events and 13 restless ghosts, each carrying a tragic tale. Investigate, exorcise, and piece together the dark history that binds them to this cursed place. To help your players dive deeper into the supernatural, we’ve also included an 8-page Ghost Hunting Compendium as a handy player handout. 𝐏𝐫𝐞𝐩𝐚𝐫𝐞 • 7 homebrew magic items, including a powerful Fated Item with 3 variants • 6 different charms to protect your players from the curse • 9 Magic Item Cards to print and hand out to players, with artwork, in 2.5 x 3.5 inches (MTG-sized) • 43 haunted events to keep players on edge Don’t go into battle unprepared. Arm your adventurers with 7 custom magic items, including 1 Fated Item with 3 powerful variants. Stock up on 6 unique charms to ward off the curse, and keep your party on edge with 43 haunting events that can strike at any time. 𝐑𝐮𝐧 • 17 monster cards for easy reference, with artwork, in 88mm x 125mm (Tiny Epic size) • Ghost Tracking Sheet for smooth management of the adventure • 36 small room cutouts for quick navigation during gameplay • 24 VTT tokens for easy integration into your online games For GMs, we’ve made running the adventure easier than ever. With 24 VTT tokens for monsters and NPCs, a Ghost Tracking Sheet to manage exorcisms, and 17 monster cards for quick reference, everything you need is at your fingertips. Plus, 36 cutouts in the description of every room, provide clear guidance for navigating the sprawling manor. 𝐏𝐫𝐞𝐬𝐞𝐧𝐭 • 7 detailed town locations for investigation • 7 NPC background and roleplay sheets to add depth to the world • 1d12 Superstition Table to bring the town’s eerie atmosphere to life Bring the town of Whitethorn Rose to life with 7 detailed NPC background sheets and 7 town locations, giving your players more ways to explore, interact, and investigate. And for added flavor? A 1d12 Superstition Table to bring out the eerie quirks of the locals. 𝐏𝐥𝐚𝐲 • Battle against the darkness with strategic challenges and eerie storytelling • Solve the murder mystery, lift the curse, and guide your players through an unforgettable experience With The Return of the Blackflame Curse, every decision matters, every room hides a deadly secret, and every ghost has a story to tell. Get your copy now and take your players on a journey into the heart of darkness. This is more than just an adventure—it’s a test of survival.
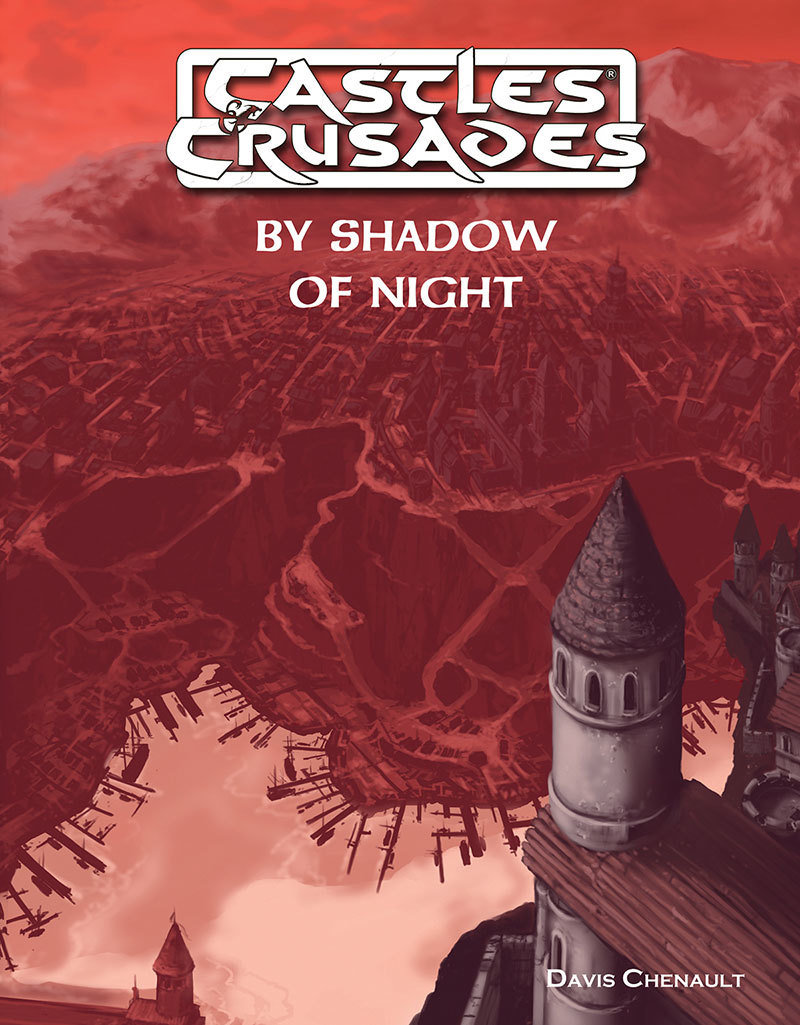
The City of Bergholt lies upon the southern shores of the Interzae. Her crumbling walls and ancient cobbled streets are little more than a backwater, controlled by powerful merchants and thieves. In these darkened streets and twisted alleys people claw their way to the top through violence and guile. In Bergholt, the fear lingers in every shadow. In By Shadow of Night you’ll find a complete detailed description of Bergholt, a rich cast of NPCs who all have their own plots and plans, over 20 encounter areas, including a small dungeon and a large fold-out map of the city. All this setting material comes to life in the dark and deadly adventure, also included within, that is By Shadow of Night. By Shadow of Night picks up after the Death in the Treklant series, available from Troll Lord Games, though it can be a stand-alone adventure if desired.

Break in. Do the job. Survive the fallout. In a city so vast as Pindus-on-Isles, if you want to get ahead, you need to cozy up with someone powerful. And do something dangerous. When Hope the Fixer shows up at your door with a job from an anonymous employer, the pay is good enough. Are you? Seems there’s a thief holed up in a Wizard’s Egg, a stone laboratory suspended high on a tower. The anonymous employer wants the stolen goods trashed. It’s in Lightmill though. Those glittering skyscrapers are no place for basegels like you. Get your disguise together. Hope’s got the hippogriffs. It’s destruction time.

Ra’s Evil Grin challenges adventurers of at least 11th level who are seeking a powerful magic item—the globe of Arden. If a different item suits your campaign better, another appropriate powerful item can be substituted as the final objective. This dungeon culminates in a battle with Dendorandra, a lesser marilith known as a dark daughter. As a lead-in to this adventure, the GM may use a map from another treasure hoard showing the location of the globe (detailed more fully in “The Legend of the Globe of Arden,” below) or a priestly tome describing Arden, the long-dead avatar of Ra, and the wondrous powers of an unknown artifact called the globe of Arden. Such a tome might mention that the globe emits rays as intense as those of the sun, destroying all they touch. In any event, characters should need to consult with sages and oracles to determine the location and history of the globe and dungeon. A sage could also provide a map to the dungeon’s location, referenced in the “The Legend of the Globe of Arden,” below. We set the dungeon on a small, remote island far across the sea, but you can relocate it to suit your campaign. This dungeon provides numerous puzzles, a few traps, and only two monsters. Those monsters, though few in number, should challenge and threaten even the most combat-hardened party—particularly after the party encounters all the vicious creatures that inhabit the Island of the Globe.

The Bale Crossing is a short adventure for Draw Steel. It takes about four hours to complete and is designed for 3 to 6 2nd-level heroes. It places the heroes at the center of a cat-and-mouse game between House Vorona and the agents of Ajax on a voyage across the Bale Sea. Directors can use this adventure either as a follow-up to The Fall of Blackbottom or as a drop-in scenario in a larger story featuring the power struggle between factions in Capital, Ajax's war of conquest, or war dogs. The adventure features advice for skipping straight to the action in a hot start, an optional negotiation, three possible montage tests, and a dynamic final combat with guidance for running the encounter as a stealth mission or a boarding action across the decks of two ships. If they succeed, heroes will earn 2 to 7 Victories.

“The Lamia’s Heart”: Your party are contracted by the nascent master of an unsanctioned thieves’ guild. To earn his favour, you must steal a singular gem from the mansion of a prominent merchant. Purloining this gem, however, may raise the ire of the city’s official thieves’ guild; notwithstanding, the reward is significant.
No introductions are necessary for I know well who you are, my intrepid adventurer. A weary traveler indeed. Have a seat, my friend, before you enter the Graffenvold and traverse its byways. Have you come here to rest, to leave the muddy tracks and sharp edges of the world behind? Is that, it my fine fellow? Or have you come to beat down the Lords of this Land and submit them to your will? Which is it fellow, the easy or the hard road you are after? I fear you have gone beyond yourself, and here in Inzae your mistake may be your doom. For beyond yonder door is a fearful world clinging desperately to life. Its denizens struggle against a vast array of malignant forces that seek to drag them deeper into the pits of the Maelstrom. And even here, in this backwater called the Reintier, you will find no respite from this meaningless and overwhelming struggle. So take heed traveler, take heed as you enter the Graffenvold, it will do you well to remember that this is a deadly world and lest you take care, you will be engulfed in its dying spasms. Traveling south in the goblin kingdoms is always frought with danger. So many will go only so far as the Baron's outpost, The Vakhund, The Watchdog Tower, and reside there in safety while merchants and others fare their way down the road. But what happens when the Vakhund is attacked by goblins, orcs and bandits? A princess is kidnapped, and only a dangerous trip into the dark, infested goblin kingdoms will reveal the answer. A Castles & Crusades adventure intended for 4-8 characters of levels 1-2, Vakhund: Into the Unknown marks Part 1 in the thrilling Death on the Treklant Trilogy and introduces the grimly realistic World of Inzae. Those brave enough to enter her Maelstrom and become heroes shall linger long in the halls of valor and memory.
What's happened to the Pearl Tower -- an ancient lighthouse built to warn ships away from a treacherous reef? Ships are disappearing, and the busy part of the trading season is just about to start. Could someone have taken over the lighthouse and wrecked the ships?
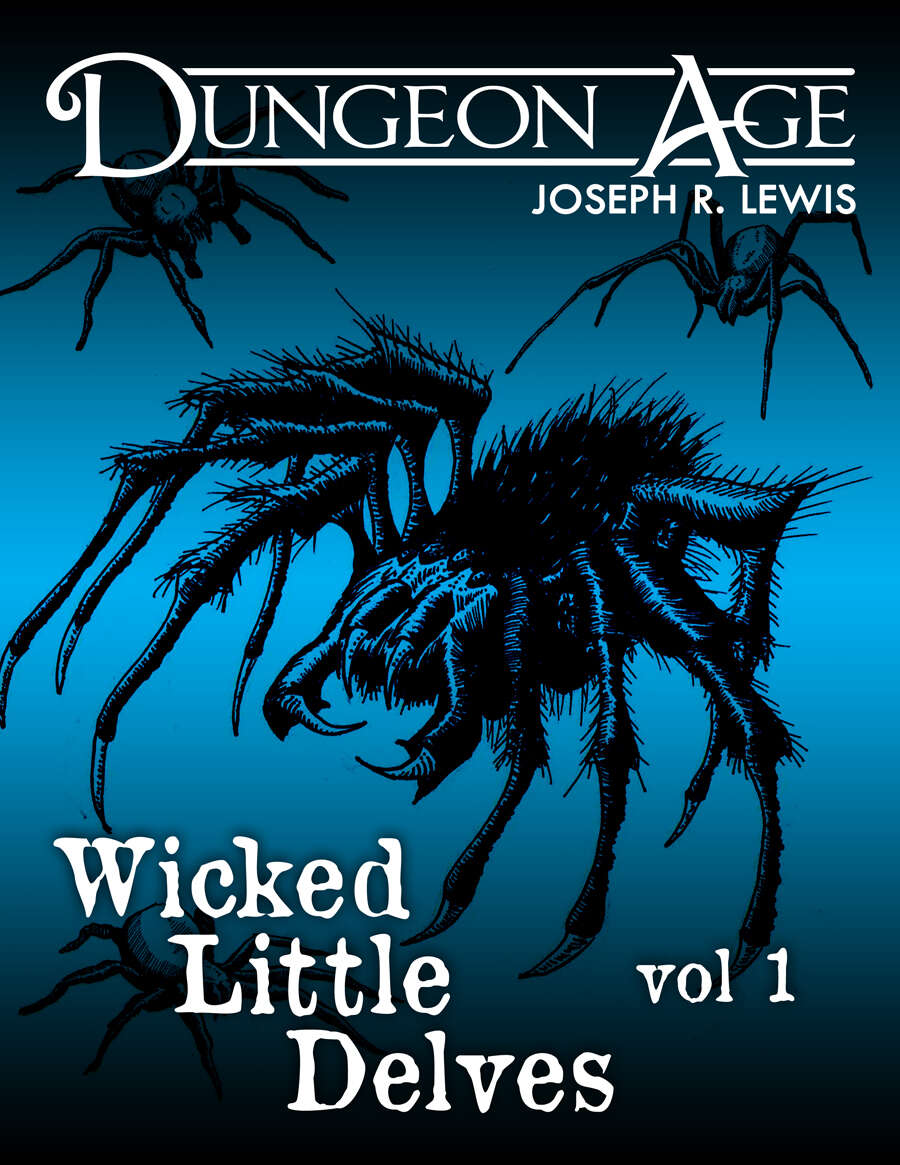
These are three one-shot dungeon delves. Each delve features nine rooms or locations full of challenges and interactivity. Each delve has only one type of monster, but they are complex, and there are lots of them! This volume of Wicked Little Delves includes three small dungeon adventures: - a new twist on the classic spiders-in-the-cellar, - a prison full of attack dogs, and - an abandoned cult lair full of pirate treasure and killer crabs. SYSTEM: Each monster has stats for Fifth Edition, Old School Essentials, and Into the Odd. These adventures are intended for characters at levels 1, 2, and 3. They are mainly focused on exploration and combat, with some minor social encounters. Estimated run time for each: 1 session, or 2-5 hours. Each adventure includes one complex original monster and a variety of unique treasures. ADVENTURE TYPE: Low Level / Combat / Exploration / One-Shot / Dungeon Delve

The adventures in Dalentown continue in The Darkness Beneath Dalentown. Workers in the town’s sewers have stumbled upon the long abandoned halls of the dwarves that once settled beneath this region. What they’ve found is a haunted library. What they’ve woken is something far more sinister! The Darkness Beneath Dalentown features hordes of oozes, undead, and demons festering for years in an ancient dwarven mining stronghold. Now, they are slowly working their way to the surface, and the folk of Dalentown are in dire peril!
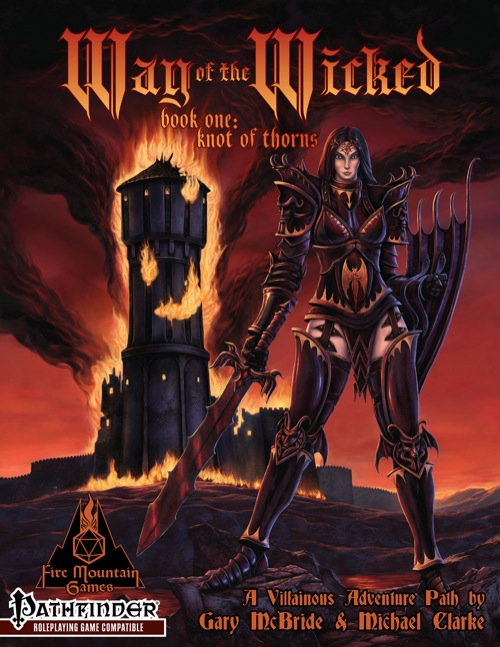
BE THE BAD GUY! The Kingdom of Talingarde is the most noble, virtuous, peaceful nation in the known world. Herein is the story of how you burned this insipid paradise to the ground. It's only fair. They burned you first. They condemned you for your wicked deeds. They branded you. They shipped you to the worst prison in the kingdom. In three days, you die. In three days, the do-gooders pray they'll be rid of you. They've given you three days. The fools, that's more than you need to break out. And then, it will be their turn to face the fire. Published by Fire Mountain Games.

An original Valentine's Day-themed one-shot adventure designed for level 4-5 characters. SUMMARY The city of St. Valentine is home to Dante's Casa di Dolci, a world-renowned bakery — and tucked within the bakery is the entrance to a secret labyrinth, created by a mischievous, merciless god. Every February, an unsuspecting resident from St. Valentine is pulled into the maze. Some return after years spent in the labyrinth, but most do not. When Dante's beloved wife, Simonetta, is pulled into the labyrinth, he must enlist the help of adventurers to get her back. The journey that follows is one of strange doors, riddles, and dangerous creatures that lurk among the hedges... DETAILS 2-4 hour session for 3-6 players Play-tested material Original NPCs and locations Diagrams and NPC stats 19-page campaign guide Enjoy the adventure? Share your experiences with me! Hashtag: #LabyrinthOfThorns

The Legend of the Black Monastery Two centuries have passed since the terrible events associated with the hideous cult known as the Black Brotherhood. Only scholars and story-tellers remember now how the kingdom was nearly laid to waste and the Black Monastery rose to grandeur and fell into haunted ruins. The Brothers first appeared as an order of benevolent priests and humble monks in black robes who followed a creed of kindness to the poor and service to the kingdom. Their rules called for humility and self denial. Other religious orders had no quarrel with their theology or their behavior. Their ranks grew as many commoners and nobles were drawn to the order by its good reputation. The first headquarters for the order was a campsite, located in a forest near the edge of the realm. The Brothers said that their poverty and dedication to service allowed them no resources for more grand accommodations. Members of the Black Brotherhood built chapels in caves or constructed small temples on common land near villages. They said that these rustic shrines allowed them to be near the people they served. Services held by the Brothers at these locations attracted large numbers of common people, who supported the Black Brotherhood with alms. Within 50 years of their first appearance, the Black Brotherhood had a number of larger temples and abbeys around the kingdom. Wealthy patrons endowed them with lands and buildings in order to buy favor and further the work of the Brothers. The lands they gained were slowly expanded as the order’s influence grew. Many merchants willed part of their fortunes to the Black Brotherhood, allowing the order to expand their work even further. The Brothers became bankers, loaning money and becoming partners in trade throughout the kingdom. Within 200 years of their founding, the order was wealthy and influential, with chapters throughout the kingdom and spreading into nearby realms. With their order well-established, the Black Brotherhood received royal permission to build a grand monastery in the hill country north of the kingdom’s center. Their abbot, a cousin of the king, asked for the royal grant of a specific hilltop called the Hill of Mornay. This hill was already crowned by ancient ruins that the monks proposed to clear away. Because it was land not wanted for agriculture, the king was happy to grant the request. He even donated money to build the monastery and encouraged others to contribute. With funds from around the realm, the Brothers completed their new monastery within a decade. It was a grand, sprawling edifice built of black stone and called the Black Monastery. From the very beginning, there were some who said that the Black Brotherhood was not what it seemed. There were always hints of corruption and moral lapses among the Brothers, but no more than any other religious order. There were some who told stories of greed, gluttony and depravity among the monks, but these tales did not weaken the order’s reputation during their early years. All of that changed with the construction of the Black Monastery. Within two decades of the Black Monastery’s completion, locals began to speak of troubling events there. Sometimes, Brothers made strange demands. They began to cheat farmers of their crops. They loaned money at ruinous rates, taking the property of anyone who could not pay. They pressured or even threatened wealthy patrons, extorting money in larger and larger amounts. Everywhere, the Black Brotherhood grew stronger, prouder and more aggressive. And there was more… People began to disappear. The farmers who worked the monastery lands reported that some people who went out at night, or who went off by themselves, did not return. It started with individuals…people without influential families…but soon the terror and loss spread to even to noble households. Some said that the people who disappeared had been taken into the Black Monastery, and the place slowly gained an evil reputation. Tenant farmers began moving away from the region, seeking safety at the loss of their fields. Slowly, even the king began to sense that the night was full of new terrors. Across the kingdom, reports began to come in telling of hauntings and the depredations of monsters. Flocks of dead birds fell from clear skies, onto villages and city streets. Fish died by thousands in their streams. Citizens reported stillborn babies and monstrous births. Crops failed. Fields were full of stunted plants. Crimes of all types grew common as incidents of madness spread everywhere. Word spread that the center of these dark portents was the Black Monastery, where many said the brothers practiced necromancy and human sacrifice. It was feared that the Black Brotherhood no longer worshipped gods of light and had turned to the service of the Dark God. These terrors came to a head when the Black Brotherhood dared to threaten the king himself. Realizing his peril, the king moved to dispossess and disband the Black Brother hood. He ordered their shrines, abbeys and lands seized. He had Brothers arrested for real and imagined crimes. He also ordered investigations into the Black Monastery and the order’s highest ranking members. The Black Brotherhood did not go quietly. Conflict between the order and the crown broke into violence when the Brothers incited their followers to riot across the kingdom. There were disturbances everywhere, including several attempts to assassinate the king by blades and by dark sorcery. It became clear to everyone that the Black Brotherhood was far more than just another religious order. Once knives were drawn, the conflict grew into open war between the crown and the Brothers. The Black Brotherhood had exceeded their grasp. Their followers were crushed in the streets by mounted knights. Brothers were rounded up and arrested. Many of them were executed. Armed supporters of the Black Brotherhood, backed by arcane and divine magic, were defeated and slaughtered. The Brothers were driven back to their final hilltop fortress – the Black Monastery. They were besieged by the king’s army, trapped and waiting for the king’s forces to break in and end the war. The final assault on the Black Monastery ended in victory and disaster. The king’s army took the hilltop, driving the last of the black-robed monks into the monastery itself. The soldiers were met by more than just men. There were monsters and fiends defending the monastery. There was a terrible slaughter on both sides. In many places the dead rose up to fight again. The battle continued from afternoon into night, lit by flames and magical energy. The Black Monastery was never actually taken. The king’s forces drove the last of their foul enemies back inside the monastery gates. Battering rams and war machines were hauled up the hill to crush their way inside. But before the king’s men could take the final stronghold, the Black Brotherhood immolated themselves in magical fire. Green flames roared up from the monastery, engulfing many of the king’s men as well. As survivors watched, the Black Monastery burned away, stones, gates, towers and all. There was a lurid green flare that lit the countryside. There was a scream of torment from a thousand human voices. There was a roar of falling masonry and splitting wood. Smoke and dust obscured the hilltop. The Black Monastery collapsed in upon itself and disappeared. Only ashes drifted down where the great structure had stood. All that was left of the Black Monastery was its foundations and debris-choked dungeons cut into the stones beneath. The war was over. The Black Brotherhood was destroyed. But the Black Monastery was not gone forever. Over nearly two centuries since its destruction, the Black Monastery has returned from time to time to haunt the Hill of Mornay. Impossible as it seems, there have been at least five incidents in which witnesses have reported finding the Hill of Mornay once again crowned with black walls and slate-roofed towers. In every case, the manifestation of this revenant of the Black Monastery has been accompanied by widespread reports of madness, crime and social unrest in the kingdom. Sometimes, the monastery has appeared only for a night. The last two times, the monastery reappeared atop the hill for as long as three months…each appearance longer than the first. There are tales of adventurers daring to enter the Black Monastery. Some went to look for treasure. Others went to battle whatever evil still lived inside. There are stories of lucky and brave explorers who have survived the horrors, returning with riches from the fabled hordes of the Black Brotherhood. It is enough to drive men mad with greed – enough to lure more each time to dare to enter the Black Monastery.

An Adventure for Odysseys & Overlords Standing on a lonely, bare mound in the bottom of a dell full of swirling fog, a castle from the time of the Schism crumbles, forgotten. Inside, treasures—and terror—await. A writ of salvage has been posted in Chandra's Haven: 500 gold coins to the brave adventurers who find Misthollow Castle and secure it for Salamon Castos, a wealthy merchant. Castos claims to be the scion of the noble family which ruled Misthollow and built the castle generations ago. Castos grudgingly agrees to allow the characters to keep whatever they find in securing the castle, though he insists on right of first refusal on anything of value. The Odysseys & Overlords Player’s Guide is available at https://www.drivethrurpg.com/product/275042/Odysseys--Overlords-Players-Guide The Odysseys & Overlords Game Master's Guide is available at https://www.drivethrurpg.com/product/275040/Odysseys--Overlords-Game-Masters-Guide