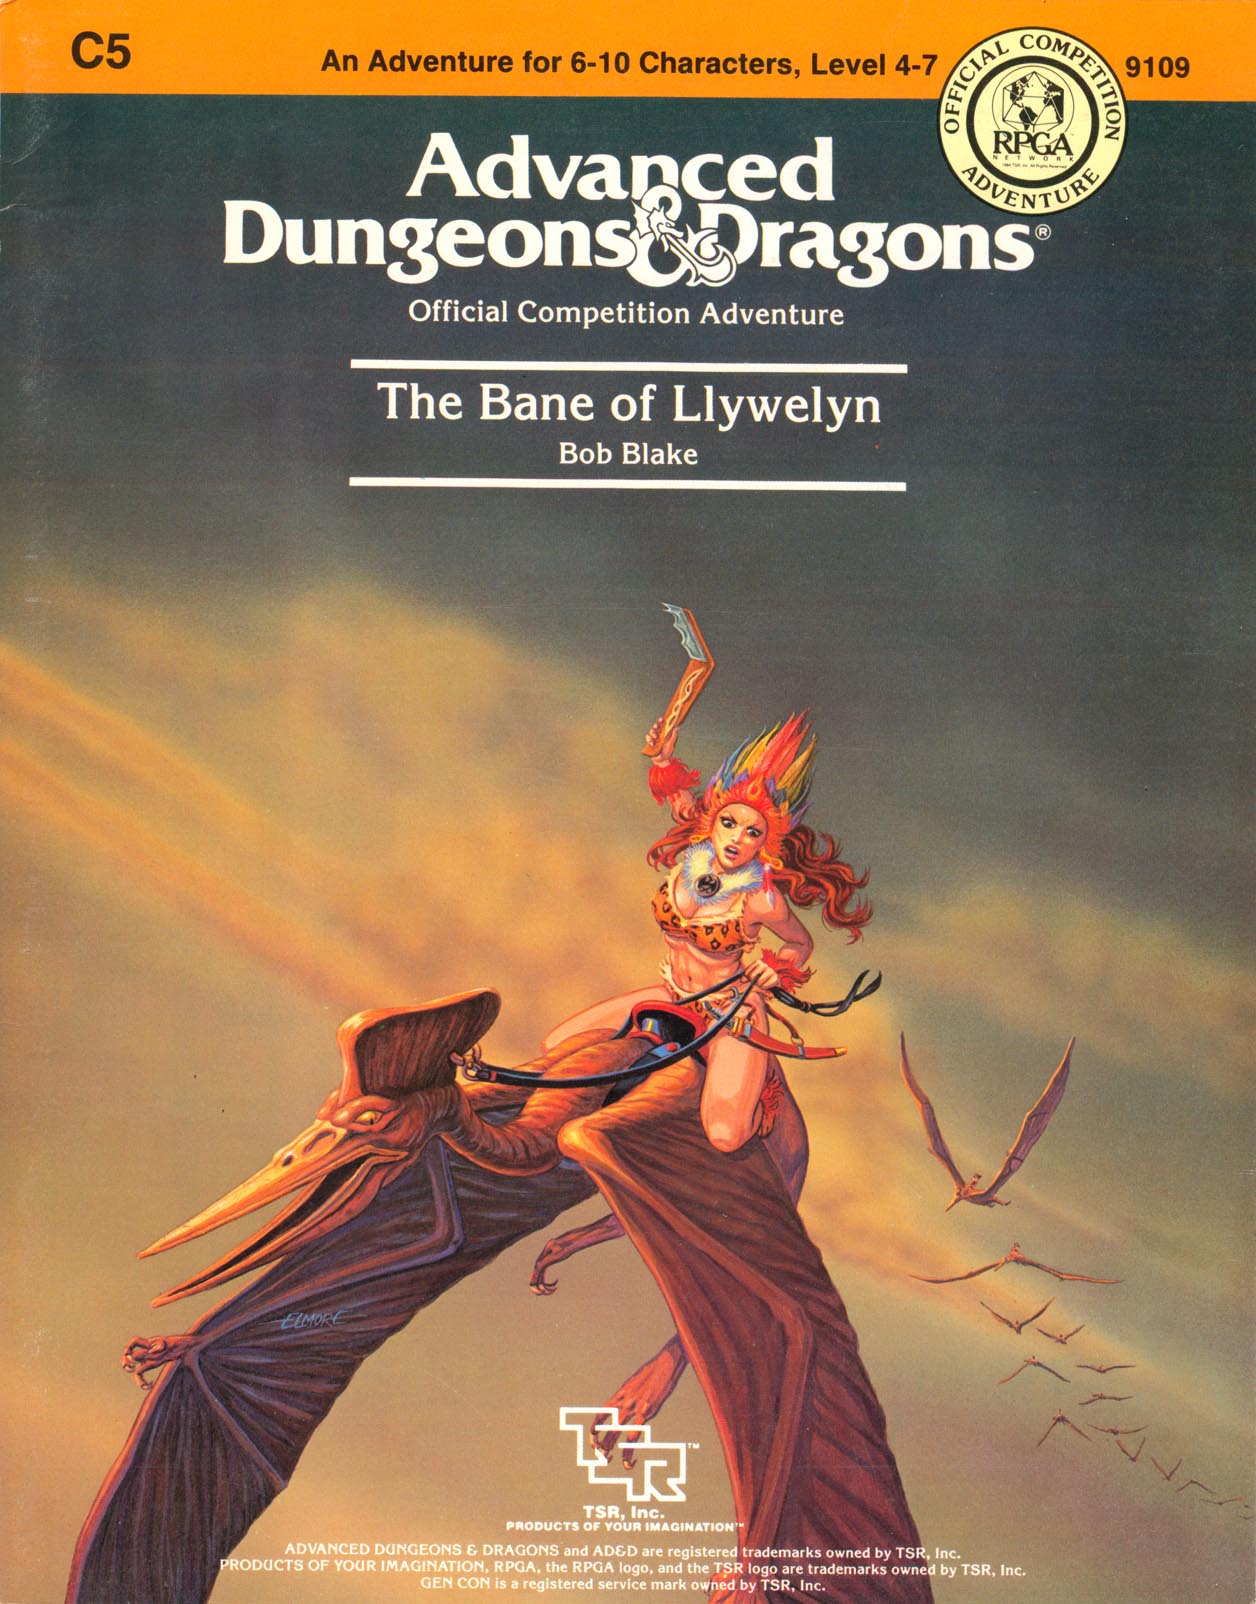
Excitement and unrest grip the land of Pellham. Two hundred years ago, the royal line of kings was deposed and replaced by a High Council. The current council is well-meaning but hopelessly incompetent. Everyone agrees that a drastic change is needed for the kingdom to survive. The ancient Prophecy of Brie foretells that in Pellham's darkest hour, a king from the past will return to restore the kingdom. The time of the prophecy is now. All is in readiness: the symbols of the ancient kings have been recovered, the keys to the royal tomb are in hand, powerful magics to revive the long-dead king have been secured at great cost. Only one problem remains... no one knows where the king is buried! The Bane of Llywelyn concludes the epic adventure of the Prophecy of Brie -- can YOU insure that the quest will be a success? The adventure can be played as a separate adventure or as the second part of the Prophecy of Brie series. TSR 9109

A supernaturally powerful storm, mudslides, and agitated dinosaurs are the least of the worries in the tropical village of Mora. The village's spiritual leader, the Zombie Master, has gone missing, and now undead rise from sodden graves and the village matriarch lies dead, murdered by her own son. What dire menace awaits in the flooded catacombs below? Set on the infamous Isle of Dread.

The colony of Farshore has survived on its own for years, a secluded and struggling hamlet perched on the western shore of the tiny island of Temute. An island dwarfed by the savage landscape across the narrow channel to the north, a landscape of rugged mountains, tangled jungles, and trackless swamps. This is the Isle of Dread, and its resources and hidden treasures are matched only by its peril. Yet for all these dangers, what may bring doom to Farshore is not an invasion of inhuman monsters from the mainland, but an invasion of all-too-human monsters from across the sea. "Tides of Dread" is the fifth chapter of the Savage Tides Adventure Path, a complete campaign consisting of 12 adventures appearing in Dungeon magazine. For additional aid in running this campaign, check out Dragon magazine's monthly "Savage Tidings" articles, a series that helps players and DMs prepare for and expand upon the campaign. Issue #352 of Dragon magazine features rumors of Farshore, a helpful list of improvements the PCs can make to the colony, and other features to help get PCs oriented in their new home on the Isle of Dread. The destruction of a pirate ship signals the beginning of a Crimson Fleet invasion. The PCs must race against time to prepare for the onslaught before an old enemy can release another savage tide. Pgs. 28-59 Also see Pgs. 60-71 Backdrop: Farshore City of Hope.

The hidden masters of the Ebon Triad have something special planned for the culmination of the Champion’s Games: a foul ritual designed to transform the arena into a stage of enormous carnage to honor their dark overgod. To stop them, the PCs must explore the dark complex of the arena’s master, and destroy his pet monster before it’s too late. An Age of Worms Adventure Path Adventure for 9th level characters. "The Champion's Belt" is the fifth installment of the Age of Worms Adventure Path, a complete campaign consisting of 12 adventures, several "Backdrop" articles to help Dungeon masters run the series, and a handful of poster maps of key locations. For additional aid in running this campaign, check out Dragon's monthly "Worm Food" articles, a series that provides additional materials to help players survive this campaign. Check out issue #337 of Dragon for guidelines on what they can purchase in the Free City. Pgs. 30-62

A haunted house, a missing person, and a hint of wild fey magic. In the kingdom of Norland in the Moonshae Isles, King Keethan rules by the will of Torm the True, though in Glen Dourn folk still hold true to the old ways—a dense and layered folklore of monsters and tales to frighten children. It is to this remote valley that Keethan bids you make haste to seek out signs of his beloved cousin, Lady Sorcha Hannigard. Sorcha vanished on her wedding day three years ago, sending her groom and neighbours alike into mourning. But where can she have gone? The only remaining clues to this mystery lie in her abandoned mansion home, where powers less wholesome have now taken up residence. The Dread Coven will not give up what they know so easily, although they will strike a bargain if you’re willing to pay the price in pain.
Something is killing people in Palebank Village, and if the party does not stop it they could be next.

In the Tower of Yladhra the Grim, a party of adventurers braves the dangers and puzzles of an enchanted wizard's tower, and finally confronts the wizard herself. The adventure is designed for a party of five adventurers between levels five and eight. It features: Encounters by Level - Varying types and quantities of creatures are suggested based on the party's actual level, allowing each encounter to present the appropriate challenge to the party. Encounter Notes - Suggestions for how to run combats are provided for game masters who place an emphasis on engaging, tactical battles. Inciting Action - Suggestions for ways to present the adventure to players are provided. Aftermath - Ideas for future adventures based on this one. Unique Magic Items - New magic items to introduce into a campaign. Ease of Use - The format and style of the document allows the game master to find information quickly while running the game at the table. Detailed Maps - What's an adventure without maps? Not much else to say here.

In Heart of Nightfang Spire, the player characters are drawn to investigate Nightfang Spire, a lonely stone tower in a barren land. The vampire lord Gulthias, servant of the great dragon Ashardalon, has returned to the tower which was once the main cult temple of Ashardalon. The vampire prepares for the dragon's return by awakening the other cultists who had preserved themselves as undead creatures. Gulthias is a vampire and a level 13 wizard.

The Haunt Unlock the secrets and drive back the evil from Montarthas Manor In ages past, an ancient town was lost and destroyed to a seige of orcs. Only one building survived and to this day, the manor is the only still standing building to be seen for miles around. Some say it is haunted, a few whisper of great treasures within, whilst others whisper that it is the manor itself that lives! No one knows for sure, only that a great evil haunts its halls. Do you dare enter Montarthas Manor? Published by P.B. Publishing

The End of the World Is at Hand! A hideous death cult has seized control of an ancient artifact-monument known as Tovag Baragu. The power behind the cult is the Old One himself, Iuz the Evil, demonic master of an empire. He's on an all-or-nothing quest for supremacy over the world—and the heavens beyond. To stop him, heroes must face horrors never dreamed of, journeying to a shadowed city where Death rules and the living cower. Here, Iuz will achieve his mad dream by destroying the imprisoned master of that alien citadel: Vecna, the mightiest lich, an immortal demigod. Two items exist with the power to stop Iuz—the Eye and the Hand of Vecna—but using them carries fantastic risks. Not even the gods know what will be unleashed when these items are fully activated. Die Vecna Die! takes the heroes from the Greyhawk campaign to the demiplane of Ravenloft and then to the Planescape city of Sigil. However, none of the material from those settings is required for play. TSR 11662

A traditional "funhouse" dungeon, White Plume Mountain begins with the archmage Keraptis stealing three artifacts and leaving cryptic poems with their former owners. The players are hired to recover the items, and find a bizarre dungeon in the side of the eponymous volcano. TSR 9027
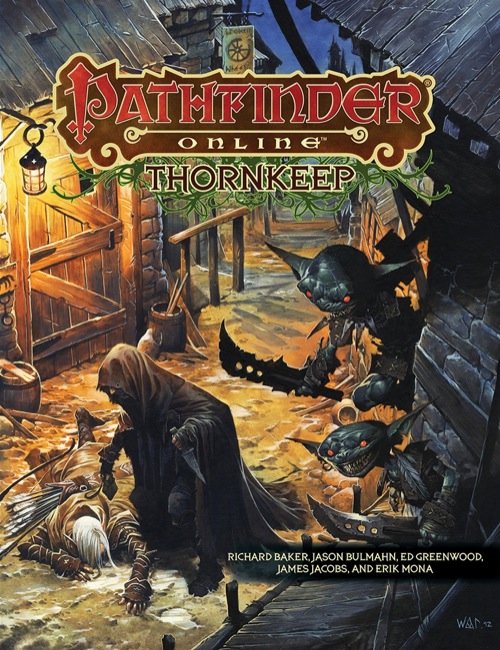
Uncover a world of adventure and claim your fortune in Pathfinder Online: Thornkeep! This detailed sourcebook contains everything a GM needs to run adventures in and around the dastardly town of Thornkeep, as well as several deadly dungeon levels and a sneak peek at the upcoming massively multiplayer online game Pathfinder Online.

Exploring Baba Yaga's Dancing Hut. This adventure design to test high level PCs can be used in a variety of scenarios as the DM sees fit.

This deluxe adventure takes heroes into the ruins of Gardmore Abbey, a monastery that was once the base of a militant order of paladins devoted to Bahamut. According to legend, the paladins brought a dark artifact back from a far crusade and stored it in their abbey for safekeeping, and evil forces gathered to assault the abbey and take it back. What the legends don’t tell is that this artifact was actually the Deck of Many Things, a force of pure Chaos. This adventure brings characters into the extensive dungeons beneath the ruins - dungeons that are warped and twisted with the raw forces of Chaos surrounding the cards of the deck.

Designed for a party of five characters of at least 9th level, this adventure will challenge players seeking a powerful magic item of the GM’s choosing. A sphere of annihilation has been provided and is woven into several elements of the adventure, but any appropriately powerful item can be substituted if something else suits your campaign better. Though the adventure is designed to test every type of character class, a rogue who can deal with traps is essential, as is a wizard or sorcerer of at least 9th level. Larger groups will have an easier time; parties of four or fewer characters will be in for a very bad time unless you mitigate some of the tower’s more lethal traps and encounters. This adventure culminates in an encounter with devils and a sphere of annihilation. The sphere of annihilation is hidden deep within the tower-and-dungeon complex of Crane the Sorcerer. Originally set atop a high mountain in a secluded and wild part of the world, the tower and dungeon can be relocated to meet the situation in your campign. Crane, an introvert, stayed as far away from civilization as possible, as is detailed below. The tower above the dungeon doesn’t present many difficulties for a group of powerful characters or alert players. It might lull PCs into a false sense of security before they enter the areas where they’ll really be put to the test.

A series of small earthquakes have brought a sense of disquiet to the town of Daern Kelton and Roslof Keep. Against these strange earthly portents, the members of the Ivory Scimitar have claimed their place as a true Mithel Company, but even greater danger now awaits them in the second level of the Dungeon of the Black Fey Mithelvarn. What lost secrets will be revealed as they journey below? What new threats and adventures can be had in Daern Kelton? The town opens its doors to the brave new heroes of the Company of the Ivory Scimitar. Here continues the Roslof Keep Campaign in the pages of ROS2, The Tremors in the Machine. This adventure is formatted to both 1E & 5E gaming rules. Also available in PDF.

A storm of unparalleled fury has been ravaging the peaks of the Earthspur Mountains for a tenday, and the Monastery of the Yellow Rose sits in its eye for now. Some monks have fled the monastery to the safety of Mulmaster and beseech you to convince their more obstinate brothers to retreat to the city before the eye of the storm shifts, and the monestary is in terrible danger. Can you brave the elements and convince the monks to escape?

A trap that perhaps works too well. No matter how much loot you take, you never took anything at all. Confused? Wait until you try this dungeon. The players are hired to investigate and clear a tomb of a time wizard. This tomb is heavily guarded both by creatures and traps, and some sages are concerned that the defenses are lasting longer than they were supposed to. Unknown to the sages, the wizard, Sur-in Am, bound a time elemental to guard the treasures of the tomb. This guardian's duty is to frustrate robbers by returning stolen items to their original place and also reset traps in the tomb. Pgs. 26-36

*THIS IS A D&D NEXT/5E PLAYTEST ADVENTURE* Imani, a Turmishan wizard and former adventurer, seeks the aid of heroes to infiltrate Dretchroyaster’s lair and recover the Diamond Staff of Chomylla—the key to powerful magic and wisdom locked away for thousands of years. In addition to his own sagely interest in the lore of lost Uvaeren, Imani recognizes the dangers of such powerful magic falling into evil hands. The dracolich has secured the staff in his lair’s cen- tral chamber, using ancient wards of protection that can be bypassed only by four artifact-idols once belong- ing to a cult of Bhaal. Each group of adventurers enters the dungeon through a different section of the dun- geon—a forgotten temple of Bhaal, a vast underground lake, a troglodyte village, or Dretchroyaster’s vaults. Dretchroyaster’s lair is no simple set of caverns and ancient ruins. It sits atop a source of great power and energy, which the dracolich and his Cult of the Dragon allies hope to use to unlock the secrets of the staff. Only by undertaking a unified assault against Dretchroyas- ter’s lair can the adventurers hope to recover the Diamond Staff and survive the dracolich’s fury. The adventurers must make their way through the lair and recover the Bhaalite idols that will help unlock the Diamond Staff, all the while dealing with the lair’s creatures and avoiding the dracolich as he pur- sues intruders. Entering the Chamber of the Diamond Staff, the heroes must overcome its magical wards and claim the staff before being slain by the dracolich and his servants.
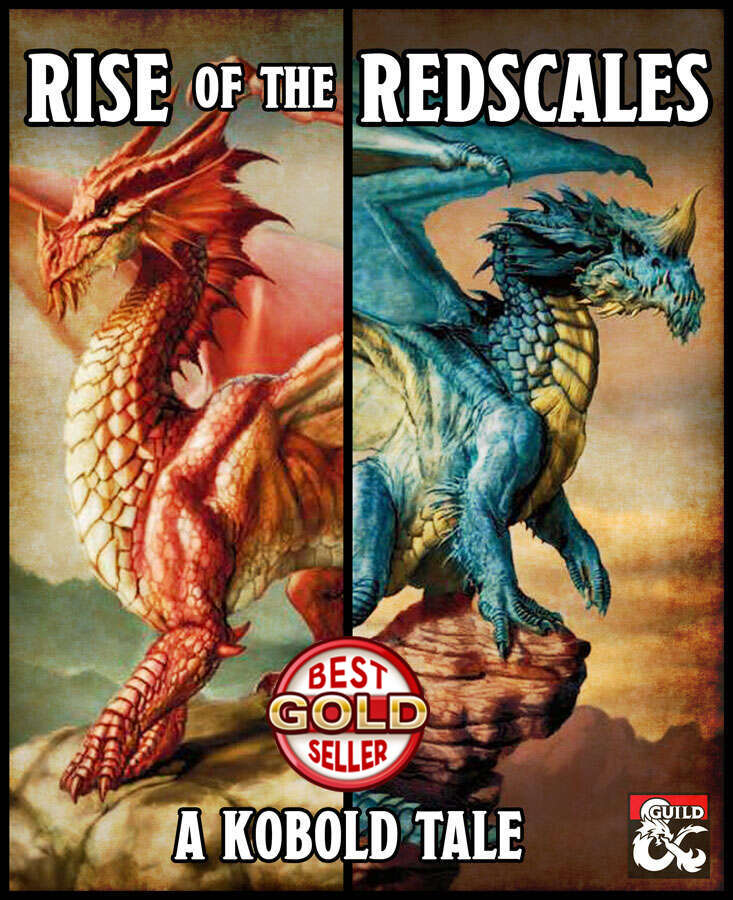
Two feuding kobold tribes have been left alone in their dragon queen's lair. Without supervision, surrounded by the wealth of nations and piles of magical artifacts. How long before things devolve into utter chaos? Set inside an enormous dragon's lair, the adventure allows players to take control of the best and brightest among the kobold tribe known as the Redscales. Their entire lives they have been the Dragon Queen's minions and her lair's caretakers. But the Dragon Queen has been gone for some time now and an ancient feud with another kobold tribe (the Bluescales) is about to be a rekindled. And the trap- and treasure-filled lair is to become their battleground. The gameplay is a mix of roleplaying, involving some tough moral choices (well, tough for kobolds), solving puzzles and wacky combat with kobolds wielding powerful ancient artifacts. There is an abundance of magic items, specially chosen for their potential to lead to hilarious situations.