
Things are not right at Du Sharid Manor. Months ago, a deranged parish priest and his most devout followers formed a heretical cult. These self-proclaimed “Seekers of the White Heart” chose the desolate Wild Hills to practice their secret rites; but the strange goings on at the Wild Hills did not escape the prying eyes of the more pious villagers who set out to confront the cultists. Once there, the villagers witnessed something terrifying and unexpected. Since the events of that night, the cultists have vanished, but the remaining serfs of Du Sharid now live in constant paranoia. Your party has been hired by the local bishop to to learn the truth about what happened at Du Sharid Manor. For use with Swords & Wizardry (or the like) and designed for the experienced Referee, Jewel of the Lunar Rift is a first-level campaign-starter and an introduction to the Messoria setting. Included as a bonus are campaign journals from the author's own sessions.

Your party has just spent the better part of the day travelling in dismal weather and you've just located an appropriate place to camp when, out of the drizzle filled sunset, the terrifying screams of a woman can be heard through the patter of rain through the trees. Great! You're cold, miserable, and now you have the moralistic compulsion to investigate and render assistance to a damsel in distress. What you don't realize is that morals and damsels always means more trouble than what you may be willing to pay. Will your party survive long enough to see the dawn through the Screams at Sunset?

STILL WATERS Sushi or Steak? Freshwater sahuagin!? Landlocked for hundreds of years, this colony of sahuagin have adapted to live in fresh water and flourished in secret, at least until recently, with the aid of a mysterious patron. Now, they need the party’s help to retrieve something precious to them… This adventure was originally made for a West Marches campaign, but is designed to easily fit into any standard fantasy setting. There are many areas to insert plot hooks for your own world or campaign. A 4-hour adventure for 6th-8th level characters by ALAN TUCKER

Baron Ketterall’s lands are beset by a plague of marauding goblins! Goblins you say? Pah! Who's afraid of few poxy goblins? But two experienced parties have already gone looking for the goblin lair – never to be heard of again. Poxy goblins you say? Be afraid, be very afraid… The scenario is designed to be an extremely challenging adventure that might undermine a player’s bravado in dealing with low-level monsters such as goblins. Unusual traps, tricks and special weapons are used by the inhabitants of the dungeon to cause the party as much trouble as possible. Published by Dunromin University Press.

A fiend lurks among the Black Blade goblins. A shapeshifting barghest fashioned by the General of Gehenna to exact revenge on all goblin-kind. It’s aim: to kill as many goblin leaders as possible… A masked goblin approaches the party asking for help. Two tribe leaders are dead. But a rival for chief has control of the crime scene. Will the party discover the barghest among the goblin ranks? Can they stop this imposter before it strikes again? Adventure Overview The adventure’s story is spread over 4 parts and takes approximately 4 hours to play. The adventure begins with a Call to Action scene. Part 1: Goblin Politics. Krill sends his emissaries to implore help from any strong intermediary. The party is asked to investigate the murder of Thrawn in Dringly’s lair. This is Story Objective A. Part 2: The Opposition. Gain entry into Dringly’s lair and investigate the murder of Thrawn. Gather enough evidence to find the killer. This is Story Objective B. Part 3: To The Lair! Now that the players have determined the barghest (Yeep) is to blame, they need to get to Krill’s lair quickly as he is in imminent danger. This is Story Objective C. Part 4: The Barghest.When the players arrive at the lair, they need to get to Krill and expose and defeat the barghest. This is Story Objective D. Adventure Background A barghest named Yeep has begun its onslaught of attacks against the Black Blade goblins. Starting with Chief Gnar, then his second in command Thrawn, the barghest is moving methodically down the line of command. Krill is now chief. But he has some problems: Two leaders of the Black Blades are dead. Who killed them and why? Is he next? Dringly, the next in command, has decided to take his lair for himself, declaring himself Chief of the Black Blades. Who are the Black Blades? The Black Blades are a tribe of goblins in the local area. They are known for dipping their blades in a dark black substance. It is rumored these blades are poisonous. The Black Blades regularly attack passersby on the road to rob them. The Black Blades have two lairs, one run by a chief who leads the whole tribe, and another overseen by a boss lieutenant. The Black Blades have a well-established pecking order which is how Krill stands to become chief. The next in line is Dringly, who has also declared himself chief and wants Krill dead. Krill suspects that there is something suspicious about two leaders being killed within a day of each other, but he has already burned Gnar’s body without any investigation. He needs to investigate the body of Thrawn, but it is in Dringly’s lair. Krill wishes to avoid direct confrontation with Dringly at the present for three reasons: 1) Any violence would only kill his own tribe members and further divide the lairs. 2) He believes there is still hope for negotiation to reunite the Black Blades. 3) He believes that if he were to attempt negotiations himself, Dringly would kill him. This adventure features: Two maps. Ready for your favorite Virtual Tabletop. A full color pdf. A black and white pdf. One custom monster, a reprint of barghest, all others available in the Monster Manual. Four hours of entertainment involving: roll playing a goblin bard, investigating a murder scene, tracking down a barghest before it strikes again. Applicable to any setting.
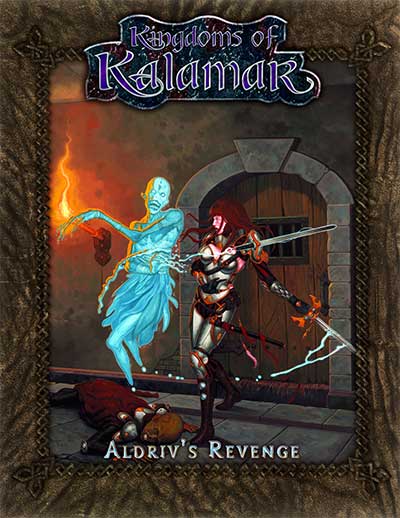
Duke Aldriv III has been brutally murdered. His brother, Prince Cardor, disappeared under mysterious circumstances. Mordeln, the bastard son of the Prince, is under suspicion. But Mordeln claims to be innocent, and fears he will be the assassins' next target. Let your plater characters' personalities come alive as they join forces with Mordeln in his desperate race to find his missing father. Will the players find the Prince before the assassins do? Or will they too fall victim to the mysterious figure manipulating the events from behind the scenes?

The heroes arrive at the eponymous Keep on the Borderlands, a fortress on the edge of civilization built to stave off the chaos and evil of the wilderness. Using it as a home base, a party can make forays into the surrounding wilderness, encountering monster and marauder alike. The centerpiece of the adventure is certainly the CAVES OF CHAOS, a network of tunnels and caverns found in the walls of a nearby but isolated ravine. It is here that hordes of evil humanoids have made their home. Through combat and negotiation, the players can try to explore and map out these caves, perhaps with the aim of accumulating valuable treasure or even cleansing the land of evil creatures. However, even the Caves are not all they seem. Beyond the goblins and kobolds lurk dark horrors: cults dedicated to fiendish chaos and a Minotaur's enchanted labyrinth await the unprepared adventurer. But for the hero who is brave, clever, and fortunate in equal and sufficient measure, great treasures and glory await in the Caves of Chaos that lie beyond the Keep on the Borderlands! TSR 9034
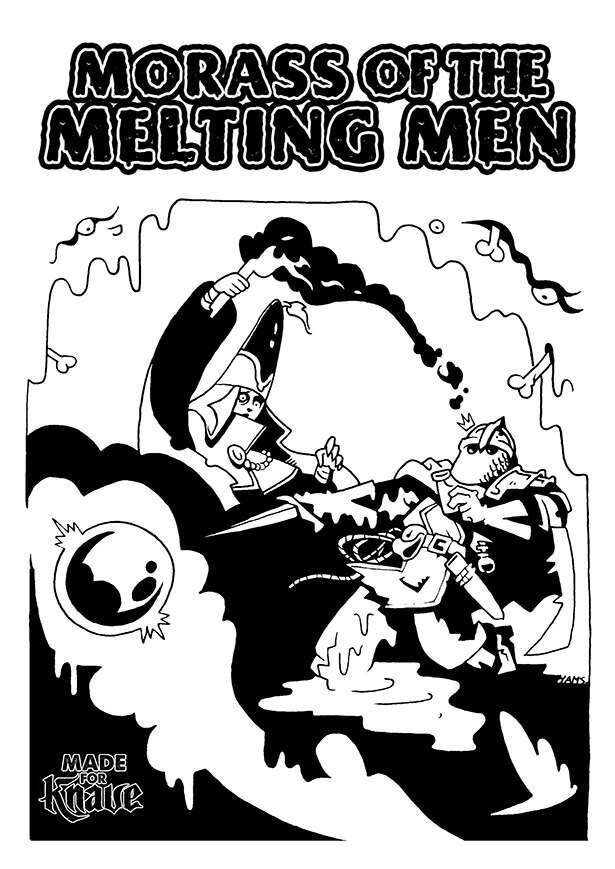
In these lands of eldritch goo, it's a fine line between victory and a sticky situation Tzork, the sentient globe of glass, wasn’t exactly born from a grand spell—it was more of a cosmic "oops". After a backstabbing disciple named Theridus offed his master and snagged the relic, he promised his followers unimaginable power. But instead of turning them into terrifying demons, Tzork turned them into puddles of goo. Now, the once "glorious" cult's mansion is less a temple and more a swamp of melted, failed adventurers, attracting only the most reckless of treasure hunters. 'Morass of the Melting Men' is an adventure for Knave 2e, suitable for low-level PCs. The adventure revolves around an extremely powerful sentient magical item that has gone out of control, melting all the nearby people and turning what was once an evil temple into a swamp of slime, filled with bones and eyeballs. In Morass of the Melting Men, players enter a location flooded with a magical liquid exuding chaotic energy. The longer the PCs remain within the swamp, the more they suffer the unexpected effects of this alien magic. Step inside this morass if you dare — goo and treasure awaits... but mostly goo What you'll find here: A complete 22-page adventure A 20 room dungeon map Several new (and bizarre) magic items such as the magnificent Tray of Force and the powerful Theridus' Head. Several wild random tables of weird and gooey outcomes

Ages ago, the tower stood as a bastion against banditry and marauders. But civilization has long since retreated from this area, and a band of goblin thieves has taken up residence in the ruined tower. Local woodsfolk beg the PCs to rid the place of the bandits before they are victimized again by the goblins of the Broken Tower. Pgs. 18-23

Ehor Stravensky sells the most marvellous potions, and the secret ingredient is purewater - water from the elemental plane itself! A small hole between the planes sits in the heart of a nearby forest, but recently the path has grown dark and corrupted. Ehor wants you to clear a path and secure more purewater for his business, and he'll pay handsomely. This first-level adventure is perfect for first-time DMs and players alike. Delve into the forest of Airedale and fight a skittering spider host, meet a dryad, and face off against a classic D&D monster! Included in this adventure: A quest to delve into a corrupted forest Bloodhawk hatching rules 7 encounters and 5 battlemaps Approx. 4 hours of fun An awesome adventure for 1st-level parties
This dungeon is a tower inhabited by a goblin tribe, who is performing a ritual to gain the aid of their god. This adventure is perfect for any adventuring group. It pushes adventurers to be more thoughtful about their decisions, especially before and during combat. It is perfect for a one-shot but is meant for a starting dungeon for the players to go from level 1 to level 2.

"The Tree Prince“ is a short adventure. The adventurers will meet a fae leader for whom they will fulfill a task.
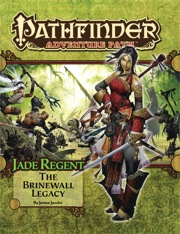
The town of Sandpoint, Varisia, Inner Sea Region has put out a bounty on the nearby tribe of Licktoad Goblins in retribution for the goblins raiding traders and travelers near the quiet town. The party takes up the bounty and ventures into the swamp; eventually finding the goblin village in ruins and it's inhabitants scared in it's burned huts. The party finds out; either through investigation of the ruins or the goblins themselves; that a group of skeletons with eastern arms and armor had ransacked the village and took a stash of fireworks that the goblins stole from an old shipwreck. The party then makes it to this cave and finds it empty except for a half dozen skeletons. Further in past the skeletons is their leader, a skeletal samurai who fights the party in an attempt to defend his treasure. The treasure turns out to be a letter that reveals that secrets of the Kaijitsu family; the same family their good friend Ameiko who runs the Rusty Dragon inn belongs to; that lies in wait in the abandoned town of Brinewall to the northern boarder of Varisia. Ameiko along with several other important NPCs with a caravan north. It's recommended that GMs create encounters for the caravan trip north as it's essentially 3 weeks of travel with nothing in it. It's also recommended that GMs completely ignore caravan rules; they're not flushed out and they're not fun to run. The party and the caravan reaches the abandoned town of Brinewall where their friend Ameiko becomes possessed and is thrown into a coma; where the other NPCs agree to take care of her while the party explores the town and castle. The castle is a three floor behemoth of a dungeon populated by Dire Corbies, Troglodytes, and various other monsters all under the leadership of Kikonu, an Yamabushi Tengu Oni. The goal of exploring Brinewall Castle is to find the two keys to the vault; one of which is on the Yamabushi Tengu while the other is on a Half-Fiend Decapus that lives in the basement of Brinewall. Once the PCs enter the vault they find the Amatatsu Seal; one of the seals that cement authority to one of the ruling houses in Minkai of Tian Xia; as well as several visions that show that Ameiko Kaijitsu is the rightful heir to be ruler of Minkai and that they'll need to travel north to do so. Such ends the first book of six.

He wanted a scabbard - but got the shaft. If the book is to believed, there's a magical sword - completely unguarded! - ripe for the taking. This short adventure starts with the players finding a diary describing the final resting place of Hrothgar and his powerful intelligent sword. In a quest for the sword, the players investigate a small cavern system and find the sword in a gelatinous cube. Pgs. 32-37

A goblin warband has found the secret tunnel which leads from the dwarven keep of Hearth-Home to the nearby hills. The tunnel is intended to be a means of escape if the keep ever falls to attackers, but now it has provided goblins with an easy way into the Underkeep. So far, the goblins have confined their attentions to the various underground rooms that make up the Underkeep, but sooner or later they will find a way to the surface. They pose a serious threat to Hearth-Home - the goblins must be cleared out of the Underkeep so this breach in security can be repaired before the orcs hear of it and overrun the dwarven keep. This adventure is slightly more challenging than Red Hand Trail, and it is recommended that it is played after that quest and before Palace of Dread. However, the scenario in Trouble Below can easily be played independently from the rest. Part of TSR 1076 The Goblin's Lair
Caravan of Peril takes place on the unprotected roads and trails of the wilderness between cities. Merchants, pilgrims, and wanderers have long banded together in wagon caravans for safety when setting off into the wild -- yet a caravan is only as safe as its hired guards. There's plenty of coin to be had on the road for those with a swords (or spell book), a steady will, and a taste for adventure. This adventure begins assuming the characters have all signed on as caravan guards. Their motivation may be money, wanderlust, or a hasty need to get out of town. Whatever the case, payment is 25gp each, paid upon safe arrival in the next city. Along the way, the characters will brave the dangers of the wilds, make some unusual acquaintances, and be ambushed by crafty goblins.
The brilliant (if somewhat eccentric) detective Viktor Saint-Demain has put more criminal masterminds behind bars than any three other inqusitives. But when the master sleuth fails to get the recogintion he deserves, he sets out to prove to Sharn that they can’t live without him. Pgs. 16-34

This Adventure is based on the web comic series, Table Titans. It is set in the same village that part of the comic takes place in, however the path of the adventure does not follow the story line set in the comics. There are familiar elements that are a wink and a nod to fans of the comic, but it is a unique story. The adventure is set around the village of Haverford, currently beset by an unknown [i]Terror[/i] that has resulted in many many deaths in the surrounding forest. The adventures have arrived at this once peaceful hamlet and if they discover the source of the [i]Terror[/i] plaguing the region they will be handsomely rewarded. The Terror of Haverford is a starter adventure. Characters will advance from level 1 to 4 if completed. This adventure has both social and combat encounters, as well as combat encounters that can be solved socially. If characters aren't thorough in their investigations they will be taken by surprise by what lies ahead.

Daggerford is fairly quiet for a frontier town. Sure, lizard men raid the local baron's holding now and then, orcs sneak out of the Misty Forest to raid caravans on the Trade Way, and Lady Bronwyn has a few suitors who are a touch too passionate, but there's nothing going on that a member of the renowned Daggerford militia can't handle. Except that the Shining River has turned green, and cattle are dying. Except that the Elf King of Laughing Hollow, a place where no human dares go without fearing for his life, is asking the militia for help. Except that strange substances are oozing from the fissures caused by a recent earthquake. Except that the earthquake also has opened an entrance in the cliffs around the Laughing Hollow that might lead to the fabled dwarf mines of Illefarn. Suddenly, being a militiaman isn't quite as easy as it used to be. TSR 9212

The Feystone Shards is an adventure for characters from levels 5-8, optimized for 4-6 player characters. This moderate length campaign should have 20+ hours of gaming, all focused around the Forgotten realms area of Red Larch. The Heroes are tasked to find five fragments of a shattered Orb, once worshipped by a faction of Elves. The search will take the party to a haunted Citadel, as they seek the scattered remnants of the Feystone. From a city of Stone Golems, to an alchemist's underground lair - the players will face obstacles and enemies that will challenge their very resolve. The Heroes will need to discover the secrets of the bauble's fey magic, finding the lost Elvin city where the Orb was once worshiped as a God. Join in the hunt for the Feystone Shards, and see if your characters are ready to transcend common Heroes...and become Legends.