
This 80-page supplement contains 38 encounters written by many of the Dungeon Masters Guild’s best-selling writers. Encounters in the Savage Jungles includes 23 encounters / mini-adventures of various difficulty that can be used while the adventuring party braves the uncharted and savage jungles. It also includes 15 Quick Encounters, and additional resources. Although inspired by the Tomb of Annihilation, these encounters can be used with any official D&D campaign, or in your own home campaign. Many could even be used in forest, wilderness, or swamp settings. These encounters are location generic and are designed to be easily added to any campaign. Use them to introduce new players, as inspiration for a new campaign, as a one-shot, or whatever else you can think of.

Break in. Do the job. Survive the fallout. In a city so vast as Pindus-on-Isles, if you want to get ahead, you need to cozy up with someone powerful. And do something dangerous. When Hope the Fixer shows up at your door with a job from an anonymous employer, the pay is good enough. Are you? Seems there’s a thief holed up in a Wizard’s Egg, a stone laboratory suspended high on a tower. The anonymous employer wants the stolen goods trashed. It’s in Lightmill though. Those glittering skyscrapers are no place for basegels like you. Get your disguise together. Hope’s got the hippogriffs. It’s destruction time.

The village of Orașnou is buried in winter's snows and facing starvation. An unseen beast has ravaged the livestock culled to pay Lord Strahd's tax and the village is thrown into panic and chaos. Can you find the monster and save the village from starvation, or worse? Part eight of Misty Fortunes and Absent Hearts.
Two Red Wizards of Thay have undertaken a secret mission into the High Moors east of the Sword Coast. They are searching for something or someone. Whatever their goal out there in the cold and windswept hills, if the Red Wizards want to keep it secret then it is probably best uncovered swiftly for the good of everyone else. Even the mercenaries who escorted them into the wilderness earlier agree: someone should stop them. Pursuing the Red Wizards leads the adventurers to a barrow mound in the wild grasses of the High Moors. At the barrow, they discover the remnants of a wizards' sanctum still being plundered. The fate of its lore and treasures is up to the characters. Without caution, things may get out of hand. This Dungeons & Dragons adventure is written to suit four to six characters of 8th level. With this text and the core D&D manuals, you have everything you need to play. You may also benefit from the Sword Coast Adventurer's Guide to learn more about the High Moors of Faerûn. Made for the Magic: the Gathering set "Adventures in the Forgotten Realms".

Evil is stirring in the tiny village of Akeley - an evil that reaches out to minds that drift through the inky void between the stars. However, not all that comes from the skies comes with malice. A band of rather unusual warriors have are resolved to deal with the infestation before it can spread, though they cannot conquer it alone. Perhaps it’s blind chance that brings together the players in this strange and terrible drama, or perhaps it was written in the stars long, long ago. Note: This adventure is intended to work with Mordenkainen's Tome of Foes, and requires a copy of the book to run succesfully.

Barbarian forces are handing out trouble to the combined forces of the Inydo Federation and your assistance has been requested! You have been told that the aggressive forces are being bolstered by a rumored, powerful wizard. The general of the military has asked you to skirt around the major engagement areas and attempt to locate and capture/kill the troublesome wizard. A major windfall will be given to the PCs as Xalo Mendas, leader of Helvana is known to add treasure to agreements if handled “effectively”.

Silent crawlers with a venomous bite. Web spinners, creating sticky, beautiful homes that double as deadly traps. Nature’s most artistic killers. What fools would grow these tiny killing machines into the size of ponies or even larger? Gnomes! Opportunistic dark gnomes, looking for profit, who stumbled upon an inter-dimensional substance—experimental, yet undoubtedly powerful. Then something came creeping down the strand that connected the spiders to the inter-dimensional world, a shadow—the Shadow of the Spider Goddess! This adventure is designed for 5e for 4-6 characters of 6th level. The adventure is designed to link to the Lands of Lunacy setting from Fail Squad Games, but has been adapted to be run in any setting with no additional GM or player effort. The hold of Nevnooblin contains steam technology and creatures.

A fiend lurks among the Black Blade goblins. A shapeshifting barghest fashioned by the General of Gehenna to exact revenge on all goblin-kind. It’s aim: to kill as many goblin leaders as possible… A masked goblin approaches the party asking for help. Two tribe leaders are dead. But a rival for chief has control of the crime scene. Will the party discover the barghest among the goblin ranks? Can they stop this imposter before it strikes again? Adventure Overview The adventure’s story is spread over 4 parts and takes approximately 4 hours to play. The adventure begins with a Call to Action scene. Part 1: Goblin Politics. Krill sends his emissaries to implore help from any strong intermediary. The party is asked to investigate the murder of Thrawn in Dringly’s lair. This is Story Objective A. Part 2: The Opposition. Gain entry into Dringly’s lair and investigate the murder of Thrawn. Gather enough evidence to find the killer. This is Story Objective B. Part 3: To The Lair! Now that the players have determined the barghest (Yeep) is to blame, they need to get to Krill’s lair quickly as he is in imminent danger. This is Story Objective C. Part 4: The Barghest.When the players arrive at the lair, they need to get to Krill and expose and defeat the barghest. This is Story Objective D. Adventure Background A barghest named Yeep has begun its onslaught of attacks against the Black Blade goblins. Starting with Chief Gnar, then his second in command Thrawn, the barghest is moving methodically down the line of command. Krill is now chief. But he has some problems: Two leaders of the Black Blades are dead. Who killed them and why? Is he next? Dringly, the next in command, has decided to take his lair for himself, declaring himself Chief of the Black Blades. Who are the Black Blades? The Black Blades are a tribe of goblins in the local area. They are known for dipping their blades in a dark black substance. It is rumored these blades are poisonous. The Black Blades regularly attack passersby on the road to rob them. The Black Blades have two lairs, one run by a chief who leads the whole tribe, and another overseen by a boss lieutenant. The Black Blades have a well-established pecking order which is how Krill stands to become chief. The next in line is Dringly, who has also declared himself chief and wants Krill dead. Krill suspects that there is something suspicious about two leaders being killed within a day of each other, but he has already burned Gnar’s body without any investigation. He needs to investigate the body of Thrawn, but it is in Dringly’s lair. Krill wishes to avoid direct confrontation with Dringly at the present for three reasons: 1) Any violence would only kill his own tribe members and further divide the lairs. 2) He believes there is still hope for negotiation to reunite the Black Blades. 3) He believes that if he were to attempt negotiations himself, Dringly would kill him. This adventure features: Two maps. Ready for your favorite Virtual Tabletop. A full color pdf. A black and white pdf. One custom monster, a reprint of barghest, all others available in the Monster Manual. Four hours of entertainment involving: roll playing a goblin bard, investigating a murder scene, tracking down a barghest before it strikes again. Applicable to any setting.

This scenario was presented to Gryphcon's 30th anniversary last year. The party finds themselves coming to the Triland on their way to Taco Del Toro. This island chain is unique in that it has a land mass made of clouds, hovering over the island. Upon landing, your group discovers that the governor's child has been abducted by a Cloud Giantess. Time for your hero hats...

As an ominous comet passes over Toril, a young researcher from Candlekeep goes missing. In darker corners of the Realms, eldritch horrors stir, answering the call of a dead god. Will the heroes be able to save the scholar before they succumb to an Elder Evil from beyond the reaches of sanity? This single session adventure is perfect if you are looking to introduce science-fiction themes into your game or just enjoy Lovecraftian horror. It has copious references to the Spelljammer setting and could be used as a springboard into that campaign setting. The Call of Atropus requires Mordenkainen's Tome of Foes to run effectively.
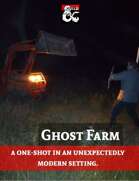
Have you ever considered how hard it would be to fight a tractor with a sword or greataxe? Your players deserve to find out! This adventure traps the player characters in a small pocket plane set up by nefarious forces. They must explore a small modern farm and deal with its hazards to end the curse placed on the farmer. There are, of course, a few complications to deal with, like animated farm equipment trying to kill them, and the innumerable horde of ghoulish chickens penned up in one of the chicken houses... The adventure is balanced for the way 5e is structured, meaning Long Resting is very risky, so they will have to conserve resources, and was designed and tested for 4 Level 6 players. It should take 3-6 hours to complete. It includes map images scaled for Roll20 and Fantasygrounds.

Kind words and a scrap of paper are enough to lead you off on an adventure into the hills. You and your party have opted to follow the clues leading to a fabled Talisman of Otek lost years ago in an old dungeon. Your benefactor has warned you that some cultists are actively seeking the item and hope that the “heroes in the making” will obtain the item before the nasty fanatics get ahold of it and use it for nefarious purposes!

Desperately needed supplies have failed to arrive at the suffering frontier settlement of Ravendale. Rumors are flying that the supply wagon must have fallen afoul of the legendary troll of Stonebottom bridge. The townsfolk are in desperate need of heroes to reclaim their supplies or the town won't survive the encroaching winter! A 2-4 hour adventure for four to six players of 1st or 2nd level characters

The promises of glory and the chance of riches draws you to Blasingdell, a small village near the infamous Stone Tooth. Within the rocky mountain lay the dwarven stronghold Khundrukar and the fabled Forge of Fury, to which a chance encounter provides you with the location of a hither-to unknown entrance. Are you brave enough to explore this mystery? Will it lead you to wealth or to your doom?

The village near Oreclasp Keep has been reporting brutal owlbear attacks that have left people missing or dismembered. Lord Oreclasp has placed a bounty for every owlbear beak brought to Oreclasp Keep. The villagers don’t suspect the deeper problems brewing in the land.

The Cage: A valuable trinket was stolen from the well-protected manor of the lady Morrigan Strange, and she enlists the help of some able-bodied adventurers to retrieve it. As it is the way of things, it turns out the problem is not as simple as it first seemed. A vile demon was trapped in the stolen orb and threatens to kill everyone in sight after its release! The package includes background information about the involved characters, a few details about the town of Beregost, several maps, and lots of adventure!

The tritons have arrested the keeper of Skyhorn Lighthouse for unleashing vile, bug-like abominations into the sea. When a lone triton comes to the characters and asks their help in exonerating the keeper, will the heroes rise to the challenge and confront the dangers lurking in the deep? The Corruption of Skyhorn Lighthouse is a 5-7 hour adventure for 8th-level characters. You can run The Corruption of Skyhorn Lighthouse as a standalone adventure or as a follow-up to The Secrets of Skyhorn Lighthouse, a free 5th-level adventure downloaded over 100,000 times with 350+ five-star reviews! Inside the The Corruption of Skyhorn Lighthouse, you'll find: -Three new monsters that prowl the ocean depths -A goblin submarine, a darkmantle sea captain, and a marid with a pet starfish grove -The Arcane Library's signature format to make running the adventure effortless -Combat cards for monsters, PCs, and special treasure -Gorgeous maps designed for easy use with Virtual Table Tops

Take the adventuring party on a journey through a nasty, smelly swamp as they follow an exotic map which (they hope) leads to a grand treasure. Unknown hazards, NPCs, adventure, and creatures stand between them and the X that 'marks the spot' on the map. This adventure includes: •Custom art •8 hand-drawn maps (color and black & white included) •3 new creatures •1 new magic item •Includes a printer-friendly version of the adventure. Into the Belly of the Beast runs smoothly as-is, but an additional 8 encounters are included. These encounters can be used to lengthen the adventure, or they could used separately and added to your own campaign.
Goblin attacks have always plagued the farmers and merchants who live and travel along the roads leading to Whitesparrow. But a recent rash of new attacks are something different. The goblins of one particular tribe have gotten particularly smart, attacking with careful tactics and cunning ambushes. The village guards haven’t been able to outwit the goblins, even when laying traps of their own and hiring mercenaries to stop them. Even as goblins go, Rosethorn isn’t much to look at. He’s small and runty, and yet a lucky break placed him in charge of the Brownleaf goblin tribe. When he claimed a powerful magic relic from a dead wizard three months ago, Rosethorn found his intellect multiplied many times over. The world began to make a more intricate kind of sense to him, and he saw patterns in the ways other folk traveled the roads. After hiring a spy in Whitesparrow to tell him which wagons to pursue, Rosethorn cunningly bribed the wagons’ guards to throw battles in the goblins’ favor. He then moved the lair of the Brownleaf tribe away from their dank caves and into the ruins of the Bearded Man—an enormous dead tree at the center of the Howling Wood. There, Rosethorn continues his campaign of ambush against the foolish villagers, increasing his wealth and power with each robbery.

The party visits the village of Bellmare, where a hag has recently been slain, and which has since been plagued with deadly wintery weather during the Summer Solstice. The party meets the head of the village, who asks them to find the cause. When the party reaches a small hut in the mountains, they encounter a hag. Rather than attack them, she offers them information to help stop her sister from enacting revenge upon Bellmare. Pgs. 109-117