
A traditional "funhouse" dungeon, White Plume Mountain begins with the archmage Keraptis stealing three artifacts and leaving cryptic poems with their former owners. The players are hired to recover the items, and find a bizarre dungeon in the side of the eponymous volcano. TSR 9027

Your party of stalwart heroes must venture into a lost dwarven mining complex, fighting terrible monsters, bypassing deadly traps, and exploring chambers heavy with the dust of ages. Somewhere deep below the surface lies the heart of darkness--a corrupting evil that must be stopped before its influence can spread! TSR 9844

The Hag's Hexes is a 66 page guide designed by Dungeon Masters Guild luminaries like JVC Parry and Janek Sielicki alongside rising stars and old stalwarts like Matt Butler, Matthew Gravelyn, and Tim Bannock. It was created with one thing in mind: to make hags more than the sum of their (often meager) Challenge ratings, giving them the mechanics, roleplay potential, and weird magic that can inspire campaigns, lay low kings and warlords, and potentially ensnare unwary Player Characters into campaign-changing curses or long-term bargains that force them into terrible moral quandaries! Split into five chapters, the authors have provided everything a DM needs to terrify their players for years to come. The Bestiary features over a dozen monsters; some are new hags, some are their minions or even their mobile lairs, and one of them -- the Shaitan AKA Desert Hag -- was featured in Monsters of the Guild! Bargains & Curses is a chapter filled with ideas that can kick-start campaigns, threaten valued NPCs, or put Player Characters' very existence and morality at stake. Chapter 3 includes two dozen items of wonderment, weirdness, and dread, ranging from fairy tale-inspired items of whimsy to terribly cursed items of horror. Chapter 4 is titled "Filthy, Vile & Downright Dirty" and provides dozens of roleplaying tips to make hags come alive, new mechanics inspired by and expanding on Volo's Guide to Monsters (coven spell lists, aunties, grandmothers, alternative coven members), and ends with useful combat tactics for each of the hags from the Monster Manual and Volo's Guide, as well as tactics for covens. Finally, Chapter 5 presents five encounter groups (with sub-encounters) to give you quick story seeds and monster lists that you can put together in minutes to create a single encounter or to inspire a full campaign, and ends with three full-length adventures -- each with 3-5 encounters -- that showcase many of the new monsters, rules, magic items, and so on that appeared in earlier chapters. Each of these adventures comes with an encounter map meant to act as inspiration for hag lairs, and they include useful mechanical ideas for terrain effects and descriptive keywords listed directly on the map for added inspiration and easy customization! Designed by Tim Bannock. Written by Matt Butler, JVC Parry, Janek Sielicki, and Tim Bannock. Edited by Matthew Gravelyn and Tim Bannock. Cover Art by Elena Naylor. Cartography by Tim Bannock using Inkwell Ideas' Dungeonographer (Dungeonographer is copyright Inkwell Ideas). Layout & Graphic Elements by Elena Naylor with Tim Bannock. Interior Art by Arcana Games, Bruno Balixa, David Lewis Johnson, Dean Spencer, Earl Geier, Filip Gutowski, Jacob E. Blackmon, Joyce Maureira, Petr Kratochvil, Jayaraj Paul, Brian Brinlee, and Wizards of the Coast.

In the flooded temple is hidden a great treasure, and the adventures are in race to get there first, but the ancient temple is the home of Death's Messenger and several cults each with their own agenda. Will the adventurers survive or be dragged off to the lands of the dead? The Flooded Temple is a low-level OSR adventure based on the greatest RPG ever written as system agnostic and easily adapted to your favorite version. The adventure was originally written for the Danish Living Campaign The Hinterlands, and it is for the first time presented in English. The adventure introduces the players to a different tradition of adventures, and it one with a focus on exploration and encountering the unknown. The adventure contains several new items to entertain your players, and several challenges for them to overcome as they encounter the residents of the abandoned temple. The Flooded Temple also have a prequel, Tomb of the Dragon's Heart, and a sequel, Grave of the Heartless. Published by Greis Games.

A recent earthquake has brought forth ancient evil from beneath the waves, to terrorize a sleepy coastal town. People are disappearing. The heroes will sail to an ancient, steam-powered temple in the ocean. They'll encounter mad fishmen, deadly traps, and ancient horrors that slumbered until now.
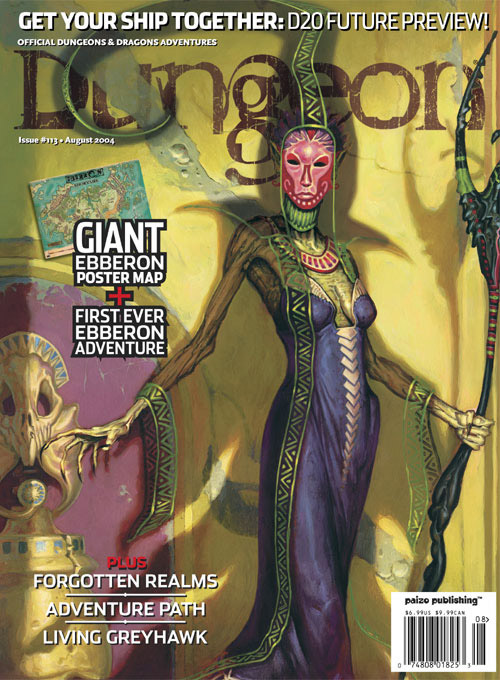
Take your first exciting foray into D&D's newest campaign setting with a deadly exploit in Sharn, City of Towers. Descend into the ruined undercity to face the legacy of the daelkyr, aberrations from the evil plane of Xoriat, and come face to face with the Queen with Burning Eyes! Pgs. 16-32

At just 8 pages, with lots of illustrations, this adventure is much shorter than most TSR-published modules of the era (mid-90s). It is a very simple D&D adventure. It features a macguffin quest that immediately pushes the players into a dungeon crawl through the five-and-a-half-page "Dungeon of the Mad Warlock". The idol of old, The Jade Hare, as been taken from the Dar el-Tamyya, stolen by Goblins, who strangely enough killed no one. Abdullah, the old man who cared for the statuette remembered that about a month ago a stranger has asked if he might purchase the Jade Hare. Though he offered much gold, Abdullah of course refused the offer. Whom Abdullah describes the other villagers recognize as Abu-Ghabar, the mad warlock who lives in the hills. He is rumored to have built a dungeon there. Who knows what strange purposes the mad warlock has for the Jade Hare? In any case, the precious statuette's theft is an intolerable strain on the honor of the village and all the tribe therein. A party must be assembled to confront the warlock. This party may consist of none other than yourselves. Won't you save Dar el-Tamyya's ancient honor, and thwart whatever sinister plans the warlock has? TSR 9259

The Dwarven clans are in chaos, and a powerful host of goblins stand poised to sweep over the land in a wave of death and terror. Only the Axe of the Dwarvish Lords- one of the most powerful weapons ever created by the dwarven race- holds the key to ultimate victory against the massing humanoids. Can the PCs brave the labyrinth of an abandoned dwarven stronghold to find the Axe? TSR 11347

Run, play or splice up 66 pages of mayhem and weirdness in this Slavic mythic-inspired (with an acid fantasy-twist) mini-sandbox for Labyrinth Lord or the well-aged fantasy rpg of your druthers. Contains: • A 25-site pointcrawl of the otherwordly Slumbering Ursine Dunes region. Beyond the big ticket adventure sites you will find along the way a Polevik-haunted rye field, a Zardoz head-living hermit, bearling pilgrimage site, antediluvian beaver engineers and other assorted madness. • Two separate “dungeons”, the bio-mechanical, lost-in-time Golden Barge and the faction-contested Glittering Tower, with enough detail and portability to be slotted into an existing campaign. • The Chaos Index, a dynamic events system for modeling the mythic weirdness of the Dunes. Actions of the players in the sandbox will escalate or de-escalate the levels of events. • Four competing factions operating inside the Dunes, plus guidelines for their mutual interactions.

The Pyramid of Amra is a challenging adventure designed for characters of at least 12th level. Due to the nature and numbers of undead enemies (vampires), having a cleric on hand with the ability to cast raise dead and greater restoration is advisable. The PCs should be rounded out with a wizard or sorcerer and a pair of front-line fighters. In this adventure, the PCs travel to the Pyramid of Amra and the ancient Monastery of Night, where they face one of the most dangerous of opponents they are likely to meet, C’nosretep the Champion of Set.

Half a century ago the legendary mage Delekin reached his zenith but began a fall of monumental disaster. After being betrayed by his party the mage changed alignment and began a cruel tirade against the residents. He was finally taken down by the Lords of Evil and imprisoned in a tomb created to lure good adventurers to their death. Many have entered the unholy locale and none have returned. Whatever evil is present in the tomb is powerful, and most likely very wealthy. This adventure is one of the Original series i.e. an early work!

This adventure takes place in the Moonsea of Faerûn. The players have been brought to Melvaunt to search for the missing scions of the city's great families. To the north, in Thar the orc tribes converge on the ruined fortress of Xul-Jarak, flocking to the banner of a charismatic warlord. There, he intends to sacrifice the scions of the great families of Melvaunt in a bloodritual to Gruumsh. The players will escape Melvaunt, search along the wilderness of Thar for the Fortress of Xul-Jarak, and then explore the dungeons of the ruined fortress and hopefully rescue the scions before they are sacrificed. There also is a Web Enhancement by Eric Cagle on the archives of wizards of the coast's website designed to scale the adventure to level 8. For example, it replaces the Owlbear with a Tyrannosaurus. This is an easy to scale adventure with much of the player's difficulty coming from intelligently avoiding problems, choosing how to approach each floor in the most tactical way, and quickly adjusting when something goes wrong. The adventure has sidebars including common orc battle cries (In Orc!), ready to use orc names, weather and random encounter table in Thar, a description of what happens if the party fails or partially succeeds, and suggested minis for each of the encounters. There is even an extended description of the bloodspear ritual, an event the party is not meant to encounter in a normal run. The appendix is detailed for all the humanoid characters including the scions and their equipment, the named villains, and variety of unnamed orcs the party will encounter. The fortress also offers an opportunity to introduce the players to the Underdark and the Zhentil Keep. There is a passage to the Underdark the players can accidentally explore, and return to later. Emissaries from Zhentil Keep have come to watch the ritual and have their own motivations. These npcs provide an opportunity for exposition and role playing at a point which otherwise might be combat heavy, acting as a valve for the first floor - helping or hurting the party with subtle magic should the difficulty be off.

The player characters investigate recent kidnappings. The trail leads to a slaver operating from Underdark passages below the city. Also available at https://adventureaweek.com/product-category/rise-of-the-drow-ce/

The PCs are looking to gain entry to the Glantri School of Magic, after the initial admission tests they are drawn into a commotion where one of the other students is being attacked by an evil sorceress. He tries to flee but but is killed, and the PCs are framed for the murder. The authorities are called and bribed to just kill the PCs, they flee and are chased and taunted by the evil sorceress. Eventually, during one of her attacks, she opens a weak spot in the ground and the heroes are dropped into the warrens under the school. They must navigate the warrens, which are shrouded in magical darkness, defend against further attacks, and find escape where they can prove their innocence.

While you search for treasure, others search for you. A treasure vault without guards or traps - can it be true? Pgs. 16-30
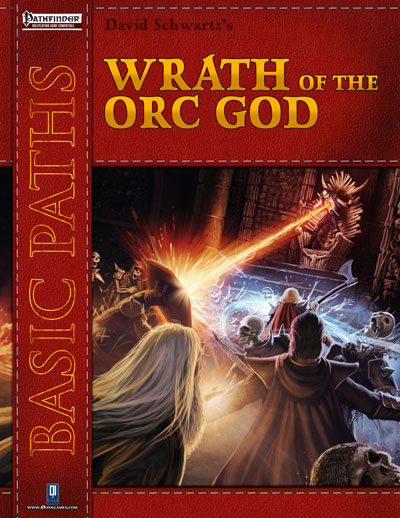
In the town of Gafolweed, the market is in disarray: toppled barrows and collapsed tents spill their contents onto the muddy ground. Merchants and locals flee the scene as you arrive. In the midst of the destruction stands a muscular, green-skinned humanoid—an orc! Three bodies lie near his feet, the victims of his bloody axe. He turns to you, a vivid red tattoo of a bleeding eye prominent on his brow. The orcs are gathering in numbers unseen in many generations and make war upon the people of the Borderlands. The cause of this deadly conflict is entwined with the history of the unholy mark that all the orcs now bear. Will your fellowship of budding heroes be able to quell the Wrath of the Orc God?

The yuan-ti anathema, Hessatali, calls out to his yuan-ti faithful from his prison in the Abyss. His network of vipers has uncovered the ruins of ancient Ss’tatha’lass and the Fane of Hessatali, a fountain of pure venom that will return the demi-god to life. Above the buried ruins of Ss’tatha’lass, yuan-ti agents have moved to control the politics of Scornubel. The characters fall into a complex yuan-ti plot that spans the breadth of the realm, pits the heroes against the forces of the Abyss, and explores the culture of the yuan-ti.
The city is plagued by an affliction being called "stone sickness" or "the gorgon’s touch" that disorients people and turns them to stone. Those with, or suspected to have, the affliction are being banished from the city. Some demand a cure, but most are just scared for their loved ones. A ravenfolk woman named Spinel Larkdon, mother to a child with the gorgon’s touch, begs the PCs for assistance. An artifact known as the Shroud of Tiberesh, capable of curing any sickness, is locked away within The Umbers' vault of spoils below the city. Passionate, she is determined to save her son and all those afflicted. Fortunately for the player characters, completing the Umber’s Gauntlet alive means they are not only entitled entrance into the cult, but also a single item from its vault of spoils. The PC's only hope of procuring the Shroud is by traversing this initiation Gauntlet – a series of traps, monsters, and puzzles devoted to the demon-god Nakresh - and claiming the Shroud as their prize.

𝐍𝐨𝐰 𝐰𝐢𝐭𝐡 𝐚𝐧 𝐢𝐥𝐥𝐮𝐬𝐭𝐫𝐚𝐭𝐢𝐨𝐧 𝐛𝐲 𝐂𝐇𝐑𝐈𝐒 𝐇𝐎𝐋𝐌𝐄𝐒 𝐚𝐧𝐝 𝐚 𝐏𝐑𝐈𝐍𝐓𝐄𝐑-𝐅𝐑𝐈𝐄𝐍𝐃𝐋𝐘 𝐃𝐔𝐍𝐆𝐄𝐎𝐍 𝐌𝐀𝐏! 𝐓𝐇𝐄 𝐑𝐔𝐈𝐍𝐄𝐃 𝐓𝐎𝐖𝐄𝐑 𝐎𝐅 𝐙𝐄𝐍𝐎𝐏𝐔𝐒 is a fifth edition (5E) conversion of the ground-breaking introductory adventure for Dungeons & Dragons that served as a DM aid in the first 𝐃&𝐃 𝐁𝐚𝐬𝐢𝐜 𝐒𝐞𝐭, released by TSR in 1977. This set included a 48-page rulebook covering the first three levels of play, and was skillfully edited by 𝐃𝐫. 𝐉. 𝐄𝐫𝐢𝐜 𝐇𝐨𝐥𝐦𝐞𝐬 from the original 1974 D&D rules written by 𝐆𝐚𝐫𝐲 𝐆𝐲𝐠𝐚𝐱 and 𝐃𝐚𝐯𝐞 𝐀𝐫𝐧𝐞𝐬𝐨𝐧. Holmes advanced the "Sample Dungeon" concept by writing a new thematic dungeon with a strong backstory, creating an adventure that has remained a fan favorite over the decades. Officially, its only title is "Sample Dungeon" but colloquially it goes by various names based on Zenopus, the doomed wizard who built the dungeon under his tower. An adventure for 1st to 2nd level characters; four pregenerated characters are included. Also includes ideas for using it as an adventure site in 𝐆𝐡𝐨𝐬𝐭𝐬 𝐨𝐟 𝐒𝐚𝐥𝐭𝐦𝐚𝐫𝐬𝐡. 𝐍𝐎𝐓𝐄: Using this conversion requires a copy of the original dungeon found in the (1977) Basic D&D rulebook. However, Wizards of the Coast has provided a free pdf of this dungeon since 2008 on their website, see the first page of the pdf for the link. 𝐂𝐎𝐍𝐓𝐄𝐍𝐓𝐒: Introduction, page 2 The Setting, page 3 About the Dungeon, page 4 Dungeon Master's Map, page 5 Areas of the Dungeon, pages 6-13 Appendix A: Further Reading, page 13 Appendix B: Dungeon Factions, page 14 Appendix C: Portown Rumors, pages 15-17 Appendix D: Use with Ghosts of Saltmarsh, pages 18-19 Appendix E: Pre-generated 1st level characters, page 20 𝐈𝐧𝐜𝐥𝐮𝐝𝐞𝐬 𝐭𝐡𝐞 𝐟𝐨𝐥𝐥𝐨𝐰𝐢𝐧𝐠 𝐧𝐞𝐰 𝐦𝐨𝐧𝐬𝐭𝐞𝐫𝐬, 𝐍𝐏𝐂𝐬, 𝐚𝐧𝐝 𝐌𝐚𝐠𝐢𝐜 𝐈𝐭𝐞𝐦𝐬 𝐟𝐨𝐫 𝟓𝐄: Cleaning Cube, Veteran Smuggler, Thaumaturgist, Monstrous Sand Crab, Lemunda, Monstrous Rat, Brazen Head of Zenopus, Verminslayer Longsword, Lesser Wand of Petrification, Scroll of Stone to Flesh The Ruined Tower of Zenopus was featured as part of the "D&D Classics" column in Issue #32 of Dragon+ magazine! Go to 𝐝𝐫𝐚𝐠𝐨𝐧𝐦𝐚𝐠.𝐜𝐨𝐦 or find the link on the Wikipeda page for Dragon magazine. 𝐂𝐑𝐄𝐃𝐈𝐓𝐒: Original Dungeon: J. Eric Holmes Conversion, Added Content & Cartography: Zach Howard Content Review & Editing: Scott McKinley Interior Art: Chris Holmes (“Octopus Attack”, page 9) Cover Art: “Italian Coast Scene with Ruined Tower” by Thomas Cole, 1838. Open Access Image from the National Gallery of Art at images.nga.gov Format: Derived from the “Adventure Template for Open Office/LibreOffice” by Dale Robbins on DMs Guild Dungeon Maps drawn using the application Gridmapper by Alex Schroeder

When a Thayan research expedition returns from the Glacier of the White Wyrm with only two survivors that are reduced to whispering about an ancient pyramid under the ice, perhaps it is time to discover just what scares the life out of a nation of necromancers. The events of DDEP2 Mulmaster Undone resulted in terrible geographic upheaval all around the southeastern region of the Moonsea. Massive landslides, earthquakes, tidal waves, and gnashing tornados devastated the land and the city of Mulmaster was nearly scrubbed from the face of Faerun. Fortunately, these events also revealed previously hidden artifacts—trinkets, mostly—from the ancient Netherese all around the city. The Thayans have long held an interest in the port city and wasted no time in assisting in the rebuilding efforts. They simply asked that a blind eye be turned to their archaeological interests, and in return they would continue to spend their own resources (at no expense to the Mulmasterites or even the High Blade) to rebuild the city, bigger and better than before. It wasn’t long before their interests paid off with the discovery of a research laboratory beneath the Glacier of the White Worm, far to the east of Mulmaster and nestled in the mountains. The Thayans sent a sizable expeditionary force but only two acolytes returned. The visiting Zulkir has found this particularly troublesome, and with the assistance of Rastol Shan, the head of the Cloaks, has arranged for a mercenary force to perform a more pointed investigation of the area. In return the Thayan noble has promised significant compensation. Upon arrival at the dig site, the characters are quick to discover that the laboratory hides ancient and palpable evil. The purpose of the facility can be discerned with careful investigation, and the effect of the still-active fragment of the Dark Obelisk has empowered (some may say attracted) servants of the Worm that Walks. Danger and death await, certainly, though the characters always have the option of running away and living to fight another day…