
Inside this full-color, 124-page anthology you’ll find four best-selling Adventurer’s League quests for level 1-10 characters set in the hobgoblin fortress of Glip Dak. Also included are instructions on how to weave these adventures into an ongoing story arc as part of your campaign. Tier 1 (Level 1-4): Glip Dak (CCC_GLIP-01-01) The Kroth Magg hobgoblins run the trade city of Glip Dak in the Troll Hills of Thar. From there they have taken control of the trade routes along the northern Moonsea. A young noble has been captured for refusing to pay their tariffs and his house looks to hire adventurers to rescue him. Beneath Glip Dak (CCC_GLIP-01-02) A series of unusual heists has both the thieves’ guild and city guard scrambling to uncover the culprits before the burglaries destabilize the thriving trade within the city, threatening the budding kingdom the Kroth Magg have fought and died to forge. Citadel of Vlaakith (CCC_GLIP-01-03) The adventurers are tasked with rescuing a group of heroes who vanished in the pearlescent fortress that manifested on the border between the Kroth Magg kingdom and the Varkonin empire in the Steppes of Thar. Tier 2 (Level 5-10): Blue Scales (CCC_GLIP-02-01) A behir has been hired to destroy the herds of aurochs necessary to feed the hobgoblin city of Glip Dak. Patrols and scouts continue to go missing, forcing the hobgoblins to hire mercenaries to track this behir as they recall their troops to the capital to maintain order as food riots break out.
Part of a Numerian relic once thought scattered to the winds has found its way back to the savage land of super-science, and the Pathfinder Society must track down the component if they are to unlock the device’s secrets. Clues point to the economic hub Chesed, where only the descendants of a shattered clan can share where their revered ancestor buried the strange artifact. Can the PCs brave the troubled city, evade the vigilant agents of the Technic League, and survive a trip into the Numerian wastes? Content in “Returned to Sky” contributes directly to the Year of the Sky Key metaplot as well as the ongoing storyline of the Exchange, Liberty’s Edge, and Silver Crusade factions.
The infamous Sword of the Dales has always held a certain fascination in the eyes and hearts of the citizens of the Dalelands. Thus, it was no surprise when Randal Morn, rebel leader of Daggerdale, led an expedition into the crypt of a long-dead wizard to recover the weapon. Shaevyn the weapons-mage had created the Sword long ago, and it stood to reason that the blade would be waiting within his tomb. Perhaps the Sword of the Dales woulld allow Randal Morn to rule Daggerdale once again. But Randal Morn never returned from that fated party. Only tales of terror told by a lone survivor held any clues as to Randal's fate. A brave hand of heroes accomplished what Randal Morn's group failed to do in part one of this adventure trilogy, "The Sword of the Dales." Battling through the tomb's undead inhabitants, those heroes reached the burial crypt of Shraevyn. There, resting in the center of the coffin, was the Sword of the Dales, its azure glow filling the chamber. However, there was no sign of Randal Morn. Only a note signed by his hand held any clue as to his fate. "Seek me in Spiderhaunt," it proclaimed. "The fate of Daggerdale is in your hands." This is the second part of a trilogy of modules that began with "The Sword of the Dales." The saga concludes with "The Return of Randal Morn." TSR 9485

A friendly little cottage and a dreadful secret. As the adventure begins, the PCs are on a journey through temperate, wilderness hills -- perhaps toward a destination of importance in the ongoing campaign, or they might merely be wandering in search of heroic opportunities. Pgs. 20-25
Long abandoned and all but forgotten, Ridgeway Watch has fallen to lawless hands. Travellers talk of ambushes on the high pass, but few dare challenge Kessel’s gang. Can the heroes reclaim the ruin, or will they join the list of the missing?

When a group of archaeologists put out a call for adventurers to help them escort a valuable artefact back to civilization, nobody expects anything out of the ordinary. However, our heroes have more than mere bandits to deal with at Havel’s Cross... Undead monsters roam the night and an ancient artefact stirs within a long forgotten temple. Getting to the bottom of the mystery will require a strong sword-arm and an even stronger stomach.
Rumours tell of a secluded cave where a powerful cleansing artifact resides, guarded by a mythical creature that no one has seen and lived to tell the tale. Heat boils forth from this cave, and tortured shrieks echo on the wind. Do you have what it takes to brave the Lair of the Lava Queen?

Tired and sore, you struggle over the burning sands toward the long-forgotten city. Will you reach the place in time to save yourselves from the evil efreeti? The sun beats down, making your wounds stiff and worsening the constant thirst that plagues anyone who travels these waterless wastes. But there is hope - are those the ruins over there? In the midst of broken columns and bits of rubble stands a huge statue. This is the place! You've found it at last. Gratefully, you sink onto the sand. But there is no time to lose. You must hurry. So with a quavering voice you say the magic words. And then you wait... A hush falls over the ruins, making the back of your neck prickle. Then, out of the east, a wind rises, gentle at first but quickly growing stronger and wilder, until it tears at your clothes and nearly lifts you off your feet. The once clear sky is choked with white and grey clouds that clash and boil. As the clouds blacken day turns to night. Lightning flashes followed by a menacing growl of thunder. You are beginning to wonder if you should seek shelter, when all of a sudden there is a blinding crash and a bolt of lightning reduces the statue to dust. For a moment, silence. The, out of the statue's remains, soars a blue flame. Its roar deafens you as higher and higher it climbs, until it seems about to reach the clouds. Just when you think it can grow no larger, its shape begins to change. The edges billow and soften, their roar lessens, and before your eyes materializes a gigantic blue man. This adventure can be played alone or as the second part of the Desert of Desolation series. For characters level 6-8. TSR 9053

Six murders in a single night! A major city in the Forgotten Realms is rocked by a series of gruesomely bizarre deaths of notable citizens. What mysterious murderer could have slain six people in different corners of the city? Why did the criminal leave a playing card at each scene? Could a high-stakes card game that happened ten years ago explain the goings-on? And, most importantly, is the goddess of misfortune personally involved?
A collection of five one-shot adventures for Cairn! Imperial Vault 19 A grieving widow in the forest begs you to save her baby. A hedge witch has taken the infant down into an old imperial vault where she uses the child’s Chaos tears in alchemical potions. And who knows what old treasures might still be hidden in the vault? Unless it’s not that kind of vault… Barrow of the Blood Baron Face off against vampire bats, vampire thralls, and a vampire noble, as well as a few other creatures that have clawed their way into this once-armored vault. Discover works of art, exotic wines, enchanted clothing, and filthy weapons. Negotiate with the guards and intruders alike, using clever words or whatever stake-like objects are close at hand! Tomb of the Tin Templar Encounter electric jellyfish, tinker gnomes, and the rusted corpse of the noble Sir Tristan, as well as a few other creatures that have drifted into this marvelous mechanical vault. Discover windup toys, clockwork companions, and baffling devices. Negotiate with the guards and intruders alike, using clever words or whatever rusty objects are close at hand! Priory of the Primate Priest Defy root trolls, monkey monks, and a beguiling dryad, as well as a few other creatures that have found their way into this marvelous living vault. Discover magical armor, haunted skulls, and the bonest of the apes' victims. Negotiate with the guards and intruders alike, using clever words or whatever living objects are close at hand! Fane of the Fey Fellmonger Match wits with guild goblins, pixies, and a living skin suit, as well as a few other creatures that have spirited their way into this disturbing leathery vault. Discover arcane clothing, deadly sewing tools, and a fey lord who isn't entire dead yet. Negotiate with the guards and intruders alike, using clever words or whatever sewing objects are close at hand! New PC Background: The Dungeoneer! In addition to some unusual delving gear, select one of 10 unfortunate results of a recent delve-gone-wrong, as well as one of 13 helpful boons or tools from a recent delve-gone-right.

The Halls of Runehammer is a classic dwarven dungeon crawl for 5th edition dungeons and dragons. The core adventure module is desigend for characters who are second level and should take a party up to 4th level. 150 years ago a horrible plague called the Red Death swept the known world. When faced with the destruction of their entire clan some of the dwarves of Runehammer turned to a dark evil in an attempt to survive. Until recently that evil lay dormant, but now it threatens to engulf the entire region surrounding the Halls of Runehammer including the small town of Last Stop. Features over 8 episodes of encounters flled with action, excitement, and danger Blaze your own path or choose from two sets of pregenerated characters; one party of dwarves and one party of the canon characters for the Asnar: The Last Kingdom campaign (digital download) Contains 25 available digital maps for high quality printing or use with Online systems like Roll20 (digital download) Comes with Combat Encounter sheets for most combat encounters to help speed up your game play (digital download) Comes with a fully printable puzzle ring trap for Episode 7: The Pump Tower Contains 30 pieces of artwork created just for this adventure and 14 additional licensed pieces of artwork

A serial killer is stalking the unsavory citizens of Baldur's Gate and freezing them solid! Discover who or what is responsible for these chilling crimes and unravel the killer's twisted motivations in this adventure for Baldur's Gate: Descent into Avernus! This adventure includes: 1 New Neighborhood for any Urban Location, 1 New Creature, 3 New Magic Items, 5 New Shops & Taverns, and 12+ New NPCs!
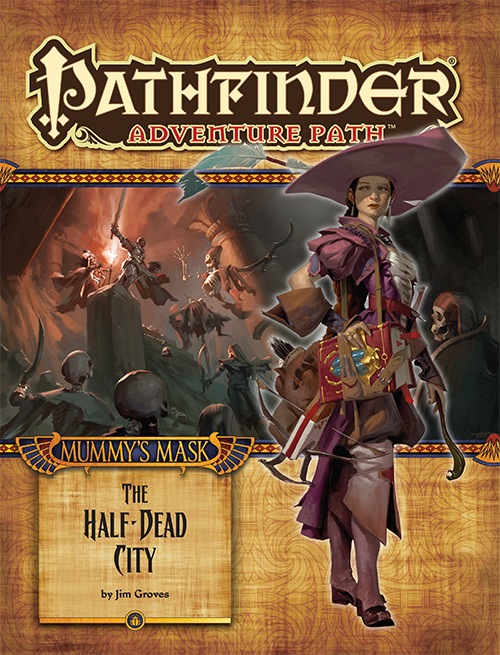
The Mummy's Mask Adventure Path begins with "The Half-Dead City," an exciting new adventure in the pyramid-laden realm of Osirion, Land of Pharaohs! In the city of Wati, the church of Pharasma holds a lottery allowing explorers to delve the tombs of the city's vast necropolis in search of the nation's lost glories. In the course of investigating dusty tombs and fighting their ancient guardians and devious traps, the heroes encounter a group of rival adventurers intent on keeping one tomb's treasures for themselves. At the same time, the heroes learn that a dangerous artifact has been stolen from the tomb. Can the adventurers defeat their rivals, or will they fall to the undead defenders of the city's necropolis?

After turning himself into a manticore, the self-style wizard-artiste, Mortzengersturm, moved to the crystalline peak of Mount Geegaw to practice his transformation magic without interference. You've been hired to snatch his most prized artifact, the Whim-Wham Stone--or at least some of its eldritch light. A menagerie of magic hybrids, a self-absorbed vampire, more than a few hippogriffs, and of course, the mad manticore himself await! It's like a Rankin-Bass stop motion special--except it could end in a total party kill.
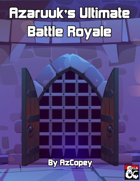
You step forward into the circle of runes and feel your stomach lurch. Within a blink of an eye, you find yourself in the arena. You can no longer see the audience but you can faintly hear them cheering and chanting beyond the arena’s walls... In Azaruuk's Ultimate Battle Royale the players find themselves whisked away to Sigil, the city in the center of the multiverse, where the must face off against each other in Azaruuk's arena. In this arena they will fight Azaruuk's Homunculi and dodge devious hazards all while trying to defeat the others to become the Ultimate Champion! This module is intended for two or more level 10 players, however it can be run for players of any level with only a little tweaking required. There is no need for a dedicated Dungeon Master when running this module. Everyone can have their own character and responsibilities of the Dungeon Master can be shared between everyone. It includes: An exciting player versus player encounter Rules for building better balanced characters including how to handle equipment Rules for running this module without a dedicated DM Various hazards such as lava pits and lightning rods A new Arena Action mechanic for dynamic hazards A new monster to fight: azaruuk's homunculus Two new items designed to make PvP combat more exciting: insignia of ba'sha and tonic of exceptional healing A detailed map of the Arena
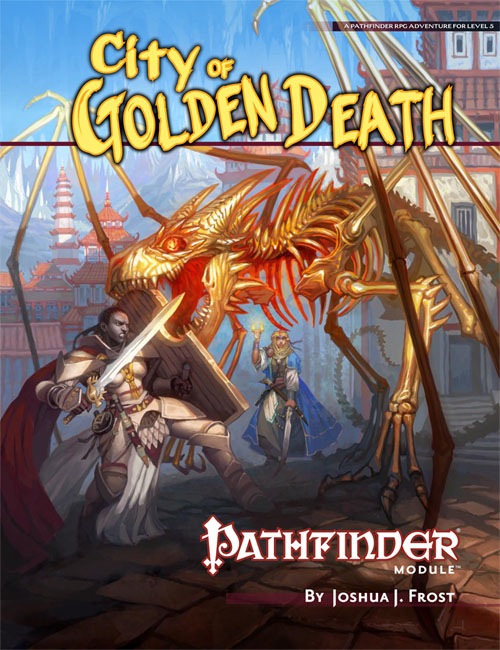
In the center of Lake Encarthan looms the dreaded Isle of Terror, accursed land of mystery and treachery. Hidden within the island's negative energy storms, the secret treasure city of the wizard-king Tar-Baphon has lain sealed for centuries. Now masked cultists have opened the golden city of Xin-Grafar to claim the wealth of the legendary city for the Living God Razmir. Can the PCs track the cultists through the poisoned swamps and blasted wastelands of the Isle of Terror to the City of Golden Death itself? And what forgotten dangers will oppose them as they struggle to prevent a dark faith from spreading across the world? Part 3 of the Price of Immortality trilogy.

A job has come up for your party straight from the leader of Phoenix! A trade deal is desired with the leader of an island chain known for Ioun Stones. The Zephyr has requested that your party go and use your skills to negotiate the deal. Upon arrival, your talents serve you well but King Homa requires that your talents serve him...

A magical conk is stolen and planted by an unsuspecting pawn. The tree which grows from this 'tato threatens the whole village of Hempholme and the characters have to take matters into their own hands. There are a number of threats to deal with and number 3 will shock you!

Rumors and legends surround a hidden temple dedicated to the god of Magic, Ileaeni. This lost shrine is supposed to be in the Border Hills but no one, not even a legendary general has been able to locate this famed location. While long rumored to hold a supply of magical items no proof exists of this temple aside from notations in old scrolls. Myth or real you and your party are interested in exploration and treasure…this sounds like it may be right up your alley.

Mimic Madness is a psudeo-adventure with four interesting mimic encounters. These four encounters are structured in a way that they can be used together as one adventure, or each individually dropped into any adventure from EL4 to 7. The encounters vary the mimic's tactics significantly, such as by having them we a weapon rack that wields the weapon it holds, pretending to be animated furniture using its ability to speak, and pretending to be a floor covering a pit; none of them rely on the typical chest or door mimics. Pgs. 24-25