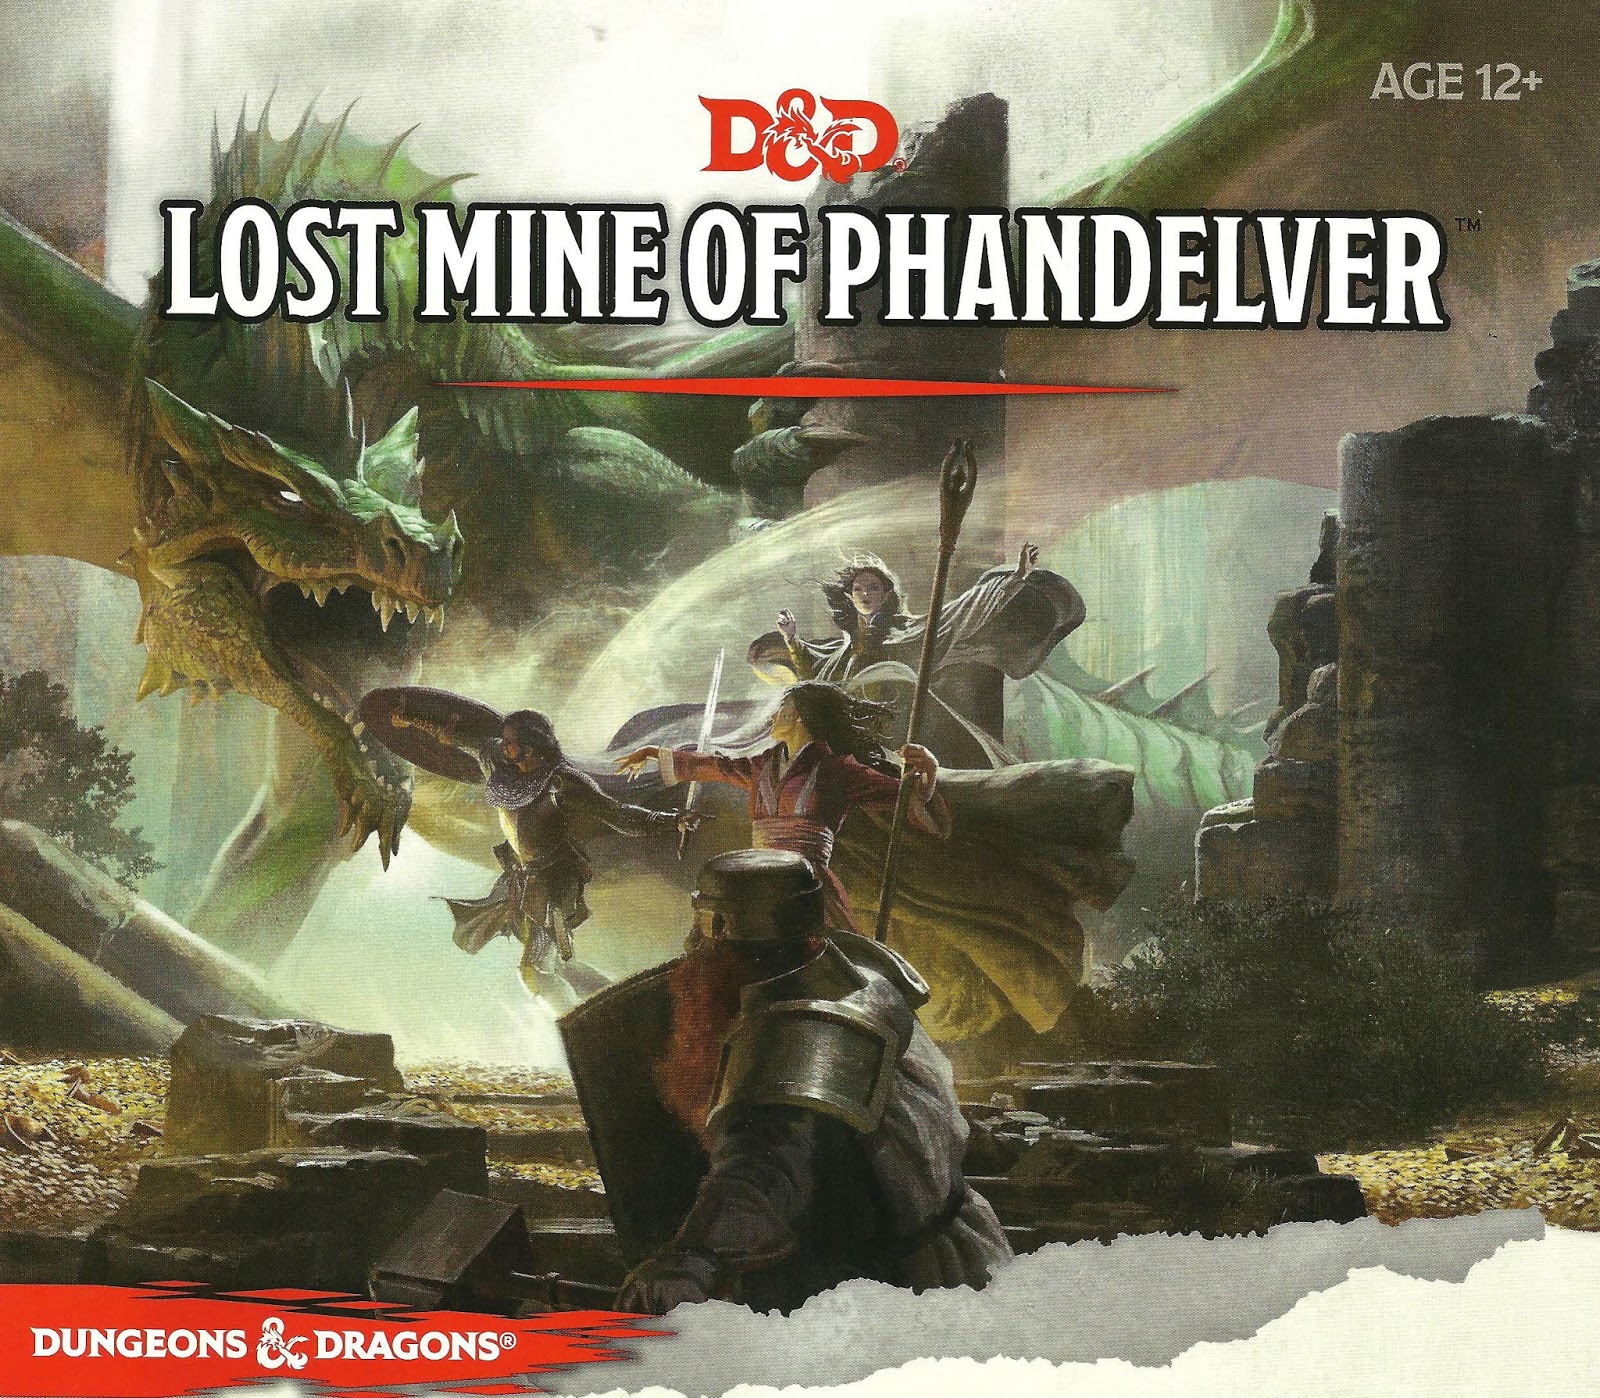
"More than five hundred years ago, clans of dwarves and gnomes made an agreement known as the Phandelver’s Pact, by which they would share a rich mine in a wondrous cavern known as Wave Echo Cave. In addition to its mineral wealth, the mine contained great magical power. Human spellcasters allied themselves with the dwarves and gnomes to channel and bind that energy into a great forge (called the Forge of Spells), where magic items could be crafted. Times were good, and the nearby human town of Phandalin (pronounced fan-duh-lin) prospered as well. But then disaster struck when orcs swept through the North and laid waste to all in their path. A powerful force of orcs reinforced by evil mercenary wizards attacked wave echo cave to seize its riches and magic treasures. Human wizards fought alongside their dwarf and gnome allies to defend the Forge of Spells, and the ensuing spell battle destroyed much of the cavern. Few survived the cave-ins and tremors, and the location of Wave Echo Cave was lost. For centuries, rumours of buried riches have attracted treasure seekers and opportunists to the area around Phandalin, but no one has ever succeeded in locating the lost mine. In recent years, people have resettled the area. Phandalin is now a rough-and-tumble frontier town. More important, the Rockseeker brothers - a trio of dwarves - have discovered the entrance to Wave Echo Cave, and they intend to reopen the mines. Unfortunately for the Rockseekers, they are not the only ones interested in Wave Echo Cave. A mysterious villain known as the Black Spider controls a network of bandit gangs and goblin tribes in the area, and his agents have followed the Rockseekers to their prize. Now the Black Spider wants Wave Echo Cave for himself, and he is taking steps to make sure no one else knows where it is." Extra Info from AL.com users: by @marcellarius. "There are a variety of locations in this adventure: the town of Phandalin, a gang hideout, a ruined keep in the forest, a destroyed village, and Wave Echo Cave (a dungeon crawl). The adventure is written in a sandbox style and relies on the players to choose their path. Phandalin offers several side-quests which could serve as hooks for continuing adventures. The premade characters have ties in their backgrounds to NPCs and locations. If you're not using these you'll need to consider other ways to introduce key NPCs."
Two thieves' guilds fight to the death - with you in the middle. Run silently; the Midnight Stalkers are after you. Escape from the Tower of Midnight is an AD&D* game module for 2-6 thieves of 2nd-4th level. The Dungeon Master may change the names of the thieves’ guilds, countries, deities, and so forth to fit the individual campaign. Note that all player characters are assumed to have been imprisoned at the start of the adventure; little or no equipment will be available at first. This module is well suited for tournament use. Adventure Background It must be assumed, for the sake of the adventure to follow, that the PCs have no way of avoiding capture by the Midnight Stalkers. However, the DM may find a way to play out this adventure and have some or all of the PCs captured, allowing any who escape to attempt to rescue their comrades. Pgs. 16-27

Slain in disgrace, reborn in fury, armed to the teeth: Flame returns! Flame is back - and is he mad! The sequel to "Into the Fire" from Dungeon 1. Pgs. 42-63
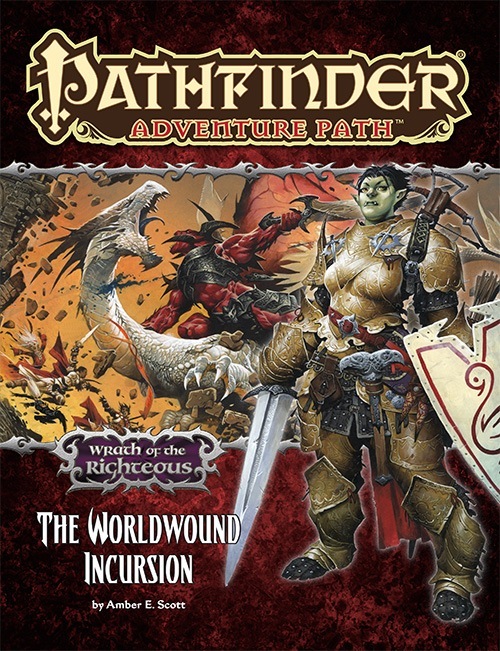
For more than a hundred years, the demon-infested Worldwound has warred against humanity, its Abyssal armies clashing with crusaders, barbarians, mercenaries, and heroes along the border of lost Sarkoris. But when one of the magical wardstones that helps hedge the demons into their savage realm is sabotaged, the crusader city of Kenabres is attacked and devastated by the demonic hordes. Can a small band of heroes destined for mythic greatness survive long enough to hold back the forces of chaos and evil until help arrives, or will they become the latest in a long line of victims slaughtered by Deskari, the demon lord of the Locust Host?

The Assassin's Knot is a sequel to The Secret of Bone Hill, picking up on themes from that module and shifts them to a new locale. The player characters must solve the mystery of who killed the Baron of Restenford, with evidence pointing to somebody from the town of Garrotten. The scenario describes the town and its castle. The Assassin's Knot module is different from most of its contemporaries in that it contained no dungeon or dungeon-like area. The longer the players take to find the murderer, the more unfortunate events occur in the village. The village, Garrotten, is reputed to be the place to go to have someone killed. The entire village shuts down when the Baron of Restenford is found dead, mutilated beyond the possibility of magical restoration. Three small clues are all the player characters have to unravel the mystery. TSR 9057

While doing due diligence going over some dusty tomes you have discovered a scrap giving you a clue about some magical items in a strange obelisk somewhere in the vicinity. The adventure takes the PCs across the Torgoth’s Causeway into the frontier. A few coins to a local sage and you will have a better idea on where to go…or so it would seem.

Suitable for four PCs. Adventure can be finished in one session. Several months back, Dip Halfling-Chewer and his cronies were ejected from a nearby goblin clan for indiscriminate wrestling. Their antics, although hilariously entertaining to themselves, were destructive and dangerous to the rest of the clan. The goblins spent several nights in the wilderness before discovering an abandoned wagon by the side of a trade road. There, the homeless cadre transformed the wagon into distinctly goblinoid fortress. They have had some success in assaulting and looting travelers on the road.

The door slams open so hard that the wall shakes and the hinges groan. To everyone’s astonishment, a goblin staggers in. He is badly wounded, with dried blood covering about half of his body. Only a moment before the air was full of the rattle of dice, the slap of cards, and cries of victory and defeat. Now the Gambling Golem is dead silent. The goblin lurches toward your table then collapses right in front of you. “Help me,” he croaks, looking up at you with bloodshot eyes. “I’ll make you rich!”

All of the Treasure, None of the Traps is an adventure that includes a single gauntlet of traps that contains twelve traps; meaning that it has either one or twelve encounters. The adventure consists of a long, twisting corridor with all of the traps set off, but these traps are reset by the PCs when they reach the center of the area. Pgs. 32-34

The Sea Witch is a short adventure for four 10th-level characters. The difficulty of the adventure can be adjusted by changing the level of main antagonist (Black Molly, the sea hag pirate) or by altering the number of her ogre servants. To tailor the encounter to groups of different levels, refer to table 4-1 in Chapter 4 of the DUNGEON MASTER’S GUIDE. The adventure is set off a lightly populated coastline known as Misty Bay, but adapts easily to any coastal region in existing campaigns. The sea hag known as Black Molly is a notorious pirate who has plagued the coastal cities for the better part of a decade. A successful Knowledge (local) check (DC 15) will reveal that Molly and her ogre crew have a filthy reputation as merciless killers who delight not only in plundering vessels for their riches, but also in destroying the ships themselves and sending all hands to the bottom of the sea. Now the villain and her followers have seized control of the Old Lighthouse of Misty Bay located off a lightly populated coastline. For generations the lighthouse beacon has protected the fishermen of this region, warning them of the dangerous rocks that lurk just below the level of the high tides. Recently, the hag has put out the beacon, darkening the lighthouse; misery and destruction are sure to follow as ships start to blunder into the rocks. Blackmail is apparently Black Molly’s aim in this venture: She conveyed a message to the nearest shore community, the fishing village of Poisson, demanding the princely sum of 50,000 gp. Until she receives this ransom, she intends to hold the lighthouse and its beacon hostage. The fate of the human keepers who tend the lighthouse is unknown to the seaside communities at this time, but they fear the worst. The Sea Witch is ostensibly a rescue mission: The PCs are pitted against the evil of Black Molly and the brawn of her savage ogre crew. It is the heroes’ task to retake the lighthouse and, if possible, free its captives from the clutches of their jailer. What neither the PCs nor the shore communities yet realize is that while she 1would be pleased to have the gold, Black Molly is in fact after bigger treasure. Molly has no intention of giving up the lighthouse — at least, not until she finds what her master sent her here for. Lying on the sea floor practically at the base of the rock on which the lighthouse sits is the wreck of the war galley Flying Cloud, which according to popular legend was captained by a cleric who wore around his neck an amulet of the planes. Black Molly wants this prize, but so far she hasn’t been able to find it. She’s scoured the wreck without finding any sign of the magic item. Now she’s trying to determine where to search next, for the item might well be somewhere near the wreck. If she can’t find it, she’ll start torturing her captives to find out if they have any useful knowledge about the amulet.
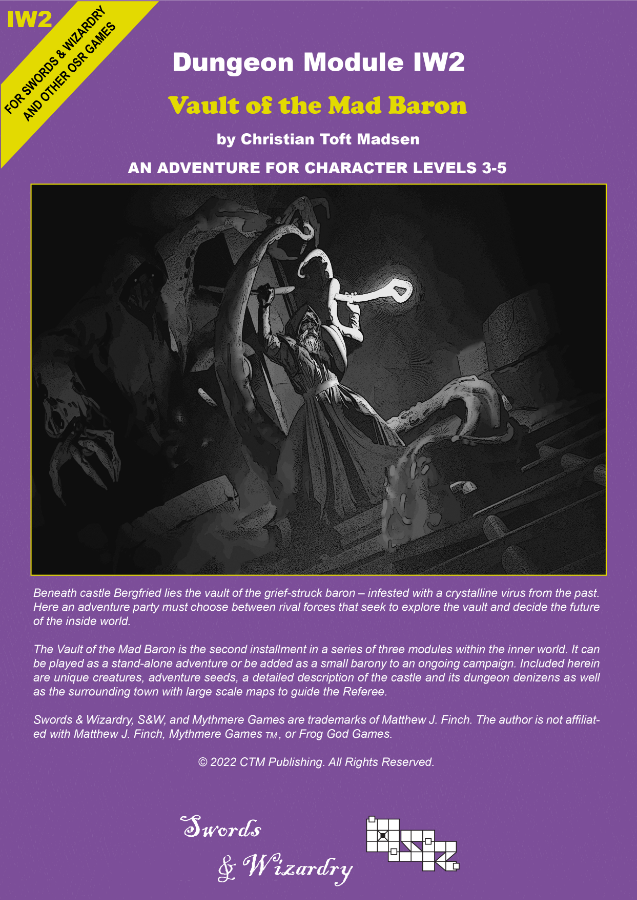
Beneath Castle Bergfried lies the vault of the grief-struck Baron – heavily infested with a crystalline virus from the past. Here an adventure party must choose between rival forces that seek to explore the vault and decide the future of the Inside World. ‘Vault of the Mad Baron’ is the second installment in a series of three modules in the Inner World. It can be played as a stand-alone adventure or be added as a small barony to an ongoing campaign. The scenario can be used with Swords & Wizardry or any other early variant of game rules and is suitable for PCs level 2-5. Inside you will find: A 60+ page old-school module with a layout optimized for fast and easy interfacing. An adaptable barony complete with town, castle and dungeon. Unique districts with encounters and sights. 6 major factions fully detailed with headquarter, plans, and missions for the PCs. Detailed description of a castle and associated dungeon levels. Downloadable maps for both players and the Referee. Locations allowing the PCs to travel to another era within the setting. Unique new creatures and magic items.
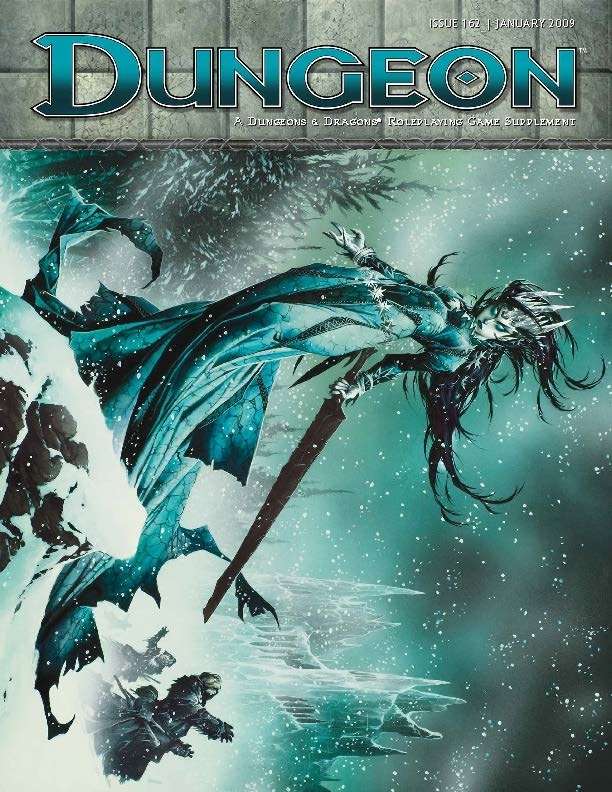
A cold winter wind blows from the Scourge Mountains, but its origins are not of this world. And with it come horrifying stories of a fey who walks the land. Cold, beautiful, and deadly, she turns every mortal she touches into a statue of ice, and she seems determined to blanket the entire north in a blanket of frost. It is the Winter of the Witch…and if the archfey Koliada is not stopped, it could be the world’s last. “Winter of the Witch” starts with the PCs receiving an urgent but somewhat cryptic message from the skeletal knight, Sir Keegan. They find the skeletal knight a helpless victim of an aggressive interrogation by an undead minion of Orcus and his demonic thugs, who are attempting to extract the location of something called the Sun’s Sliver from the stubborn knight. The PCs fight their way into deep ruins, defeat the demon lord’s toadies, and retrieve the Sun’s Sliver. Once the PCs have recovered the Sun's Sliver, they must confront the Winter Witch in Winter's Heart, the witch's icy sanctum in the Feywild. Only there can they confront the cold-hearted archfey and save a section of the world from a wintery doom.

Indomitable it stood for centuries, a symbol of order in a world of chaos. Bastion of the pass through the Kamph Mountains, the very stones of the Keep of Adlerweg were the stuff of legends. What evil power had strength enough to take it? How were its defenses swept aside? Fell creatures now attend the battlements that overlook the only pass between Berghof and the sea. This is not a pretty problem to be solved by the militia of the local villages. These and more may be needed to withstand the mayhem stirred up by the fall of the keep. Indeed, if the Keep is not retaken, and retaken soon, the Hold of the Sea Princes itself may not be secure. Now is the time for heroic action. Aided by the Sentinel, former protector of the legendary Guardians of Adlerweg, have you the courage and the determination to rid the keep of its sinister occupants? UK3: "The Gauntlet" (1984), by Graeme Morris, is the third UK-series adventure and the second half of the two-part Adlerweg series. It was run as the final round of the GamesFair 1983 AD&D Open (and won by a RuneQuest fan!). It was then published in 1984. TSR 9111

Built high on cliffs overlooking the confluence of two rivers, Gurthap Keep was a bastion of strength and a haven for the Cult of the Red God. Here, priests of old sacrificed over the tomb of long dead Kha M Thir, honoring him for his long service to the Red God. They added bastions to the keep, walls, a temple and barracks. From there they terrorized the surrounding country, raiding the villages of Alice, Greenbriar and Ends Meet until at last the rangers gathered against the Cult and overthrew it. They drove them from their walls and those they did not slay, fled into the Darkenfold to the south. The castle has sat thus ever since, a grim testament to the gods of the old world. The forest has consumed it and only the memories of men keep it alive. But within its abandoned walls lie the shadows of yesteryear. For the tomb of Kah M Thir was never found and the secrets of the priests of the Red God never fully revealed.
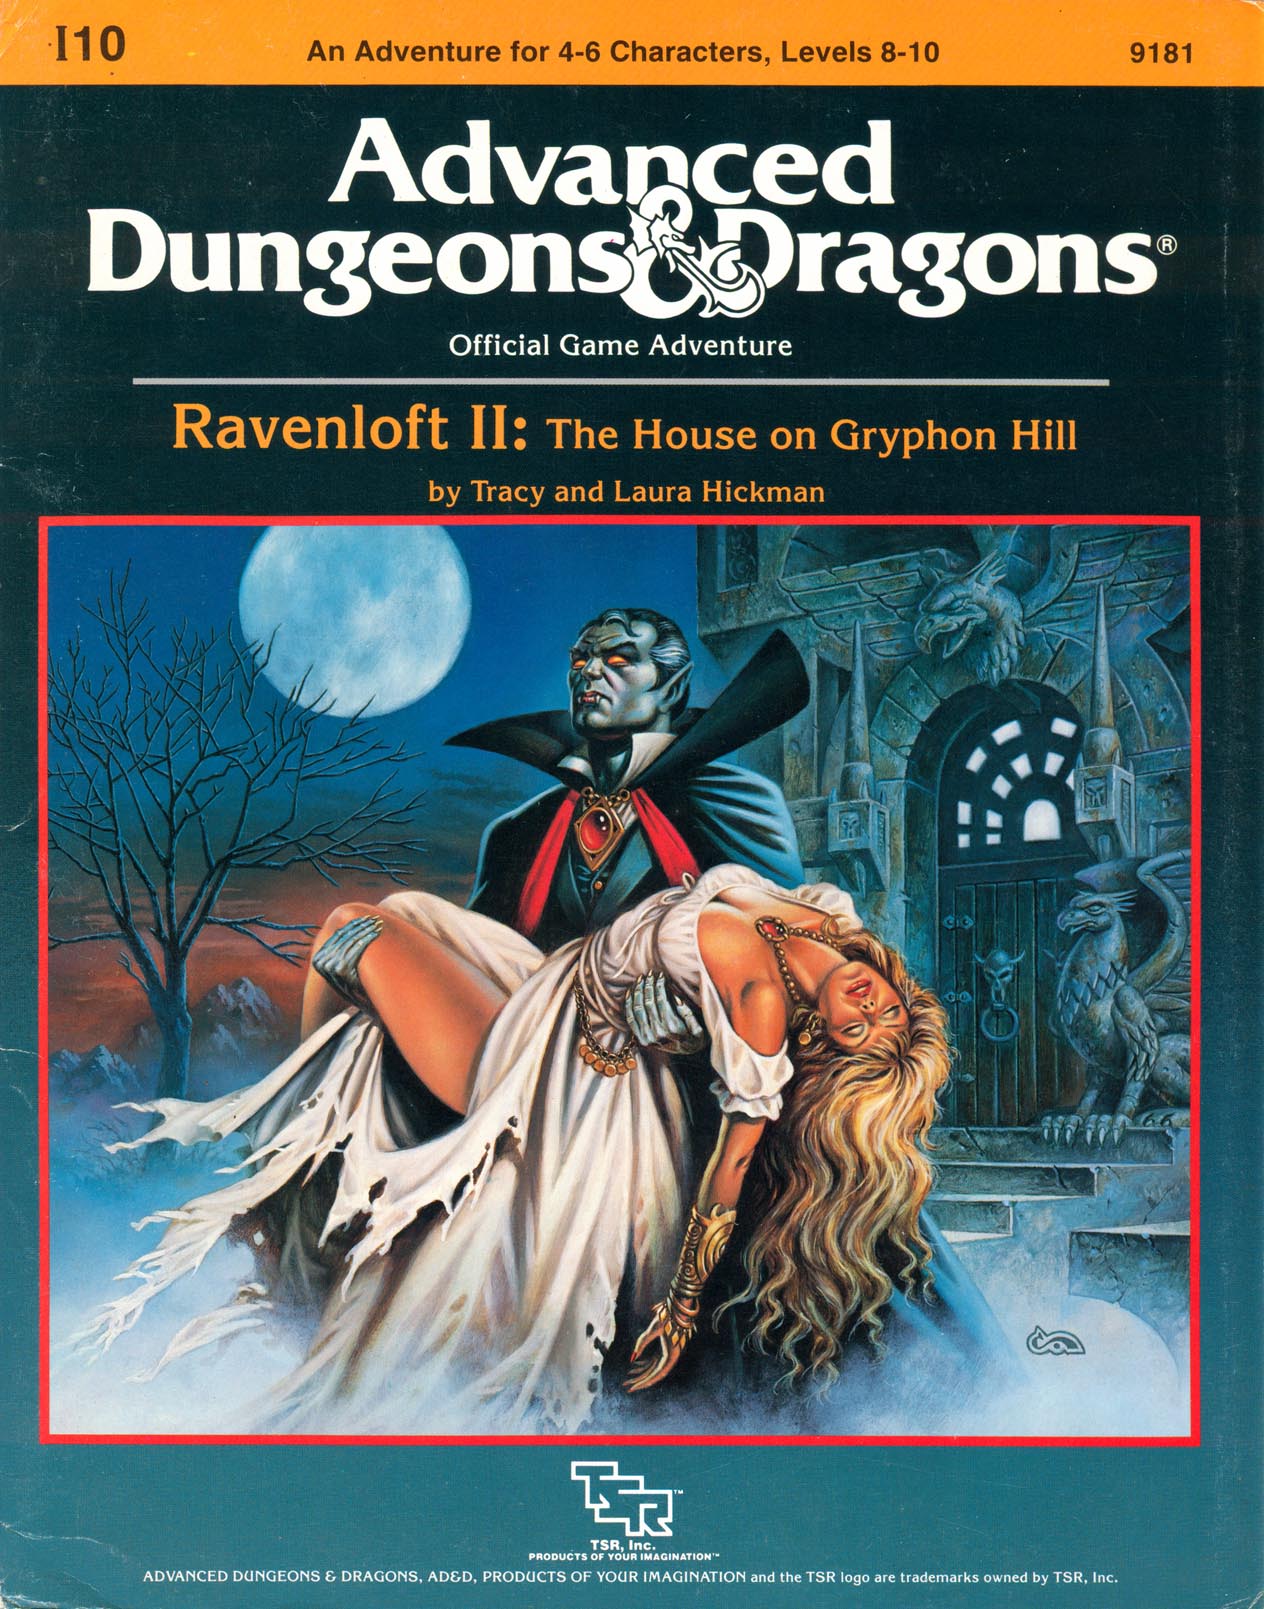
"I AM THE ANCIENT ... I AM THE LAND ..." Your screams still echo in your room. Cold sweat soaks the bedsheets and trickles down your back. It seemed so real! The great towers of a darksome place called Ravenloft ... it's misty vales and the terrible tragedy of a man who had sold his soul to unlife. Now the sunlight streams through the window with the promise of a new day. The dread nightmare at last is over. In the cold sunlight of a dying autumn, you step from your room at the inn and stroll along the friendly streets of Mordentshire. But, from the back of your mind the dream creeps forward to haunt you. Why do the faces of those who have befriended you now seem those of strangers? Why do those who called you here in terror, now seem to dismiss your task as a folly? More .. why are you advised so strongly, to forget about the House on Gryphon Hill ... the domain of the fair haired Count Von Zarovich, a name that cries out from your dark nightmare? You halt, as the swirl of events grow more confusing with every passing minute. Which is the dream ... and which the reality? TSR 9181

Deep in the elven forests of Myereth, ancient rowan trees spread white boughs above a sacred site. Pillars of stone twist like some strange form of vine, curling among the branches and reflecting the light of a silvery moon. The forest is silent, and beautiful, protected since the dawn of time by a powerful Unicorn. The elven forest of Myereth is well known throughout the world as a safe haven of good and peace, a place where evil cannot stand to enter and where the trees weep healing tears upon those injured within its boundaries. Any player character elves know of the forest, its healing properties, and its legendary beauty. They may have heard of it as a legend, or they may have visited its mystic shrine when they were children, brought along on a pilgrimage by other elves. But something has gone terribly wrong. Refugees from Myereth, terrified and confused, are flooding into other elven cities. They speak of a great evil that has conquered the forest, one that has killed the body of the immortal Unicorn and tainted its spirit. Myereth runs with blood, they say, and the once-powerful rowan trees have begun to wither and die. In the center of the Rowan Grove, the bloodied bodies of the last elven warriors of Myereth lie scattered and broken. Those responsible call themselves the Servants of the Blood Moon, and they are led by a dark-robed sorcerer. The surviving elves do not know this evil man — all but one of those who fought against the Servants died — but they know that the sorcerer calls himself Tamarat. He has butchered the Unicorn, the spirit of the forest. The Myereth, and the elves, are dying.

A galvanice weird has torn apart an Izzet laboratory in the Blistercoils. The weird’s path of destruction leads to Tin Street where the weird was spotted being subdued and taken aboard the notorious Palace of Pain’s Pleasures, a mobile Cult of Rakdos performance stage. To return the weird to its proper owner and discover the mystery behind its bizarre behavior the party must brave The Palace of Pain’s Pleasures! The Palace of Pain’s Pleasures is a 2-hour Guildmasters' Guide to Ravnica adventure for 2nd - 3rd level characters. Picking up where Off to a Weird Start left off, this adventure is designed to be part of an ongoing campaign. For Dungeon Masters who wish to incorporate The Palace of Pain’s Pleasures independently from the ongoing story, 20 Adventure Hooks (two for each guild) are included, giving The Palace of Pain’s Pleasures flexibility for one-shot play or for inclusion in your own campaign! The Palace of Pain’s Pleasures contains: A new location that is also a magical construct. New trinket tables for the Cult of Rakdos. A new NPC antagonist (or contact), Ophyira, the star performer of the Palace! Two new magic items. One new spell. Discover the secrets of The Palace of Pain’s Pleasures TODAY!

Giants have been raiding civilized lands in bands, with giants of different sorts in these marauding group. Death and destruction have been laid heavily upon every place these monster have visited. This has caused great anger in high places, for life and property loss means failure of the vows of noble rulers to protect the life and goods of each and every subject--and possible lean times for the rulers as well as the ruled. Therefore, a party of the bravest and most powerful adventurers has been assembled and given the charge to punish the miscreant giants. Remake of the original series of AD&D adventure.

A wealthy sea-trader hires the PCs to solve a pirate problem and recover stolen supplies. Almost 100 pirates have made base in a treacherous cove. When the PCs arrive, most of the pirates are at sea on a mission. A large host of pirates remain in the base and force PCs to be creative with their approach, as a direct attack would be met with an overwhelming swarm of pirates. Unknown to the player's as they scheme is that the ship will soon return with its massive crew. The treasure cave is guarded by the dead sailors foolish enough to try and steal from the captain, who is the only one who can enter the cave safely. Players must be creative to deal with the pirates in the base and the approaching ship while still securing the plundered supplies in the treasure cave.
The Cult of the Dragon leads the charge in an unholy crusade to bring Tiamat back to the Realms, and the situation grows more perilous for good people with each passing moment. The battle becomes increasingly political as opportunities to gather allies and gain advantage present themselves, all centered in Waterdeep. Continuation of Hoard of the Dragon Queen.