
Lurking in the watery depths of a fallen orc tribe's sacred burial cairn amid the bleached, broken bones of savage warriors, honored champions and mighty warlords the forest drakes Arduthal and Ingeirmaugh have made themselves a comfortable, safe home. Periodically emerging to ravage the surrounding countryside their depredations have reached such a level that Baron Liofa Othen begs the PC's to slay the foul beasts. The cairn's remote location, inundated, bone‐choked passageways and the vengeful, possessive ghost of the orc champion Gork Shattershield, not to mention the drakes' mistaken identity as green dragons, all stand in the way of the PCs' victory. A short Pathfinder Roleplaying Game adventure for four 5th‐level characters by Creighton Broadhurst.

Important: The adventure is 1e but it has monster conversion notes for D&D 4th edition The town of Highport, once a human community overlooking Wooly Bay from its perch on the northern coast of the Pomarj, fell prey to hordes of humanoids swarming out of the jungle-covered hills surrounding the settlement. Though the orcs, goblins, kobolds, ogres, and gnolls razed much of the place in their ferocious rampages, the smoldering ruins they left behind soon became a new kind of community, a place of trade between the humanoid “locals” and the unsavory human traders who have no compunction about doing business with them. Slaves are a commodity in ready supply in Highport’s market, since many pirates raid up and down the coast of the bay, putting fishing villages to the torch and filling their holds with captured refugees. Slavery has become a thriving business in the town, and rumors abound of a cartel of Slave Lords who run things from behind the scenes, filling their coffers in secret from the buying and selling of human chattel. The trade has become so prolific that the good folk to the north have grown tired of these depredations and decided to fight back. Forces of righteousness and honor have recently descended upon Highport, some openly and others in secret, in various attempts to destroy the machinations of the Slave Lords and abolish the abominable enterprise that has taken far too many loved ones from home and hearth. One such doughty servant of goodness is Mikaro Valasteen, a cleric of Trithereon. Mikaro slipped unnoticed past the crumbling walls of Highport with a single mission: to rescue and transport as many slaves to their freedom as possible. Mikaro and a handful of faithful assistants located a number of escaped slaves—as well as rescued a few more not sufficiently restrained and guarded—and shepherded them through the gates and beyond the reach of their humanoid tormentors, returning them to their lands and homes. This covert freedom brigade enjoyed remarkable success early on, since the servants of the Slave Lords were often lax in their vigilance and sloppy in their efforts to prevent loss of the “merchandise.” After one too many shipments never made its destination, the humanoids stepped up their security and the normal channels of escape from Highport closed to Mikaro and his team. He cannot risk exposure by smuggling the freed slaves through the gates as merchandise any longer, since shipments of goods are now regularly stopped and checked. No longer able to free the slaves in that manner, Mikaro began hiding his charges in an abandoned villa in a particularly rundown part of the town. Although they are safe for the moment, their numbers have grown unmanageable, and the priest fears it is only a matter of time before someone slips up and brings slavers to their doorstep. Ever more desperate to find a new means of escape from Highport, Mikaro has started work on a plan that is both daring and dangerous. He intends to use a series of old sewers coupled with natural caverns running beneath the town as an escape route to the sea beyond the walls. But he needs someone to clear out the creatures and pitfalls he knows lie within. Pgs. 2-27
Strange calamity has come to the Moonstone Reach. What was once a foreboding forest is now completely underwater, the gods Umberlee and Mielikki locked in dispute over the wondrous biome. Umberlee calls forhomage and claims dominion over what she sees as rightfully hers.

The Sunken City is a companion adventure made to go along with events unfolding in Folio #18 (WS5 The Shattered Tower). It contains the information needed to run a side adventure that will help characters in their journey through The Corsair Mists. After completing the tests of The Shattered Tower, the players are invited by the sea elven queen to ward their ship and crew from the Ghost Eye Corruption that lurks within the mists. Plunging into the waters that now cover one of the lost trade cities of Uthoria, the players must overcome a corrupted dwarven temple to find the cure for the contagion before it can take over their ship. This adventure is formatted to both 1E & 5E gaming rules.

Tillius Morganstein aka the Mad Mage has selected your group to investigate an ancient temple hidden below the peaceful waters of Lake Springwood. The wizard is too old to investigate the area himself and has enlisted your help. While he has studied the ancient texts dedicated to "Bulu" he cannot define what dangers may lurk or what treasures may await those brave enough to delve into the submerged halls but surely the rewards will be great!
Living pirates are a common enough hazard around the islands known as the Serpent's Teeth. A dead one is even more trouble- especially when his treasure has been stolen. Characters who successfully complete this adventure should be of sufficient level to tackle the award-winning Freeport trilogy, Death in Freeport, Terror in Freeport, and Madness in Freeport. Pgs. 84-103
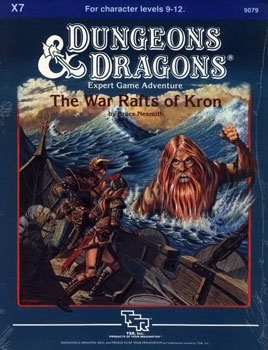
The lerendi princess, Corinna, has disappeared. She set sail aboard a ship of the Minrothad Guilds - the guilds whose ships have been pirated and plundered for many weeks. Trade is horribly disrupted as many ships leave, never to be seen again. The guild masters now call for adventurers of great skill and renown. They offer small fortunes to any who can help them discover who is pirating their ships. But most importantly, to any who can rescue the princess. Can you and your party of adventurers defeat the dangers that lurk in the dark depths of a terrifying sea? Or will you find a watery grave within the cold confines of a murky sea floor? This game adventure contains special rules for underwater adventuring. TSR 9079

A 20-page adventure for OSE Save the wizard! A sunken cathedral on a quiet mountain lake hides a long forgotten temple to Mathanoga, God of Knowledge and wizardry. Abandoned by Man for centuries , but protected by the legend of man-eating fishmen lurking in it. Or until a few weeks ago the young wizad Elric embarked on its expedition. With help from the accademy of Greykeep he found the temple and began to explore it, hoping to uncover its ancient magical secrets. Now the wizard is missing and the accademy has put a bounty on its head: its weight in silver to whoever will find him and bring him home alive and well. Find magical secrets! Deep inside the temple are stashed many magical items, all sacred to the fishmen dwelling there, all worth dying for. Save Elric and the treasures will be yours! The Sunken Temple is an expert level Old School Essentials adventure for a party of 1-4 players. Perfect for a one shot or a random encounter in an hex crawl.

FVC9 – Royal Recovery is a short adventure involving a lost princess. A peace accord is in jeopardy when a royal wedding may be postponed due to a missing bride. She was secretly coming to Tol Borron, home to her future suitor, but her ship is now missing. The party has been asked by a gypsy, working on behalf of the king, to head towards the Horns of Barnack where some debris has been located. Will your party be able to solve the mystery of the missing princess?

At last- an opportunity to avert the threat to the little town of Saltmarsh! The real enemies have been identified-- evil, cruel creatures, massed in force and viciously organized. Can the brave adventurers thwart this evil and ensure the safety of Saltmarsh? The Final Enemy is the final part in the series of three modules designed and developed in the United Kingdom for beginning adventures with AD&D rules. Its plot follows directly from those of the first two parts (U1 - The Sinister Secrets of Saltmarsh, and Module U2 - Danger at Dunwater.) TSR 9076

The Heart of the Haunted Sea e adventurers are on a storm-wracked ship, seeking the island of a long-forgotten, abandoned temple to the Sea Demon. In the temple, an extinct people sacri ficed their wealth, their criminals, and their kings to quell the demon’s wrath. Untold treasure is said to just be lying there. Are your heroes bold or ruthless enough to claim it? Written by Shane Ivey and illustrated by Kurt Komoda, “ The Sea Demon’s Gold” is an adventure for the Fi h Edition of the world’s most popular fantasy role-playing game. It can be played in any fantasy world you choose. It also makes the perfect introduction to the Broken Empire, a world of ancient mysteries, perils, power, and corruption featured in the Swords & Sorceries adventure line by Arc Dream Publishing.

The End of the World Is at Hand! A hideous death cult has seized control of an ancient artifact-monument known as Tovag Baragu. The power behind the cult is the Old One himself, Iuz the Evil, demonic master of an empire. He's on an all-or-nothing quest for supremacy over the world—and the heavens beyond. To stop him, heroes must face horrors never dreamed of, journeying to a shadowed city where Death rules and the living cower. Here, Iuz will achieve his mad dream by destroying the imprisoned master of that alien citadel: Vecna, the mightiest lich, an immortal demigod. Two items exist with the power to stop Iuz—the Eye and the Hand of Vecna—but using them carries fantastic risks. Not even the gods know what will be unleashed when these items are fully activated. Die Vecna Die! takes the heroes from the Greyhawk campaign to the demiplane of Ravenloft and then to the Planescape city of Sigil. However, none of the material from those settings is required for play. TSR 11662

Stormy seas rock your vessel, tossing her about like a toy in the jaws of a hound. Thunder rolls in the distance. Then, an arc of lightning splits the sky, and the sound like an exploding fireball all but bursts your eardrums. Your mainmast, struck by lightning, burns, splinters, and topples onto the deck like a felled oak. The last thing you hear is the cracking of wood as the deck explodes into splinters, and the ship is torn asunder. All goes black. You awaken in shackles, half-submerged in water, and surrounded by salmon-pink coral. You survived, but what fate awaits you now? The sound of soggy footsteps echo down the hallway. A creature approaches with an answer. This week’s encounter is Coral Colosseum, a combat encounter in which the characters must prove themselves as worthy gladiators to escape the clutches of a ruthless sahuagin baron. This encounter can serve as a follow-up to Encounter of the Week: Sharkfin Shipwreck, or as a stand-alone mini-adventure. It could also serve as an introduction to Ghosts of Saltmarsh, which releases on May 21st, 2019.

This solo adventure is designed as an adventure to teach the PC that sometimes you need help in solving tough problems. The adventurer learns that Ortella the Druid is seeking assistance in obtaining spell components to help the local village. It seems that the community has a magical phantasm causing problems in its lake and they need help in the form of Ortella and Ortella needs your help!

One of the original D&D classics, "The Isle of Dread" is a hex crawl wilderness adventure. It focuses on surviving primitive beasts, dinosaurs, and pirates while uncovering the mystery of the island's inland city, where a great treasure awaits. From the cover: "This module contains maps and background material for the Isle, fifteen new monsters, and suggestions for further adventures. In addition, The Isle of Dread contains a map and background information for a large continent, and eleven smaller maps for encounters on the island itself. In this module, players will push their way through dark jungles and treacherous swamps to discover the lost plateau, and the final secrets of - the Isle of Dread!" TSR 9043

Just off the northern coast of Chult churns the waters of the Cauldron, a single volcano with a terrible history. Legends from the jungle lands say that it vomits forth lava, stone, and monsters if the peninsula is threatened - and yet the recent events did not set if off. So why is it threatening to explode now? Part Three of the Broken Chains Series.

Stopping an undersea war wasn't in your contract. The seas will boil with war, and you're going to be right in the middle of it. Pgs. 34-47

The Godless Depths For the first time in eons, ancient aberrations are emerging from the deep ocean. Driven by some otherworldly fervour, they encroach upon the local villages, searching with beady eyes for anyone linked to the Gods. Even now you hear rumours of kidnap, men and women dragged kicking and screaming into the depths.
Provost Faurious has procured an Aethervane, an astrolabe-like instrument tied to Kythri that's used to navigate manifest zones. Unfortunately for the Provost, the Riedran ship that was carrying the Aethervane across the Sea of Rage to deliver it to their agent in Regalport fell victim to piracy. The player characters are dispatched to Regalport to meet up with the Provost’s agent there and petition High Prince Rygar for more information about the stolen cargo. When the characters dock in Regalport, they meet the Provost’s contact and are ushered into a meeting with High Prince Rygar. Wishing to show his intolerance for piracy, Rygar charters one of his own ships for the party’s use as they investigate the stolen cargo. Upon arriving at the crash site of the stolen cargo, the party is set upon by a fleet of pirates known as the Wind Whisperers. When things turn sour, a new surprise reveals itself as an unnatural storm rolls in, a stolen airship at its heart. The Wind Whisperers have found a way to convert the Aethervane to serve their own purposes. Seeking aid from Rygar and House Lyrandar, the heroes chase after the pirates by sail and airship. As they do, they are bedeviled by the Chaos Fleet—strange ships sailed by an even stranger crew that are drawn to the Aethervane and the chaos it brings. In a final airborne confrontation, the party boards the rogue airship and retrieves the sought-after artifact, with a chance to salvage or sink the stolen vessel in the process…

This adventure picks up where AS1 – Artifact of Gegios left off. You return to the city of Gegios to divide treasure and determine what the strange wand is. Your return trip may have given you a clue in that travel to the east causes it to vibrate less while moving in a western direction causes it to shake more. What is the significance of this anomaly? Is your party ready to find out? Bring your water wings folks you’re probably going for a swim!