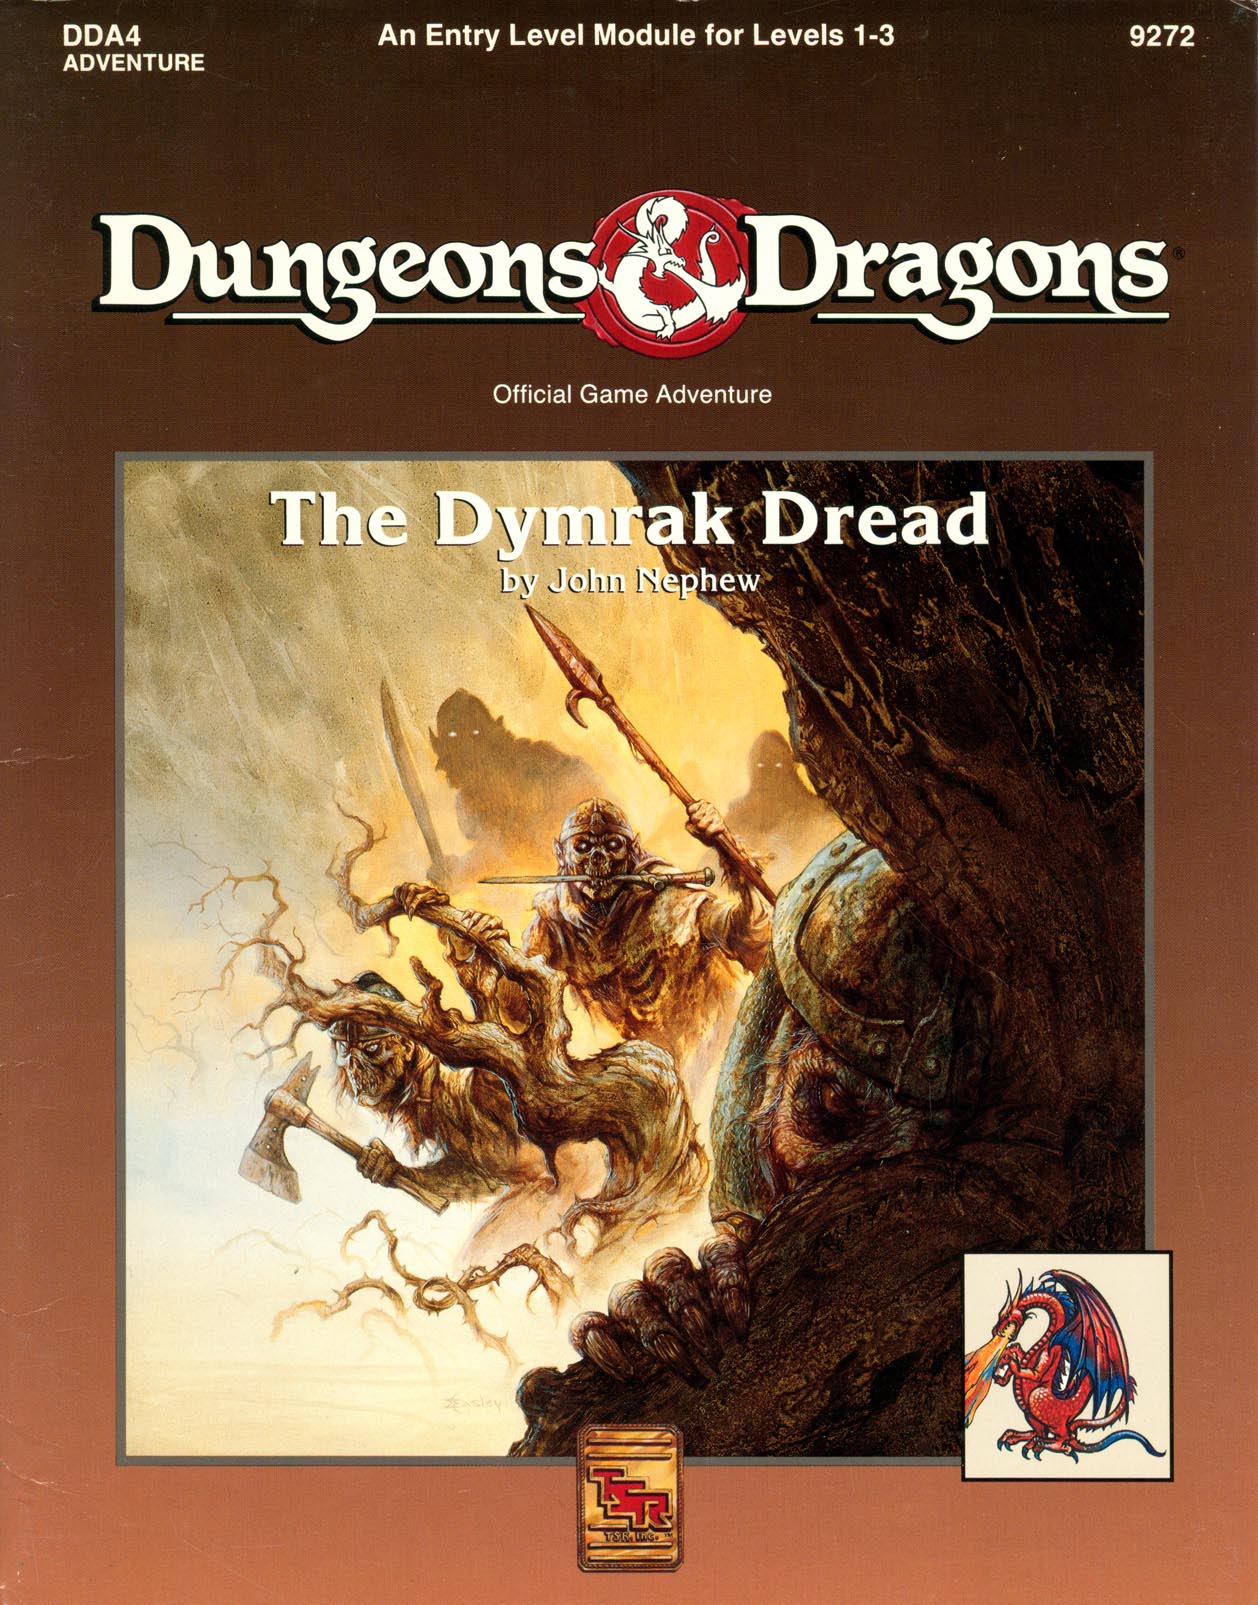
Adventure Lies Ahead, Deep in the Heart of the Dymrak Forest Are you ready to meet the Lord Forester's challenge: to put an end to needless death and destruction by doing away with the goblin war chieftain, Kosivikh, and his evil band of raiders? Eager to prove yourselves as new adventurers and to collect a sizable bounty, you travel to the goblins' dungeon in the Dymrak Forest - a place that has captivated your interest for years, a place where few have dared to venture. Only you and your fellow adventurers can put an end to the rampant bloodshed and return peace to the territory. This module is recommended especially for beginner Dungeon Masters and players who are interested in dungeon exploration. Can be used as a follow-up to the DDA3, Eye of Traldar module or it can stand alone Features easy-to-follow rules on dungeon adventuring in the heart of the Dymrak Forest. TSR 9272

There are some things that mere mortals were never meant to know. . . . In the domain of Lamordia, Doctor Victor Mordenheim created Adam?cobbling the creature together from parts of human corpses. Now, years later, Adam wants revenge. Adam wants Elise, Victor's wife. Adam wants Victor dead. The player characters' ship founders on the coast of the domain of Lamordia. A vicious storm leaves them washed ashore, cold and hungry on the ice-bound Isle of Agony. . . . Then the terror begins. The adventurers embark on a journey of fear that leads from certain doom on the frozen island to a strange new life a Schloss Mordenheim. To return home they must challenge Adam himself and discover a portal?a gate that might lead homeward. TSR 9439 Adam's Wrath is intended for a party of four to eight characters of 5th to 7th level. Carefully designed to allow a Dungeon Master to launch from any campaign world or Ravenloft domain, Adam's Wrath is an adventure your characters will never forget?if they survive!

Devastated in a war with a nearby wizards' school, the Fighters' Academy has since been surrounded by a foul and dank swamp - the Gloomfens. Since the climatctic battle between the wizards and fighters, the tower has decayed. The spirit of the head of the academy haunts the building, eternally plotting his revenge on the wizards who killed him. his loyal sutdents remain faithful to him even in death. Other foul undead have made their home in the rotting, spacious academy. From their lair, they make forays into farmsteads near the swamp in search of victims to feed their unspeakable appetites. The Problem of these terrible attacks by the savage undead will not stop until the evil that has found a home at the tower is burned from the face of the land forever. Will your party heed the call and help the town of Melinir? Will they be able to clear the former Academy of its undead? The Fighters' Academy is the first in a three part adventure, The Haunted Tower. Or, it can be ran as a stand alone adventure. The choice is up to you. Part of TSR 1081 The Haunted Tower

In the canyon of Thunder Rift, in the village of Kleine, goblins have always been a nuisance, but the natives have dealt with them and continued an otherwise peaceful existence. Now, a valuable magical item, called the scepter of truth, has disappeared! The ingenuity of the crime bears the mark of the goblins' leader, the Master Thief Raven. The scepter must be recovered, but there is no one in Kleine with the strength and courage to penetrate Raven's trap-laden hide-out, deep in goblin territory. A party of stout adventurers might survive the mission, but they will have to be quick, smart, and especially careful. This module has been created especially for the inexperienced Dungeon Master and players who are interested in the exploration of dungeons and ruins. TSR 9350

"Tyr is free! Tyr is free!" Such is the heady cry that echoes from the darkest warrens to the gleaming chambers of the Council in that ancient city. Now is your chance to savor life released from the oppressive gloom of the sorcerer-kings-but for how long? New forces threaten the newly-born independence of Tyr, as outside forces march upon the city. King Tithian is determined to resist, but there are others on the Council of Advisors less eager to risk their wealth and lives for the cause of independence. It falls upon you to help mobilize and lead the citizen-army of Tyr on the road to Urik. In Road to Urik, the city-State of Tyr has thrown off the yoke of the sorcerer-king Kalak and declared all slaves free, but the neighboring city-state of Urik is amassing its own armies to conquer Tyr. In the first part of the adventure, the PCs must negotiate with various factions of the city in order to win their support for the war effort. In the second part the PCs leading a scouting force ahead of the main army, and the choices and successes in the first part will affect the troops they lead here. Finally, they will need to fight and lure away the Urik army's own scouting force, letting the army of Tyr ambush them. The second and third part make heavy use of the Battlesystem rules, which were pushed pretty heavily in the early Dark Sun books. Like many Dark Sun adventures, the module makes heavy use of handouts that come in a flip-book along with the main adventure. This adventure is a sequel to Freedom. It stands on its own, but the plot of the adventure is based on the events of Freedom and the novel the Verdant Passage, so you can't really run them in reverse order. Much like Freedom took place concurrently with The Verdant Passage, Road to Urik takes place just before the events of The Crimson Legion, the second novel in the Prism Pentad. TSR 2406

In the Yatil Mountains south of Perrenland there is rumored to be a magical hoard of unsurpassed value, a treasure of such fame that scores of adventurers have perished in search of it. Find the perilous Lost Caverns of Tsojanth and you may gain the hidden wealth of the long-dead arch-mage-- if you live. Module S4, this contains a brief wilderness journey to the caverns, but the bulk is underground. The caverns are noted as a previous lair of the Arch-mage Iggwilv- though she is long gone, her Demonomicon remains. This module marks the first appearance of several monsters and items that would later appear in the Monster Manual 2 and Unearthed Arcana. A labyrinth features in the caves. TSR 9061
When the magic runs out, so does your luck. The wildspace monster is deadly, but its lair is the real killer. The Spelljammer ship, Sky Ranger, is lost in wildspace and the players are hired to find it. When investigating the Pirtel system where the ship was last seen, the players have a chance for exploration and roleplay in a city called Skyport. The adventure is mostly exploration of Pirtelspace and investigation to find the final resting place of the Sky Ranger. The adventure is full of random and planned encounters for this area. The story culminates in an encounter with an insane radiant dragon named Blacklight. Pgs. 40-69

Kidnapped! The cursed Baron von Hendriks has kidnapped your betrothed. Now the madman wants as a ransom your Alandah's weight in unrefined gold! How are you going to pay? The baron himself has been kind enough to provide you with that answer: streams of raw gold gush from a burning mountain somewhere in the Sea of Dread. All you have to do is find this mysterious mountain. Unfurl the sails! The open sea awaits you and your crew as you sail from the city harbor. But beware! The Sea of Dread has more than earned its title over the centuries. Can you survive the perils of the sea? Will your crew mutiny before you reach the Burning Mountain? Or will you have to throw crew-members overboard just to make room for the gold? Solo adventure. "Lathan's Gold" is a real innovation in solo adventure design, considerably more complex than any of the gamebooks then being produced. Though the adventures uses the typical trope of numbered paragraphs, its paragraphs are divided into six types: "S"pecularum, "U"rban", Island "E"xploration", "C"oastal", "T"rade Routes, and "V"oyages. Players can jump between the sections, then return, in slightly freeform ways. Players are also required to keep track of hit points, money, and treasure (which were typical for the more advanced gamebooks), and rations, days remaining, and hull points (which were not). Another freeform element, quite unusual for gamebooks, is the "wandering monsters" table, which introduces semi-random encounters. TSR 9082

"A great cat sits upon the northern grasslands, my friend, waiting to pounce on adventurers just like you." As you part the tall grass with your sword, the words of the tavernkeeper echo in your head. "He was the mightiest wizard we'd ever known, and that Lion Castle was his home." Your friends' voices mingle with the tavernkeeper's. "He's but a ghost now, haunting those halls, and waiting for an heir." The ground rises slightly. A strong wind rushes through the field. Suddenly, the grasses part, and Lion Castle rises majestically before you! "Magical riches await those who enter!" "Beware of man-beasts!" Voices flood your head again. Will you brave the haunted castle? Can you afford not to? It's all up to you in this D&D Solo Adventure. Ghost of Lion Castle is for one player only, but that one player makes all of the choices and enjoys all of the rewards. An entire castle and courtyard await your exploration. The adventure also includes a complete solo combat system. TSR 9097

Deep below the surface lies an ancient beholder city called Ilth K'hinax. In times past, hundreds of beholders called it home - until simmering rivalries within their society exploded into warfare. The few survivors fled, leaving the city deserted for hundreds of years. However, the story of Ilth K'hinax's glory was passed down from one generation of beholders to the next. Now, after countless years of self-imposed exile, the beholders are back! After securing the city, the hive mother of Ilth K'hinax implemented a plan to wipe out all the beings living above it. Unfortunately for the beholders, several facets of the hive mother's plan have been revealed through the exploits of a party of adventurers. Now, this group of heroes must meet eye to eye with Ilth K'hinax's newest occupants in an effort to stop the hive mother's pernicious plan! "Eye to Eye" is the last of three adventures featuring the nightmarish beholder. It can be played as an individual mission or as part of the series that began with "Eye of Pain" and continued in "Eye of Doom." TSR 9536

"Several small wagon trains have recently been overrun by a force of goblins and wolves while the former were camped out at night. Among the attackers was a titanic black beast on which some of the goblins rode, a monster so huge that it crushed whole wagons beneath its feet and flung horses and riders aside with its arms." --from the adventure. Includes an extensive narrative opening to the adventure and a map of the cave system.
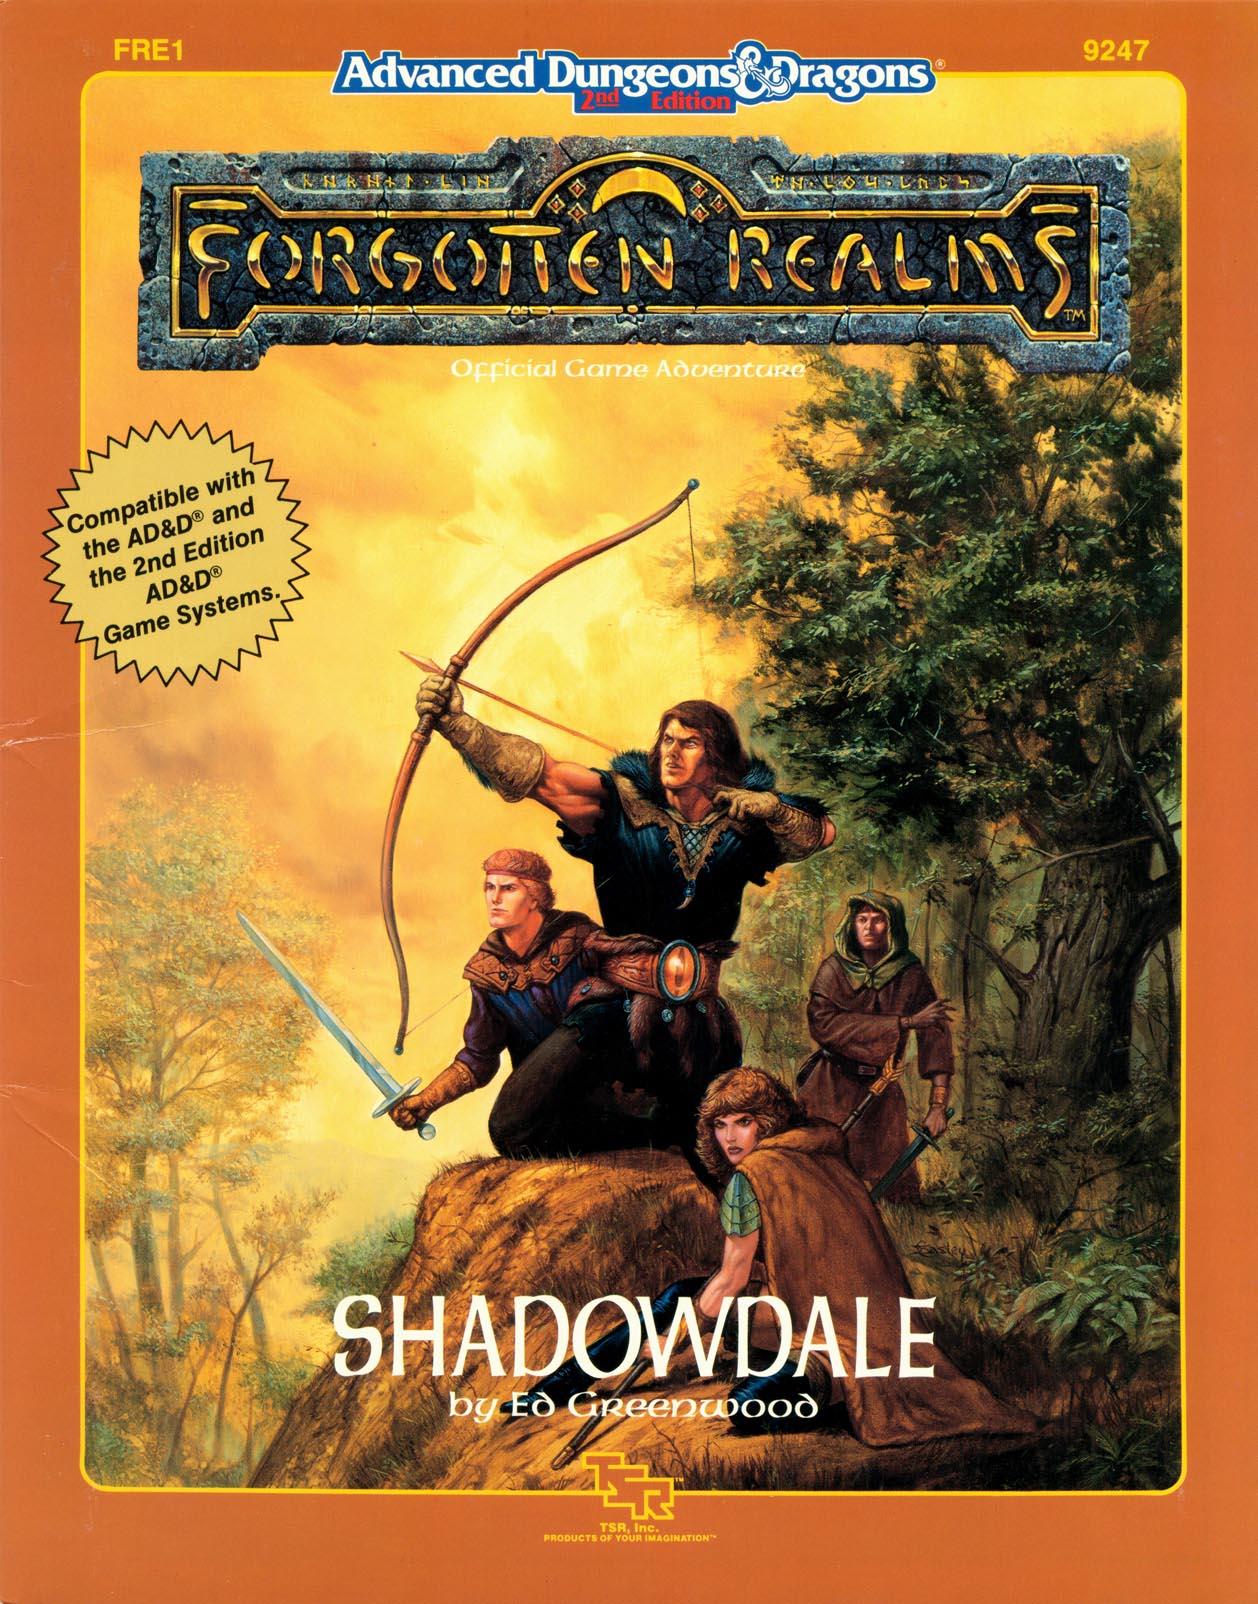
"One morn, no sunrise comes. There is only darkness, and an icy chill." Cast out from their heavenly domain, the gods of the Forgotten Realms wander the land as mortals. They seek the lost Tablets of Fate, key to their return. A band of adventurers are hired by a young apprentice to rescue her sorceress-mentor, little do they realize the size of the stakes they will soon be playing for. Caught up in a power struggle that will determine the fate of the Realms themselves, the first step is to find the only mortal who may know what's going on - the legendary sage Elminster. Shadowdale is the first of a trilogy of modules that describe the strife called by some "the Godswar," in The Forgotten Realms. TSR 9247

Civil War Unrest. Turmoil. Rebellion. As above, so below - the cataclysmic events of the Wrath of the Immortals echo throughout the Hollow World setting. The Milenian Empire, with its classical Greek culture, has not escaped. Already the streets are un-safe, and the omens are getting worse... The emperor is dead... long live the emperor! But is the new emperor a man of the people, or a tool in the hands of malevolent powers? Walk carefully, for no stranger is safe upon the streets these days, and adventurers least of all! The mood of the capital city is turning ugly. Minions of the new emperor look on uncaring, while citizens disappear and philosophers fall to heedless mobs. The old emperor's elite guards are disbanded and scattered. Disorder reigns, and restless citizens threaten open revolt. And yet... a whisper is heard. Civil war can be averted. An ancient artifact, the Milenian Scepter, can rally those who would serve the Empire best. But the Scepter has been lost for generations, and who can say where it might be? The trail leads into the depths of the city, and across a dangerous wilderness to a forgotten oracle. For the lucky and the bold, perhaps it will lead to... THE MILENIAN SCEPTER This stand-alone adventure is compatible with the Wrath of the Immortals boxed set and the accessory HWR3, The Milenian Empire. You will need the D&D Hollow World boxed set to play this adventure. Easily adaptable to the AD&D game. TSR 9378
Abandon hope early and avoid the rush. A rebel leader is locked in a prison from which there is no escape. That's why the rebels called for you. The players are recruited to help rescue a prisoner of the Theocracy. The prison is very unique in that the cells are situated in a wheel formation. The prisoners are forced to push against their cell walls every day until after 1 full year (1 full rotation of the wheel), an opening appears in their cell and they are free to leave. There are many paths to success in this adventure, and it can play out more like a heist rather than a dungeon crawl. Pgs. 24-37

When a wizard makes a mistake, he makes a MISTAKE. Hirward the Wizard has a little problem on his hands - and it's destroying his fortress, followers and future. A good mix of character types is strongly advised, but paladins, rangers, dwarves, and gnomes may not be comfortable sparing the lives of Hirward’s kobold assistants. A generally neutral party composed of humans and half-orcs will stand the best chance of completing Hirward’s Task. This not a standard "hack-and-slash” adventure. The PCs will have to do some fighting to he successful in completing the module, but most of the time they must use their brains to figure out the best way to complete their mission. Pgs. 45-64

The Mists of Ravenloft draw close, surrounding unfortunate travelers in their clammy embrace. When they part, they reveal the land of Mordent, a domain of rolling moors and woods, beautiful by day and terrifying by night. A new danger lurks in the haunted moors: hounds whose mournful howls and murderous jaws trap the townsfolk in their homes at night. At the heart of it all lies a curse laid a century ago, and a tale of bitter tragedy. Even now, you can hear the howls in the night... Howls in the Night is a dark fantasy murder mystery - but one in which the victim has been dead for 100 years! Alternate adventure backgrounds allow the Dungeon Master to choose one of four possible conclusions. TSR 9466
Of all the inhospitable domains in the RAVENLOFT@ campaign world, Bluetspur is the cruelest and most gruesome. Nothing grows in the endless night, and lightning periodically falls like rain. The only place to escape those storms is inside the mind flayers' complex under Mt. Makab, but that is the last place where any sane person would want to go. The High Master Illithid has been hatching black plots by hatching vampiric mind flayers in his laboratories! His prodigies are horribly insane, but if he can complete his plans, he will achieve a new level of dark immortality. A pair of heroes has stolen the key to his success, but they have paid a heavy price for their bravery and are in desperate need of aid unlooked for. Meanwhile, the Lord of the Realm watches over the proceedings and plays havoc with the wits of both sides, sapping strength and will with all-powerful thoughts of darkness. A party of adventurers will need all of their skills to escape this black domain without the loss of life, power, or sanity! Enter now the perpetual twilight realm of Bluetspur, home to mind flayers, a land of relentless nightmares. There's no rest for the wicked or the good in this domain. Once caught within the borders of this desolate land, the characters must complete their mission without delay or lose their minds and become slaves of the Lord of Bluetspur. TSR 9264, from 1992

Beware the cat-men's fury! This entry-level module pits a single player character of 2nd to 4th level against samurai cat-men. Rage of the Rakasta is specially designed as a one-on-one for a single DUNGEON MASTER and one player. It can also be played by a DM and a group of players or by a single player without a DM. Rage of the Rakasta takes place in the Thunder Rift game setting. It can be played by itself or as part of a campaign with other modules sharing the same setting: Quest for the Siver Sword, Assault on Raven's Ruins, Sword and Shield, Knight of Newts, and the forthcoming In the Phantom's Wake. TSR 9435

Snakes fly, stones walk, and colossal monsters burrow in the world's crust - do these omens fore-tell catastrophe? Perhaps so, for now the dark elves walk in the sunlight, wearing armor that turns the shcaprest blades and strongest spells. They are poised to conquer the fabulous Hollow World. But what is this armor? How does its creation involve the ancient, mile-long Great Annelids, as well as those wondrous creatures, the feathered serpents? The mystery's solution draws your heroes across three thousand miles, from ruins to seaports, through the trackless caverns beneath the World's Spine, and finally to the eternal land of Nithia. There, your heroes discover the true meaning of... NIGHTRAGE! Nightrage is the second part of the far-ranging Blood Brethren Trilogy. You can play these three Hollow World modules in any order, or play this 64-page adventure by itself. You need the D&D Hollow World Campaign set to play. Easily adaptable to the AD&D game! TSR 9310

To arms! To arms! The battle lines are drawn as desert men and inhuman tribes wait poised to strike on the fertile and rich lands of the east. The call has gone out through the civilized lands. The armies have been raised to match the invading foes from the west. Nobles and peasants have joined swords to greet the foes. But Fate or Chance has decreed another role for a small few. No glorious banners will wave on their march. No squadrons of knights will charge at their word. Instead, they will fight the war with stealth, secrecy, and cunning. The risks they will take are great, but the fates of both armies lie with them. It begins one night for your party far from the fighting. Suddenly you are entrusted with the most dangerous mission of the war. Can you cross the Sind Desert, occupied now by enemy armies, to find the Great Pass? Can you find the one known only as The Master? What will you do if you find him? So begins your adventure in The Master of the Desert Nomads, the first module of a two-part adventure that can be concluded in the exciting Temple of Death or played entirely on its own. Can your party do what must be done? TSR 9068