
The first part of the Dreams of Red Wizards adventure path originally published for the D&D NEXT Playtest. Following the events Ghosts of Dragonspear Castle, a new set of adventurer's will see some of the repercussions of that adventure. This adventure is intended to be continued in the Dead in Thay adventure (Note that they Dead in Thay 5e adventure featured in Tales from the Yawning Portal is missing a significant portion of interlude that links Scourge of the Sword Coast to the events within the Doomvault). The adventurers arrive when Daggerford is crowded with refugees from outlying lands. Goblins, gnolls, and orcs have been raiding the countryside. Now, food is scarce and tension is high. Blame for a theft has fallen on the refugees, and the Duke of Daggerford has forbidden more of the displaced from coming into town. After overcoming difficulties to enter Daggerford, the characters learn more about the raids. As they fight against the humanoids and delve deeper in the darkness that encircles Daggerford, the characters learn of Bloodgate Keep. After a final fiendish ambush, they’re ready to confront the real threat to the area. DM Note: This adventure points the adventurers strongly towards Bloodgate Keep but that location does not appear until the Dead in Thay adventure; at several points the party may feel drawn to explore that location rather than continue their investigations around Daggerford. However, since Bloodgate Keep is only eluded to as a source of great evil power, it can serve to easily segue to an entirely different adventure path. As a NEXT Playtest adventure, Scourge of the Sword Coast uses milestone leveling and the included stat blocks for creatures do not necessarily match or even appear in the 5e Monster Manual, nor do they have XP values or challenge ratings. In some places it will reference rules used in the Playtest but dropped or changed in the 5e release, these are unlikely to substantially impact gampley with 5e rules.
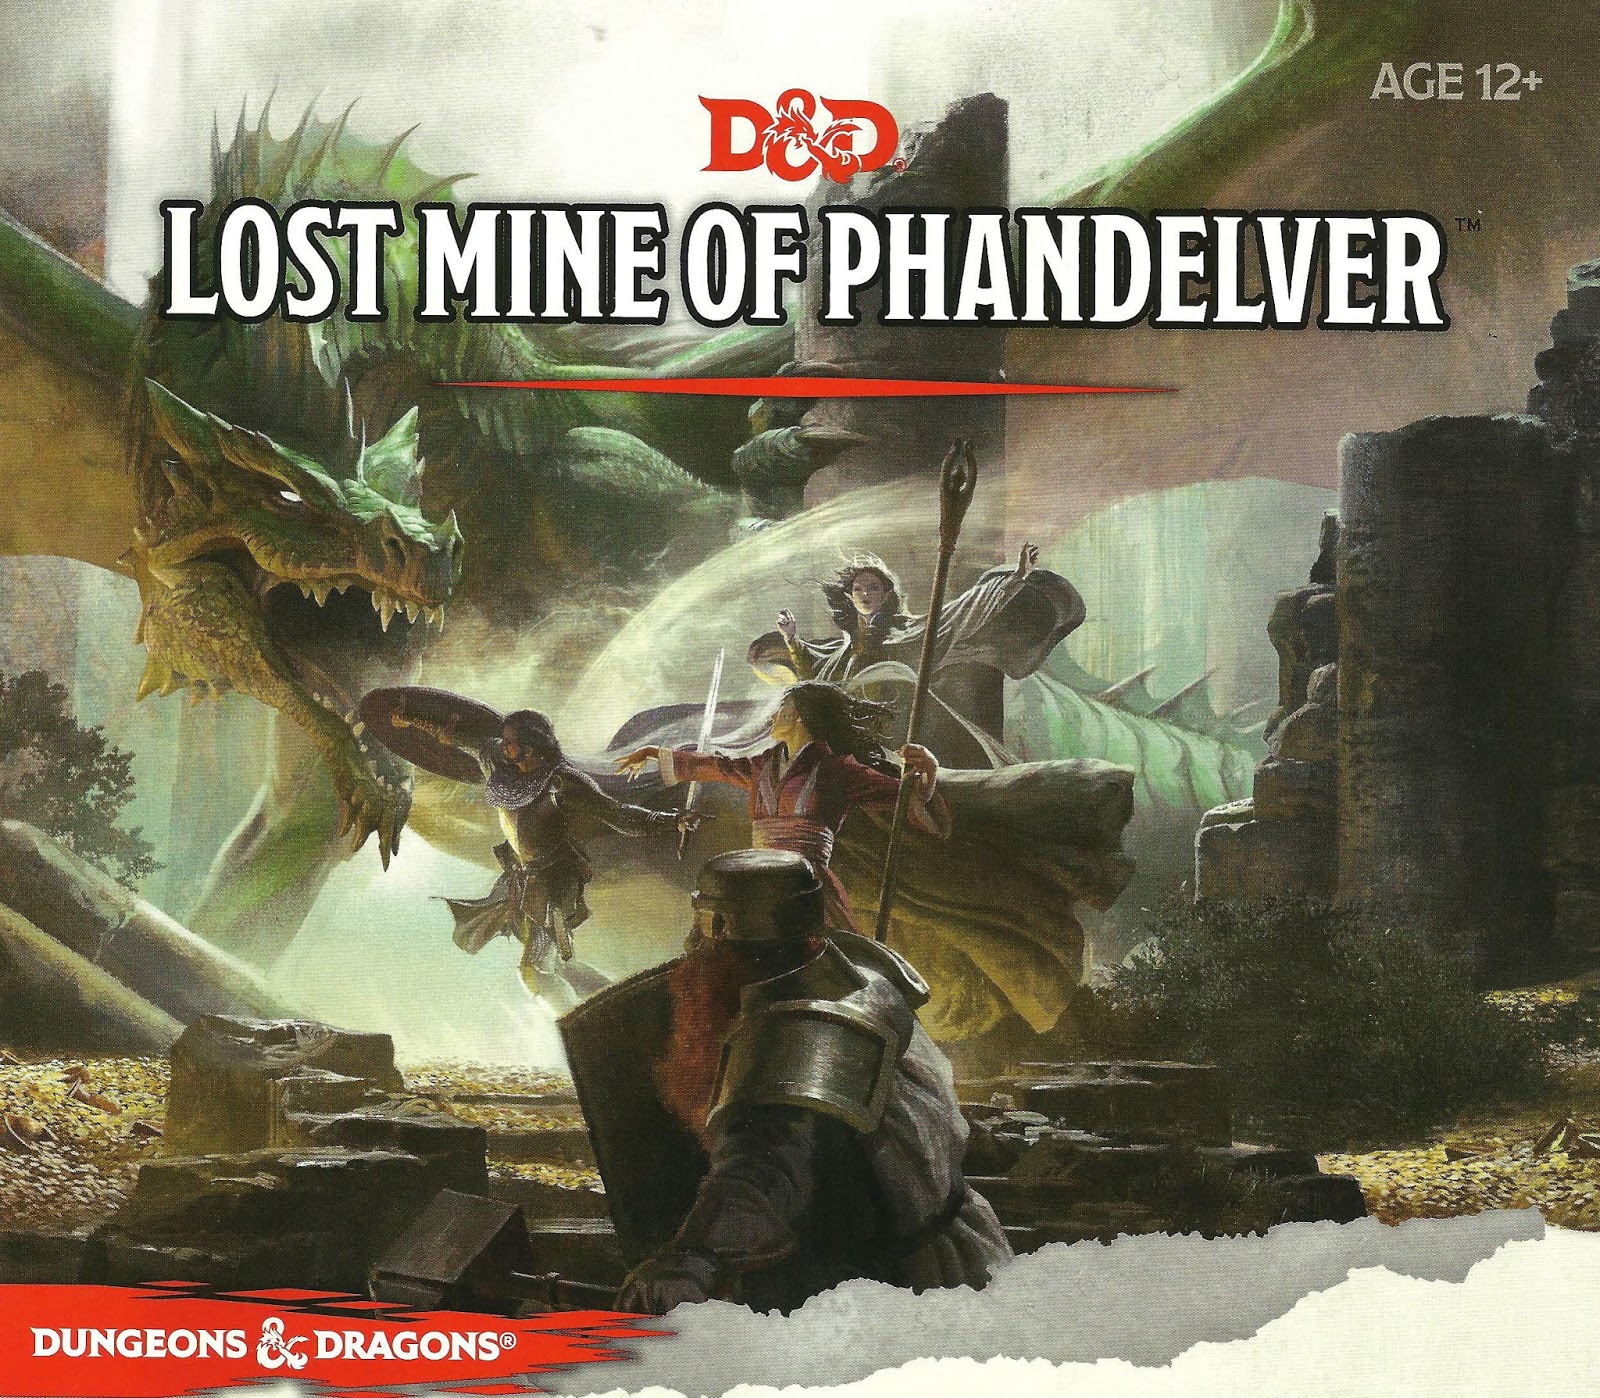
"More than five hundred years ago, clans of dwarves and gnomes made an agreement known as the Phandelver’s Pact, by which they would share a rich mine in a wondrous cavern known as Wave Echo Cave. In addition to its mineral wealth, the mine contained great magical power. Human spellcasters allied themselves with the dwarves and gnomes to channel and bind that energy into a great forge (called the Forge of Spells), where magic items could be crafted. Times were good, and the nearby human town of Phandalin (pronounced fan-duh-lin) prospered as well. But then disaster struck when orcs swept through the North and laid waste to all in their path. A powerful force of orcs reinforced by evil mercenary wizards attacked wave echo cave to seize its riches and magic treasures. Human wizards fought alongside their dwarf and gnome allies to defend the Forge of Spells, and the ensuing spell battle destroyed much of the cavern. Few survived the cave-ins and tremors, and the location of Wave Echo Cave was lost. For centuries, rumours of buried riches have attracted treasure seekers and opportunists to the area around Phandalin, but no one has ever succeeded in locating the lost mine. In recent years, people have resettled the area. Phandalin is now a rough-and-tumble frontier town. More important, the Rockseeker brothers - a trio of dwarves - have discovered the entrance to Wave Echo Cave, and they intend to reopen the mines. Unfortunately for the Rockseekers, they are not the only ones interested in Wave Echo Cave. A mysterious villain known as the Black Spider controls a network of bandit gangs and goblin tribes in the area, and his agents have followed the Rockseekers to their prize. Now the Black Spider wants Wave Echo Cave for himself, and he is taking steps to make sure no one else knows where it is." Extra Info from AL.com users: by @marcellarius. "There are a variety of locations in this adventure: the town of Phandalin, a gang hideout, a ruined keep in the forest, a destroyed village, and Wave Echo Cave (a dungeon crawl). The adventure is written in a sandbox style and relies on the players to choose their path. Phandalin offers several side-quests which could serve as hooks for continuing adventures. The premade characters have ties in their backgrounds to NPCs and locations. If you're not using these you'll need to consider other ways to introduce key NPCs."

When the priestess of Ehlonna was murdered by a werewolf, the townsfolk of Deepwood lost no time in meting out justice, even though the shapechanger turned out to be a trusted friend and neighbor. But his journal has the town worried. Written in an unknown tongue, it seems to contain important pieces of information. Is it a list of other werewolves? Is the threat to Deepwood over, or has it only just begun? Cries of "Murder!" brought the villagers of Deepwood running to the temple to witness a grisly sight. The priestess of the Temple of Ehlonna lay murdered on the floor, savaged by some vicious beast. Above her body stood a large wolf. Then, before their horrified eyes, the wolf turned into a man -- their friend and neighbor Trammil! The villagers lost no time in giving Trammil the justice he deserved at the end of a rope, even over the objections of those few who thought he deserved a trial. But Trammil's death has not made the villagers feel safe. No one suspected his dark secret until the day of the crime. Could there be others? Can anyone in town be trusted? Only someone who can translate Trammil's journal and fully investigate the murder can solve the mystery.

The Temple of Draxion is an adventure with 2-3 encounters that uses clever tactics, trickery, and good defensive positions to make low-level monsters challenging. The defenders in the encounter try to deceive the PCs; groups willing to accept anything the DM says at face value will horribly misjudge the actual level of danger they are in. The adventure is set in a partially-collapsed dungeon that was once a temple to Erythnul, but is now the headquarters of a pair of aspiring bandits, and their kobold employees. Pgs. 12-15

“Gorgoldand’s Gauntlet” takes place in a cave network in the side of a cliff overlooking a lake and can be inserted easily into any campaign. Gorgoldand’s Gauntlet is a site-based adventure with a pre-dominance of puzzles and traps. The PCs discover a map leading to the Gauntlet and explore it looking for treasure. They test their strength and wits against various traps and puzzles created by a gold dragon who converted a cave network into a proving ground to surreptitiously test the abilities of local adventuring bands. If they make it all the way to the end of the Gauntlet, they’ll have the chance to fight a dragon construct made of the dungeon's treasure hoard and have the chance to gain access to a magic item that can have a significant impact on their adventuring careers. Pgs. 39-51

The Red Plumes have increased patrols in the region surrounding Hillsfar, and a string of disappearances has followed in their wake. Naturally, this has roused the suspicion of the factions. Join your factions and find out the truth behind the missing farmers. A four-hour adventure for 1st-4th level characters.
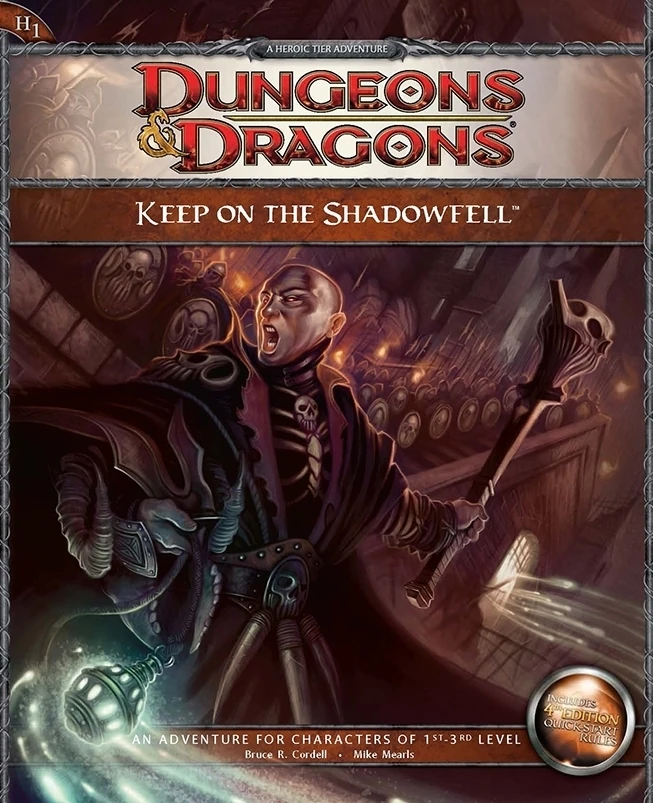
Darkness looms near Winterhaven! Kobold brigands have grown ever bolder in their attacks, marauding the once peaceful town, and a known explorer has been missing ever since their departure to the excavation site of a dragon burial site. When the party investigates, they will discover that the kobold's leader, Irontooth, bears a tattoo of a ram-headed demon. This is a troubling portent, for the townsfolk will report that this can only mean the dread god Orcus, master of death, has an active cult in that ruined keep! It is up to the party to enter the Keep on the Shadowfell and put a stop to the cult's fell machinations before it threatens all the realm. There they will fight the evil priest Kalarel, Scion of Orcus and seal off the vile portal to the dark realms he is master of. Should the heroes seize victory, glory and treasure are sure to be theirs. But first they must endure the challenges of that dreaded KEEP ON THE SHADOWFELL!

Part Two of the Umbral Aristocracy Trilogy. The treasure hunt has led to the City of the Dead. Beneath that well-manicured park is an ancient crypt where the treasure awaits you!

The couatl Tlanextic saved the village of Pearlglen from a terrible plague many years ago, and now he has returned. But why is he hiding in an abandoned temple in the woods instead of working in town, the way he once did? And what exactly is the threat to the village this time? Does the mysterious death of the town's chief warden at the bony hands of skeletons have anything to do with it? Download this new adventure by Skip Williams and give your PCs a bit of detective work to do to find out what's really happening in Pearlglen. The scenario is set in a forested area, and the action takes place in the village of Pearlglen and a nearby, half-ruined temple. As always, feel free to adapt the material presented here as you see fit to make it work with your campaign.

Important: The adventure is 1e but it has monster conversion notes for D&D 4th edition The town of Highport, once a human community overlooking Wooly Bay from its perch on the northern coast of the Pomarj, fell prey to hordes of humanoids swarming out of the jungle-covered hills surrounding the settlement. Though the orcs, goblins, kobolds, ogres, and gnolls razed much of the place in their ferocious rampages, the smoldering ruins they left behind soon became a new kind of community, a place of trade between the humanoid “locals” and the unsavory human traders who have no compunction about doing business with them. Slaves are a commodity in ready supply in Highport’s market, since many pirates raid up and down the coast of the bay, putting fishing villages to the torch and filling their holds with captured refugees. Slavery has become a thriving business in the town, and rumors abound of a cartel of Slave Lords who run things from behind the scenes, filling their coffers in secret from the buying and selling of human chattel. The trade has become so prolific that the good folk to the north have grown tired of these depredations and decided to fight back. Forces of righteousness and honor have recently descended upon Highport, some openly and others in secret, in various attempts to destroy the machinations of the Slave Lords and abolish the abominable enterprise that has taken far too many loved ones from home and hearth. One such doughty servant of goodness is Mikaro Valasteen, a cleric of Trithereon. Mikaro slipped unnoticed past the crumbling walls of Highport with a single mission: to rescue and transport as many slaves to their freedom as possible. Mikaro and a handful of faithful assistants located a number of escaped slaves—as well as rescued a few more not sufficiently restrained and guarded—and shepherded them through the gates and beyond the reach of their humanoid tormentors, returning them to their lands and homes. This covert freedom brigade enjoyed remarkable success early on, since the servants of the Slave Lords were often lax in their vigilance and sloppy in their efforts to prevent loss of the “merchandise.” After one too many shipments never made its destination, the humanoids stepped up their security and the normal channels of escape from Highport closed to Mikaro and his team. He cannot risk exposure by smuggling the freed slaves through the gates as merchandise any longer, since shipments of goods are now regularly stopped and checked. No longer able to free the slaves in that manner, Mikaro began hiding his charges in an abandoned villa in a particularly rundown part of the town. Although they are safe for the moment, their numbers have grown unmanageable, and the priest fears it is only a matter of time before someone slips up and brings slavers to their doorstep. Ever more desperate to find a new means of escape from Highport, Mikaro has started work on a plan that is both daring and dangerous. He intends to use a series of old sewers coupled with natural caverns running beneath the town as an escape route to the sea beyond the walls. But he needs someone to clear out the creatures and pitfalls he knows lie within. Pgs. 2-27
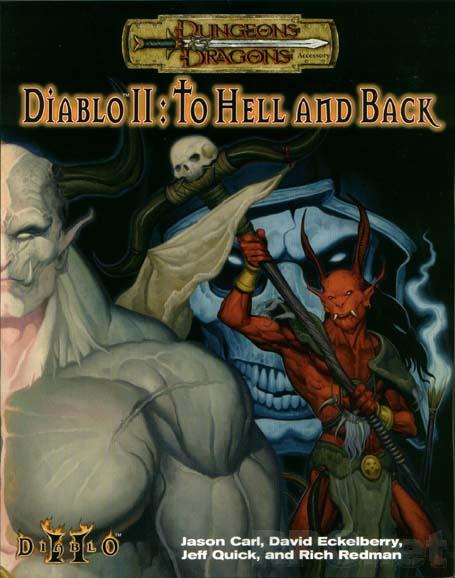
Bringing Diablo II to the tabletop. The legendary Diablo and Diablo II computer games come to life with the release of the tabletop Diablo II: To Hell & Back roleplaying adventure. All a player needs is the Dungeons & Dragons(r) Player's Handbook (0786915501-8/00) to accompany the Diablo II game. Every level and all 4 acts of the computer game are represented in the tabletop mega-adventure, which will also include 64 pages of monsters, information for levels 1-30, and over 60 maps!

Days ago, a portal to the Elemental Chaos appeared near the PCs’ home city. Since then, it has grown into an enormous sinkhole that periodically belches fire and brimstone. The rip in reality threatens to overwhelm settlements and a nearby river unless someone ventures through and closes it from the other side. Pgs. 102-107

Lost Tombs, Volume 2 The lich Lyzandred: a madman, an undead archmage, a survivor of the twin cataclysms that destroyed tow great empires. His name invokes fear in the hears of the smallest children, the bravest warriors, and the wisest sages. Like a malicious cat, the lich toys with all who stumble into his maze, tormenting them with strange puzzles and obscure riddles, monsters and demons, weird traps and dangerous magics. All who enter the crypt of Lyzandred find themselves scarred with his rune, proof of their visit -- and their folly. But there is a method to the madness of Lyzandred, a purpose to his twisted games. If you're lucky, you might even live to learn about it. The Lost Tombs series begins with Star Cairns (Volume 1) and concludes with The Doomgrinder (Volume 3). Each adventure is playable separately, or they can be linked to form an epic-length story. TSR 9580

"And they bade their slaves, 'Build unto us tombs to rival the palaces of the gods, for there shall we live or lives and sleep our deaths in splendor.' And the people of Maru-Qet wore their fingers down, broke their backs, burst their hearts to obey. Indeed they raised up great tombs to rival the palaces of the gods. And their masters were well pleased, for it was as gods they saw themselves." The brown dragon Urum-Shar lurks in a strange tomb, plotting schemes only a wyrm of incredible power could understand. Expanding on content from Draconomicon: Chromatic Dragons, this adventure takes the heroes into Urum-Shar’s dark and trap-filled lair, where they will eventually face the powerful dragon herself. The dungeon heavily employs the use of traps, with fewer monsters. The upper tomb consists of a great puzzle of twelve rooms, and the lower tomb contains the dreaded Urum-Shar, an ancient brown dragon and heir to the lost draconic empire of Maru-Qet. The dungeon has special protections against scrying and other divinations, as well as teleportation. Pgs. 55-90

The Fortress of the Yuan-Ti describes a fortress build into a cliff side and the slave village outside. The Adventure is the third of three but can easily be played by its self. The adventure revolves around the players discovering the dark plot to revive the demon Sertrous and then stopping it. The adventure describes the outside, inside, and hanging towers of the fortress. The adventure concludes in a forth extra-planer tower were you fight the boss. It also includes 4 sidetracks from portals that explain how they get the materials for the ritual. Final part of the Barrow of the Forgotten King series.

Was it destiny or something worse that destroyed the Order of the Opal Fist? A dungeon crawl designed for four 3rd level characters. The original article has a sidebar for scaling the adventure up or down. Pgs. 106-124

Oblivion is a town like no other. Situated in a hidden valley within a high mountain range and accessible only via air or a secret tunnel through the mountains, it has remained unknown to all except its inhabitants for uncounted centuries. What happens when a natural disaster exposes the town to the world and lets loose an ancient danger at the same time? Will the PCs aid those in need?

"Blood Money" is a caper adventure in which the adventurers work outside the law to pull off a major robbery. Good planning is essential, and the characters need to stay cool under pressure.

“The Shadow Rift of Umbraforge” is a sequel to “Siege of Bordrin’s Watch” and the third part of the Scales of War Adventure Path. In “Siege of Bordrin’s Watch,” the PCs discovered that dark creepers had sold arms and tactical intelligence to the orc war chief Tusk, aiding him in his attack against the folk of the Stonehome Mountains. In this adventure, the PCs investigate the link between the orcs and the dark ones, stumbling into an armsrunning operation that takes them to the Shadowfell in order to finally confront the charismatic figure behind it. Pgs. 4-53

To stop a devastating rampage of giants across the land, the party must venture into the lair of the stone giant thane Arnak to uncover the truth about why he has broken his peace with the neighboring dwarves. In the process, they will have the opportunity to retrieve important symbols of the fight against the giants and uncover a dangerous excavation. The adventure is part of the "Against the Giants" series originally by Gary Gygax, hence the writing credit.