
Ill winds blow over Wayward. The men drink apart from their wives, while a mysterious traveler sows discontent between married couples. The Wayward wives have had enough and are plotting revenge. Part 2 of the Evenflow Saga.

Over a millennium ago, a clan of dark elves broke away from their evil kin and fled from the city of Menzoberranzan. Though many lives were lost in the initial exodus, the large numbers of the renegade band ensured that they were more successful than any could have hoped. And yet, the drow that finally arrived into the surface world found themselves shunned at every turn by those unable to see past their appearances. Just as their hope was beginning to wane, a song rang out through the night, beckoning the way to the sea and to a silver ship waiting amidst the dark waves. Many years have passed, and little knowledge remains of the strange island that the dark elves came to call their home, but the wicked Lolth forgets nothing. Evil magic converges upon El’tara and begins to steal away the light of hope. Whether through fate, mere coincidence or perhaps divine intervention, a band of adventurers find themselves standing at the shores of this land in the time of its greatest need. This adventure should run for approximately four to five hours and may be played either as a one-shot or as part of an ongoing campaign. It contains guidelines for running the adventure at any level from 1st to 8th and for a variety of group sizes.

Will your party survive the frostbite Frostbite Gauntlet? A sequel to The Great Trial, this module is an arctic, highly challenging gauntlet focused on exploration and combat, planned for fours 10th-level characters. The adventure can be also run as a one-shot or as part of any campaign for that level. For more information on The Great Trial, see at the end of this page. The module is divided in two parts: Chapter 1 The gauntlet itself, the party will be taken to a demi-plane against their will and from there, they have a simple goal: leave. However, a powerful undead guardian will make things difficult. The party needs to find some of the sources of power of Deathwings, the guardian, to weaken it and have a chance against it. Chapter 2 After leaving, the group will arrive at a cave complex made of stone and ice. A ancient dracolich names Icingdeath will chase the party, squeezing through the tight tunnels, always on the party' heels. Once out, the party is greeted by Aenor and offered their rewards.

Seer has learned of an attempt to intimidate Gralm, an ettin, and his followers into joining Bad Fruul’s army. Hsing comes forth to communicate that she wants you to see if you can find some way to either insure Gralm remains neutral, or to encourage the creature to challenge Bad Fruul to single combat in the hopes that he might wrest control of the hill giant’s forces and turn them back from Parnast.

The Heartland Scouts – brave defenders of the Coast Way – have been captured! What their captors haven’t counted on is the adventurers’ feisty animal companions. Left behind, they are nevertheless bound to spell trouble! In this entirely unique adventure, players take on the roles of trusty animal companions and familiars on a quest to rescue their adventurer masters. Surely leaving behind a druid’s harmless badger friend is no threat to one of the great evil powers of the world – or is it? Rescue: A Familiar Tale features a story and challenges designed especially for the animal companions. Players choose and customize their animal companion from over 20 options, with illustrated character sheets included for each one. This adventure does not require existing player characters and can be enjoyed by players of any experience level with the game. While it makes for a perfect “something different” one shot, Rescue can also serve as a session zero for any new campaign and includes guidelines for a fun and surprising way to create inspired new characters at the adventure’s end!

The Tower of Bondage is a frightening place for player characters that are used to raiding dungeons and once they have grown tired or run out of spells, can leave the dungeon, and find a warm comfortable inn. Not so with the Tower of Bondage. Once you enter, you may not leave unless you escape, and the only way out is down. The first level contains: ● 17 deadly encounters ● New stats for animated statues ● Traps ● Even a riddle to solve to save their lives The Tower of Bondage is a fresh look at the ancient Netherese lich known as Aumvor the Undying of the Forgotten Realms, and featured in Champions of Ruin. Having finally fled to the Endless Caverns and having reached lichdom, he was no longer able to feed upon the life force of others. His minions built hidden portals to his domain in order to trap living victims to slake his lust and continually feed his gluttony. That was long ago and the portals have been forgotten with time. Recently, a forest ranger has stumbled onto the location of one of the old portals and has made it public. Dare to enter the snare and be teleported deep into the Star Mounts without the luxury of returning to town at your leisure for supplies and rest. If you escape, you will have a better appreciation for life and a whole lot of Aumvor’s treasure to boot. Rumor has it that Aumvor the Undying is getting old and slow, and perhaps – hungry The Tower of Bondage “Aumvor’s Welcome” is the first level of a much larger complex that opens to the Endless Caverns and the under dark. 𝘐𝘧 𝘺𝘰𝘶 𝘦𝘯𝘫𝘰𝘺 𝘱𝘢𝘳𝘵 𝘰𝘯𝘦, 𝘣𝘦 𝘴𝘶𝘳𝘦 𝘵𝘰 𝘨𝘦𝘵 𝘱𝘢𝘳𝘵 2 “𝘍𝘢𝘯𝘦 𝘰𝘧 𝘵𝘩𝘦 𝘑𝘢𝘪𝘭𝘦𝘳𝘴”

This quest takes the player characters through a harrowing journey of dangerous adversity! The characters are informed that some unknown adversary has disrupted an ancient tree called Wise Willow. This sends them first on a subterranean excursion into ancient tunnels infested with curiously ravenous Thri-Kreen! Then, they are introduced more formally with Wise Willow, who requires their services to cure her terrible plague! The players must then navigate the wild maze of her surface roots, purge it of grotesque creatures, and then find the cause of her ailment. Doing so excites the interest of the deities, Lathander and Sylvanus, who descend from the heavens in a glorious show of light and mysticism! The two divine beings then graciously bestow their gifts upon the party to reward their deeds. The player characters embark on a perilous journey that will test their resourcefulness and wits in a building arc of intensity. The environments are deeply detailed by the boxed text and should provide you and your characters a sturdy foundation for your creativity to launch from. There is a compelling story full of lamentations as well as laughs. The robust exposition sets up hours of challenging, combat-heavy “dungeon delving” throughout the quest. The aim is to maintain a versatile balance between “hack-and-slash” and “immersive storytelling” play styles, so that everyone can enjoy it in their own way. The numerous optional components allow you to scale the difficulty to your liking, and there is plenty of space for you to use your own creativity to enhance the content. Guts, Gods & Glory is a Dungeons & Dragons module using the 5e rules. It is designed to be played by three to six players of sixth to eighth level. It takes place in the Sword Coast setting of the Forgotten Realms, specifically the Elturgard region. Changes can be made to make it playable in a nondescript setting.

The fabled mines of Dhol Kuldhir once showered the Dalelands, Cormyr, and points beyond with precious gems and expertly crafted jewels. Operating from a hidden complex in the Thunder Peaks, their exquisite craftsmanship was said to rival that of even Thunderholme. Almost as quickly as it rose to prominence it vanished, along with all of the dwarven miners, crafters, and untold riches. Some speculate that the mine ran dry, and the inhabitants abandoned it for a more plentiful location. Others believe that they probably fell victim to one of the many goblin tribes plaguing the area. The truth, however, is much more grave. Centuries later, the nearby town of Keen is beset upon by unlikely thieves, the local innkeeper charges a small band of unlikely allies to investigate the string of burglaries. What they uncover leads them to the long-lost dwarven mine. In the darkness, they will have to brave insidious traps, cunning monsters, and the dreaded new lord of Dhol Kuldhir.

Agents of the fire giants of Maerimydra, a city in the Underdark, have overtaken the drow outpost of Szith Morcane. The factions seek out adventurers to free the outpost’s leaders for questioning on the giants’ activities. Can you extricate them before it’s too late?

The Zhentarim ask the party to investigate what happened in one their most important underdark outposts. If the party accepts, they'll have to deal with maddening darkness, grimlocks, an insane kenku assassin and unpredictable mixtures of potions. A short, fun dungeon romp that is easily adapted to other settings and other patrons. The combination of utter darkness and a villain based on sound makes for fun shenanigans on the side of the DM. Feasible as a one shot for an efficient party. Two tendays ago, Zhentarim agents were to transport a shipment of rare potions between their Underdark outpost and the surface world. The shipment has yet to arrive, and the outpost is not responding to any sending spells. Growing worried, the outpost’s overseer sends a group of hireswords to investigate and return it to Zhentarim hands. This particular adventure deals with the delusions of madness of Fraz Urb'luu. It also features Muurmic, the mad kenku first described in the December 2015 issue of Dragon+.

5e Solo Gamebooks presents Drums at Daggerford, the fifth in our continual series of solo adventures set in the Forgotten Realms. This quest enables you to experience D&D without a dungeon master! Simply roll up a level 5 PC and get playing. Drums at Daggerford is the way you must experience solo adventuring. Players and DMs beware, a new standard has been set. This solo adventure continues the story arc first begun in Death Knight’s Squire, developed further in Tyrant of Zhentil Keep & Citadel of the Raven, and left in The Tortured Land. Drums at Daggerford’s ability to echo a Tolkien spirit reverberates throughout the narrative no matter which path you may choose. But choose wisely because a razor’s edge separates peril from glory. Over a year in the writing, this latest instalment in our solo adventure series is a mini sandbox campaign that will give you anywhere up to 8 hours of solo adventuring enjoyment. Completionists and those who like to replay these adventures will get even more gametime. There are mysteries to be uncovered, items and sidekicks to be gained, codewords to unlock and villains to conquer! With lots of exploration, meaningful decisions, hard fights, and a variety of rewards and stories, Drums at Daggerford will continue to resonate with you long after solving the big mystery behind Krond Vikkurk’s malevolent plans.
CORE 1-2 With the identity of a murderer confirmed, heroes are needed to track it down to its home. As it turns out, it might be a longer journey than first imagined. Part Two of The Chaos in Melvaunt. The characters enter Mechanus via a portal in Melvaunt with the aim to infiltrate a modron army encampment. They must then flee the camp in a chase scene.

There is little time to celebrate the victory at the Well of Dragons. The Lord’s Alliance believes the Cult of the Dragon has a stronghold in Calimport, the home of vanquished cult leader Severin Silrajin. To find the secret stronghold, the heroes must explore the Palace of the Red Pasha in the city’s Wizard’s Ward. Can they unravel the cult’s next insidious plot? This is a Dungeons and Dragons adventure for characters of Level 16, springboarding from the events in The Rise of Tiamat in the Tyranny of Dragons storyline, although it can also be played as a stand-alone adventure.

You wake up in a dark room with a group of friends. You don't know how you got here and your thoughts seem distant, echoing in your mind. The note you find reminds you your mission: retrieve the flower of oshadis and escape this temple alive. Culitsts and traps stand between you and freedom.
The town of Phandalin, nestled in the foothills to the east of the Sword Mountains, continues to grow since being rebuilt after the devastation wrought by rampaging orc hordes. It recently survived violent gang activity, drow machinations, and even the attention of a green dragon. But can it withstand a new threat, bizarre but no less perilous: the fame brought by a visit from none other than loremaster Volothamp Geddarm? Six 1-Hour Mini-Adventures for 1st-4th Level Characters. Also included in the purchase of this adventure is a version specially converted for use with the Fantasy Grounds virtual tabletop software. The converted adventure features all the text and maps from the original adventure along with cross-linking of monsters, spells, magic items, equipment, and story elements, plus the powerful rules automation for which Fantasy Grounds is known.

In this prelude to the full Princes of the Apocalypse campaign book, adventurers face off against the influence of Elemental Cultists in the hills and canyons of the Dessarin Valley. The four mini-adventures within are only tangentially related to each-other, and instead serve as starting points and hooks for the plots of the complete Princes of the Apocalypse Campaign. Players start in the well-described town of Red Larch; first investigating a local necromancer, then uncovering cult influences within the town, and finally heading off to infiltrate or do battle with two small elemental cultist strongholds. All parts of this adventure can serve as great places to seed hooks for other campaigns.

The mining town of Glister has a problem. The latest caravan only arrived with a part of its supplies. Orcs waylaid them, took much needed goods, and are now making demands that the town return an artifact that is theirs, but the town is unfamiliar with. Help track down information about this artifact and possibly defend the city from an orc invasion! A 4-hour Adventure for 1st-4th Level Characters Part 2 of Kossuth's Kiss

Modrons, Mephits & Mayhem is a Dungeons & Dragons 5E tier 2 adventure for three to five characters of levels 5-8. It is primarily set in a modron-designed research facility that has been abandoned by its creators but retains guardians that are still active. Additionally, two groups have broken into the facility with their own goals in mind; the githyanki and their red dragon cohort are antagonistic and provide the main source of combat in this adventure, while a modron traveling with a few mephits may prove friendly although ultimately troublesome. Inspired by adventure games in which the protagonists explore baroque, esoteric technological fortresses, and seeded throughout with factions that sport competing and often bizarre goals, Modrons, Mephits & Mayhem is sure to test the mettle of any group of players, and will provide endless amusement for Dungeon Masters seeking something different from the typical hack-and-slash dungeon crawl. This 70-page adventure features: *Two wilderness areas, random wilderness encounters, and a massive, interlinking 3-level dungeon filled with bizarre puzzles. *Ancient machinery powered by elemental portals, all of which can be activated, turned off, or manipulated by the player characters and the various factions within the modron facility. *Planar creatures like githzerai and githyanki, modrons, mephits, and elemental guardians, skillfully placed into the High Moor area of the Forgotten Realms setting. *Monsters and NPCs that have detailed (yet easy to run!) personalities and goals that will provide tons of roleplaying opportunities. *Notes and sidebars on running the NPCs with added complexity, or simplifying the NPCs' motives to make the adventure more straightforward. *Tactics notes for every single encounter! *An appendix that features all monster stat blocks, and both tagged (DM) and untagged (Player) versions of the dungeon maps. *Wilderness hex map by Elven Tower Cartography! Three interlinked dungeon levels by Dyson Logos...and one of them is a flying fortress! Cover art by Patrick E. Pullen!
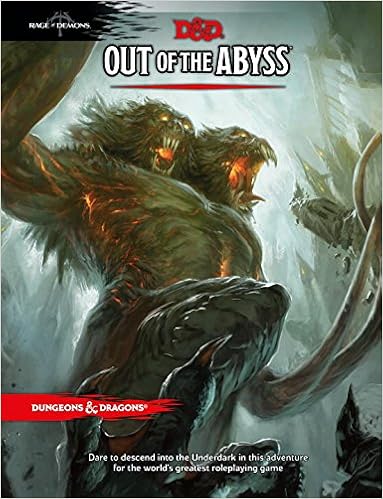
The Underdark is a subterranean wonderland, a vast and twisted labyrinth where fear reigns. It is the home of horrific monsters that have never seen the light of day. It is here that the dark elf Gromph Baenre, Archmage of Menzoberranzan, casts a foul spell meant to ignite a magical energy that suffuses the Underdark and tears open portals to the demonic Abyss. What steps through surprises even him, and from that moment on, the insanity that pervades the Underdark escalates and threatens to shake the Forgotten Realms to its foundations. Stop the madness before it consumes you! Note for DMs: This adventure is not for the faint of hearted, to run or to play. The module starts with 10 NPCs traveling with the party through the grueling Underdark. This number can grow. The encounters within the book are often incredibly deadly for the characters that would be going through it. This is because the module expects them to run or talk their way through the events, or, in some cases, the module expects them to lose. If your players aren't the kind of party to run, talk, or surrender, do not get this adventure. The module almost requires that you use milestone leveling because the experience provided does not commonly get players to the levels they should be once they get to certain milestones in the story (7th when they leave the underdark, 15th when they face the demon lords.) Good luck and happy questing.

How dangerous is a wounded dragon? A black dragon has seized Ravenglade Keep, though not without resistance! Badly wounded in the fight, the Warriors of Sehanine have fled their home and now turn to the outside world for help. There’s no time to lose! Can you arrive at Ravenglade Keep in time and discern allies from foes on the way? Warriors of Sehanine is a Dungeons & Dragons adventure module for a party of four to five characters from 3rd to 5th level. • Experience the Wood of Sharp Teeth on the way to Ravenglade Keep in a 12 to 16 hour adventure of 38 pages, written by Mithral Best Selling creators Florian Emmerich, JVC Parry and DMsGuild Adept Ashley Warren • Rock the (virtual) table with four breathtaking maps by Dean Spencer & Erin Harvey that come with player and DM versions • Bring the adventure to life with stunning artwork and player handouts by Raluca Marinescu,Henrik Rosenborg & Nathalie Lehnert • Show the NPCs with selected exclusive Trash Mob Minis