
A haunted house, a missing person, and a hint of wild fey magic. In the kingdom of Norland in the Moonshae Isles, King Keethan rules by the will of Torm the True, though in Glen Dourn folk still hold true to the old ways—a dense and layered folklore of monsters and tales to frighten children. It is to this remote valley that Keethan bids you make haste to seek out signs of his beloved cousin, Lady Sorcha Hannigard. Sorcha vanished on her wedding day three years ago, sending her groom and neighbours alike into mourning. But where can she have gone? The only remaining clues to this mystery lie in her abandoned mansion home, where powers less wholesome have now taken up residence. The Dread Coven will not give up what they know so easily, although they will strike a bargain if you’re willing to pay the price in pain.
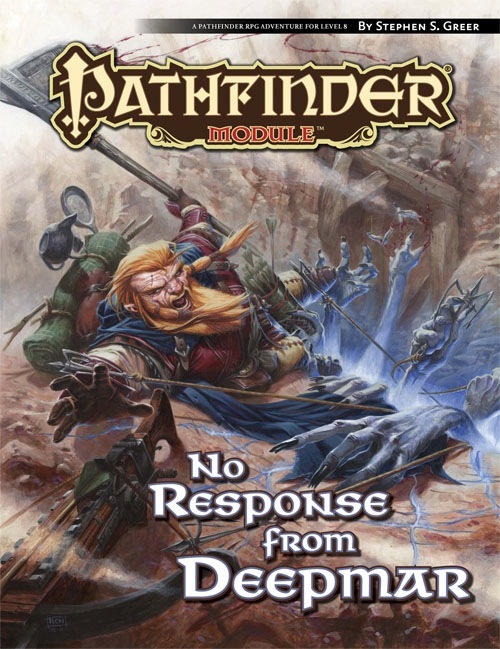
A hundred miles off the Chelish coast lies the remote island of Deepmar, where the House of Thrune sends prisoners to work in crystal mines, wresting valuable spell components from the depths of the earth. A month ago, all contact with the penal colony ceased, and now someone must discover what mysterious fate has befallen the prisoners and guards of this isolated mining operation.
Few are the wizards that seek to prolong their lives with dark rituals and foul magic to become the powerful undead beings called liches. But far fewer are those that seek to undo what necromancy what done and take back their lives after initiation to lichdom. Balipur is one of those few. Turned to a vassalich by the darklord Azalin against his will for impersonating him, Balipur, after Azalin's departure at the destruction of Il Aluk, seeks to imitate his former master's Grim Harvest project, inverted, in a smaller scale to forge a soul from the lives of other men.

Designed for a party of five characters of at least 9th level, this adventure will challenge players seeking a powerful magic item of the GM’s choosing. A sphere of annihilation has been provided and is woven into several elements of the adventure, but any appropriately powerful item can be substituted if something else suits your campaign better. Though the adventure is designed to test every type of character class, a rogue who can deal with traps is essential, as is a wizard or sorcerer of at least 9th level. Larger groups will have an easier time; parties of four or fewer characters will be in for a very bad time unless you mitigate some of the tower’s more lethal traps and encounters. This adventure culminates in an encounter with devils and a sphere of annihilation. The sphere of annihilation is hidden deep within the tower-and-dungeon complex of Crane the Sorcerer. Originally set atop a high mountain in a secluded and wild part of the world, the tower and dungeon can be relocated to meet the situation in your campign. Crane, an introvert, stayed as far away from civilization as possible, as is detailed below. The tower above the dungeon doesn’t present many difficulties for a group of powerful characters or alert players. It might lull PCs into a false sense of security before they enter the areas where they’ll really be put to the test.

A traditional "funhouse" dungeon, White Plume Mountain begins with the archmage Keraptis stealing three artifacts and leaving cryptic poems with their former owners. The players are hired to recover the items, and find a bizarre dungeon in the side of the eponymous volcano. TSR 9027
Something is killing people in Palebank Village, and if the party does not stop it they could be next.
The legacy of Dr. Frankenstein lives on as the handiwork of a rash young scientist responds in an unexpected manner. An angry lover and an evil monster. The party must stop this monster before he kills the young lovers.

Riddled with veins of precious ore and gem, the Earthspur Mountains to the west have long been a valuable resource for anyone able to mine them. One such mine has gone silent and the only thing more concerning than its long overdue shipment is the fate of the members of the Soldiery sent to discover what has happened to the mine’s workers. Though the mine lay in a region of the Mountains once claimed by a clan of reclusive dwarves, the Ludwakazar clan wouldn’t be so bold as to violate their long-standing peace with Mulmaster. Or would they?
/pic3143465.png)
Once a powerful proponent of Law, the Archmage Tazimack the Red was eventually driven mad by a fear of mortality. As he slipped into insanity his retirement home began to reflect the chaotic bent of his mind. Long after Tazimack’s unnaturally animated body has disintegrated, his manor house remains as a shadow cast by a twisted intellect. Can the characters bring order to this chaos?

A storm of unparalleled fury has been ravaging the peaks of the Earthspur Mountains for a tenday, and the Monastery of the Yellow Rose sits in its eye for now. Some monks have fled the monastery to the safety of Mulmaster and beseech you to convince their more obstinate brothers to retreat to the city before the eye of the storm shifts, and the monestary is in terrible danger. Can you brave the elements and convince the monks to escape?

A trap that perhaps works too well. No matter how much loot you take, you never took anything at all. Confused? Wait until you try this dungeon. The players are hired to investigate and clear a tomb of a time wizard. This tomb is heavily guarded both by creatures and traps, and some sages are concerned that the defenses are lasting longer than they were supposed to. Unknown to the sages, the wizard, Sur-in Am, bound a time elemental to guard the treasures of the tomb. This guardian's duty is to frustrate robbers by returning stolen items to their original place and also reset traps in the tomb. Pgs. 26-36
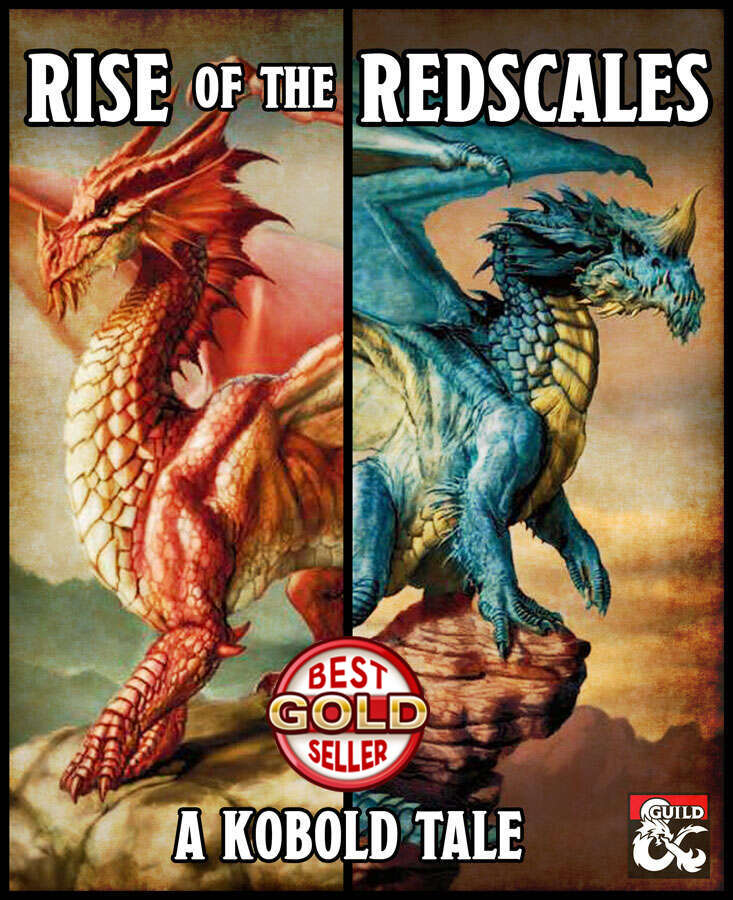
Two feuding kobold tribes have been left alone in their dragon queen's lair. Without supervision, surrounded by the wealth of nations and piles of magical artifacts. How long before things devolve into utter chaos? Set inside an enormous dragon's lair, the adventure allows players to take control of the best and brightest among the kobold tribe known as the Redscales. Their entire lives they have been the Dragon Queen's minions and her lair's caretakers. But the Dragon Queen has been gone for some time now and an ancient feud with another kobold tribe (the Bluescales) is about to be a rekindled. And the trap- and treasure-filled lair is to become their battleground. The gameplay is a mix of roleplaying, involving some tough moral choices (well, tough for kobolds), solving puzzles and wacky combat with kobolds wielding powerful ancient artifacts. There is an abundance of magic items, specially chosen for their potential to lead to hilarious situations.
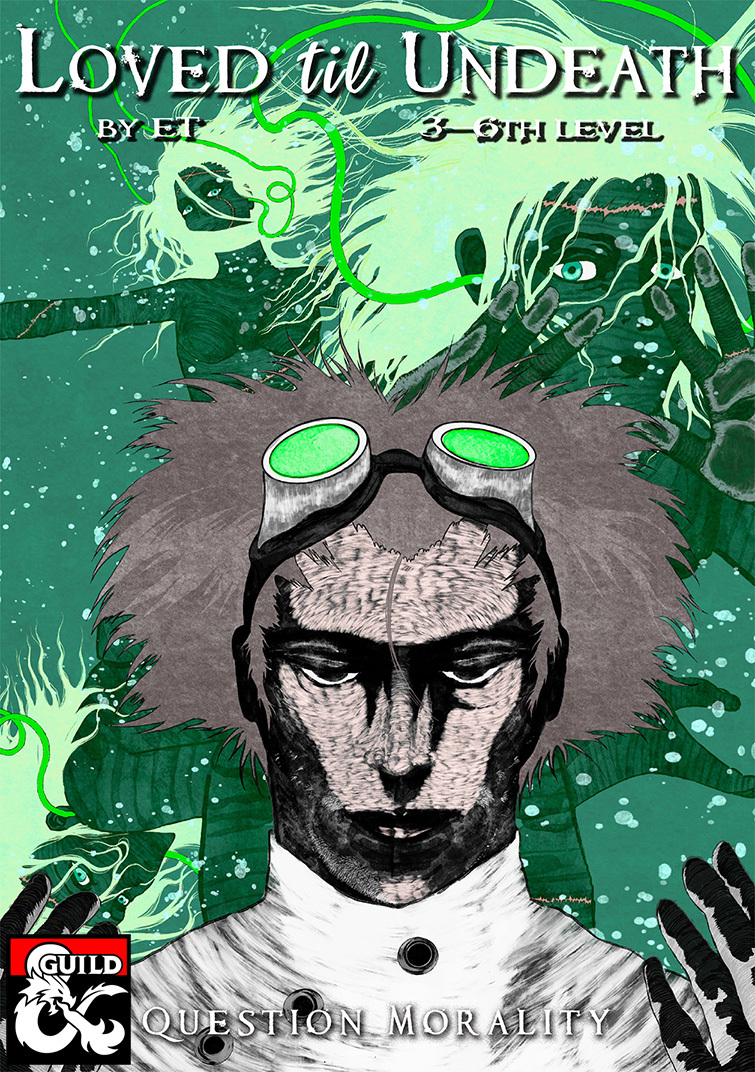
Clouds smother the sky, smoke fills your nostrils, and a shrill scream falls on deaf ears. The bonfire swells as the crowd surrounds. “Undead filth!” they shout, as she burns alive. What do you do? This Frankenstein inspired one-shot will have body horror, a murder mystery, undead constructs questioning the purpose of life and will make your characters question their morality. Designed for 3-6th level to be run in a single night of gameplay. All of ET’s adventures have been playtested at least three times, professionally edited and contains zero ai generated content. Click below for the video walkthrough. This adventure includes: 1 player handout, 5 maps including 2 battlemaps, 2 random tables, 6 secrets and clues, dramatis personae for the 5 main NPCs.

A series of small earthquakes have brought a sense of disquiet to the town of Daern Kelton and Roslof Keep. Against these strange earthly portents, the members of the Ivory Scimitar have claimed their place as a true Mithel Company, but even greater danger now awaits them in the second level of the Dungeon of the Black Fey Mithelvarn. What lost secrets will be revealed as they journey below? What new threats and adventures can be had in Daern Kelton? The town opens its doors to the brave new heroes of the Company of the Ivory Scimitar. Here continues the Roslof Keep Campaign in the pages of ROS2, The Tremors in the Machine. This adventure is formatted to both 1E & 5E gaming rules. Also available in PDF.
The waters of a sunless sea meet a pebble-strewn shore, beyond which opens a wide Underdark vista shimmering with pale cave-light. Titanic columns as big as castles march miles into the misted distance. The wide, steeply sloping base of the nearest colossal column is carved with streets, walls, and elaborate structures, many with gaping, empty windows. A few glimmer with faint illumination. Are you brave enough to explore the spire-city and face the terrors that lurk within? Part 2 of the Barrow of the Forgotten King series. Followed by Fortress of the Yuan-ti.

There is no particular overarching story here, just a prospect gate keep dungeon you can drop into your own sandbox and run as you see fit. This adventure is formatted to both 1E & 5E gaming rules.

The Cagewrights are defeated. The Tree of Shackled Sould is no more. Lord Vhalantru has been exposed and put down for the menace he truly was. The town of Cauldron has been saved from volcanic apocalypse. The heroes of Cauldron have earned their place in history, and more than deserve a time of rest, yet fate is not so kind. For the true menace behind the curtain still lives. As long as Adimarchus, the demon prince of madness, continues to dream his haunted dreams and writhe away the years in torment in the fiendish asylum of Skullrot, Cauldron can never be truly safe. "Asylum" concludes the Shackled City Adventure Path that began with "Life's Bazaar" (Dungeon #97) and continued with "Flood Season" (Dungeon #98), "Zenith Trajectory" (Dungeon #102), "The Demonskar Legacy" (Dungeon #104), "Test of the Smoking Eye" (Dungeon #107), "Secrets of the Soul Pillar" (Dungeon #109), "Lords of Oblivion" (Dungeon #111), "Foundation of Flame" (Dungeon #113), "Thirteen Cages" (Dungeon #114), and "Strike on Shatterhorn" (Dungeon #115). Pgs. 40-65

In the Tower of Yladhra the Grim, a party of adventurers braves the dangers and puzzles of an enchanted wizard's tower, and finally confronts the wizard herself. The adventure is designed for a party of five adventurers between levels five and eight. It features: Encounters by Level - Varying types and quantities of creatures are suggested based on the party's actual level, allowing each encounter to present the appropriate challenge to the party. Encounter Notes - Suggestions for how to run combats are provided for game masters who place an emphasis on engaging, tactical battles. Inciting Action - Suggestions for ways to present the adventure to players are provided. Aftermath - Ideas for future adventures based on this one. Unique Magic Items - New magic items to introduce into a campaign. Ease of Use - The format and style of the document allows the game master to find information quickly while running the game at the table. Detailed Maps - What's an adventure without maps? Not much else to say here.

A Vistani fortuneteller has called you out by name during the Burgomaster’s private reading. She raved of an army of the dead, a delicate powderbox, and a beautiful yet dangerous woman. Now the Burgomaster wants to know why you’re more important than he is... Part Four of Misty Fortunes and Absent Hearts.

*THIS IS A D&D NEXT/5E PLAYTEST ADVENTURE* Imani, a Turmishan wizard and former adventurer, seeks the aid of heroes to infiltrate Dretchroyaster’s lair and recover the Diamond Staff of Chomylla—the key to powerful magic and wisdom locked away for thousands of years. In addition to his own sagely interest in the lore of lost Uvaeren, Imani recognizes the dangers of such powerful magic falling into evil hands. The dracolich has secured the staff in his lair’s cen- tral chamber, using ancient wards of protection that can be bypassed only by four artifact-idols once belong- ing to a cult of Bhaal. Each group of adventurers enters the dungeon through a different section of the dun- geon—a forgotten temple of Bhaal, a vast underground lake, a troglodyte village, or Dretchroyaster’s vaults. Dretchroyaster’s lair is no simple set of caverns and ancient ruins. It sits atop a source of great power and energy, which the dracolich and his Cult of the Dragon allies hope to use to unlock the secrets of the staff. Only by undertaking a unified assault against Dretchroyas- ter’s lair can the adventurers hope to recover the Diamond Staff and survive the dracolich’s fury. The adventurers must make their way through the lair and recover the Bhaalite idols that will help unlock the Diamond Staff, all the while dealing with the lair’s creatures and avoiding the dracolich as he pur- sues intruders. Entering the Chamber of the Diamond Staff, the heroes must overcome its magical wards and claim the staff before being slain by the dracolich and his servants.