
It is Autumn. Most of the clans of the Great Valley have departed south with the herd animals they depend on for survival. But one small clan lags behind. For seven nights they have been unable to travel, plagued by a terrible monster known as the Night Thing, which has killed their people and wounded more. Your party answers the call of dwarf chieftain Skarna Two-Axe, begging hunters from neighboring clans to pursue and kill the monster that’s been attacking her clan, and that slayed her son. Starting at the chieftain’s clanfire, the characters uncover mysteries about the creature that can only be fully solved by tracking the awful Night Thing to its lair, which is full of frightening apparitions. As the party ventures deeper into the Night Thing's lair, they'll discover an even deeper menace, and a plot to overthrow the chieftain. Only they can save Skarna and her people from the grim machinations of their powerful enemies! Published by Atlas Games

An adventure included in the Essentials Kit (2019). The party starts in Phandalin, the starting town for the Starter Set (2014) adventure, Lost Mine of Phandlever. Various jobs are posted by Harbin Wester, townmaster, which the PCs can pursue. These jobs culminate in a raid on Icespire Hold, where Cryovain, a young adult white dragon, has recently claimed as its lair.
In this level 1-5 adventure for 3-5 players the party is tasked with the rpg standard mission a.k.a. catching rats in a cellar, only in this case they are not rats but guinea pigs. However this is all a big ruse to get some test subjects together, because the mage who gave them the job actually wants to start a gameshow. People from around the world can compete here for prizes in front of a live audience. However the games will have to be tested and that's where your brave adventurers come in. This adventure contains 10 different puzzles, 10 different rewards and tips on how to adjust the encounters for players of higher and lower levels than the recommended level of 3.
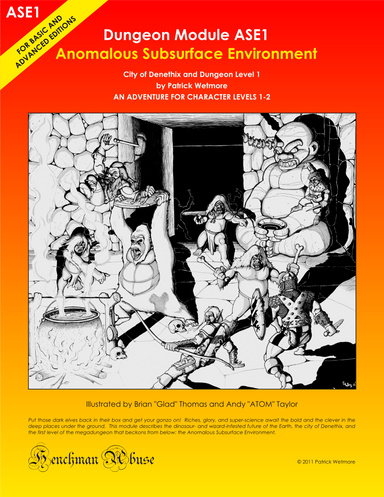
"Put those dark elves back in their box and get your gonzo on! Riches, glory, and super-science await the bold and the clever in the deep places under the ground. This module describes the dinosaur- and wizard-infested future of the Earth, the city of Denethix, and the first level of the megadungeon that beckons from below: the Anomalous Subsurface Environment." Set in a post-apocalyptic future where Earth's remains are explored through dungeons filled with ancient tech, magic, and bizarre ecosystems, inhabited by various factions with their own agendas. This setting blends sci-fi and fantasy with a touch of the absurd, offering a playground for imaginative gameplay and storytelling. The module includes a gatehouse and the first level of the Anomalous Subsurface Environment, each designed with multiple pathways. Unique twists on monsters and magic items. Written for Labyrinth Lord

The heroes arrive at the eponymous Keep on the Borderlands, a fortress on the edge of civilization built to stave off the chaos and evil of the wilderness. Using it as a home base, a party can make forays into the surrounding wilderness, encountering monster and marauder alike. The centerpiece of the adventure is certainly the CAVES OF CHAOS, a network of tunnels and caverns found in the walls of a nearby but isolated ravine. It is here that hordes of evil humanoids have made their home. Through combat and negotiation, the players can try to explore and map out these caves, perhaps with the aim of accumulating valuable treasure or even cleansing the land of evil creatures. However, even the Caves are not all they seem. Beyond the goblins and kobolds lurk dark horrors: cults dedicated to fiendish chaos and a Minotaur's enchanted labyrinth await the unprepared adventurer. But for the hero who is brave, clever, and fortunate in equal and sufficient measure, great treasures and glory await in the Caves of Chaos that lie beyond the Keep on the Borderlands! TSR 9034

Important: The adventure is 1e but it has monster conversion notes for D&D 4th edition The town of Highport, once a human community overlooking Wooly Bay from its perch on the northern coast of the Pomarj, fell prey to hordes of humanoids swarming out of the jungle-covered hills surrounding the settlement. Though the orcs, goblins, kobolds, ogres, and gnolls razed much of the place in their ferocious rampages, the smoldering ruins they left behind soon became a new kind of community, a place of trade between the humanoid “locals” and the unsavory human traders who have no compunction about doing business with them. Slaves are a commodity in ready supply in Highport’s market, since many pirates raid up and down the coast of the bay, putting fishing villages to the torch and filling their holds with captured refugees. Slavery has become a thriving business in the town, and rumors abound of a cartel of Slave Lords who run things from behind the scenes, filling their coffers in secret from the buying and selling of human chattel. The trade has become so prolific that the good folk to the north have grown tired of these depredations and decided to fight back. Forces of righteousness and honor have recently descended upon Highport, some openly and others in secret, in various attempts to destroy the machinations of the Slave Lords and abolish the abominable enterprise that has taken far too many loved ones from home and hearth. One such doughty servant of goodness is Mikaro Valasteen, a cleric of Trithereon. Mikaro slipped unnoticed past the crumbling walls of Highport with a single mission: to rescue and transport as many slaves to their freedom as possible. Mikaro and a handful of faithful assistants located a number of escaped slaves—as well as rescued a few more not sufficiently restrained and guarded—and shepherded them through the gates and beyond the reach of their humanoid tormentors, returning them to their lands and homes. This covert freedom brigade enjoyed remarkable success early on, since the servants of the Slave Lords were often lax in their vigilance and sloppy in their efforts to prevent loss of the “merchandise.” After one too many shipments never made its destination, the humanoids stepped up their security and the normal channels of escape from Highport closed to Mikaro and his team. He cannot risk exposure by smuggling the freed slaves through the gates as merchandise any longer, since shipments of goods are now regularly stopped and checked. No longer able to free the slaves in that manner, Mikaro began hiding his charges in an abandoned villa in a particularly rundown part of the town. Although they are safe for the moment, their numbers have grown unmanageable, and the priest fears it is only a matter of time before someone slips up and brings slavers to their doorstep. Ever more desperate to find a new means of escape from Highport, Mikaro has started work on a plan that is both daring and dangerous. He intends to use a series of old sewers coupled with natural caverns running beneath the town as an escape route to the sea beyond the walls. But he needs someone to clear out the creatures and pitfalls he knows lie within. Pgs. 2-27

"Gnolls have captured the heroes! After stripping the characters of all equipment except their armor and clothing, the gnolls drag them to an expansive briar maze known as the Twisted Thickets and set them loose. Then, armed to the teeth, the gnolls hunt down their prey. The characters must survive the hunt and outwit their pursuers. Stripped of your armor and weapons, you are cast into the Twisted Thicket and hunted like rabbits. If you want revenge, you must first survive Yeenoghu's evil Hunters. After dealing with the gnoll hunters, the heroes can try to reclaim their lost equipment and exact revenge on the tribe, which lairs in the caves beneath Dead Gnoll’s Eye Socket." Pgs. 2-14

When a wizard makes a mistake, he makes a MISTAKE. Hirward the Wizard has a little problem on his hands - and it's destroying his fortress, followers and future. A good mix of character types is strongly advised, but paladins, rangers, dwarves, and gnomes may not be comfortable sparing the lives of Hirward’s kobold assistants. A generally neutral party composed of humans and half-orcs will stand the best chance of completing Hirward’s Task. This not a standard "hack-and-slash” adventure. The PCs will have to do some fighting to he successful in completing the module, but most of the time they must use their brains to figure out the best way to complete their mission. Pgs. 45-64

An interesting and atypical adventure in its writing style. For one the module contains insightful "When things go Wrong" sections and DM guidance for sticking close enough to the rails for the story and fun's sake. Lots of DM hints about how to handle PCs' choices. Overall the story is fine too - a traditional hook, a mystery, some twists. There's a tower, a surprise pocket-dimension context, and a dungeon. It's mirror of life trapping, isn't it? Well, yes and no. People go in, and they don't come out. Nor can you talk with anyone inside. Somehow, that's not quite the way you remember those mirrors work. This Skarda fellow showed up a few years ago with a band of raiders, and no one in the land has been safe since then. Whole villages have disappeared into this Skarda's mirror. Your band is approached by relatives of one of the victims?and adventurer like yourselves. You have to get into that mirror of whatever-it-is, find this man, and get him out in one piece. The reward is more that adequate. Only problem is, no one out here can tell you what to expect once you get in? or even how to get there. TSR 9188

A Villain with a Vison A stolen jewel leads to the heart of the swamp, where one man’s thirst for vengeance threatens to destroy an entire town. Pgs. 68-92

Written in celebration of Swords and Wizardry Appreciation Day 2017, Return to Fel’Valashar picks up where Dungeons of Fel’Valashar left off. In this book is a collection of mini dungeon adventures with a small region called Fel’Valashar that they take place within. Each of these adventures is written in such a way that they don’t have any ties to each other or to Fel’Valashar. This means you can easily drop them into your own world with no fuss. Includes: Details of the south-western region of Fel’Valashar. Four mini dungeon adventures. New monsters. New magic items.

This new version of the classic adventure is completely updated to 3.5 edition. In The Lost Vault of Tsathzar Rho, a defenseless village asks the characters to slay an out-of-control ogre. Sounds easy enough. But the ogre, who used to be nothing more than a nuisance, has become crazed and psychotic. When the characters arrive at its cave, they find a subterranean portal has connected the cave to a much larger underground complex. Something in that complex has transformed the ogre and many other local creatures into fiendish marauders. In fact, it’s the lost vault of Tsathzar Rho, an ancient wizard and prophet of the Outer Gods, who are gathering their foul minions for battle.
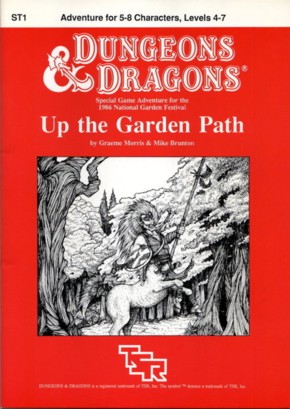
The day has been long and hard and, as night falls, you gratefully surrender to the soft, silent blackness of well-earned sleep. Then the dream comes. You are seated on a throne in a cavern where the sun has never shone; where no voice has ever spoken. Yet you are not alone. Through the darkness, silent figures are moving. Blacker than black... formless yet menacing... advancing towards you from every side... You fell their touch; icy claws plucking at your skin and hair, lifting the throne and carrying you helpless on a journey from darkness into further darkness, from silence into deeper silence. You scream, and a million anguished, reedy voices answer your call. Suddenly you awake... ... and the dream is real. A module printed exclusively in the United Kingdom by TSR UK. Using the 1986 National Garden Festival as its theme, this module was sold both at that festival, and at the 1986 Games Day RPG convention at the Royal Horticultural Society Hall in London (hosted by Games Workshop that Saturday, September 27th). It was briefly mentioned in White Dwarf magazine 82, page 49.

This deluxe adventure takes heroes into the ruins of Gardmore Abbey, a monastery that was once the base of a militant order of paladins devoted to Bahamut. According to legend, the paladins brought a dark artifact back from a far crusade and stored it in their abbey for safekeeping, and evil forces gathered to assault the abbey and take it back. What the legends don’t tell is that this artifact was actually the Deck of Many Things, a force of pure Chaos. This adventure brings characters into the extensive dungeons beneath the ruins - dungeons that are warped and twisted with the raw forces of Chaos surrounding the cards of the deck.

This adventure focuses on a Zhentarim attempt to spread terror in Mistledale, although it is suitable for almost any lightly settled area northwest of the Sea of Fallen Stars. "The Raiders of Galath's Roost" is suitable for four 1st-level characters, but PCs should be at least 2nd level before tackling the adventure's second half, the Zhentarim Citadel. Even in the first half of the adventure, many of the encounters are quite formidable for 1st-level characters, and the PCs might find it necessary to withdraw and recover one or more times before completely exploring the ruins.

An elder warlock from the goblinoid swamp village of Urzin has been kidnapped by soldiers of the Dwendallion Empire. Now the machinations of an evil imperial inquisitor might unleash an evil that could threaten the garrison at Fort Venture and the goblinoids of Urzin alike.

The end of the road. A lonely fort stands on the banks of a mighty river. It is here the hardy bands of adventurers gather to plan their conquests of The Hill, the hulking mass that looms over this tiny settlement. The Hill is filled with monsters, they say, and an evil witch makes her home there. Still, no visitor to The Hill has ever returned to prove the rumors are true or false. The thrill of discovery is too great to pass up, and only the river stands in the way. The adventurer's boat is waiting! This module is designed for use with the D&D Basic Rules. A trip through the wilderness begins a unique challenge for the novice player and Dungeon Master. TSR 9078

Restore an Abandoned Temple Enter the catacombs near the desecrated Temple of Muir, Goddess of Paladins, and search for the lost tomb of Abysthor. Will your party be able to cleanse the evil that now inhabits these once-sacred halls, and recover the Stone of Tircople? Can your characters survive the traps of an undead sorcerer? Will your players discover the chamber of Living Rock and the secret power it holds? Adventure awaits! Gold and Glory! A fantasy adventure published for the D20 system, The Tomb of Abysthor is the first module in Necromancer Games Dungeon series and can be played as a stand-alone story or in conjunction with The Crucible of Freya and the forthcoming city supplement Bards Gate. What secrets lie hidden in the tomb of Abysthor?
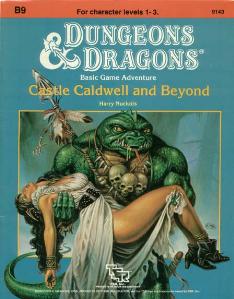
Five exciting short adventures to make your Basic campaign come alive! The Clearing of Castle Caldwell - A local merchant has recently purchased a small castle... but when he tried to move in, he discovered that the castle was already inhabited! Dungeons of Terror - A strange trapdoor in the floor of Castle Caldwell leads to a terrifying challenge! The Abduction of Princess Sylvia - On the eve of her wedding, the beautiful princess has been kidnapped! Can you save her in time? The Great Escape - Imprisoned in an enemy fortress, without armor or weapons, your situation seems hopeless. Yet there may be a way to freedom... The Sanctuary of Elwyn the Ardent - A mystical chime of great power has been stolen - but by whom? In the wrong hands, the chime can cause untold harm! But can you find and defeat this mysterious and powerful creature? TSR 9143

The mine has been known as Tessount’s Folly for years, due to it producing nothing of value. Now Valmour, the youngest son of the mine’s late owner, has inherited the mine...and found something he should have left buried. Pgs. 56-81