
After spending a little time going through dusty old tomes and documents your group has discovered a tapestry offering you clues to a long dead and buried king. Since kings are usually buried with their riches and no information shows that his tomb has been located perhaps a little grave robbing may be in order! This adventure has several wilderness spots for exploration as well as an old burial cairn with several levels. The only problem is that the king isn’t really “dead” in the normal sense.

The people of Northwood’s Rest need help. Winter is coming, and something’s been slaughtering the livestock. Surely it must be the orcs of the Northwood! Heroes are needed to hunt them down. Will you answer the call? Welcome to Hunted! The latest adventure from the critically acclaimed platinum best-selling author Tony Petrecca. Hey, that’s me! I’ll stop with the 3rd person talk now. My last release, Killer Kobolds, was all about unadulterated, non-stop run and gun action, and quite purposefully contained absolutely no moral quandaries. Its theme was simple - Kidnapping Kobolds needed killing… now go! The result was an absolute blast, but with Hunted! I wanted to explore notably different themes. With Hunted! Exploration, investigation, and role play go hand in hand with unexpected twists and turns to present an adventure I’m quite proud of. Worry not, action hounds, as there’s plenty of combat to be had, but with Hunted! mindless murder hobo’s need not apply. Set in the frontier town of Northwood's Rest, a simple thorpe on the edge of a forest, Hunted! lends itself to easy insertion into any campaign setting and would make an excellent side quest for Storm King's Thunder. With direct tie ins to Acererak, Hunted! fits naturally within any Tales of the Yawning Portal campaign. Scaled for a party of 4-6 adventurers of levels 5-7, Hunted! can be easily tweaked to accommodate parties of lesser or greater strength. Featuring gorgeous cartography by Ennie award winner Elven Tower Cartography, beautiful art, a bevy of new creatures, new locations, several potential plot twists and a fun new magic item, Hunted! should provide six to ten hours of outstanding Dungeons and Dragons 5th Edition adventuring fun.

Under the Temple Crypt is the first in a series of site-based, Swords & Wizardry** compatible, “micro modules” that can be dropped into just about any campaign (especially a sandbox-style campaign). No underlying story-hook or rationale for exploring the site is given here. This dungeon assumes that there is a temple somewhere with a mysterious walled-in doorframe in the basement crypt. The walled-in doorframe predates the temple itself and leads to ancient subterranean structures that hint of an older civilization as well as an expansive underworld.
Under raging storm clouds, the vampire Count Strahd von Zarovich stands silhouetted against the ancient walls of Castle Ravenloft. Rumbling thunder pounds the castle spires. The wind’s howling increases as he turns his gaze down toward the village of Barovia. A lightning flash rips through the darkness, but Strahd is gone. Only the howling of the wind fills the midnight air. The master of Castle Ravenloft is having guests for dinner—and you are invited. Spans levels 1-10.
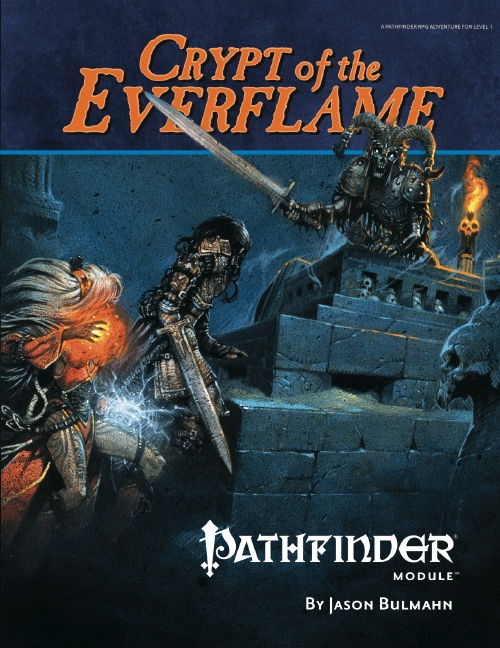
The young heroes of the town of Kassen are ready for their coming-of-age ceremony, an old tradition in which they retrieve a piece of the eternal flame burning in the tomb of the town's founder. Yet when they arrive there, they find only the corpses of their fellow townsfolk, dead bandits, and mysterious animated skeletons. The novice heroes must brave the traps and perils of the Crypt of the Everflame, discover the source of the corruption that has awakened an ancient evil, and defeat a menace that seeks vengeance against Kassen and its people. Part One of Price of Immortality.

The small village of Angst in western Famore has a humanoid problem. A missive on the message totem is calling for help to dispatch these pesky raiders. It is believed that they are working out of the abandoned Opair Keep. Locals gasp in amazement as the locale is well known to be cursed!
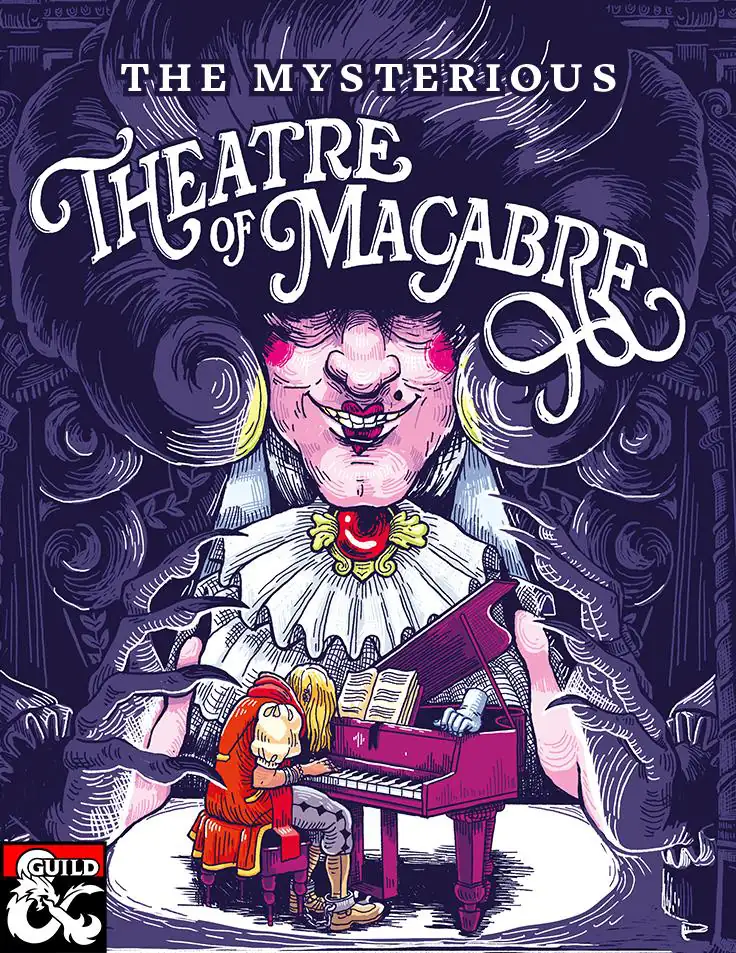
This is an adventure for one or two sessions with a group of 3-5 players from the level 3rd-5th. In this adventure you will be getting into a story full of humor and horror that will lead up to a big and marvelous theatre performance. The beloved local bard was kidnapped by a mad theatre nerd of a necromancer, which uses the bard in his grotesque production. It is on your party to save him! To run this adventure you need a Monster Manual 5e from Wizards of the Coast. Included: 3 adventure hooks to choose from Quick-start to get you right into the game A full script for the final play for you to perform 3 battlemaps with and without grid (included as JPG) Map of the town also usable as a starting town for your campaign (included as JPG) Custom monsters “Actor Skeleton”, “Broom Skeleton”, “Reginald van Fare” (Necromancer) _________________________________________ Dies ist ein Abenteuer für ein bis zwei Spielabende für eine Abenteuergruppe der 3. - 5. Stufe. Dieses Abenteuer ist eine lachhaft schaurige und furchterregend lustige Erzählung von einem Barden, welcher in einer feuchtfröhlichen Nacht von einem wahnsinnigen Dramaturg-Nekromanten in sein Theater entführt wird. Das ganze endet schließlich in einer pompösen Aufführung. Um das Abenteuer zu leiten, benötigt man ein Monsterhandbuch, vorzugsweise in englischer Fassung, da die Referenzen sich auf die englische Version beziehen. Inkludiert: 3 Abenteuereinstiege von denen man auswählen kann. Einen „Schnellstart“ um dich schnell zu Recht zu finden. Ein komplettes Drehbuch für die Aufführung. 3 Battlemaps mit und ohne Gitternetzlinien. Eine Karte für SpielleiterInnen und eine für SpielerInnen vom Dorf Höttingheim, welches auch gut als Startdorf für eine Kampagne verwendet werden kann. In Höttingheim gibt es einiges zu entdecken und NSCs kennen zu lernen. 4 eigene Monster die im Stück vorkommen. Deutsche Version hier: https://www.dmsguild.com/product/278151/Das-Mysteriose-Makaberitaten-Theater-2024-5e?view_as_pub=1

In ages past, the wizard Karavakos made a deal with devils, which resulted in him being trapped in an extradimensional pyramid, unable to escape. His only hope for escape is to lure adventurers into the Pyramid, in hopes that they will destroy his splinters and return his power to him. But his wife Vyrellis, whom he slew in a rage when the Pyramid formed, still lingers in spirit and wants nothing more than to see him laid low... Although set to allow PCs to just fight through each encounter, tips are included for PCs negotiating with the factions trapped in the pyramid.

A dwarven laboratory forgotten for many centuries has finally been rediscovered, but there is sure to be danger lurking within. It turns out some of the other machines within are still active, as are some of the traps and puzzles. Prepare your party for a blend of challenging puzzles and diverse fights in the dungeon that was home to my first player kill.
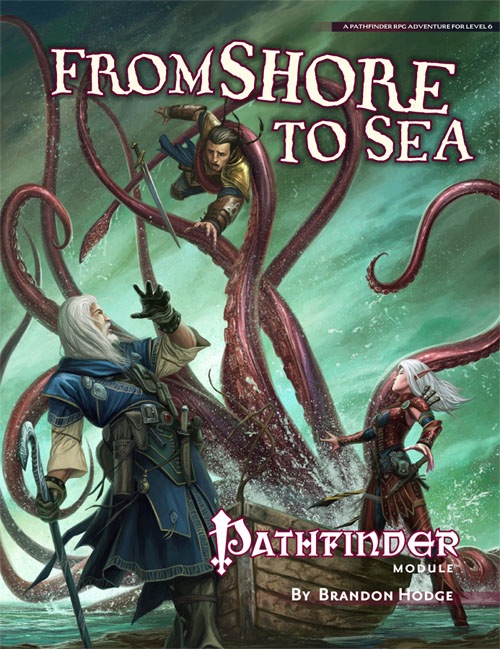
The deep waters of the Hellmouth Gulf have long concealed ancient mysteries, both wondrous and terrible. But these secrets have been submerged for too long, and the remote coastal village of Blackcove has accidentally awoken a slumbering horror from a bygone age. Strange creatures now venture from beneath the waves to steal townsfolk away in the dark of night.

Civil War Unrest. Turmoil. Rebellion. As above, so below - the cataclysmic events of the Wrath of the Immortals echo throughout the Hollow World setting. The Milenian Empire, with its classical Greek culture, has not escaped. Already the streets are un-safe, and the omens are getting worse... The emperor is dead... long live the emperor! But is the new emperor a man of the people, or a tool in the hands of malevolent powers? Walk carefully, for no stranger is safe upon the streets these days, and adventurers least of all! The mood of the capital city is turning ugly. Minions of the new emperor look on uncaring, while citizens disappear and philosophers fall to heedless mobs. The old emperor's elite guards are disbanded and scattered. Disorder reigns, and restless citizens threaten open revolt. And yet... a whisper is heard. Civil war can be averted. An ancient artifact, the Milenian Scepter, can rally those who would serve the Empire best. But the Scepter has been lost for generations, and who can say where it might be? The trail leads into the depths of the city, and across a dangerous wilderness to a forgotten oracle. For the lucky and the bold, perhaps it will lead to... THE MILENIAN SCEPTER This stand-alone adventure is compatible with the Wrath of the Immortals boxed set and the accessory HWR3, The Milenian Empire. You will need the D&D Hollow World boxed set to play this adventure. Easily adaptable to the AD&D game. TSR 9378

Just as the trail led from the STEADING OF THE HILL GIANT CHIEF to the frozen wastes where was found the GLACIAL RIFT OF THE FROST GIANT JARL, so the adventure in the latter place has let (or transported) the intrepid party to what they hope will be their last challenge. They are about to venture into the hot and smoking barrens which are in effect Muspelheim, the home of fire giants. This module contains background information, referee's notes, three level maps, and exploration matrix keys. It provides a complete module for play of ADVANCED DUNGEONS & DRAGONS, and it can be used alone or as the last of a three-part expedition adventure which also employs DUNGEON MODULE G1 (STEADING OF THE HILL GIANT CHIEF and DUNGEON MODULE G2 (GLACIAL RIFT OF THE FROST GIANT JARL). TSR 9018

‘The Secrets of the Twisting Colossus’ is a tale of alchemy and transformation. The heroes are the material components in the creation of an addictive potion. The heroes are lured into the experiment by the alchemist Paricalus, and once the heroes understand the true purpose it will be too late. The only escape is to understand the subtle clues around them and to keep moving forward. At the end of the experiment lies salvation but also the grand finale. If the heroes escape the experiment, they can confront their tormentor. In this 5E module (suitable for level 4-6 & adaptable to any setting), you will find: • 40-page module. • 3 colored maps and downloadable options for FG, Roll20. • 3 Appendices covering NPCs, magic items, and alternative chambers. • Handouts containing visual depiction to entice players. • 2-3 sessions of gameplay. • A dynamic dungeon where chambers change position. • Rules for miniaturized game play. • Old-school play-style suggestions. • Possibilities to use the module as a springboard to planar adventures. If you enjoy this module please let me know. Any feedback is greatly appreciated. Have fun!

A trek across the Shadow Marches leads weary travellers to Blackroot, a quiet village of ramshackle huts nestled among the darkwood trees. Here, orcs and humans live in peace. However, all is not well. Something evil has crawled up from below, threatening to devour the village and its denizens. Only a party of brave heroes stands in its way. In Khyber’s Harvest, the PCs battle an ancient evil threatening a remote village in the Shadow Marches. The dark power of the planes has grown strong in this place. Depraved cultists and twisted aberrant creatures are dragging innocents down into ancient caverns to undergo a horrific transformation. To save these helpless villagers, the PCs must overcome the terrors of Khyber—a quest that brings them to the attention of the dreadful Belashyrra, the Lord of Eyes.

Years ago, brave heroes put the denizens of the Temple of Elemental Evil to the sword. Now, dark forces whisper again in the shadows of the once-deserted temple - forces far more insidious and dangerous than any sane person could dream. Evil has risen again to threaten the village of Hommlet. A continuation of the original AD&D Temple of Elemental Evil, made for a party of 4th-level adventurers, taking them up to 14th level.

The Lost Tombs, Volume 1 Derro swarm in the Abbor-Alz. The Doomgrinder windmill's blades approach their zenith. Strange sightings in Hardby and rumors of a bandit empire in the mountains have commoners and nobles concerned. The Circle of Eight hopes that the key to averting this disaster can be found in the mysteries of a group of five ancient crypts, the Star Cairns. But first someone has to find the fifth cairn.... Five separate adventure sites playable individually or linked together, The Star Cairns can provide a diversion for treasure-hungry adventurers - or can be used as the seeds for an extensive campaign. Although the adventures are designed for four to eight characters of levels 5-8, each section can be adjusted for weaker or stronger groups. TSR 9579

Nightmares that kill, a mysterious thief that only steals knick-knacks, tales of a huge beast terrorising fisherfolk, an inn with disappearing guests, discoveries of hidden magic portals and rumours of an assassin at large: None of these things are enough to stop the ever-flowing tide of traders and travellers crossing the Bridge of Fallen Men, but its protectors - Cormyr's Purple Dragons - are short on time, and courage... ...will adventurers answer the call?

A fiend lurks among the Black Blade goblins. A shapeshifting barghest fashioned by the General of Gehenna to exact revenge on all goblin-kind. It’s aim: to kill as many goblin leaders as possible… A masked goblin approaches the party asking for help. Two tribe leaders are dead. But a rival for chief has control of the crime scene. Will the party discover the barghest among the goblin ranks? Can they stop this imposter before it strikes again? Adventure Overview The adventure’s story is spread over 4 parts and takes approximately 4 hours to play. The adventure begins with a Call to Action scene. Part 1: Goblin Politics. Krill sends his emissaries to implore help from any strong intermediary. The party is asked to investigate the murder of Thrawn in Dringly’s lair. This is Story Objective A. Part 2: The Opposition. Gain entry into Dringly’s lair and investigate the murder of Thrawn. Gather enough evidence to find the killer. This is Story Objective B. Part 3: To The Lair! Now that the players have determined the barghest (Yeep) is to blame, they need to get to Krill’s lair quickly as he is in imminent danger. This is Story Objective C. Part 4: The Barghest.When the players arrive at the lair, they need to get to Krill and expose and defeat the barghest. This is Story Objective D. Adventure Background A barghest named Yeep has begun its onslaught of attacks against the Black Blade goblins. Starting with Chief Gnar, then his second in command Thrawn, the barghest is moving methodically down the line of command. Krill is now chief. But he has some problems: Two leaders of the Black Blades are dead. Who killed them and why? Is he next? Dringly, the next in command, has decided to take his lair for himself, declaring himself Chief of the Black Blades. Who are the Black Blades? The Black Blades are a tribe of goblins in the local area. They are known for dipping their blades in a dark black substance. It is rumored these blades are poisonous. The Black Blades regularly attack passersby on the road to rob them. The Black Blades have two lairs, one run by a chief who leads the whole tribe, and another overseen by a boss lieutenant. The Black Blades have a well-established pecking order which is how Krill stands to become chief. The next in line is Dringly, who has also declared himself chief and wants Krill dead. Krill suspects that there is something suspicious about two leaders being killed within a day of each other, but he has already burned Gnar’s body without any investigation. He needs to investigate the body of Thrawn, but it is in Dringly’s lair. Krill wishes to avoid direct confrontation with Dringly at the present for three reasons: 1) Any violence would only kill his own tribe members and further divide the lairs. 2) He believes there is still hope for negotiation to reunite the Black Blades. 3) He believes that if he were to attempt negotiations himself, Dringly would kill him. This adventure features: Two maps. Ready for your favorite Virtual Tabletop. A full color pdf. A black and white pdf. One custom monster, a reprint of barghest, all others available in the Monster Manual. Four hours of entertainment involving: roll playing a goblin bard, investigating a murder scene, tracking down a barghest before it strikes again. Applicable to any setting.
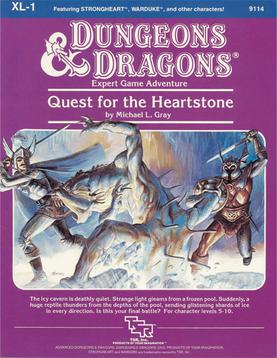
The King is dead! And the queen is in trouble. She has chosen you to find the fabled heartstone, which is buried somewhere deep in the Mountains of Ice. Is the gem I the hands of the corrupt Master Thief? Has he harnessed its powers for his own vile purposes? Or does it lie unguarded in the frozen ranges to the north, which teem with horrible creatures? This is your kind of quest! Quest for the Heartstone is a combined wilderness/dungeon adventure designed to be compatible with the Advanced Dungeons & Dragons Action Toys from LJN Toys, Ltd. and the Advanced Dungeons & Dragons Fantasy Adventure Figures from TSR, Inc. The adventure also includes complete maps, new monsters and players' illustrations. Will the heartstone be the key to peace in the kingdom? By her majesty's request... it's up to you to find out! TSR 9114

Stop evil cultists of the Crushing Wave. The party rescues a member of the Brotherhood of the Cloak in Mulmaster (local mage guild); Drayson Fivestar. Drayson asks them to investigate the murder of his colleague. After some urban investigation, the investigation leads to a former guard tower of the Zhentarim, now occupied by elemental cultists. The tower was submerged in mud, but recently uncovered. The party faces of with the cultists. (Large page count, but feasible as a one shot after some editing, will probably take two sessions at most)