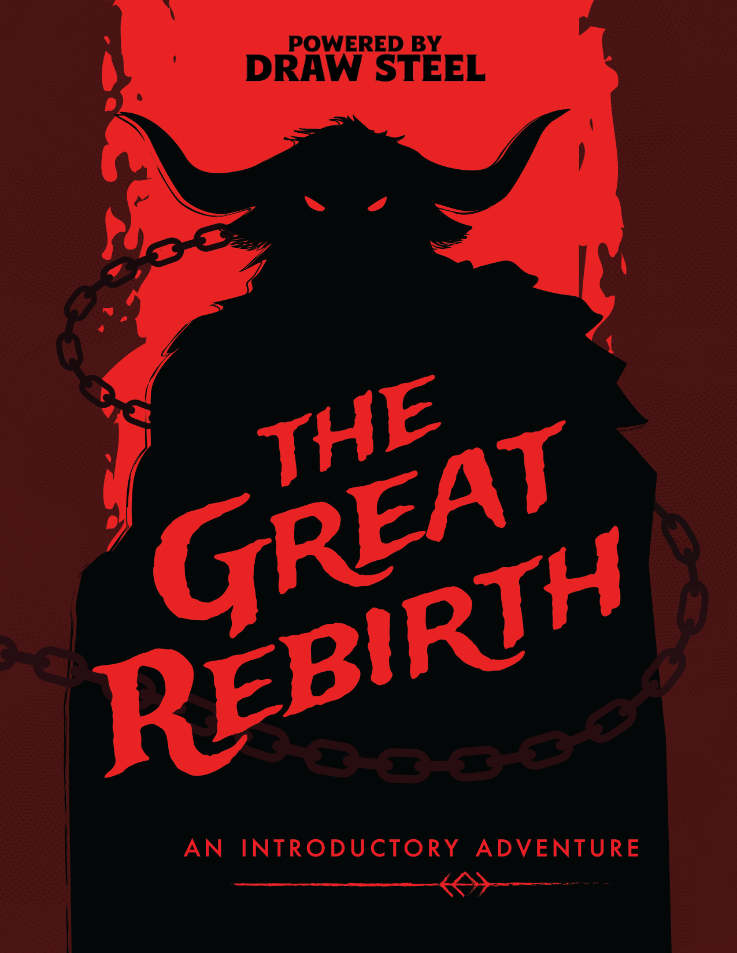
Darkness festers deep inside the forest of Logard. A beast has emerged, killing and abducting local villagers. A secret society of monster hunters has enlisted the heroes to help find one of their missing members and aid them in killing the beast… The Great Rebirth is a streamlined Draw Steel adventure with embedded rules references to make running and playing fun and easy. The adventure is laid out so players are introduced to a new mechanic (tests, combat, montage, and negotiation) one at a time, keeping the game and story engaging, without being overwhelming. What is this adventure about? The heroes have answered the call to eliminate a beast that has rampaged through the local village of Logard. They receive help in navigating Logard forest where they discover and explore a set of ruins while learning about tests. The ruins are trapped and a group of cultists send the heroes plummeting into their lair; combat ensues. From there it's a fast-paced journey of survival as the heroes escape a collapsing dungeon in a montage test, then negotiate with a speaking stone door in order to finally gain access to the monster they’ve been looking for: a being that has undergone the evil saint Eseld’s ‘Great Rebirth.’ Who is this adventure for? This is an ideal adventure for those wanting to run Draw Steel for the first time or looking to onboard newer players. The adventure is broken into various encounters, each focused on separate mechanics. This allows players to learn the different aspects of Draw Steel in a digestible and fun way. The Great Rebirth Features: - A 3-6 hour level 1 adventure for 5 players. (Balance suggestions included for various party sizes.) - 3 custom encounter maps (2 for combat, 1 for tests). - Embedded stat blocks and ‘Rules Recap’ text to keep things flowing at the table and minimize time spent searching for common answers. - All original artwork from Katrina Neyra (cover art) and Shaeomar.

Disturbing shadows have grown long over the northern reaches of The Land of Song. The fierce people who once fished the chilly fjords and hunted in the evergreen peaks now huddle in their villages. An evil is abroad in the land. The heroes are charged by Jarl Yngvar with traveling to the Valley of the Sleeping Jarls, an old tomb in the hills where dead kings are laid to rest, to discover the source of the malevolence bearing down upon the land and with eradicating it. Who can say what evil lurks amid the towering peaks and shadowed fjords? For decades this malevolent being plotted his vengeance upon Hjalmar’s heirs, for the jarl had gone the way of all mortals. Taking for himself the name Mogens (“powerful”), this evil spirit, now a self-styled dark lord, gathered wicked cronies and servants to itself and came to the Valley of the Sleeping Jarls. There, he has spent nearly two decades corrupting and desecrating the sacred resting place, reshaping the hollowed tombs into a blasphemous temple to his infernal lord.

Long ago, the eight tribes of the Softoy Valley put aside their differences and united in peace to erect a great monument to test the mettle of their young men and women. Only by defeating the challenges and guardian of the monolith could a child demonstrate their strength and wisdom to complete their coming of age in the community. All of the tests can be defeated by mind or might in recognition that each member of the tribe has unique skills that can benefit everyone. Although the tribes are long since gone, the monolith remains for adventurers to test their skills.
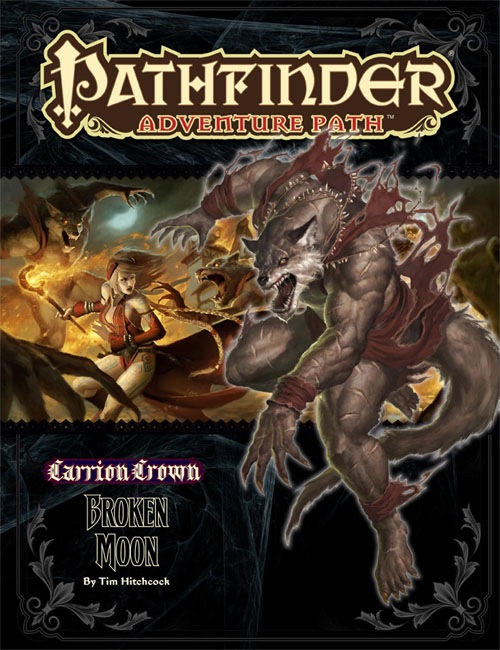
Part 3 of the Carrion Crown Adventure Path takes the heroes to the infamous Shudderwood in Ustalav. They travel to Ascanor lodge, the only safe place in the woods, to find more information on the necromantic cult The Whispering Way and meet a colorful group of npcs that reside at the lodge. The werewolf packs that live in the woods are on the brink of war as their pack leader has disappeared and as the heroes get involved, strange things start happening within the lodge. Soon all three story lines will intertwine and the heroes are left to piece the puzzle together and follow the trail left by The Whispering Way. It's worth noting that this book does an excellent job at fleshing out the npcs (lodge residents and werewolves) both through stat blocks and background information including history and motivations. This book includes: - “Broken Moon,” a Pathfinder RPG adventure for 7th-level characters, by Tim Hitchcock - The secrets of the Whispering Way, a notorious cult sworn to the powers of death and undeath, revealed in blasphemous detail, by Adam Daigle - Insights into the savage lives of werewolves, wererats, and other lycanthropes, by Gareth Hanrahan - Laurel Cylphra comes face to face with an ancient mystery in the Pathfinder’s Journal, by F. Wesley Schneider - Seven exciting and deadly new monsters, by Tim Hitchcock, Rob McCreary, and Patrick Renie

Ducklings. It's not too late too close this page, and go and find an adventure about happy-go-lucky halflings, or emotionally stable young adventurers. This is not that story. You can still walk away, and find some other engagement that your players will forgive you for running. Open this little document, and you will be introduced to the wretched streets of Elysium. Home of aberrations, mystery and futile quests for meaning in the drowned streets of the tortured city. Escape is unlikely. Enjoyment fleeting. I implore you, turn away and don't look back. Mind flayers stalk streets plagued by invisible death. Curses bubble from ancient evils sleeping beneath the water. Questions lead to questions, which evolve into answers you will only regret asking for. Go whilst you still can. There is nothing here for you but death. Prologue: Welcome to Elysium Chapter One: The Crooked House Chapter Two: The Broken Prison Chapter Three: The Temple of the Gaunt Silhouette Chapter Four: The Grand Library Chapter Five: The Adamant Asylum Chapter Six: The Dancing Spider Chapter Seven: The Undercity An adventure for characters of level 15+ Contains: An introduction to Elysium, a Ravenloft domain filled with eldritch mystery and drowned secrets, including Life In Elysium, The Rule Unspoken and the Marks of Horror that set Elysium apart. Guidance on Madness in Elysium, with Elysian Madness tables for your horror/amusement. A list of Elysian locations, some of which will be expanded in later releases. Elysian random encounter tables, day & night. An Elysian Wild Magic table, miserable magic items and tragic trinkets. The first installment - The Crooked House, in which we meet the Duchess and her parade of dead husbands. The seconf installment - The Broken Prison, where the shadows of gods walk amongst men The third installment, The Temple of the Gaunt Silhouette, where broken fragments of reality are reached by strange avenues. The fourth installment, The Grand Library, where the things we wanted to forget prove impossible to truly banish. The fifth installment, The Adamant Asylum, where medicine and madness meet. The sixth installment, The Dancing Spider, in which there is no rest for the wicked. The seventh installment, The Undercity, where your worst suspicions are confirmed. Three new character backgrounds: the Eldritch Detective, the Information Broker and the Tempter of Fate. The long-suffering Elysian character race, with two subraces. The first One Page Woes collection, included here for your convenience, which contains thirteen reasons to be thoroughly miserable.

Twilight at Eventide is a 32-page collection of three short adventures designed for characters of level 1-3. In the village of Eventide, the walls separating the settlement from the Feywild are weak. And strange creatures stalk the surrounding forests. Dark forms worship their demigod in hidden caves. A darkling elder has returned to take what was promised to him. And people enter the woods never to return. The village is in need of heroes. Will you answer the call? In this product, you will find: a description and map of the village of Eventide a vivid cast of characters in the village a variety of detailed location maps, including an old mine, an abandoned farmhouse, a decrepit tower, and a ruin adventures that feature xvarts, darklings, dryads, and hags a combination of roleplay, exploration, and combat encounters

The Shattered Circle is an AD&D® adventure for four to six player characters of 1st to 3rd level. For many ages, the standing stones known as the Circle of Cahervaniel have stood on a grassy hilltop, unremarkable and unmenacing, but something has changed. A powerful artifact deep within the earth has been uncovered, and its evil power has corrupted the recent inhabitants of a dungeon complex. The chitine live within, a cross between humans and spiders created by the drow, but trying to live a quiet existence. The evil Foundingstone has corrupted some of the chitine, and split their society in two, bringing them to conflict. Adventurers who navigate the chitine factions and dangerous dungeon will need to end the threat of the Foundingstone and the solve the mystery of the strange dark unicorn Mizar that has appeared recently around the stones. Interestingly, one of the unique magic items in this adventure, Icerazor - is said to have grown from a shard of Frostrazor, a sword that appears in a famous later adventure - Return to White Plume Mountain. There is a brief mention of Suloise, so it can be considered a Greyhawk adventure, but clearly states it can be placed anywhere.

Captured! While trekking across a trackless wasteland, your stalwart band has fallen into the clutches of a nefarious gang of desert raiders. Imprisoned in a subterranean chamber, you are bereft of all of your equipment and magic items, save for a few tattered loincloths. But as chance would have it, an opportunity to escape the cell presents itself. To escape, you must head deeper into an ancient sealed tomb, armed with nothing but your wits and anything you can find along the way. Getting to the surface is just one of many challenges, as you still need to recover your precious equipment, and flee the Lost Oasis, which is surrounded by an inhospitable sea of solid glass!

No description available.

Hushed Hills is an adventure location set in a haunted town nestled in hilly woodlands. It doubles as a toolbox with encounters and NPCs to support DMs in running a gothic horror adventure. You can use it in three ways: 1. Run the Hushed Hills as a Tier 1 adventure that takes one, two, or three 5-hour sessions (based on the starting quest you select). 2. Select the best encounters and NPCs to add to your game. 3. Use the presented content as fuel to inspire your ideas. This toolbox is packed with assets and consists of: • 50 encounterswith 4 quests to tie them into an adventure. • 21 NPC outlines (including eldritch chimeras), • 3 multi-phased boss battle against the Godless Chimeras. Assets are grouped into 3 regions, including Crestfall Abbey, Town of Kletva, and Mirage Forest. Each region has a high-resolution map and each NPC a portrait. Published by: Immersive Adventuring

This strange fruit has an unusual aftertaste. That horrible blue, bug-eyed monster you just fought - was it really an orc? An alchemist hires the party to gather as many moonmelons as possible for his own experiements. This strange fruit causes random mutations in the offspring of those that eat it. Unfortunately, it can only be found in the domain of a strange and mutated orc tribe. Pgs. 24-31

The rough ground on the outskirts of the village of Col Fen once served as a graveyard for an evil temple destroyed long ago. A recent disturbance released some of the ancient evil buried here, and now the dead in this graveyard are beginning to walk. Several villagers have already vanished and more will die if the undead are not put to rest. Pgs. 56-63

Modrons, Mephits & Mayhem is a Dungeons & Dragons 5E tier 2 adventure for three to five characters of levels 5-8. It is primarily set in a modron-designed research facility that has been abandoned by its creators but retains guardians that are still active. Additionally, two groups have broken into the facility with their own goals in mind; the githyanki and their red dragon cohort are antagonistic and provide the main source of combat in this adventure, while a modron traveling with a few mephits may prove friendly although ultimately troublesome. Inspired by adventure games in which the protagonists explore baroque, esoteric technological fortresses, and seeded throughout with factions that sport competing and often bizarre goals, Modrons, Mephits & Mayhem is sure to test the mettle of any group of players, and will provide endless amusement for Dungeon Masters seeking something different from the typical hack-and-slash dungeon crawl. This 70-page adventure features: *Two wilderness areas, random wilderness encounters, and a massive, interlinking 3-level dungeon filled with bizarre puzzles. *Ancient machinery powered by elemental portals, all of which can be activated, turned off, or manipulated by the player characters and the various factions within the modron facility. *Planar creatures like githzerai and githyanki, modrons, mephits, and elemental guardians, skillfully placed into the High Moor area of the Forgotten Realms setting. *Monsters and NPCs that have detailed (yet easy to run!) personalities and goals that will provide tons of roleplaying opportunities. *Notes and sidebars on running the NPCs with added complexity, or simplifying the NPCs' motives to make the adventure more straightforward. *Tactics notes for every single encounter! *An appendix that features all monster stat blocks, and both tagged (DM) and untagged (Player) versions of the dungeon maps. *Wilderness hex map by Elven Tower Cartography! Three interlinked dungeon levels by Dyson Logos...and one of them is a flying fortress! Cover art by Patrick E. Pullen!

HSING bears foul news: SEER has been captured. While exploring the ruins of Ulcaster in search of knowledge pertaining to runes (or perhaps even how to create them), they were separated and now the pseudodragon fears the worst. Without SEER's guidance, the efforts of the assembled factions in these recent events may all be for naught.

The ruined Thorp of Rhu once produced honey, apples, hard cider, and mead. Villagers now stay away as they believe Rhu is cursed. Years ago a witch, Katla, was cheated from a reward promised for chasing away an attacking giant. Furious, she waited for her chance at revenge. Over a year, Katla created many small sack dolls and gifted them to Rhu’s children. One night, each doll animated, killed the sleeping adults, and set the village on fire. Now Sorcha, the village elder, asks the PCs to go to Rhu to locate a lost dwarven friend, help a restless soul, and find out what really happened to Rhu long ago. These outsider sack doll spirits take great pleasure in tormenting and slaying weaker creatures. At Rhu, the PCs encounter murderous sack dolls, learn the villagers’ & dwarf’s fate, parlay with spirits, and clash with Bloody Tears, the witch’s minion & spirit familiar. Published by Wicked Cool Games

Your group of fledgling adventurers has come together from their respective backgrounds to seek out their fame and fortune in the wilderness. Upon their initial foray they uncover the lost ruins of a forgotten city. Little do these young adventurers realize that they may come into contact with a page and cover of the relic known as the Codex of Gamber Dauch!

The beginning adventure to the Dragonlance, War of the Lance series of adventures, upon which the Dragonlance novels are based. The companions meet in the Inn of the Last Home to discover a barbarian couple with a mysterious staff. The PCs journey to discover the staff's history which leads them to a ruined temple to the Forgotten Gods. Includes a full map of Xak Tsaroth and overland maps, some color. Art by Jeff Easley. TSR 9130

Venzor Trench is set for a group of characters hired to deliver a magical item between two warring countries. The sea voyage becomes tumultuous and the ship goes down. With the mission unfilled the players utilize the magic item to survive on the bottom of the sea floor and continue to trek their way towards completing their misson through the legendary Venzor Trench!

For months, the dreams of the people of Emystrell have become dark and terrible. It seems their nightmares have come to life as in recent weeks, people have mysteriously gone missing, vanishing in the night without a trace! Everyone is too paralyzed by their own despair to do anything or venture far from the safety of their homes. Emystrell is on the brink of collapse. The baron is offering a handsome reward to anyone who can show proof of the end of whatever evil curse that has taken hold of their town. This adventure is designed for a party of 3-5 heroic characters from the 2nd to 3rd level. It has elements of mystery and investigation in the first section which can be detailed and highly involved for groups that enjoy the process of searching for clues and solving mysteries or just as easily glossed over for groups that are more tactics focused. The second section of the adventure features the dungeon: a labyrinthine complex of an ancient elven crypt which the thieves guild has used as a base of operations for a decade...until the serpent worshipping cult arrived. The third section of this book is the detailed map and notes on the town and surrounding area of Emystrell. Roleplaying notes are kept light to allow for room for your own interpretations and details to NPCs remain as free to do with as you choose unless I felt inspired and hoped to give you a cool idea. This adventure has hooks for Dungeon Masters interested in a larger campaign involving the sinister plots of the Yuan-Ti (snake people) as well as other interesting adventure hooks (such as the giants in the nearby mountains or the stolen gem: The Eye of the Dragon). These plot points are intentionally left vague for you to fill in the gaps based on what your players seem interested in. You are invited to use this as a launch point adventure to lead your heroes on a larger adventure that might someday set them against an Anathema Serpent demigod, or it may simply be the adventure that begins their journeys and the evil of Yargoth stops here at Emystrell. If your campaign is set in a pre-published setting, this town of Emystrell can be replaced or fit into any campaign with a few tweaks to local gods and names. If you are playing in Dragonlance, you could replace Yargoth the Dread Serpent with Tiamat, or Dendar in Fearun. The local goddess, Tyr, could be the Tyr from the Forgotten Realms or even Norse myth if that is your campaign setting.

All ocean voyages are fraught with peril, yet a voyage to the infamous Isle of Dread might seem to some old salts to be a deliberate goading of the gods of the sea. Many of those who have attempted the voyage before managed to return to civilization often choose not to speak of the trials they experienced on that dangerous route, yet those whose lips can be loosened by a draught of grog whisper amazing stories... tales of pirates, sea monsters, terrifying storms, and perhaps most harrowing of all, of a strange and sinister land without land, a floating graveyard of dead ships mired in a sargasso the size of an island. This place has many names, but its most well-known may be it's most apt - Journey's End. "The Sea Wyvern's Wake" is the third chapter of the Savage Tide Adventure Path, a complete campaign consisting of 12 adventures appearing in Dungeon magazine. For additional aid in running this campaign, check out Dragon magazine's monthly "Savage Tidings" articles, a series that helps players and DMs prepare for and expand upon the campaign. Issue #350 of Dragon magazine features a regional guide to the seafaring environs the PCs can expect on the journey to the Isle of Dread. It’s time to bid farewell to the city of Sasserine as the PCs board the Sea Wyvern for a 3,000-mile voyage south into the uncharted waters of the Vohoun Ocean. Their destination: the Isle of Dread. Pgs. 16-48