
When the PCs turn up in the village of Ditch Nettle, they are tasked with solving the mystery of various disappearances. Will they be able to uncover the culprit, a worshiper of the long-dead cult of Morloski, goddess of the Slithering Brood. Or will they get stymied by local politics?

All ocean voyages are fraught with peril, yet a voyage to the infamous Isle of Dread might seem to some old salts to be a deliberate goading of the gods of the sea. Many of those who have attempted the voyage before managed to return to civilization often choose not to speak of the trials they experienced on that dangerous route, yet those whose lips can be loosened by a draught of grog whisper amazing stories... tales of pirates, sea monsters, terrifying storms, and perhaps most harrowing of all, of a strange and sinister land without land, a floating graveyard of dead ships mired in a sargasso the size of an island. This place has many names, but its most well-known may be it's most apt - Journey's End. "The Sea Wyvern's Wake" is the third chapter of the Savage Tide Adventure Path, a complete campaign consisting of 12 adventures appearing in Dungeon magazine. For additional aid in running this campaign, check out Dragon magazine's monthly "Savage Tidings" articles, a series that helps players and DMs prepare for and expand upon the campaign. Issue #350 of Dragon magazine features a regional guide to the seafaring environs the PCs can expect on the journey to the Isle of Dread. It’s time to bid farewell to the city of Sasserine as the PCs board the Sea Wyvern for a 3,000-mile voyage south into the uncharted waters of the Vohoun Ocean. Their destination: the Isle of Dread. Pgs. 16-48

"Tyr is free! Tyr is free!" Such is the heady cry that echoes from the darkest warrens to the gleaming chambers of the Council in that ancient city. Now is your chance to savor life released from the oppressive gloom of the sorcerer-kings-but for how long? New forces threaten the newly-born independence of Tyr, as outside forces march upon the city. King Tithian is determined to resist, but there are others on the Council of Advisors less eager to risk their wealth and lives for the cause of independence. It falls upon you to help mobilize and lead the citizen-army of Tyr on the road to Urik. In Road to Urik, the city-State of Tyr has thrown off the yoke of the sorcerer-king Kalak and declared all slaves free, but the neighboring city-state of Urik is amassing its own armies to conquer Tyr. In the first part of the adventure, the PCs must negotiate with various factions of the city in order to win their support for the war effort. In the second part the PCs leading a scouting force ahead of the main army, and the choices and successes in the first part will affect the troops they lead here. Finally, they will need to fight and lure away the Urik army's own scouting force, letting the army of Tyr ambush them. The second and third part make heavy use of the Battlesystem rules, which were pushed pretty heavily in the early Dark Sun books. Like many Dark Sun adventures, the module makes heavy use of handouts that come in a flip-book along with the main adventure. This adventure is a sequel to Freedom. It stands on its own, but the plot of the adventure is based on the events of Freedom and the novel the Verdant Passage, so you can't really run them in reverse order. Much like Freedom took place concurrently with The Verdant Passage, Road to Urik takes place just before the events of The Crimson Legion, the second novel in the Prism Pentad. TSR 2406

Bring a party of adventurers to a bustling city, where mysteries and dangers lurk around every turn. Just when you think you have the answers, a whole set of new questions arise. No matter which leads you follow, you will find yourselves... "At the Heart of Corruption" - one-shot murder mystery and fantasy horror adventure.

When a Thayan research expedition returns from the Glacier of the White Wyrm with only two survivors that are reduced to whispering about an ancient pyramid under the ice, perhaps it is time to discover just what scares the life out of a nation of necromancers. The events of DDEP2 Mulmaster Undone resulted in terrible geographic upheaval all around the southeastern region of the Moonsea. Massive landslides, earthquakes, tidal waves, and gnashing tornados devastated the land and the city of Mulmaster was nearly scrubbed from the face of Faerun. Fortunately, these events also revealed previously hidden artifacts—trinkets, mostly—from the ancient Netherese all around the city. The Thayans have long held an interest in the port city and wasted no time in assisting in the rebuilding efforts. They simply asked that a blind eye be turned to their archaeological interests, and in return they would continue to spend their own resources (at no expense to the Mulmasterites or even the High Blade) to rebuild the city, bigger and better than before. It wasn’t long before their interests paid off with the discovery of a research laboratory beneath the Glacier of the White Worm, far to the east of Mulmaster and nestled in the mountains. The Thayans sent a sizable expeditionary force but only two acolytes returned. The visiting Zulkir has found this particularly troublesome, and with the assistance of Rastol Shan, the head of the Cloaks, has arranged for a mercenary force to perform a more pointed investigation of the area. In return the Thayan noble has promised significant compensation. Upon arrival at the dig site, the characters are quick to discover that the laboratory hides ancient and palpable evil. The purpose of the facility can be discerned with careful investigation, and the effect of the still-active fragment of the Dark Obelisk has empowered (some may say attracted) servants of the Worm that Walks. Danger and death await, certainly, though the characters always have the option of running away and living to fight another day…

Come: the land of Sri Raji and the ancient rakshasa, evil masters of illusion and shapeshifting, await! The Web of Illusions module is a 64-page adventure featuring an exemplary full-color map. Players travel through the deadly land of Sri Raji, an Eastern Indian domain of jungles, savage tigers, and lost temples. Also depicted in the AD&D™ rulebook, Legends & Lore. TSR 9415

Detailed encounter, easily convertible into an adventure. Starts from investigating ambushes on the mountain pass and quickly escalated into a more twisted story about duergars, alhoons, and treasure vaults. Setting-agnostic (classic fantasy - best)

It isn’t just the weather outside that’s frightful! Now that winter has arrived in full force and the predators of the wild have grown desperate, it’s more important than ever that shipments of vital supplies be given proper escort – especially around the Midwinter holiday, when such shipments become all the more frequent! A sleepy town on the far side of a mountain range is counting on you to make this Midwinter a joyous and healthy one! Some greedy and cheerless monsters may have other ideas… “A Miraculous Time” includes: The fourth leg of the BASIC series The return of Ronius, Willow, Meeris, and Kale, fully upgraded for level 4 play. Magic items that give reference to prior adventures A spin on an oft-overlooked character in the Christmas tradition A grading system to let you know how well you’ve done!
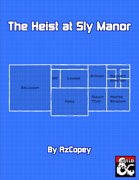
"You sneak into a museum filled with all sorts of strange displays, from fierce weaponry and intricate jewelry through to demonic statues and a strange obsidian monolith. You begin to take a couple of steps towards the monolith when darkness swirls around you as the museum's protections jump to life..." This is a one-shot heist adventure in which the players must infiltrate a high society event and steal a powerful magical item from right under the nose of an accomplished wizard. They will encounter mind-bending illusory defenses and compete with a secondary heist party, all while avoiding the gaze of the guards. This adventure is for four level 5 players (though adjusting for 3-6 players would be minimal effort) and is expected to take around five hours. It includes: * An exciting heist with several twists * Two new heist-based mechanics: Flashbacks and Guard Alert Level * Two optional objectives for the players to complete * A new monster to fight: the shadow duplicate * Two new items: the rod of illusia and the jade figurine of the deinonychus * Simple rules for running a skill challenge * Detailed maps of the manor as well as schematics for planning

The Adventurers arrive at a drow outpost in the Underdark. They must either dispose of the drow or ally with them against the invading legions of Orcus!

Disturbing shadows have grown long over the northern reaches of The Land of Song. The fierce people who once fished the chilly fjords and hunted in the evergreen peaks now huddle in their villages. An evil is abroad in the land. The heroes are charged by Jarl Yngvar with traveling to the Valley of the Sleeping Jarls, an old tomb in the hills where dead kings are laid to rest, to discover the source of the malevolence bearing down upon the land and with eradicating it. Who can say what evil lurks amid the towering peaks and shadowed fjords? For decades this malevolent being plotted his vengeance upon Hjalmar’s heirs, for the jarl had gone the way of all mortals. Taking for himself the name Mogens (“powerful”), this evil spirit, now a self-styled dark lord, gathered wicked cronies and servants to itself and came to the Valley of the Sleeping Jarls. There, he has spent nearly two decades corrupting and desecrating the sacred resting place, reshaping the hollowed tombs into a blasphemous temple to his infernal lord.

Different worlds have different laws. But everywhere you go, you're going to find people who bend and break those laws and turn a healthy profit doing it. Whether sailing the high seas or the Flow, they are called pirates. It's these pirates that you've been hired to hunt. With letters of marque in your mapcase, your job is to track down and capture, alive or dead, some of the most dangerous characters in the known( and unknown) spheres. Of course, not everyone in space is a pirate. You'll also meet Torgan Betz (a man famous for bending the laws, rarely breaking them), Tiktitik, the Thri-kreen crusader, " Thought Taker," the illithid, and the feared Drow commander Teela Darkcloud. Even so they all have their personal agendas, and it's often hard to tell enemies from friends. TSR 9286

In this level 5 adventure for three to five players, a suspicious death brings our adventurers to the village of Degorod on the night of an annual festival. Celebrations turn into chaos as an unknown force abducts villagers from above. The group must investigate the cause and, in the end, decide who to help. Pgs. 101-107
Terrible Trouble at Tragidore is a 16 page tournament module for 5th to 8th level characters. Notorious for being one of the worst modules of all time, with implausible background and encounters and a railroad of a plot.

One page side quest, one page maps. For decades old Alma Scarlet-thorn and her cat, Ferox, entwined as witch and familiar, reveled in tormenting travelers passing near her lair. But, recently, Alma has favored her newly created mist golem more. Although Ferox has enjoyed the power of their bond, she now believes the magical connection is no longer worth this jealousy. The cat, Ferox, has been searching for a way to punish her mistress or remove the golem. Adventure hooks provided. Published by Wicked Cool Games

A fiend lurks among the Black Blade goblins. A shapeshifting barghest fashioned by the General of Gehenna to exact revenge on all goblin-kind. It’s aim: to kill as many goblin leaders as possible… A masked goblin approaches the party asking for help. Two tribe leaders are dead. But a rival for chief has control of the crime scene. Will the party discover the barghest among the goblin ranks? Can they stop this imposter before it strikes again? Adventure Overview The adventure’s story is spread over 4 parts and takes approximately 4 hours to play. The adventure begins with a Call to Action scene. Part 1: Goblin Politics. Krill sends his emissaries to implore help from any strong intermediary. The party is asked to investigate the murder of Thrawn in Dringly’s lair. This is Story Objective A. Part 2: The Opposition. Gain entry into Dringly’s lair and investigate the murder of Thrawn. Gather enough evidence to find the killer. This is Story Objective B. Part 3: To The Lair! Now that the players have determined the barghest (Yeep) is to blame, they need to get to Krill’s lair quickly as he is in imminent danger. This is Story Objective C. Part 4: The Barghest.When the players arrive at the lair, they need to get to Krill and expose and defeat the barghest. This is Story Objective D. Adventure Background A barghest named Yeep has begun its onslaught of attacks against the Black Blade goblins. Starting with Chief Gnar, then his second in command Thrawn, the barghest is moving methodically down the line of command. Krill is now chief. But he has some problems: Two leaders of the Black Blades are dead. Who killed them and why? Is he next? Dringly, the next in command, has decided to take his lair for himself, declaring himself Chief of the Black Blades. Who are the Black Blades? The Black Blades are a tribe of goblins in the local area. They are known for dipping their blades in a dark black substance. It is rumored these blades are poisonous. The Black Blades regularly attack passersby on the road to rob them. The Black Blades have two lairs, one run by a chief who leads the whole tribe, and another overseen by a boss lieutenant. The Black Blades have a well-established pecking order which is how Krill stands to become chief. The next in line is Dringly, who has also declared himself chief and wants Krill dead. Krill suspects that there is something suspicious about two leaders being killed within a day of each other, but he has already burned Gnar’s body without any investigation. He needs to investigate the body of Thrawn, but it is in Dringly’s lair. Krill wishes to avoid direct confrontation with Dringly at the present for three reasons: 1) Any violence would only kill his own tribe members and further divide the lairs. 2) He believes there is still hope for negotiation to reunite the Black Blades. 3) He believes that if he were to attempt negotiations himself, Dringly would kill him. This adventure features: Two maps. Ready for your favorite Virtual Tabletop. A full color pdf. A black and white pdf. One custom monster, a reprint of barghest, all others available in the Monster Manual. Four hours of entertainment involving: roll playing a goblin bard, investigating a murder scene, tracking down a barghest before it strikes again. Applicable to any setting.

"A great cat sits upon the northern grasslands, my friend, waiting to pounce on adventurers just like you." As you part the tall grass with your sword, the words of the tavernkeeper echo in your head. "He was the mightiest wizard we'd ever known, and that Lion Castle was his home." Your friends' voices mingle with the tavernkeeper's. "He's but a ghost now, haunting those halls, and waiting for an heir." The ground rises slightly. A strong wind rushes through the field. Suddenly, the grasses part, and Lion Castle rises majestically before you! "Magical riches await those who enter!" "Beware of man-beasts!" Voices flood your head again. Will you brave the haunted castle? Can you afford not to? It's all up to you in this D&D Solo Adventure. Ghost of Lion Castle is for one player only, but that one player makes all of the choices and enjoys all of the rewards. An entire castle and courtyard await your exploration. The adventure also includes a complete solo combat system. TSR 9097

The Hardest of Hearts is a gothic horror adventure for 4-5 characters of 5-6th level. It can be played over the course of 6-8 hours and should roughly take one playing session if the party is quick, or two if the party is progressing slowly. This is the first part of the Carnival of Lost Souls campaign. It can also be played as a standalone adventure. The Hardest of Hearts features: - Exciting journey through the cold wilderness of Lamordia, which features a special travel system and survival rules - Exploration of the old mansion which has been taken over by the vicious local gang - the Corpse Collectors - Several custom diseases to challenge your players - Moral dilemma at the end of the adventure which the characters will have to solve - New custom monsters to make combat encounters truly memorable and exciting - High-quality maps, also available in universal vtt format Look out for the next adventures in the Carnival of Lost Souls series: Dementlieu: Dance with the Devil, Kalakeri: The Forbidden Temple and Valachan: Hunter’s Moon! They will be released over the course of the next two months. Once all four adventures are out, we will also release a special Campaign Guide, which will explain in detail how to best set up and play the campaign. However, if you want to start your campaign right now, don’t worry - we have included a short appendix at the end of each adventure which will explain the basics!
This book goes over the various rules around the faction of the Zhentarim in Phandalin and the Forgotten Realms, making it easy for any new or veteran DMs to integrate it more into the core stories being told, and making the faction feel more useful for the players that choose to join. The adventure, Barrhindlun sees the adventurers working for the Zhentarim and traveling to the town of Leilon and finding their way beneath to the muddy lost city of Barrhindlun, where bandits of the Xanathar Guild have been sent to reclaim a Crystal Orb.

A5e Solo Gamebooks quest for 1 Level 2 PC, this adventure sees the brave adventurer enter Weathercote Wood in search of a noble's son. The local legends around this wood are full of terror... Dare you enter? This is written like the classic 80s gamebooks Lone Wolf and Fighting Fantasy... no DM required! Part of a series, the PC can then continue to Tyrant of Zhentil Keep, and Citadel of the Raven beyond that.