
While in the peculiar village of Basht, a town full of strange customs and superstitions, an elderly woman asks you to check in on her grandson, a Gondite tinkerer testing out his latest invention in a nearby cavern. Sounds easy enough, right? A Two-Four Hour Adventure for 5th-10th Level Characters This adventure originally debuted as custom content for the 2019 U-Con convention in Ann Arbor, Michigan. Visit them at https://www.ucon-gaming.org/

Encounters in the Savage Wilderness contains 19 encounters / mini-adventures, a few new creatures and items, and downloadable maps. We've also added suggestions on how to use the encounters in Eberron.

Refugees in Mulmaster have had a fairly tough time, and that was before the disappearances. The few that return have been changed, refusing to believe that they were even missing. You have been asked by Mulmaster’s nobility to find the source of the disappearances and put an end to them. This adventure premiered at AMERICA's Cup 2018 in New Zealand.

Enjoy a day at the faire and a chance to earn some easy coin in the process! A wealthy merchant wants to hire security for his daughter’s extravagant handfasting ceremony. It sounds like simple work, but why would a merchant hire seasoned adventures as wedding security? Perhaps the groom has some skeletons in his closet? A 4-hour standalone adventure for 11th-16th level characters Note. This adventure was written for Role Call 2019, a small Adventurers League gaming convention in Collinsville, IL. For more information about Role Call, visit rolecallcon.com.

This dungeon is suitable as a one-shot or drop-in for characters between levels 12 and 17. Taken from the Against the Idol of the Sun high-level hexcrawl campaign, the Death Knight's Tomb is a location-based exploration adventure. It features increasing localized time distortions that ultimately pit the party in a fight against an ogre Death Knight and his minions who just destroyed an elven time lab over ten millenia ago, which is just a few seconds ago in relative terms at the bottom level. There are six distinct sections to the dungeon containing four combat encounters of increasing difficulty. As written, the party enters the structure to rescue an overly adventurous Scorpionfolk couple and their rescuers, but they can be omitted or rewritten to any other species.
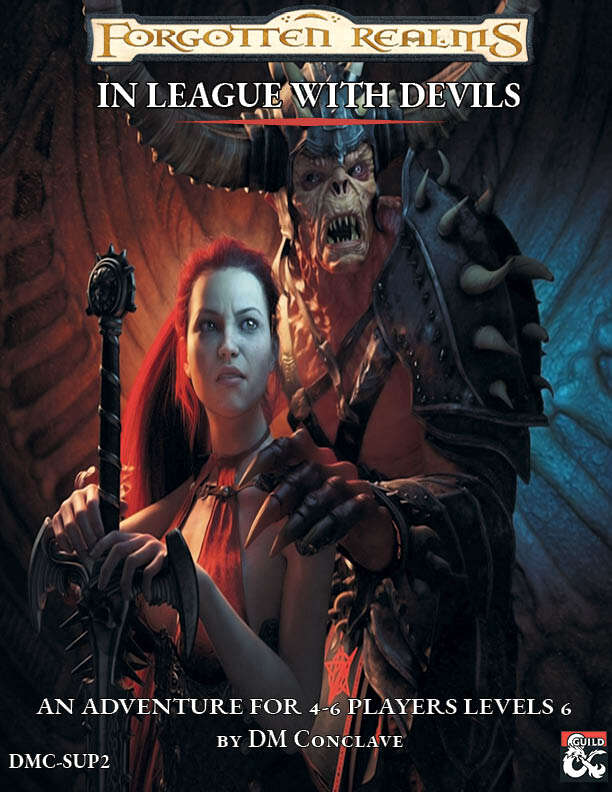
This adventure is a supplementary scenario for Baldur’s Gate: Descent into Avernus, which can be used while the party is fleeing Elturel and are heading towards Fort Knucklebone at level six. It entails a bargain with Bagrivyek, the goblin deity of cooperation. The God offers them a deal they can’t refuse, significant magical assistance for their quest, should they become its test subjects in a fight to the death with some of its elite troops. Devils that have been infected with a special substance, which is called soul-ichor and was created by a psychomancer, in search of his own power. The heroes will have a chance to interact with a god and bargain with it, a fight to the death at the Hellbent Fighting Pits, and also get a chance to learn of or even be introduced into a long-forgotten school of magic. Will the players reap all the benefits of this god-deal, or suffer the consequences of failing?

For months, the dreams of the people of Emystrell have become dark and terrible. It seems their nightmares have come to life as in recent weeks, people have mysteriously gone missing, vanishing in the night without a trace! Everyone is too paralyzed by their own despair to do anything or venture far from the safety of their homes. Emystrell is on the brink of collapse. The baron is offering a handsome reward to anyone who can show proof of the end of whatever evil curse that has taken hold of their town. This adventure is designed for a party of 3-5 heroic characters from the 2nd to 3rd level. It has elements of mystery and investigation in the first section which can be detailed and highly involved for groups that enjoy the process of searching for clues and solving mysteries or just as easily glossed over for groups that are more tactics focused. The second section of the adventure features the dungeon: a labyrinthine complex of an ancient elven crypt which the thieves guild has used as a base of operations for a decade...until the serpent worshipping cult arrived. The third section of this book is the detailed map and notes on the town and surrounding area of Emystrell. Roleplaying notes are kept light to allow for room for your own interpretations and details to NPCs remain as free to do with as you choose unless I felt inspired and hoped to give you a cool idea. This adventure has hooks for Dungeon Masters interested in a larger campaign involving the sinister plots of the Yuan-Ti (snake people) as well as other interesting adventure hooks (such as the giants in the nearby mountains or the stolen gem: The Eye of the Dragon). These plot points are intentionally left vague for you to fill in the gaps based on what your players seem interested in. You are invited to use this as a launch point adventure to lead your heroes on a larger adventure that might someday set them against an Anathema Serpent demigod, or it may simply be the adventure that begins their journeys and the evil of Yargoth stops here at Emystrell. If your campaign is set in a pre-published setting, this town of Emystrell can be replaced or fit into any campaign with a few tweaks to local gods and names. If you are playing in Dragonlance, you could replace Yargoth the Dread Serpent with Tiamat, or Dendar in Fearun. The local goddess, Tyr, could be the Tyr from the Forgotten Realms or even Norse myth if that is your campaign setting.

The Lamenting Lighthouse is a four-hour adventure for 5th-10th level characters, designed for Dungeons & Dragons 5th Edition, with a nautical theme, heavy undead and horror elements, and mysteries to solve! One lonely lighthouse shines the way through the rocks and shoals that deny entry to the northern Moonshae Isles. But when the party’s transport approaches, a horrific gale at their backs - no light is in sight... The party must venture ahead of their vessel in a race against the storm to the restore the beacon before their ship is lost. What has befallen the keepers, and what dark secret does the lighthouse hold? Will the heroes prevail, or will they join the lighthouse's lament? This adventure can easily be inserted into a run-through of Ghosts of Saltmarsh. This one-shot can also serve as a nautical interlude in any on-going campaign where the characters have to take to the sea. Included with this adventure are: + 6 original custom creatures, the dread wraith, the dread wight, the swarm of seagulls, the captain, the rating, and the sailor + 12 player hand-outs with notes that shed light on the mystery of the lamenting lighthouse, with a randomization mechanic that ensures a degree of replayability + 9 original fleshed out NPCs, including personality traits and roleplaying tips + 2 original magical artifacts + 7 hand-drawn maps of important locations + a story reward and 2 story hooks for continuing the adventure (depending on how the adventure resolves)

Sharn is paralyzed. Half of the council was under the control of roach thralls for the last 20 years, and with the conspiracy revealed the government apparatus is at a standstill. The criminal organization Daask rises from the underbelly to take control of the chaos and further destabilize the city.

An omnious encounter with a fortuneteller sends a party of adventurers on a 200-mile journey across the Lands of Intrigue. While traveling throught the towns and terrain (detailed here for the first time) that lie in their path, they hear rumors and obtain clues about their mission. Their ultimate destination is Castle Spulzeer, a once proud stronghold that has become a den of terror. When the heroes enter the haunted keep, they meet a terrifying trio of residents: a madman armed with stolen magical power, a liche whose secret laboratory houses untold horrors and treasure, and a furious ghost bent on revenge. These three ensnare the party in their fight over an ancient weapon. Each will stop at nothing to keep it from the other two. The heroes must choose with whom they will ally - and the wrong choice could lead to their doom. Castle Spulzeer is an adventure complete in itself. However, as a crossover story, it offers every Dungeon Master a choice between two endings. The first leaves the party in the Realms. The second transports the characters to the Demiplane of Dread, where the plot continues in the Ravenloft adventure The Forgotten Terror. For 4 to 6 Characters of Levels 8-12 This conversion guide allows DMs to run the original module with 5th Edition rules. To use this conversion guide you will need a copy of Castle Spulzeer, originally available in hard-copy and now for sale in digital format on the DMs Guild. Visit Classicmodulestoday.com for instructions on creating your own classic module conversions and selling them on the DMs Guild. Castle Spulzeer was originally scheduled for publication by TSR in June 1997. Then, near-bankruptcy caused a total failure of TSR's schedule, resulting in no books being published from February through the very end of July. Some books would be delayed for over a year, and others would disappear altogether, but Castle Spulzeer was relatively lucky: it was just delayed four months, until October 1997. The reason may well have been its theming, and its crossover with the Ravenloft line, which made Castle Spulzeer a great Halloween release. Castle Spulzeer has an even more far-reaching connection: its ending can lead players to the demiplane of Ravenloft and The Forgotten Terror adventure. This was probably intended as a bit of advertising for Domains of Dread (1997), the third edition of Ravenloft which was released in August 1997. In other words: in their last days, TSR was working very hard to cross-market their products, but they didn't live long enough to see the success of the Spulzeer-Intrigue-Dread connection.

The characters, members of the Clifftop Adventurers’ Guild, have been tasked with acquiring the Chains of Mur’taal, an artifact tied to Thelanis, by their guild handler, Lhara. This artifact is the latest in a series that Provost Nigel Faurious has commissioned the Clifftop guild to retrieve for him. The adventure starts when the characters arrive in Rhukaan Draal via Orien caravan. They’re given a chance to explore a small portion of the city before they head to a local bar to meet their contact provided by Lhara. Accompanied by a local guide, they make their way to the Seawall Mountains, where they’ll have to follow clues and their intuition to find the Valley of the Hero, which conceals the artifact that they’ve been hired to obtain. In order to earn the artifact, characters must first pass three tests laid before them by the Story: The Test of Courage, the Challenge of Wisdom, and the Trial of Honor. Once they finish the tests and collect the artifact, the party heads back toward Rhukaan Draal. But there are Marguul forces in the area, and they don’t intend to let the heroes escape with a priceless piece of their folklore…
"You enter some sort of corridor, but it is a far departure from the airship hallway you expected. The walls and ceiling are rusty chain-link fences and the floor is a corroded mesh of iron slats. Beyond the fence is a void of black, unmoving emptiness which carries the faint scent of ozone and rotten meat..." Inspired by horror franchises such as Silent Hill and Saw, Flight of Madness is a one-shot horror adventure in which the players must venture though an airship which has been warped by the plane of Xoriat--also known as the Realm of Madness! During the adventure the players will attempt to save the crew from unspeakable horrors, uncover the nature of the madness that has afflicted the ship, and face off against the one who appears to be responsible for all of this. But is everything as it seems? The adventure is for four level 5 players and is expected to take around 5 hours to complete. It is a great introduction to the darker side of Eberron for DMs and players alike. • An exciting mystery to unravel, with multiple interpretations and endings • An alternative to the madness mechanics provided in the Dungeon Masters Guide, which is integral to the final encounter of the adventure • Two terrifying new monsters: the winged torso and corrupted captain • Detailed battle maps as well as a map of the ship • Newspaper hand outs for the end of the adventure • Terrifying monster art WARNING: This is a horror adventure aimed at mature audiences and as such includes extreme violence and disturbing scenes. Before running this adventure it is recommended that you confirm that your players are comfortable with the adventure’s contents.

This is the introductory adventure in the Bugger's Mill campaign. It introduces the characters to the village of Oak Mill along edge of Border Forest and has them hunt down a local arsonist, as well as assist with putting out a forest fire.

The increasingly erratic behavior of Lady Selyse, Knight Captain of the small, but strongly held frontier outpost Fort Selsmire, is provoking unrest among her soldiers and fear from passing supply caravans. Many whisper of how the Captain now goes without sleep for days at a time, pacing the walls of the keep long into the night. Despite these rumors, the party has found employment at Fort Selsmire, conducting additional patrols of the nearby forests. While patrolling, they find evidence that may lead to the strange creature who seems to be provoking the Captain to madness. Pgs. 69-73

The town of Warlorn is often thought of as a peaceful one. Not much happens there, and it is usually considered a place of peace were parties could convene to make truces or were the hurt could always come to find someone to care for them. Perceptions can often be incorrect however. The church of Ilmatter, God of Suffering, acts as an effective government in the town. Illmaters tenants are that to help all those who have suffered and to take on their suffering so that they may be healed. To them suffering is truly Holy, and to take suffering on from another is seen as the greatest way to prey to their god. Not everyone is as virtuous as a god, even his own followers, and humanity in taking on holy suffering is still left with desires; lusts that can be corrupted. When the Duchess of Manipulation who delights in corrupting church men spoke to the leader of this clergy of Ilmater, it was no difficult task for her to find a loophole in Illmaters word that she could exploit. If suffering was holy, then truly it should be those that do not yet understand Ilmater’s ways that should feel this suffering. Using a cultist of hers, she was able to create a child that could later be used as an ingredient for a portal right to her layer of hell. It’d be two birds in one stone; corrupt a devoted followers of a god she hated to later take their souls as her own, and create a portal that she could use to cross both herself and her armies to the material plane. When the players enter the scene, the child will have already been kidnapped, and the child’s mother will be hanging up fliers giving out a reward to anyone that can find her child. The players will find themselves needing to infiltrate the Church of Ilmater into its secret underground cult so that they can save the child and stop Glasya from finding her way to the Material Plane.

Over a millennium ago, a clan of dark elves broke away from their evil kin and fled from the city of Menzoberranzan. Though many lives were lost in the initial exodus, the large numbers of the renegade band ensured that they were more successful than any could have hoped. And yet, the drow that finally arrived into the surface world found themselves shunned at every turn by those unable to see past their appearances. Just as their hope was beginning to wane, a song rang out through the night, beckoning the way to the sea and to a silver ship waiting amidst the dark waves. Many years have passed, and little knowledge remains of the strange island that the dark elves came to call their home, but the wicked Lolth forgets nothing. Evil magic converges upon El’tara and begins to steal away the light of hope. Whether through fate, mere coincidence or perhaps divine intervention, a band of adventurers find themselves standing at the shores of this land in the time of its greatest need. This adventure should run for approximately four to five hours and may be played either as a one-shot or as part of an ongoing campaign. It contains guidelines for running the adventure at any level from 1st to 8th and for a variety of group sizes.

In a village shrouded in mystery, a tale unfolds that will linger in your memory. Cattle mutilations, sacred stone circles, and dark rituals intertwine as werewolves prowl through this gothic tragedy. Venture with us south of Neverwinter, to the village of Phandalin, for an adventure tailored for characters anywhere from levels 3 to 6. This one-shot episode is perfect for a group of friends seeking an immersive experience or as an intriguing addition to the "Phandelver and Below: The Shattered Obelisk" campaign. You can easily adapt this module to most any campaign setting. Featuring five maps crafted by the esteemed Tessa Presents Maps, this game includes a sprawling 120 x 120 premium battle map of Phandalin, maps for wilderness encounters, and custom tokens. Welcome to the party!

Dice roll and cards fly at the Dove House of Luck in Waterdeep... but it's not all fun and games, as your party must stake out the casino and determine whether a crooked card dealer is stealing from the house, and what she's up to. Gamble and be merry... but even games of chance have a habit of leading back to the mysterious forces of quarrelsome Gods. Lucky be Malady is a D&D 5e urban adventure module set in Waterdeep, suitable for Tier 1 (level 1-3) parties. Schmooze with other gamblers, chase down crooked dealers, uncover plots orchestrated by the gods of fortune themselves. Think you're lucky? 2-4 hours of gameplay in any urban setting New rules for 4 games of chance 1 new curse 3 NPC stat blocks Beautiful hand-drawn maps and art assets An ally with a heart of gold... or copper? Introduction for adventures focusing on self-determination vs. fate This module is set in Waterdeep but can be modified to fit any urban setting. It gives resources for parties in need of an NPC healer, and also introduces players to powerful curses that cannot be rested off without help. It can slot into any adventure where your party has entered a large city and offers questions and dilemmas that can be brought forward into future modules to challenge your players. Also, who doesn't want to spend down-time gambling with all that monster loot? Module written by, and interior art assets by TL Massey: https://twitter.com/t31im4s Cover art by Kat Brechtel: http://kbrechtel.com/ Written through the RPG Writer Workshop FW19: https://www.rpgwriterworkshop.com I'd be really grateful for feedback! Comment/review below, or reach me @t31m4s

Bandits have kidnapped the eldest child of one of Timbertown’s prominent citizens, who is secretly being manipulated by shadowy forces. You are tasked to get her back. But there are questions. Is she his real daughter? Does she want to be found? Who is behind the kidnapping in the first place? If you bring Evi home alive, your rewards will be great, and your standing in the town will increase. But if you fail, or if the demon worshippers of the Fraternity of Tharos gain a further foothold for their secret society, Timbertown's future may be in jeopardy. This adventure can be played in any frontier campaign area, but is set in the author's home campaign setting of Timbertown, a barony in Impiltur, a kingdom on the Sea of Fallen Stars in the Forgotten Realms, also available from the Guild.

When a harsh winter turns uneasy neighbors into bitter rivals, or worse, Granny Grimsicle sees an opportunity to spread her unique brand of horror in Hrokstead. Short on food themselves and exhausted from their adventures, our heroes arrive in the frontier settlement to find that something is very wrong. Can they get to the bottom of the threat, and make it out alive? This title stands as a one-shot, but also plants seeds for the ongoing Hags of Hoarfrost anthology. It works great as a supplement to Icewind Dale: Rime of the Frostmaiden, or placed into your own homebrew setting, or run as a standalone adventure. This module includes a detailed battle map and a monster token for use on Virtual Tabletops, and player handouts presented as standalone images for easy distribution to your online players.