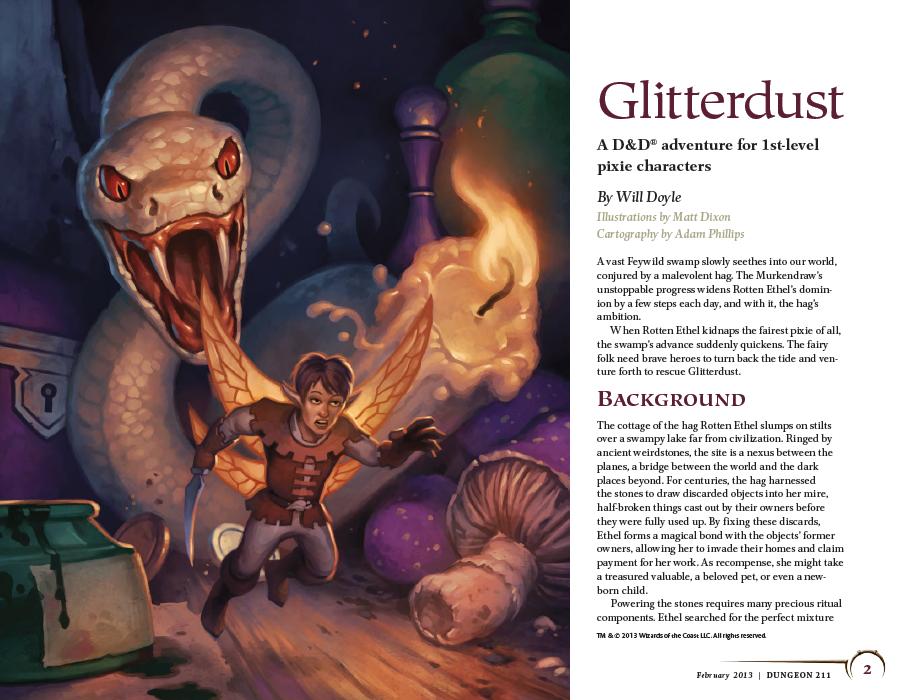
A vast Feywild swamp slowly seethes into the mortal world, conjured by a malevolent hag. The Murkendraw's unstoppable progress widens Rotten Ethel's dominion by a few steps each day, and with it, the hag's ambition. When Rotten Ethel kidnaps the fairest pixie of all, the swamp's advance suddenly quickens. The fairy folk need brave heroes to turn back the tide and venture forth to rescue Glitterdust.
Kingdom of the Blind is a short adventure for four 8th-level characters. The adventure is set in a minor duchy that is fairly removed from the ruler of the land. As a result, trouble can brew in the land and the king would not know immediately. The PCs have just learned that Dephyl is alive and well and ordering blocks of granite. Meanwhile, Zhanna and Dephyl are on the third floor. If the PCs encountered the animated staircases on the first floor, the shriekers on the second floor, or triggered the trap outside Dephyl's study, the couple knows someone unwelcome is downstairs and moving up. They begin to prepare for their arrival.

Where's Robin Hood When You Need Him? The Sheriff of Nottingham and the outlaws of Sherwood Forest share a common enemy. Will an unlikely alliance end this newest threat to the land? Pgs. 42-67

Dread tales told in the dead of night! When the shadows grow long in Waterdeep and the fireplace in the taproom of the Yawning Portal dims to a deep crimson glow, adventurers from across the Forgotten Realms, and even from other D&D worlds, spin tales of dark dungeons and spread rumors lost treasures. Within this tome are seven of the deadliest dungeons from the history of Dungeons & Dragons. Some are classics that have hosted an untold number of adventurers, while others are newer creations, boldly staking a claim to their place in the pantheon of notable adventures. The seeds of these stories now rest in your hands. D&D’s deadliest dungeons are now part of your arsenal of adventures. Enjoy, and remember to keep a few spare character sheets handy. Includes seven adventures: Against the Giants Dead in Thay Forge of Fury Hidden Shrine of Tamoachan Sunless Citadel Tomb of Horrors White Plume Mountain

Wicked forces conspire to usurp the power of the Raven Queen, god of death, by unraveling the foundations of reality. To prevent this cosmic coup, mighty heroes must survive an epic journey into the Shadowfell's timeless core, where all things find their end. The beginning of the end of the original 4th edition adventure path (although ties are very light to the heroic and elite tier adventures). The PCs must first prove themselves worthy to act as the Raven Queen's agents. They will then be sent to Death's Reach, a graveyard and dumping ground from the Dawn's War. There, they must fight through the Black Star Host- powerful elemental beings, to prevent Orcus was resurrecting a primordial, Timesus the Black Star. One notable encounter is a random encounter with the Worm of Ages. This huge worm has the ability to swallow and rules for moving creatures from its maw to its throat, gullet, and into the stomach.

Sekarvu is a typical beholder. It spent much of its youth exploring underground realms and killing everything it found. One day, it came upon a large cavern filled with violet fungi. At the edge of the cavern, it found a small band of adventurers who had all but succumbed to the toxins of the fungi's tendrils. They offered little resistance to Sekarvu as it approached and began to feed on their still-writhing bodies. With its first bite, the beholder's life changed forever. Pgs. 52-55

In order to stop a series of devastating giant raids, the party must venture into the stronghold of the frost giant jarl Grugnur to both recover the giants' plans and eliminate Grugnur, who is the tactical head behind the operations. The adventure is part of the "Against the Giants" series originally by Gary Gygax, hence the writing credit.

Long ago, before the arrival of civilized humanoids, a large colony of ogres thrived in the local area. When a great invasion from another dimension threatened this colony, their king, Koptila, prayed for his people to be spared. The gods heard these pleas, but commanded Koptila to sacrifice himself. The leader did so, and the clan disappeared—whisked away by the gods and lost to time. Over the years, a city grew up above the former subterranean home of the ogres, and no aspect of Koptila’s ancient bargain was preserved or remembered. Even so, the stars are aligned for the return of Koptila and his people. These powerful repatriates are unlikely to appreciate the changes in their old home. A sage has found dusty documents prophesying this return, and he asks the PCs to investigate the catacombs to defeat the potential threat to the city. The PCs travel down through city sewers and subterranean passages before finding the catacombs that the ogre colony once called home. Pgs. 48-53
A Giant Ransom is a short adventure for four 11th-level characters. There are opportunities for diplomacy, stealth, and combat, based on the choices the PCs make, so any mix of classes is appropriate. The adventure can be set in any campaign world, in a frontier region near glacier-covered mountains. In the story thus far, the PCs have been tasked by Duke Ambrinigan, a local lord, to recover a stolen statue of a golden lion. The lion was stolen in transit by frost giant raiders, and was to be ransomed back to the Duke for 10,000 gp. The PCs were sent to perform the exchange. The giants, however, were attacked by the white dragon Whildenstrank, who stole the statue and retreated to his lair in the middle of a nearby glacier. The PCs encountered the remaining giants, and then set off westward toward the dragon's lair. They traveled across the flat part of the glacier, encountering the frost giant ranger Velg the Dragon Tamer, as well as some burrowing bulettes. Then they braved the hazards of frost worms and remorhaz in the Ice Canyons: a maze of twisting passageways surrounding the black spire of rock that the dragon calls home. The PCs now stand at the edge of an open space, looking at the towering edifice in front of them.

Long unoccupied, the pyramid on Sorcerer’s Isle now flows with strange magical energy, warping creatures and the landscape around it. The Cult of the Dragon and Red Wizards of Thay have taken notice, and it’s up to you to keep whatever power dwells there out of their hands. An adventure for 5th-10th level characters.

Based on the popular Stranger Things Netflix show, this starter set adventure is designed for new players and features pre-generated characters and a simplified DnD 5e rule set.

An escaped duergar slave stumbles into the village of Elventree. With her she brings a malady that grips the small settlement in a bout of madness that seems unshakable. Can you find the source of the madness and save yourself and the village’s inhabitants? A four-hour adventure for 5th-10th level characters.
Every priest in the city dreamed last night of a forgotten temple carved into the side of a nearby mountain. In the dream, a storm raged deep within the temple, and the dreamers knew instinctively that evil forces sought to unleash that storm upon the surrounding lands. Pgs. 120-125

The Golden Dragon, conceived as a skyfaring warship, now serves as a symbol of peace among the Five Nations. Even before the luxurious airship embarks on its maiden voyage, nefarious pirates, thieves, and saboteurs conspire to defame, steal, or destroy it. Resourceful adventurers are needed to protect the ship and its passengers, but can they uncover the secret enemy lurking in their midst? "Voyage of The Golden Dragon" is a stand-alone adventure for the Dungeons & Dragons game that immerses your characters in the Eberron campaign setting. Designed to challenge 7th-level characters, it takes heroes on a perilous journey from Sharn to Stormreach and also serves as a launching pad for adventures the world over.
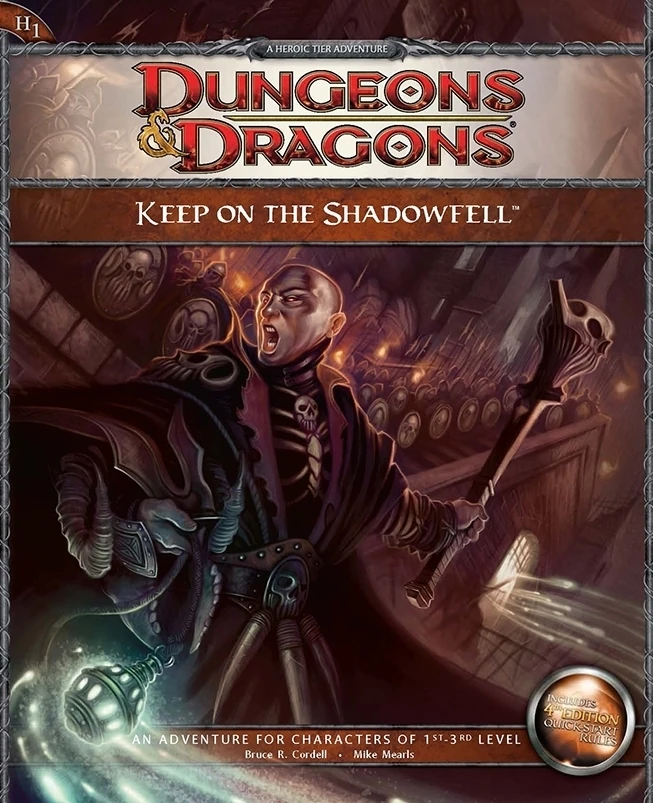
Darkness looms near Winterhaven! Kobold brigands have grown ever bolder in their attacks, marauding the once peaceful town, and a known explorer has been missing ever since their departure to the excavation site of a dragon burial site. When the party investigates, they will discover that the kobold's leader, Irontooth, bears a tattoo of a ram-headed demon. This is a troubling portent, for the townsfolk will report that this can only mean the dread god Orcus, master of death, has an active cult in that ruined keep! It is up to the party to enter the Keep on the Shadowfell and put a stop to the cult's fell machinations before it threatens all the realm. There they will fight the evil priest Kalarel, Scion of Orcus and seal off the vile portal to the dark realms he is master of. Should the heroes seize victory, glory and treasure are sure to be theirs. But first they must endure the challenges of that dreaded KEEP ON THE SHADOWFELL!

This adventure concerns a once-proud fortress that fell into the earth in an age long past. Now known as the Sunless Citadel, its echoing, broken halls house malign creatures. Evil has taken root at the citadel's core, which is deep within a subterranean garden of blighted foliage. Here a terrible tree and its dark shepherd plot in darkness.

A dark shape emerges from the shadow of Castle Ravenloft. A flash of lightning reveals the sneering countenance of Count Strahd von Zarovich. His eyes burn with eternal hunger and a contempt for life. From a narrow balcony, he peers out into the drizzling twilight at the few sad lights of the village below and mutters a single name: "Ireena..." Based on the classic adventure by Tracy and Laura Hickman, the Expedition to Castle Ravenloft campaign adventure updates the original 1st Edition "Ravenloft" module, retaining the Gothic flavor and familiar elements while expanding and reimagining some of the locations to create a deeper, richer adventure experience. This adventure is designed for characters of levels 6, bringing them up to level 10, and features a new, easy-to-use combat encounter format. This book also presents new magic items, feats, and prestige classes for player characters. For use with these Dungeons & Dragons core books: Player's Handbook, Dungeon Master's Guide, Monster Manual.

The time has come for the brave and the bold to put an end to the machinations of Maerimydra’s demonic occupiers and their fiendish fire giant ruler. This will be no mean feat; the city is a cesspit of corruption and madness. You will have help, however, as an unlikely group of allies have gathered to your side in the Underdark beneath Faerûn. Danger, glory, and redemption await those brave enough to seize it. With allies gained from denizens of the Underdark, the former drown enclave of Szith Morcane is on the precipice of being retaken. During the battle for Szith Morcane, secrets of the drow community are revealed. What will you do with this knowledge, and how will it affect the outcome of the conflict?

Giants have been raiding civilized lands in bands, with giants of different sorts in these marauding group. Death and destruction have been laid heavily upon every place these monster have visited. This has caused great anger in high places, for life and property loss means failure of the vows of noble rulers to protect the life and goods of each and every subject--and possible lean times for the rulers as well as the ruled. Therefore, a party of the bravest and most powerful adventurers has been assembled and given the charge to punish the miscreant giants. Remake of the original series of AD&D adventure.

The Sea Witch is a short adventure for four 10th-level characters. The difficulty of the adventure can be adjusted by changing the level of main antagonist (Black Molly, the sea hag pirate) or by altering the number of her ogre servants. To tailor the encounter to groups of different levels, refer to table 4-1 in Chapter 4 of the DUNGEON MASTER’S GUIDE. The adventure is set off a lightly populated coastline known as Misty Bay, but adapts easily to any coastal region in existing campaigns. The sea hag known as Black Molly is a notorious pirate who has plagued the coastal cities for the better part of a decade. A successful Knowledge (local) check (DC 15) will reveal that Molly and her ogre crew have a filthy reputation as merciless killers who delight not only in plundering vessels for their riches, but also in destroying the ships themselves and sending all hands to the bottom of the sea. Now the villain and her followers have seized control of the Old Lighthouse of Misty Bay located off a lightly populated coastline. For generations the lighthouse beacon has protected the fishermen of this region, warning them of the dangerous rocks that lurk just below the level of the high tides. Recently, the hag has put out the beacon, darkening the lighthouse; misery and destruction are sure to follow as ships start to blunder into the rocks. Blackmail is apparently Black Molly’s aim in this venture: She conveyed a message to the nearest shore community, the fishing village of Poisson, demanding the princely sum of 50,000 gp. Until she receives this ransom, she intends to hold the lighthouse and its beacon hostage. The fate of the human keepers who tend the lighthouse is unknown to the seaside communities at this time, but they fear the worst. The Sea Witch is ostensibly a rescue mission: The PCs are pitted against the evil of Black Molly and the brawn of her savage ogre crew. It is the heroes’ task to retake the lighthouse and, if possible, free its captives from the clutches of their jailer. What neither the PCs nor the shore communities yet realize is that while she 1would be pleased to have the gold, Black Molly is in fact after bigger treasure. Molly has no intention of giving up the lighthouse — at least, not until she finds what her master sent her here for. Lying on the sea floor practically at the base of the rock on which the lighthouse sits is the wreck of the war galley Flying Cloud, which according to popular legend was captained by a cleric who wore around his neck an amulet of the planes. Black Molly wants this prize, but so far she hasn’t been able to find it. She’s scoured the wreck without finding any sign of the magic item. Now she’s trying to determine where to search next, for the item might well be somewhere near the wreck. If she can’t find it, she’ll start torturing her captives to find out if they have any useful knowledge about the amulet.