
Important: The adventure is 1e but it has monster conversion notes for D&D 4th edition The town of Highport, once a human community overlooking Wooly Bay from its perch on the northern coast of the Pomarj, fell prey to hordes of humanoids swarming out of the jungle-covered hills surrounding the settlement. Though the orcs, goblins, kobolds, ogres, and gnolls razed much of the place in their ferocious rampages, the smoldering ruins they left behind soon became a new kind of community, a place of trade between the humanoid “locals” and the unsavory human traders who have no compunction about doing business with them. Slaves are a commodity in ready supply in Highport’s market, since many pirates raid up and down the coast of the bay, putting fishing villages to the torch and filling their holds with captured refugees. Slavery has become a thriving business in the town, and rumors abound of a cartel of Slave Lords who run things from behind the scenes, filling their coffers in secret from the buying and selling of human chattel. The trade has become so prolific that the good folk to the north have grown tired of these depredations and decided to fight back. Forces of righteousness and honor have recently descended upon Highport, some openly and others in secret, in various attempts to destroy the machinations of the Slave Lords and abolish the abominable enterprise that has taken far too many loved ones from home and hearth. One such doughty servant of goodness is Mikaro Valasteen, a cleric of Trithereon. Mikaro slipped unnoticed past the crumbling walls of Highport with a single mission: to rescue and transport as many slaves to their freedom as possible. Mikaro and a handful of faithful assistants located a number of escaped slaves—as well as rescued a few more not sufficiently restrained and guarded—and shepherded them through the gates and beyond the reach of their humanoid tormentors, returning them to their lands and homes. This covert freedom brigade enjoyed remarkable success early on, since the servants of the Slave Lords were often lax in their vigilance and sloppy in their efforts to prevent loss of the “merchandise.” After one too many shipments never made its destination, the humanoids stepped up their security and the normal channels of escape from Highport closed to Mikaro and his team. He cannot risk exposure by smuggling the freed slaves through the gates as merchandise any longer, since shipments of goods are now regularly stopped and checked. No longer able to free the slaves in that manner, Mikaro began hiding his charges in an abandoned villa in a particularly rundown part of the town. Although they are safe for the moment, their numbers have grown unmanageable, and the priest fears it is only a matter of time before someone slips up and brings slavers to their doorstep. Ever more desperate to find a new means of escape from Highport, Mikaro has started work on a plan that is both daring and dangerous. He intends to use a series of old sewers coupled with natural caverns running beneath the town as an escape route to the sea beyond the walls. But he needs someone to clear out the creatures and pitfalls he knows lie within. Pgs. 2-27
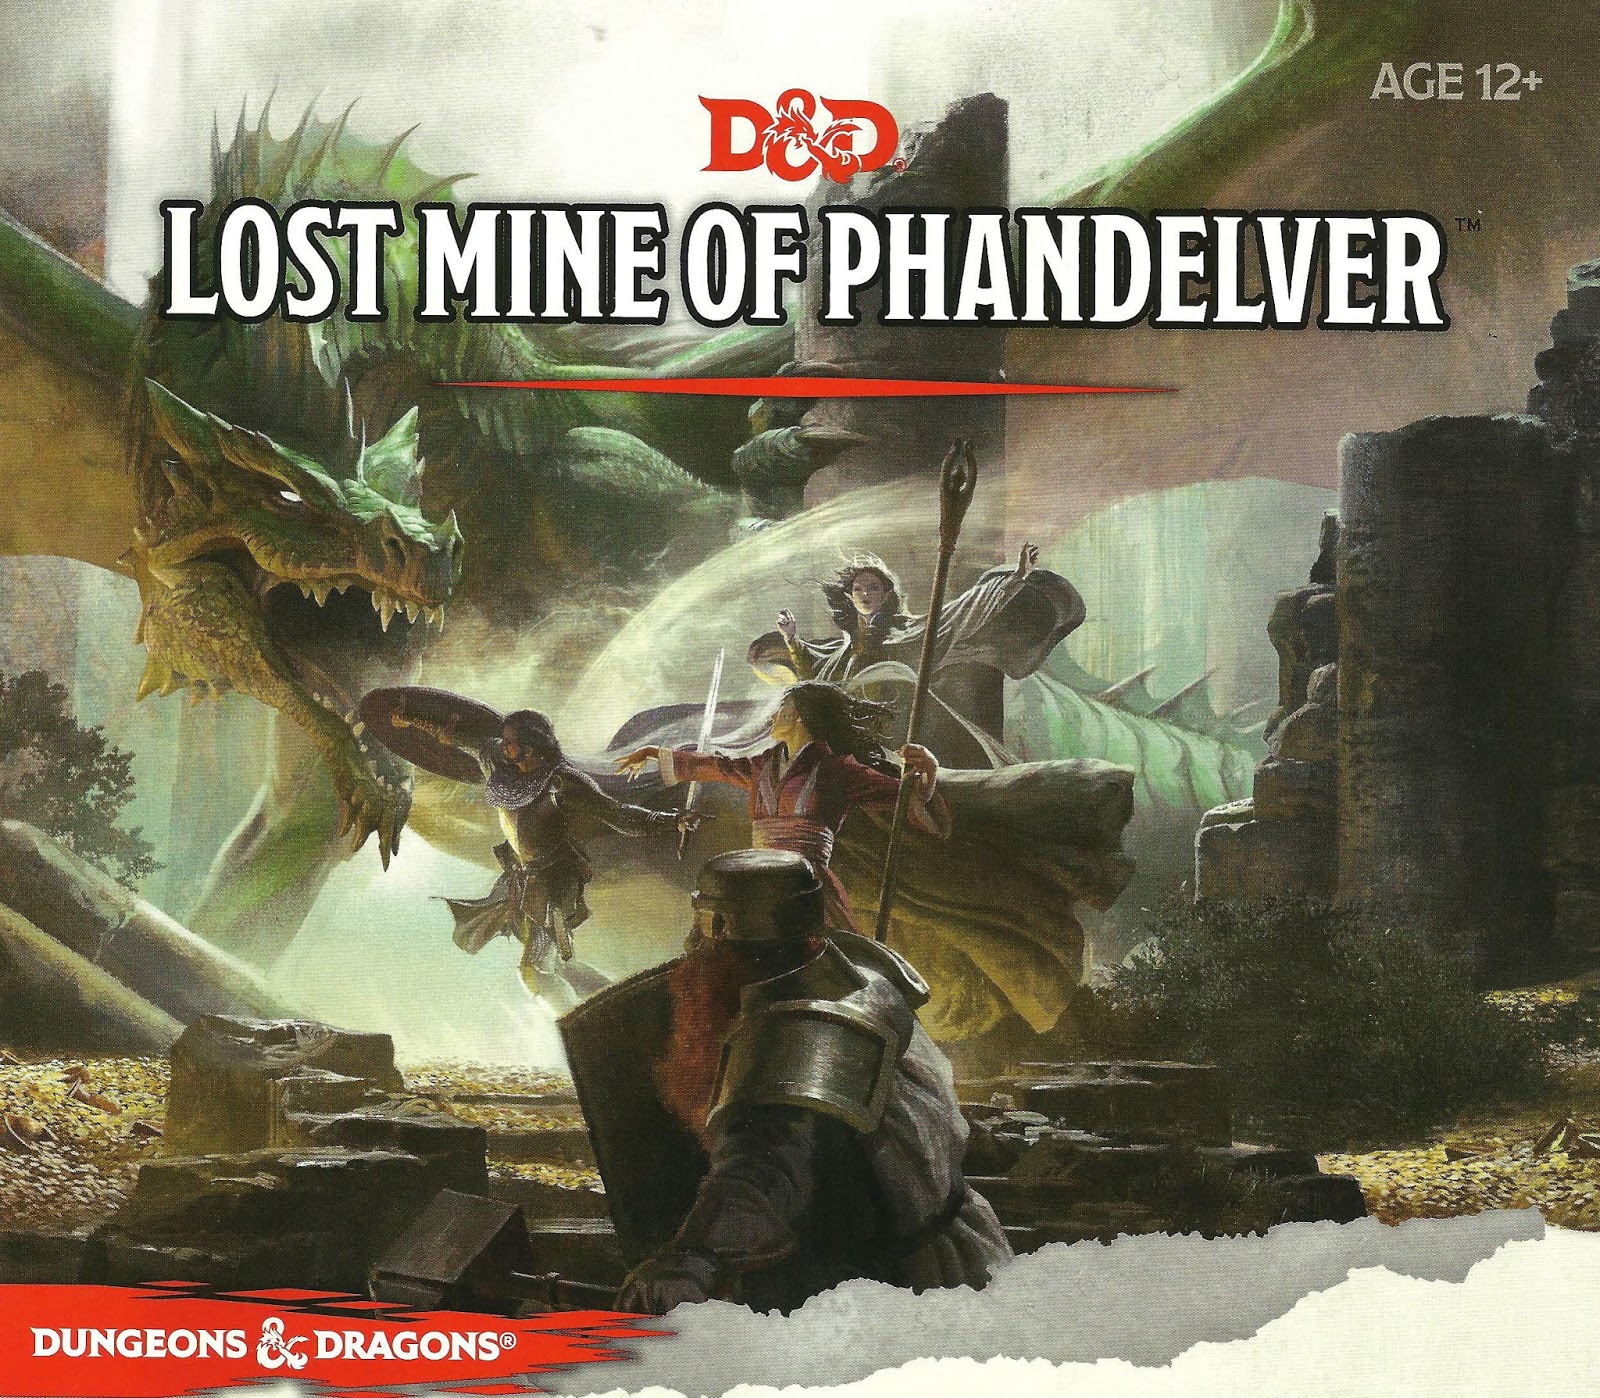
"More than five hundred years ago, clans of dwarves and gnomes made an agreement known as the Phandelver’s Pact, by which they would share a rich mine in a wondrous cavern known as Wave Echo Cave. In addition to its mineral wealth, the mine contained great magical power. Human spellcasters allied themselves with the dwarves and gnomes to channel and bind that energy into a great forge (called the Forge of Spells), where magic items could be crafted. Times were good, and the nearby human town of Phandalin (pronounced fan-duh-lin) prospered as well. But then disaster struck when orcs swept through the North and laid waste to all in their path. A powerful force of orcs reinforced by evil mercenary wizards attacked wave echo cave to seize its riches and magic treasures. Human wizards fought alongside their dwarf and gnome allies to defend the Forge of Spells, and the ensuing spell battle destroyed much of the cavern. Few survived the cave-ins and tremors, and the location of Wave Echo Cave was lost. For centuries, rumours of buried riches have attracted treasure seekers and opportunists to the area around Phandalin, but no one has ever succeeded in locating the lost mine. In recent years, people have resettled the area. Phandalin is now a rough-and-tumble frontier town. More important, the Rockseeker brothers - a trio of dwarves - have discovered the entrance to Wave Echo Cave, and they intend to reopen the mines. Unfortunately for the Rockseekers, they are not the only ones interested in Wave Echo Cave. A mysterious villain known as the Black Spider controls a network of bandit gangs and goblin tribes in the area, and his agents have followed the Rockseekers to their prize. Now the Black Spider wants Wave Echo Cave for himself, and he is taking steps to make sure no one else knows where it is." Extra Info from AL.com users: by @marcellarius. "There are a variety of locations in this adventure: the town of Phandalin, a gang hideout, a ruined keep in the forest, a destroyed village, and Wave Echo Cave (a dungeon crawl). The adventure is written in a sandbox style and relies on the players to choose their path. Phandalin offers several side-quests which could serve as hooks for continuing adventures. The premade characters have ties in their backgrounds to NPCs and locations. If you're not using these you'll need to consider other ways to introduce key NPCs."
Two hundred years ago, the great dwarf smith Durgeddin the Black built Khundrukar, a hidden stronghold for his war of vengeance against all orckind. For years Durgeddin labored, until the orcs discovered Khundrukar and stormed the citadel, slaying all within. Legends say that Durgeddin's masterful blades and glittering treasures were never found.

Chapter 2: The Sinister Secret of Saltmarsh In this version of the adventure, the characters find navigational charts and logs aboard the Sea Ghost that implicate its crew as slavers. Ned Shakeshaft is a Scarlet Brotherhood agent. He makes an attempt to foil the characters, but his true intent is to surrender and implicate Gellan Primewater as a key villain. The distraction afforded by the lizardfolk and the looming sahuagin threat gives the Scarlet Brotherhood the opportunity to bring more agents into town. posing as mercenaries brought in by Anders to protect the town. If Gellan can be removed from the council, Solmor might ask one of the characters to take his place.

In a dark cell, Rollo Bargamnn, merchant of Thyatis, turns away in disgust from his evil, green-skinned prisoner; capturing this wretch cost a ship and sixty gallant men. Then his heart hardens once more, and he resumes the interrogation. Here, perhaps, he may find an answer to the question that haunts him. What new evil is casting its shadow over the storm-swept eastern reaches of the Sea of Dread? The trading routes are no longer safe. The attacks of the green-skinned "Orcs-of-the-Sea" and the mysterious "Ship-bane" now go unchecked. Once their raids were random, but the influence of some unseen master has made them into an organized menace. Soon the questioning will be over; Rollo will know enough to track the threat to its lair. Then he will need a band of hardy adventurers brave enough to take on the task. You perhaps? TSR 9127 (Graeme Morris's name is spelled 'Grame' on the cover of this module)

The heroes arrive at the eponymous Keep on the Borderlands, a fortress on the edge of civilization built to stave off the chaos and evil of the wilderness. Using it as a home base, a party can make forays into the surrounding wilderness, encountering monster and marauder alike. The centerpiece of the adventure is certainly the CAVES OF CHAOS, a network of tunnels and caverns found in the walls of a nearby but isolated ravine. It is here that hordes of evil humanoids have made their home. Through combat and negotiation, the players can try to explore and map out these caves, perhaps with the aim of accumulating valuable treasure or even cleansing the land of evil creatures. However, even the Caves are not all they seem. Beyond the goblins and kobolds lurk dark horrors: cults dedicated to fiendish chaos and a Minotaur's enchanted labyrinth await the unprepared adventurer. But for the hero who is brave, clever, and fortunate in equal and sufficient measure, great treasures and glory await in the Caves of Chaos that lie beyond the Keep on the Borderlands! TSR 9034

"Gnolls have captured the heroes! After stripping the characters of all equipment except their armor and clothing, the gnolls drag them to an expansive briar maze known as the Twisted Thickets and set them loose. Then, armed to the teeth, the gnolls hunt down their prey. The characters must survive the hunt and outwit their pursuers. After dealing with the gnoll hunters, the heroes can try to reclaim their lost equipment and exact revenge on the tribe, which lairs in the caves beneath Dead Gnoll’s Eye Socket."

This deluxe adventure takes heroes into the ruins of Gardmore Abbey, a monastery that was once the base of a militant order of paladins devoted to Bahamut. According to legend, the paladins brought a dark artifact back from a far crusade and stored it in their abbey for safekeeping, and evil forces gathered to assault the abbey and take it back. What the legends don’t tell is that this artifact was actually the Deck of Many Things, a force of pure Chaos. This adventure brings characters into the extensive dungeons beneath the ruins - dungeons that are warped and twisted with the raw forces of Chaos surrounding the cards of the deck.

Deep below the surface lies an ancient beholder city called Ilth K'hinax. In times past, hundreds of beholders called it home - until simmering rivalries within their society exploded into warfare. The few survivors fled, leaving the city deserted for hundreds of years. However, the story of Ilth K'hinax's glory was passed down from one generation of beholders to the next. Now, after countless years of self-imposed exile, the beholders are back! After securing the city, the hive mother of Ilth K'hinax implemented a plan to wipe out all the beings living above it. Unfortunately for the beholders, several facets of the hive mother's plan have been revealed through the exploits of a party of adventurers. Now, this group of heroes must meet eye to eye with Ilth K'hinax's newest occupants in an effort to stop the hive mother's pernicious plan! "Eye to Eye" is the last of three adventures featuring the nightmarish beholder. It can be played as an individual mission or as part of the series that began with "Eye of Pain" and continued in "Eye of Doom." TSR 9536

A hunt for a missing key leads the heroes from the streets of the city of Greyhawk to the Tomb of Blood Everflowing in the treacherous Cairn Hills. Pgs. 18-20, 22 & 24-39

The wizard Kavorquian is dead. But certain items belonging to his adopted son were in the wizard's keeping at the time of his demise. Now someone must venture into the silent vaults of Kavorquian's stronghold and recover the missing property. Queen's Harvest picks up its story where B11, King's Festival, left off. It can be played as a sequel to that adventure or as a complete adventure in itself. It is tailored for beginning Dungeon Masters and players and contains helpful hints on adventuring and the land of Karameikos. The story develops simply, but ultimately leads the player characters into the nether reaches of Penhaligon's politics to confront Ilyana Penhaligon, mad pretender to the throne! TSR 9261

This adventure focuses on a Zhentarim attempt to spread terror in Mistledale, although it is suitable for almost any lightly settled area northwest of the Sea of Fallen Stars. "The Raiders of Galath's Roost" is suitable for four 1st-level characters, but PCs should be at least 2nd level before tackling the adventure's second half, the Zhentarim Citadel. Even in the first half of the adventure, many of the encounters are quite formidable for 1st-level characters, and the PCs might find it necessary to withdraw and recover one or more times before completely exploring the ruins.
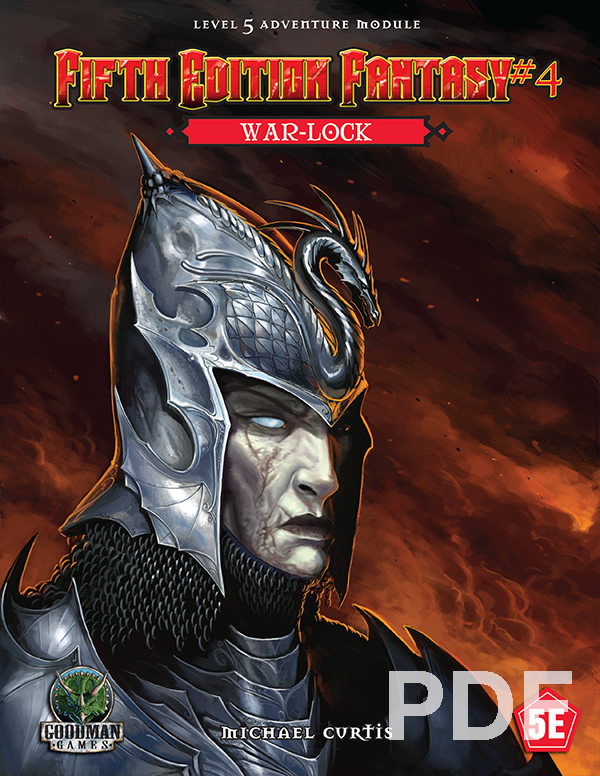
Devilish sorcery and ancient steel merge in the form of a reborn menace rising in the wild hills on civilization's verge. As the badlands burn with wildfire, an arcane warlord gathers his monstrous troops under his tattered banner. He is rumored to be immortal, and it will take tremendous bravery, immense cunning, and more than a little luck for stalwart adventurers to end his campaign of malice. Can your mighty heroes locate the War-lock's one weakness before his forces drown the realm in blood and fire?

When Fort Iron was taken from the duergar who inhabited it, much of their subterranean quarters were never fully explored. An ancient oubliette has been discovered and its contents have disturbed the miners. Can the mine and the miners be saved from the dangers of the Oubliette of Fort Iron?

A malicious and virulent force possesses the Vermyr Woods. The local wild-life has fled; known paths have mysteriously vanished or shifted; and locals have been found hanging dead from trees yet their eyes watch... they always watch. The hopes of the people are dwindling quickly. Believing that evil harpies have afflicted the woods, brave Captain Harkin set forth to serve them righteous justice! Even the mighty druid Algalor is nowhere to be found. Time passes and their worries compound. Why have the harpies attacked? What is the fate of Algalor and Captain Harkin? What is this mysterious evil that plagues the Vermyr woods? Who is Cartman's dad? The heroes will stumble into this mystery as they travel to Homid. They will discover the truth of the harpies as well as the fate of the heroes who safeguarded this region by delving deep into a forest labyrinth that feels alive! Will it consume them or will they be strong enough to defeat the evil at its core!

Who could know what is hidden within the secluded mansion of the crazed mage? Well, now, when nobody has seen him here for more than a year, it’s the best time to find out! A 4-hour adventure for two 1st–2nd level characters. Small Party Adventure: Though the party size of 3–5 characters is considered optimal in D&D, there are times when you can only gather one or two players at most. This adventure is designed exactly for such occasions.

Welcome to the picturesque village of Eveningstar, nestled at the foot of the Stonelands where the River Starwater winds down a gorge and snakes into the King's Forest. Here, the Knights of Myth Drannor began their famous adventures. Here, the Ladies of the Brazen Blade, The Company of the Singing Sword, The Steel Shield Band, and many other came, clutching royal charters from King Azoun with the ink scarcely dry on the parchment. Some fell, some went on to greatness-but they all came here first; to the Haunted Halls. Despite numerous infiltrations, the Halls have not yet yielded all their secrets or treasures. Many dangers lurk as deadly as ever in dark chambers herein, awaiting new companies of eager-eyed adventurers. Is it your turn to dare The Haunted Halls? Many come, but few survive to again see Eveningstar's beauty. Welcome, then. Enter in, and find in these pages: A challenging introductory level dungeon. A detailed countryside setting, including important local personages, local color, and guidelines for play. Suggested campaign plots and adventures. New spells. New magical items. New monsters. A splendid campaign can begin here. Adventurers in an ongoing campaign can stop by for a memorable visit. Those looking for an underground stronghold may even find a home in the Haunted Halls of Eveningstar. TSR 9354

A Villain with a Vison A stolen jewel leads to the heart of the swamp, where one man’s thirst for vengeance threatens to destroy an entire town. Pgs. 68-92

Restore an Abandoned Temple Enter the catacombs near the desecrated Temple of Muir, Goddess of Paladins, and search for the lost tomb of Abysthor. Will your party be able to cleanse the evil that now inhabits these once-sacred halls, and recover the Stone of Tircople? Can your characters survive the traps of an undead sorcerer? Will your players discover the chamber of Living Rock and the secret power it holds? Adventure awaits! Gold and Glory! A fantasy adventure published for the D20 system, The Tomb of Abysthor is the first module in Necromancer Games Dungeon series and can be played as a stand-alone story or in conjunction with The Crucible of Freya and the forthcoming city supplement Bards Gate. What secrets lie hidden in the tomb of Abysthor?

Wise rogues join the government, where their larceny has the cover of “legality” and the cash comes in heaps and piles from deceitful receipts and pocketed procurements rather than in small, bloodstained purses from breaking windows, scaling walls, and risking traps and long-fanged guard dogs. Wise rogues do not, by choice, go up against towering giants armed with clubs larger than the tallest rogue in the guild. Nor do they try to nick treasure from dragons without a group of powerful fellow adventurers behind them, who can hurl mighty spells, hack and hew toe to toe with an angry wyrm, heal the injured, and (when things go as they usually do), resurrect the dead. There are wise rogues, and then there are player characters. Emeralds of Highfang awaits them with open arms, offering special challenges and rewards to rogue characters—but as always, the prospects are much better for a party of adventurers from a variety of classes, with wide skills and experience, and of high level. Some might find that a broad base of experience is not only helpful, but essential for survival.